
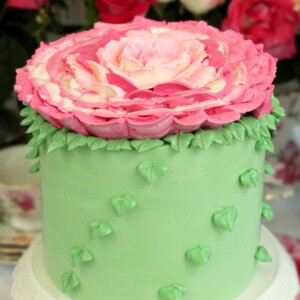
This Giant Rose Cake is a show stopper! It’s a gorgeous four-layer cake topped with a beautiful blooming buttercream rose and ombre layers of frosting on the inside.

If you couldn’t tell by now, I am not a “less is more” person. I understand that there are people out there who like a simple scoop of vanilla ice cream, or a plain slice of cake with a light dusting of powdered sugar, but I am not one of those people. I’ve never met a dessert I didn’t want to make bigger, taller, fatter, deliciouser, and undeniably more-er.
So when I thought about doing a fun springtime dessert, to celebrate all the flowers blooming right now, I was not about to put a few delicate roses on top of a sensible two-layer cake. No sir. MY flower cake had to be the springiest, floweriest, biggest, bloom-iest cake the world has ever known. And thus the Giant Rose Cake was born.

I am a little in love with how this cake turned out! The top was actually really easy. You’ll need one piece of specialty equipment, a giant rose tip (more on those specifics below) but apart from that, it’s really just about creating layer after layer of rose petals. If you look closely, absolutely none of them are perfect and most of them are more than a little floppy and wonky, but when taken together, the overall effect is a rose just like one you find in nature: imperfect but beautiful.

I used several different colors of buttercream in the piping bags to give the rose a more nuanced appearance. Most roses in nature are not just one solid shade, so layering colors in one bag helps to give the flower a realistic touch. I used these same colors in the different layers in the middle of the cake for a nice ombre effect. This is optional but really, who can resist a nice ombre now and then?

- Cake, obvi
- LOTS of buttercream. This isn’t for those folks I mentioned above who prefer plain cakes with a bit of glaze. The flower on top requires a lot of frosting. I hope you’re on board.
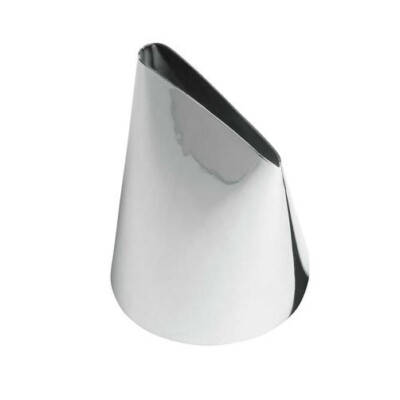
- A giant rose tip. You can get it on Amazon, or your local cake supply store might carry one. Most regular grocery and craft stores probably won’t. It’s not too expensive, and once you have it you can also use it to pipe big ruffles and swags, and it’s great for topping cupcakes as well.
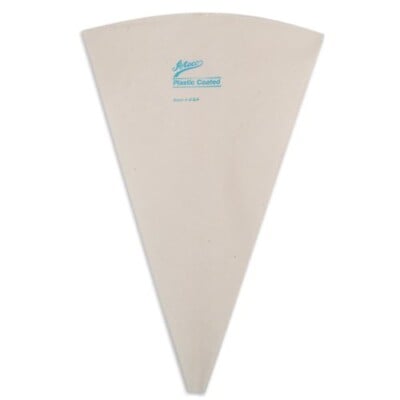
- Big ole piping bags to put the rose tip in
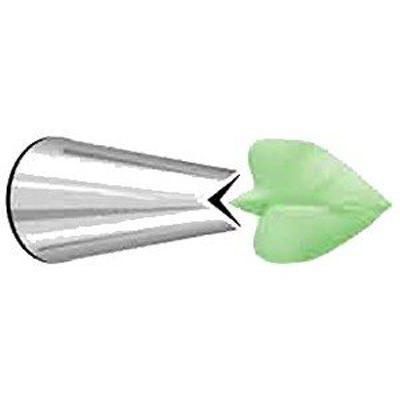
- A large leaf tip—optional but helpful if you want to add the leaves like I did.
This cake is a showstopper, and is good for so many occasions. Easter! Mother’s Day! Bridal showers! Baby showers! April showers! …wait, that’s not a thing. But you get the idea.

 More Flower Desserts You’ll Love
Giant Rose Cake
Ingredients
For the Cake:
- 15 3/4 oz granulated sugar, (2 1/4 cups)
- 15 3/4 oz cake flour, (4 1/2 cups)
- 2 TBSP baking powder
- 1 tsp salt
- 9 large egg yolks
- 1 1/2 cups milk
- 1 TBSP vanilla extract
- 9 oz unsalted butter, at room temperature
For the Buttercream – make this recipe TWICE:
- 9 large egg whites
- 14 oz granulated sugar, (2 cups)
- 1 lb unsalted butter, soft but still cool
- 1 tbsp vanilla extract
- 1/4 tsp salt
To Decorate:
- Giant rose tip
- Large leaf tip
- Large piping bags
- Cake turntable
- Pink gel food coloring
- Burgundy gel food coloring
- Green gel food coloring
Instructions
To Make the Cake:
- Preheat the oven to 350 F. Line four 8-inch cake pans with parchment rounds, and spray the parchment and pan sides with nonstick cooking spray.
- Combine the sugar, cake flour, baking powder, and salt in the bowl of the stand mixer fitted with a paddle attachment. Mix on low speed for about a minute to combine the dry ingredients.
- Lightly whisk together the egg yolks and about a quarter of the milk (it doesn’t have to be a precise measurement) and the vanilla extract, and set aside for now.
- Add the remaining milk and the softened butter to the large mixing bowl and mix on low speed until the dry ingredients are moistened. Turn the mixer to medium speed and mix for a minute and a half.
- Add the egg yolk mixture in three batches, mixing for 20-30 seconds after each addition, until you have a smooth batter. Scrape the bottom and sides of the bowl with a rubber spatula, and give the batter a few more stirs to make sure everything is incorporated. Divide the batter evenly between the four pans—if you want to weigh it out, each pan should get 15 oz of batter.
- Bake the cakes at 350 F for 28-30 minutes, until the sides just start pulling away from the pan, and a toothpick inserted into the center comes out clean.
- Let the cakes cool on a wire rack for 10 minutes, then gently turn them out and let them cool completely. I find it’s easiest to cut and stack cakes that have been chilled, so if you have time, wrap them with plastic wrap and put them in the freezer for at least 30 minutes, until they are firm but not frozen all the way through. If you are making these in advance, they can stay in the freezer for up to several weeks. Let them partially defrost, until they are firm but not rock-hard, before assembling.
To Make the Buttercream:
- Note that you should make this recipe TWICE in order to have enough buttercream! You might have some left over after decorating—just store it in the refrigerator for up to 2 weeks or in the freezer for up to 4 months.
- Combine the egg whites and the granulated sugar in the bowl of a large stand mixer, and whisk them together. Choose a small saucepan that lets you fit the base of the stand mixer snugly into the top of the saucepan—this is your makeshift hot water bath. (Alternately, you can use a different bowl or an actual bain marie and then transfer the mixture to a mixing bowl once it’s heated.) Add an inch of water to the bottom of the saucepan, and bring the water to a simmer.
- Place the mixing bowl on top of the saucepan, making sure that the bottom isn’t in contact with the water, and heat the egg white mixture. Whisk frequently so that the egg whites don’t cook. Continue to heat the whites until they are hot to the touch, and when you rub a bit between your fingers, you don’t feel any grittiness from the sugar. Once the whites are hot, transfer the mixing bowl to your mixer and fit it with a whisk attachment.
- Beat the whites on medium-high speed until they are a shiny, stiff, voluminous meringue, and are no longer warm to the touch—feel the outside of the bowl, and make sure that it is around room temperature. Depending on your mixer and the temperature of your environment, this may take 15-20 minutes, or more. Reduce the speed to medium-low and add the softened but cool butter in small chunks, a tablespoon at a time, making sure to wait in between additions. It may separate or look a little gloopy at this point—fear not. Once all of the butter is added, increase the speed again and whip until it comes together and is light and fluffy. If, after 5 minutes, it hasn’t come together, refrigerate the mixing bowl for 5-7 minutes, to cool the mixture down, and whip it again until it has thickened and is smooth and silky. Add the vanilla extract and salt.
- The buttercream can be made in advance and kept at room temperature if you’re going to use it the same day, or refrigerated. If it has been chilled, let it sit at room temperature until completely soft, then re-whip it to get the smooth texture back before you use it.
To Assemble:
- Separate out about 2 cups of buttercream, and add enough leaf green gel color to it to get a nice soft green. Set aside for now.
- Separate out another 1 cup of white frosting, and set aside for now.
- Divide the remaining frosting into 3 bowls and tint them varying shades of pink, from light pink to deep, dark pink. I used a touch of burgundy in the darkest pink to add some depth.
- Place the chilled cakes on cardboard cake rounds. If any of the cakes have a rounded top, gently trim off of the top so that they’re flat. Place the bottom layer of your cake on a cake turntable.
- Place about 1 cup of the deepest pink frosting in the center of the cake, and use a metal offset spatula to spread it into an even layer out to the edge of the cake. It’s fine if some frosting extends beyond the edge. Place a second cake round on top, and repeat the process with the medium pink color. Add another cake round, spread it with the lightest pink color, and finally top it with the fourth round of cake. Spread a very thin layer of frosting on the top, and use your spatula to smooth the sides of the cake, spreading the frosting that has extended over the edges around the cake. Fill in any bald spots with a bit more frosting—the goal is just to have a very thin layer of frosting covering the entire cake, to seal in any crumbs. Refrigerate the cake for 30-60 minutes, to firm it up.
- Once the cake is firm, place it back on the turntable and spread the green frosting around the sides. Get a nice even coating, then use a metal offset spatula and run it around the sides to smooth out the green. Transfer the remaining green frosting to a piping bag fitted with a green leaf tip.
- To make the rose on top, fit the giant rose tip into a large piping bag. Place the white frosting inside the bag, scraped against the side of the bag with the wider edge of the rose tip. Place an equal amount of light pink frosting inside the bag, positioned where the narrower end of the rose tip is. Hold the tip perpendicular to the top of the cake, with the wide edge touching the bottom and the narrow edge pointing up. Squeeze the piping bag as you turn the cake on the turntable, so the frosting comes out in a spiral. Once you have a nice spiraled “rose bud” in the center, start to pipe petals around it—refer to the video to see the technique.
- Once your rose is about half the size of the top of the cake, stop and switch piping bags. You can either add dark pink buttercream to the same bag, but I prefer to start again with a clean bag so there won’t be as many streaks. So make a second piping bag fitted with the giant rose tip and fill it in the same fashion as the first. This time, use white, light pink, and then a dark pink color on the side of the bag with the narrow end of the tip. Continue to pipe petals around the outside of the rose, and go all the way to the edges.
- Once the top of your cake is decorated, take the green piping bag and pipe leaves all around the outside of the top of the cake. Add a few leaves trailing down from the top to the bottom.
- This cake is best enjoyed at room temperature. Leftovers can be stored, well-wrapped, in the refrigerator for up to a week.
Video
Recipe Notes
Measuring Tips
Our recipes are developed using weight measurements, and we highly recommend using a kitchen scale for baking whenever possible. However, if you prefer to use cups, volume measurements are provided as well. PLEASE NOTE: the adage “8 oz = 1 cup” is NOT true when speaking about weight, so don’t be concerned if the measurements don’t fit this formula.
Want to learn more about baking measurements and conversion?


This cake is absolutely gorgeous!! I seriously need to learn how to use my icing tips!
Thank you Cathleen! Once you start using your piping tips you’ll never look back!
I love you over zealous cake decorating! You can never have too much frosting, especially when it’s so prettttty!
Right?! Mo frosting, mo betta! Thanks Lisa!
This cake is gorgeous! I love it!
Thank you so much, Miranda!