

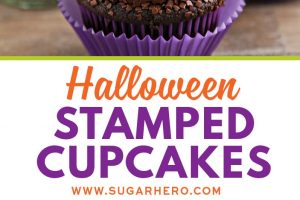
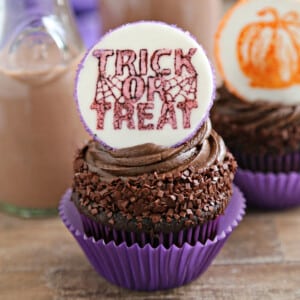
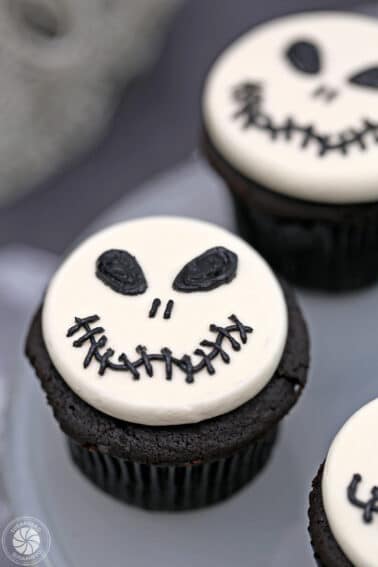
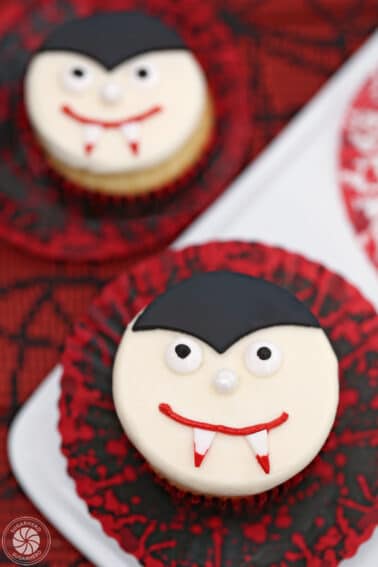
Stamped Halloween Cupcakes are a cute Halloween dessert topped with stamped fondant circles. The cupcakes and frosting are both made with chocolate milk, for an ultra-rich chocolate taste, and the fun graphic toppers are SO easy to make.

These Stamped Halloween Cupcakes are both a trick AND a treat. They taste incredible (there’s the treat part) and there’s an easy trick for making the edible stamped fondant cupcake topper. They look so impressive, you’ll be surprised—and delighted—at how simple they are to make. Need more easy cupcake inspiration? Try out these delicious Frankenstein Cupcakes or Brain Cupcakes!
This is a really fun recipe for everyone to play around with, so invite the kids into the kitchen with you to make some Halloween magic!

This recipe starts with a rich chocolate cupcake, topped with swirls of chocolate buttercream. I wanted all of the elements to be ultra-chocolatey, so I swapped chocolate milk for regular milk in both the cake batter and the frosting. The result? Double and triple chocolate flavors!

So if you’re ready to get in the kitchen, play with your food, and make some chocolate magic, here’s a little tutorial for making these fun cupcake toppers.

What You Need to Make Stamped Fondant Circles:
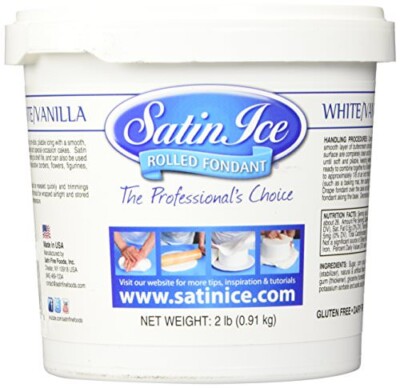
- Fondant: I used white homemade marshmallow fondant
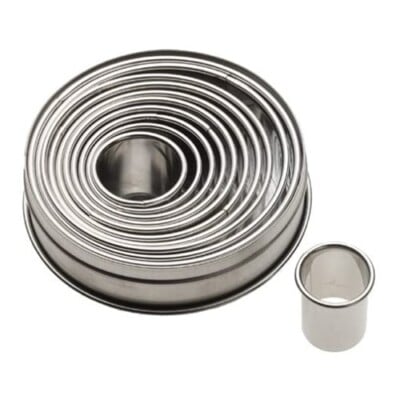
- A circle cutter: make sure it’s large enough to encompass the designs on your stamps! You can cut several sizes of circles if your stamps are different sizes
- Clean, unused stamps. Wash them with hot soapy water before your first use! Stamps with bold lines and not too much detail work best. Very thin, detailed line work will get lost and muddy. I ordered most of my cute Halloween stamps from a vendor on etsy.
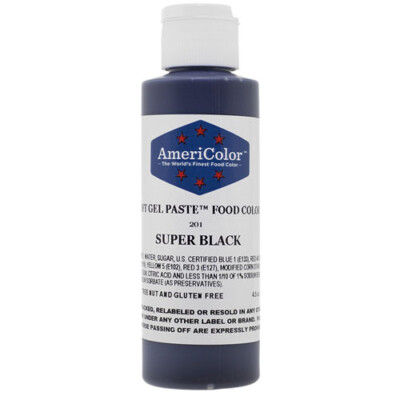
- Gel food coloring – gel provides the brightest colors
- Felt (or several folded layers of untextured paper towels)
- Plastic lids or containers – optional, but the easiest and cleanest way to use the felt as a stamp pad
Note: I wanted to find a way to make food coloring stamps using common household items, to keep this as simple as possible, so my instructions recommend using felt or paper towels. But if you have access to an unused, un-inked stamp pad, that’s probably the easiest route, so feel free to use that instead.

Dust your work surface with powdered sugar, and roll out the fondant until it is between 1/8-1/4 inch thick. Thinner fondant will harden faster, while thicker fondant will be sturdier. Use your circle cutter to cut out at least 24 circles. I recommend making a few extra, in case of breakage or stamping mishaps. Let them harden overnight or in an oven on very low heat before stamping them.

Now let’s make an edible food coloring stamp pad! Cut the felt so that it fits in your plastic lids. You can also put the felt in containers or even on small plates, if that’s what you have. I like using plastic lids because they’re light and portable, the plastic lip keeps the felt from moving around, and after I’m done stamping I can put the whole thing in a plastic bag and save it for later use.

Lightly spritz the felt with water, and add some gel food coloring. Use a brush to spread the color across the surface of the felt until it’s absorbed. Press a stamp firmly onto the felt stamp pad until it has an even coating of food coloring.

Do a few test stamps on paper or fondant scraps to make sure that you know how much pressure to use, then load the stamp up with color again, and press it onto a fondant circle. You might go through a few circles before you perfect your technique, and that’s okay—even imperfectly stamped fondant is still cute!

Once you figure out your technique, it’s all systems go! Try different stamps and different colors. You can even add several colors to the same stamp pad to make an ombre effect. Have fun with it! You can add more food coloring as necessary, and if the felt starts to dry out while you’re stamping, spritz it with a little water to revive it.
Once all of the fondant circles are stamped, let them sit at room temperature for about an hour, until the food coloring is dry to the touch.

This final step is optional, but I like to do it because it really makes the fondant circles pop. When the stamp is dry, you can brush a thin layer of corn syrup around the edges of the fondant circle, then roll the edges in sparkling sugar or other sprinkles. Instant Halloween glitz!
If you’re going to be transporting your cupcake and want them SUPER secure, you can use melted white chocolate to glue a long toothpick to the back of each fondant circle. If you’re just going to be serving them at home, they’ll be secure enough without the toothpick.

After your fondant circles are done, you can even use the stamps and food coloring stamp pads to make little Halloween cards and tags to go along with your cupcakes!

These cupcakes make great edible gifts and spooky treats to share with neighbors and teachers. I’m picturing a little Halloween goodie basket with a few cupcakes, and a customized Halloween card that goes along with the cupcakes. Too cute? Too cute!

We shared some of our Stamped Halloween Cupcakes with friends and coworkers, and kept the rest for ourselves to enjoy during family movie night. Served with chocolate milk to wash it all down, they were complete perfection…and my son’s chocolate mustache told me he loved them too.

I hope you’ll give these a try, and please share a photo if you do—I’d love to see your creations!
👻More Halloween Cupcakes to Enjoy
- Spiderweb Cupcakes
- Brain Cupcakes
- Stuffed Halloween Cupcakes
- Caramel Skull Cupcakes
- Pumpkin Spice Hi-Hat Cupcakes
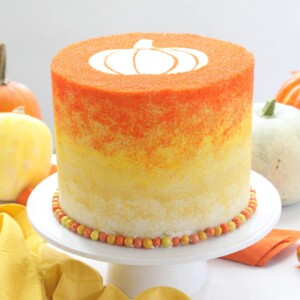
Stenciled Halloween Sprinkle Cake
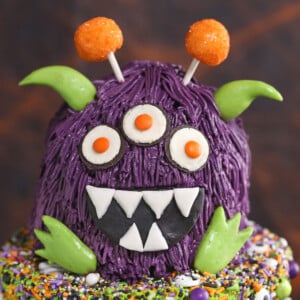
Monster Cake
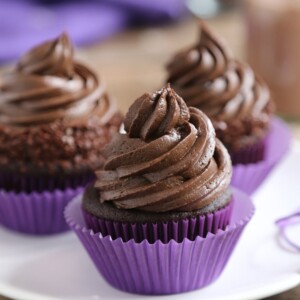
Chocolate Cupcakes with Triple Chocolate Frosting
Ingredients
For the Chocolate Cupcakes:
- 6 oz unsalted butter, at room temperature
- 4.75 oz granulated sugar, (2/3 cup)
- 5 oz brown sugar, (2/3 cup), packed
- 2 large eggs, at room temperature
- 2 tsp vanilla extract
- 4 fl oz sour cream, (1/2 cup), at room temperature
- 8 fl oz chocolate milk, (1 cup), at room temperature- you can replace with regular milk
- 2 tbsp water, or coffee
- 7.8 oz all-purpose flour, (1¾ cups)
- 3 oz unsweetened cocoa powder, (1 cup)
- 1½ tsp baking soda
- ½ tsp salt
For the Triple Chocolate Frosting:
- 8 oz bittersweet chocolate, finely chopped (can use unsweetened for a darker chocolate flavor)
- 24 oz powdered sugar, (6 cups)
- 2 oz unsweetened cocoa powder, (2/3 cup)
- 8 oz unsalted butter, (2 sticks), at room temperature
- 1/4 tsp salt
- 4 fl oz chocolate milk, (1/2 cup), you can replace with regular milk
- 2 tsp vanilla extract
For the Fondant Plaques (Make 24 hrs in Advance):
Instructions
To Make the Chocolate Cupcakes:
- Prepare to bake: Preheat the oven to 350° F (177° C). Line cupcake pans with 24 paper wrappers.
- Combine butter, sugar, eggs, and vanilla: Add the butter and both sugars to the bowl of a large stand mixer fitted with a paddle attachment. Beat them together on medium-high speed, until light and fluffy, about 5 minutes. Add the eggs one at a time, beating well after each addition. Add the vanilla extract and mix it in.
- Mix sour cream, milk, and water: In a separate bowl, whisk together the sour cream, chocolate milk, and water (or coffee, if using).
- Sift dry ingredients: In a different bowl, sift together the flour, cocoa powder, baking soda, and salt.
- Mix batter alternating dry and wet ingredients: With the mixer running on low, add a quarter of the sifted flour mixture. When the flour streaks have almost all disappeared, add a third of the liquid to the mixing bowl. When that’s incorporated, continue to add the drys and wets in an alternating pattern, ending with the dry ingredients.
- Finish mixing by hand: When the dry ingredients are nearly incorporated, stop the mixer. Scrape down the bottom and sides of the bowl with a rubber spatula, and finish mixing the cake by hand.
- Bake and cool: Scoop the batter into the cupcake pans. Bake for 20-22 minutes, until the tops spring back when lightly pressed. Cool completely before decorating.
To Make the Triple Chocolate Frosting:
- Melt chocolate: Place the chopped chocolate in a microwave-safe bowl and melt it in 30-second increments, stirring after every 30 seconds until melted and smooth. Set aside to cool to room temperature.
- Mix sugar, cocoa, butter, and salt: Place the powdered sugar, cocoa powder, butter, and salt in the bowl of a large stand mixer fitted with a paddle attachment. Mix on low speed until the sugar is moistened, then turn to medium speed and beat for 4 minutes.
- Add milk and vanilla: Turn the mixer speed to low and slowly stream in the chocolate milk and vanilla. Once it is incorporated, turn the speed back to medium and beat for another 3-4 minutes, until light and fluffy.
- Add melted chocolate: Turn the mixer speed back to low, and add the chocolate. Once the chocolate is mixed in, raise the speed back to medium and beat for one minute more.
- Use or store: Use immediately, or place in an airtight container with plastic wrap pressed on top. The frosting can be made several days in advance and kept in the refrigerator. Allow to come to room temperature before using.
To Make the Fondant Toppers (Make 24 hrs in Advance):
- Prepare baking trays: Line baking sheets with parchment and dust them with powdered sugar.
- Roll out fondant: Dust your work surface with powdered sugar. Roll out the fondant into a thin layer about 1/8” thick.
- Cut circles: Choose a circle cutter that’s large enough to contain the design of your stamp(s). Cut out 24 fondant circles, re-rolling the fondant scraps as necessary. Place them on the prepared baking trays.
- Harden circles: Let the fondant circles sit and harden at room temperature overnight, or place them in a very low oven (170° F, 77° C) for no more than 10 minutes, then cool completely until hard.
- Make stamp pad: Cut a circle of felt to fit a small plastic lid or container. You can also use an uninked stamp pad, or folded untextured paper towels.
- Add water and gel: Lightly mist the felt with a spritz of water, then add gel food coloring. Brush it across the surface of the felt until it’s absorbed.
- Begin stamping: Press a clean stamp firmly onto the felt stamp pad until it has an even coating of food coloring. Do a few test stamps to make sure that you know how much pressure to use, then load the stamp up with color again, and press it onto a fondant circle. Repeat with other stamps and colors until all the plaques have been stamped.Tip: You can add more food coloring to your stamp pad as necessary. If the felt starts to dry out, spritz it lightly with water to revive it.
- Roll edges, optional: Once the stamped gel patterns dry, brush a thin layer of light corn syrup around the edges of the fondant circles and roll in sparkling sugar.
- Use or store: Stamped fondant plaques can be made weeks in advance. Let them dry completely, then store them between layers of parchment paper at room temperature. Do not let them come into contact with moisture, or the ink will run and the fondant will get soft and sticky.
To Assemble:
- Prepare piping bag and sprinkles: Fit a piping bag with a large star tip and fill it with room temperature chocolate frosting. Pour chocolate sprinkles into a bowl.
- Frost and decorate: Pipe a big swirl of frosting on top of a cupcake. Hold the cupcake in one hand over the sprinkle bowl. With the other hand, pick up a handful of sprinkles and press them into the base of the piped frosting, all the way around the cupcake. Dust off the excess sprinkles. Repeat with remaining cupcakes and frosting.
- Finish with fondant toppers: Top each cupcake with a stamped fondant plaque just before serving.
Measuring Tips
Our recipes are developed using weight measurements, and we highly recommend using a kitchen scale for baking whenever possible. However, if you prefer to use cups, volume measurements are provided as well. PLEASE NOTE: the adage “8 oz = 1 cup” is NOT true when speaking about weight, so don’t be concerned if the measurements don’t fit this formula.
Want to learn more about baking measurements and conversion?
Nutrition
Stamped Fondant Plaques
Ingredients
- 8 oz white fondant
- Assorted gel food coloring, I like Americolor brand
- Corn syrup
- Sparkling sugar
- Powdered sugar, for dusting your work surface
- Circle cutter
- Clean, unused stamps
- Felt, or an uninked stamp pad
Instructions
Make fondant circles:
- Prepare your work environment: Line a baking sheet with parchment paper and lightly dust it with powdered sugar. Dust your work surface with powdered sugar as well.
- Roll and cut fondant: Roll out the fondant into a thin layer about 1/8” thick (no thicker than 1/4"). Choose a circle cutter that’s large enough to contain the design of your stamps and cut out 24 fondant circles, re-rolling the fondant scraps if necessary. Place them on the prepared baking sheet. (I recommend cutting out a few extra circles to account for potential mistakes.)
- Let circles harden: For the best results, let the fondant circles sit and harden at room temperature overnight, or place them in a very low oven (170° F/ 77° C) for a maximum of 10 minutes. Check the plaques every few minutes and remove from the oven once firm. Cool completely until hard.
Stamp hardened fondant circles:
- Make a DIY stamp pad: Cut a circle of felt (or folded, untextured paper towels) to fit a small plastic lid, container, or plate. (Or, you can use an uninked stamp pad if you have one on hand.)
- Add color to the stamp pad: Lightly mist the felt with a spritz of water, then add a little gel food coloring. Brush it across the surface of the felt until it’s absorbed.
- Load stamp with color: Press a clean stamp firmly onto the felt stamp pad until it has an even coating of food coloring. Do a few test stamps on paper or excess fondant to make sure you know how much pressure to use. Reload the stamp with color, and press it onto a fondant circle.
- Stamp and dry all plaques: Repeat with other stamps and colors until all of the fondant plaques have been stamped. Refresh stamp pad: If the felt starts to dry out, spritz it lightly with water to revive it. As you stamp, you can add more food coloring as necessary. If your stamp pad is large enough, you can put several colors next to each other. For smaller stamp pads, rinse out the felt when you want to use a new color.
- Dry: Allow the edible ink to dry completely, approximately 1 hour at room temperature, before adding embellishments, using as decorations, or storing.
- Embellish: Once the stamped patterns have fully dried, you can embellish the outside of the plaques, if desired. Brush a thin layer of light corn syrup around the edges of the fondant circles and roll the edges in sparkling sugar.
- Use: If you plan to serve your treats at home, place the adorable toppers on cakes, cupcakes, and more as is. Extra security: If you need to transport them, make the plaques secure by attaching a long toothpick to the back of each circle with melted white chocolate 'glue'. Once the white chocolate hardens, insert the the plaques into your treats however you like.
- Storage: Stamped fondant plaques can be made weeks in advance. Let them dry completely, then store them between layers of parchment paper at room temperature. Do not let them come into contact with moisture, or the ink will run and the fondant will get soft and sticky. In humid climates, place silica packets in the storage container to help keep the plaques dry.
Measuring Tips
Our recipes are developed using weight measurements, and we highly recommend using a kitchen scale for baking whenever possible. However, if you prefer to use cups, volume measurements are provided as well. PLEASE NOTE: the adage “8 oz = 1 cup” is NOT true when speaking about weight, so don’t be concerned if the measurements don’t fit this formula.
Want to learn more about baking measurements and conversion?
Nutrition


Hi,
These are so cute! Which
kind of chocolate sprinkles
did you use? They look
perfect. I’ve not seen these
before.
Nancy
Thanks, Nancy! They’re by Cacao Barry and they’re officially called Chocolate Pailletés, although I’ve heard them called chocolate fins and chocolate flakes as well. I LOVE them–they’re pretty and shiny and actually made of chocolate, so they taste good! I bought mine from Amazon. Here’s one link for you: https://amzn.to/2CwvKIb
This is so creative and so genius!!!!
Thanks Tisha, That is so kind! I appreciate that, thanks for following along!
These cupcakes look incredible! Using chocolate milk for chocolate cupcakes seems so logical – why haven’t I thought of that?! Genius!
Right?! It worked great–I hope you’ll give it a try sometime. Thanks Jaclyn Anne!
Wow these cupcakes look and sound amazing. he edible stamps are awesome. Love the idea of using chocolate milk instead of regular milk!
It’s my new favorite trick! 😀 Thank you so much!
I admit I am drooling a little! I was looking for a Halloween recipe and I have found it, this is fantastic. I LOVE how you have used the chocolate milk, I could also just have a glass of that, it looks so appealing. Great recipe Elizabeth!
Hey Adrianne, thanks so much for following along! Definitely let me know if you end up making them. Thanks again!
How cute! I need to make these next week for my daughter’s class. They look like they will be a hit!
Hey Carissa, yes they will! So fun, let me know how it goes!!!
I love working with fondant, but I’ve never thought about using actual stamps with it! What a genius idea. It’s funny how often craft items can be used with baking, and vice versa. Most of the time I try to buy two of everything so I can use one for my crafts, and one for baking and decorating!
Hey Indya, Right!? That’s so true, that’s what I need to do! It’s awesome, and so convenient!
Such a cool idea! This would make you the coolest person at the bake sale for sure — so creative! And love the idea of rolling the sides in sprinkles. Yum!
Hey Carissa, so true!! Its perfect for this time of year, thanks so much!!