


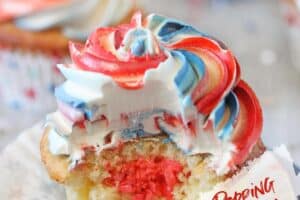

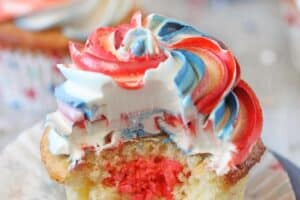


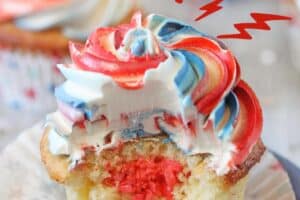
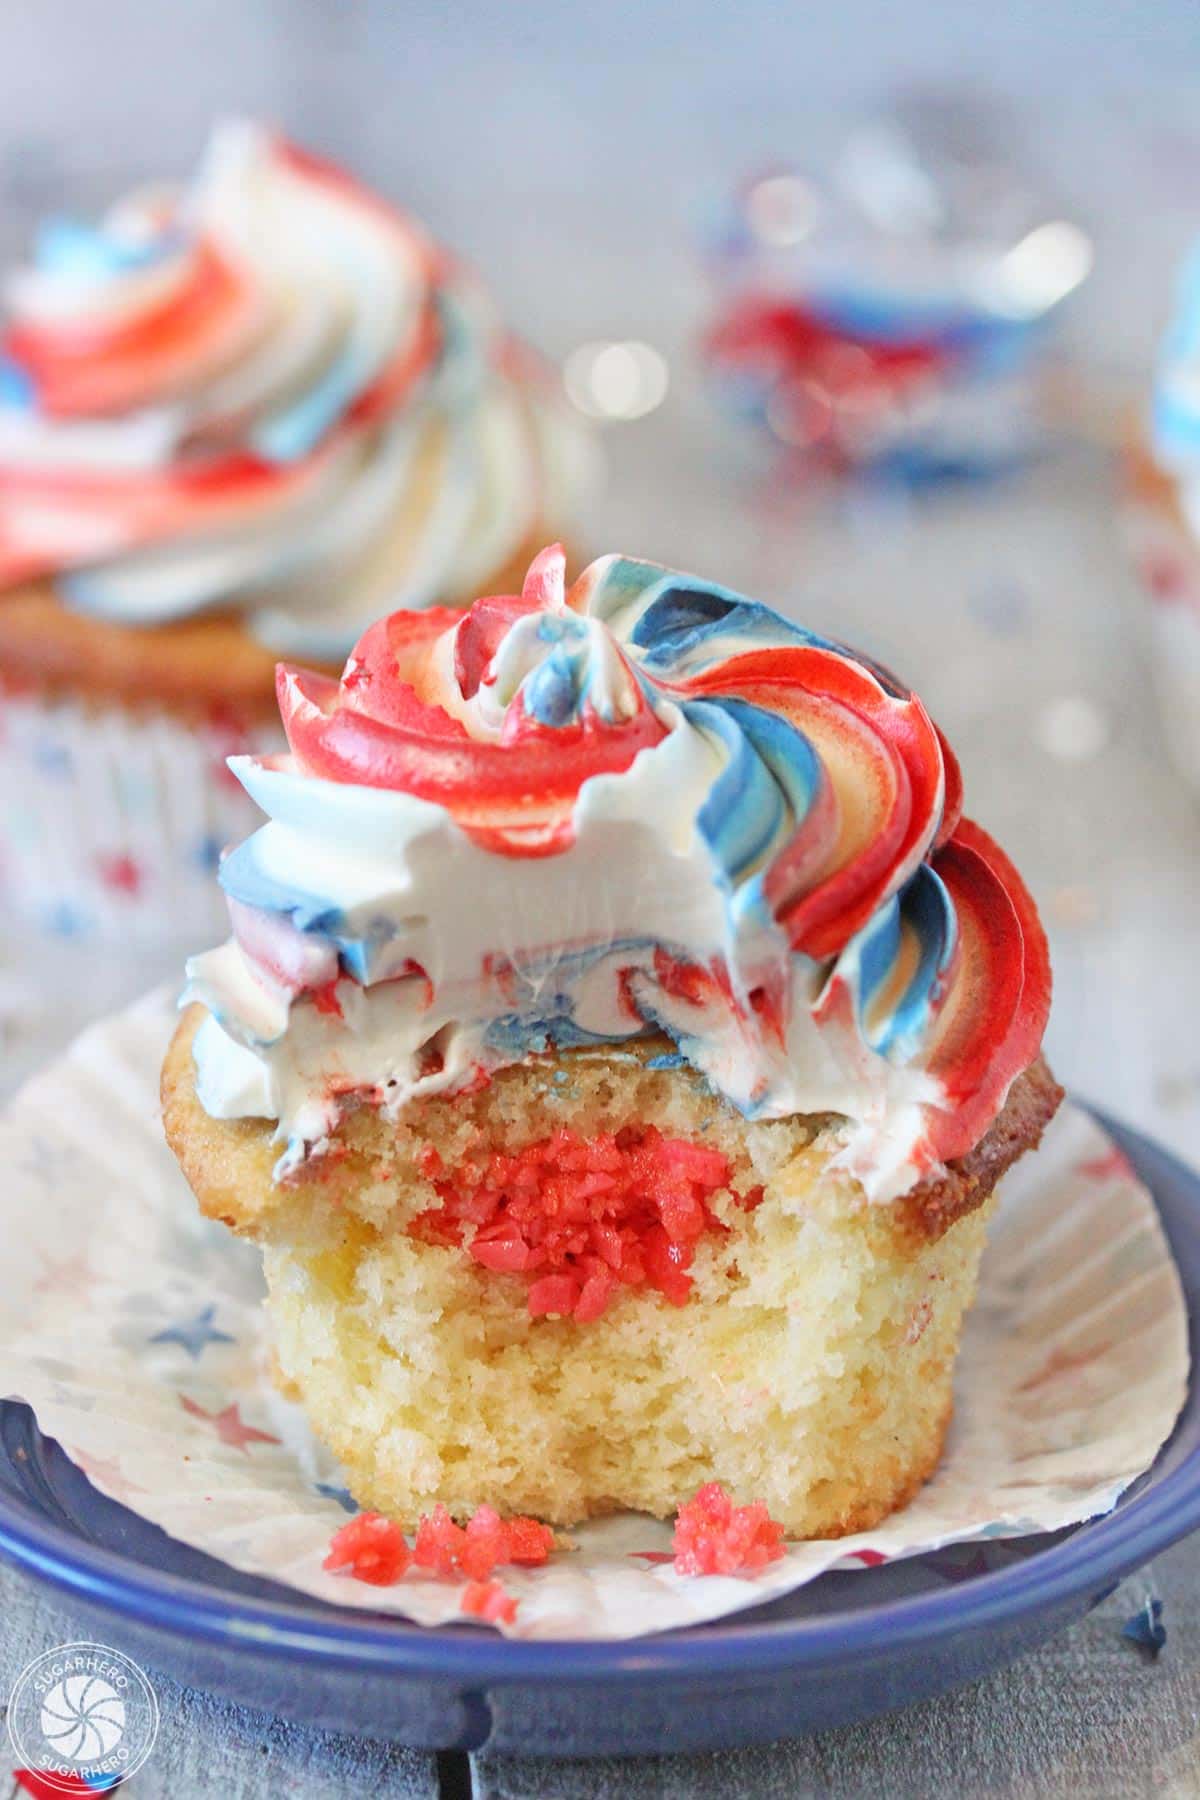
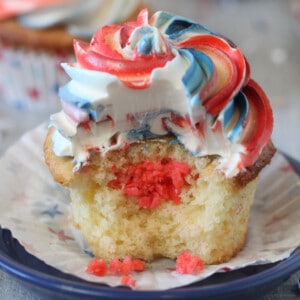
These Exploding Cupcakes are a real blast for the Fourth of July. Vanilla cupcakes are filled with Pop Rocks candy so they literally explode in your mouth when you bite into them.
You know what the Fourth of July needs? More exploding food. We have lots of grilled meat. Plenty of fresh fruit. Loads of lemonade. And heaven knows we don’t need any more ridiculously tall desserts in our lives. But…exploding food? Yeah, I could do with more of that.
I’m here to solve all of your not-having-enough-exploding-food-dilemmas. (File that one under Problems You Didn’t Know Were Problems Until Just Now.) See, I made you some cupcakes, see? But they’re not just regular cupcakes, see? They’re actually filled with Pop Rocks, which are the explodingest food known to man, see? But the Pop Rocks are hidden, so your friends and family will think they’re just typical mild-mannered holiday cupcakes until they take a bite, see? One big chomp and…BAM! An explosion big enough to cause us all to steal Emeril’s catch phrase!
THAT is how the Fourth of July should be done.

To the person who invented Pop Rocks: I salute you. You, good Sir or Madam, saw a need that no one else saw, and provided the children of this world with an extremely entertaining, only slightly terrifying candy. Is popping candy necessary? Well, I suppose not. Is it fun? Yes, unless you’re my son, in which case it kind of freaks you out. Does it belong inside of cupcakes? Heck yes!

The problem with Pop Rocks is that they’re extremely hygroscopic, meaning they absorb moisture from the air. Shortly after opening the package and exposing them to air, the little nuggets of popping magic start clumping together and losing their pop. Adding them to frosting or the inside of cupcakes “in the raw” is a sure recipe for soggy, pop-free cupcakes.

To prevent this, and to give their pop more staying power, I coated them in a light layer of coconut oil. The oil is solid at cool room temperature, so it provides a bit of a barrier between the candy and the moisture surrounding them. (I think cocoa butter would also work well for this purpose, if you’re in an experimenting mood.) The coconut oil isn’t a miracle worker, so you still have only about 8 hours after assembly before the candy loses its pop, but it still really helps to extend the life of the cupcakes! It also adds a nice subtle coconut flavor, that goes well with the vanilla cupcakes and fruity Pop Rocks.

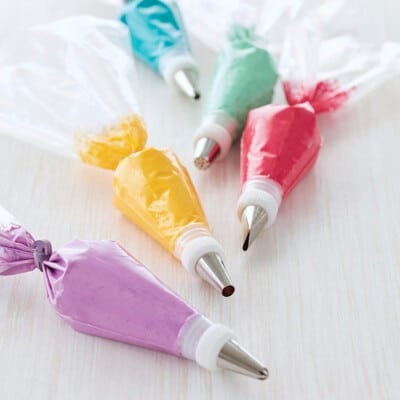
I also had fun with the frosting—I used a little leftover red and blue frosting from the American Flag layer cake to paint frosting stripes up the inside of a piping bag, then added white frosting. When the frosting mixed together in the bag it created a great airbrushed look. You could also top these with actual airbrushed color, your favorite sprinkles, or disgustingly Pinteresty cupcake toppers…

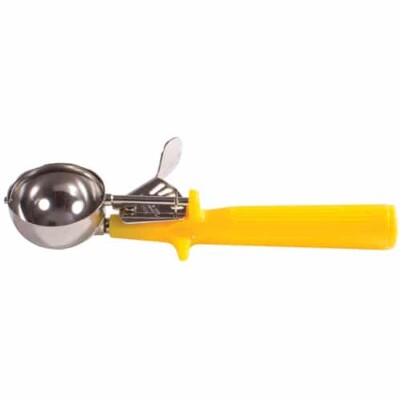
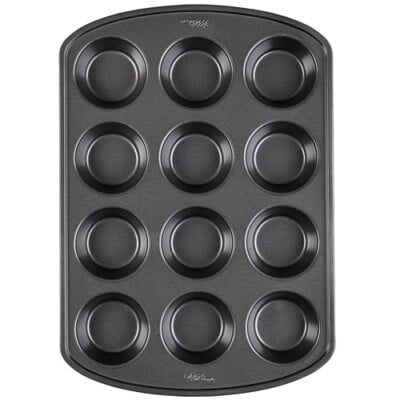
Recommended Equipment
Happy Fourth, friends! Watch out for exploding food!
💙More Patriotic Dessert Recipes

Flamingo Cupcakes

Hamburger Cupcakes
Exploding Cupcakes
Ingredients
For the Cupcakes:
- 10.66 oz all-purpose flour, (2 1/2 cups)
- 1 tsp baking powder
- 1/2 tsp baking soda
- 1/2 tsp salt
- 8 oz unsalted butter, at room temperature
- 14 oz granulated sugar, (2 cups)
- 4 large eggs, at room temperature
- 1 tbsp vanilla extract
- 8 oz plain greek yogurt, (1 cup) full-fat or low-fat, do not use non-fat
- 14 packets Pop Rocks candy, (.33 oz each)
- 1/4-1/3 cup coconut oil
For the Buttercream:
- 9 large egg whites
- 14 oz granulated sugar, (2 cups)
- 1 lb unsalted butter, soft but still cool
- 1 tbsp vanilla extract
- 1/4 tsp salt
- red gel food coloring, optional
- blue gel food coloring, optional
Instructions
To Make the Cupcakes:
- Preheat the oven to 350 F. Line cupcake pans with 24 liners.
- Sift together flour, baking powder, baking soda, and salt in a medium bowl. Set aside for now.
- Combine the butter and sugar in the bowl of a large stand mixer fitted with a paddle attachment. Mix on medium-high speed until light and fluffy, about 2-3 minutes.
- Add the eggs one at a time, beating well after each addition, then add the vanilla extract. With the mixer running on low, add third of the flour mixture, then when the flour streaks have disappeared, add half of the yogurt. Add half of the remaining flour, the rest of the yogurt, then finish with the last of the flour. Stop the mixer and scrape down the bottom and sides of the bowl with a rubber spatula to fully mix the batter.
- Fill the cupcake tins until they’re half to two-thirds full, then bake at 350 for 20-22 minutes, until they just start to turn golden and a toothpick inserted into the center comes out clean. Cool the cupcakes completely before filling and frosting.
To Make the Buttercream:
- Combine the egg whites and the granulated sugar in the bowl of a large stand mixer, and whisk them together. Choose a small saucepan that lets you fit the base of the stand mixer snugly into the top of the saucepan—this is your makeshift hot water bath. (Alternately, you can use a different bowl or an actual bain marie and then transfer the mixture to a mixing bowl once it’s heated.) Add an inch of water to the bottom of the saucepan, and bring the water to a simmer.
- Place the mixing bowl on top of the saucepan, making sure that the bottom isn’t in contact with the water, and heat the egg white mixture. Whisk frequently so that the egg whites don’t cook. Continue to heat the whites until they are hot to the touch, and when you rub a bit between your fingers, you don’t feel any grittiness from the sugar. Once the whites are hot, transfer the mixing bowl to your mixer and fit it with a whisk attachment.
- Beat the whites on medium-high speed until they are no longer warm to the touch—feel the outside of the bowl, and make sure that it is around room temperature. Depending on your mixer and the temperature of your environment, this may take 15-20 minutes, or more. Reduce the speed to medium-low and add the softened but cool butter in small chunks, a tablespoon at a time, making sure to wait in between additions. It may separate or look a little gloopy at this point—fear not. Once all of the butter is added, increase the speed again and whip until it comes together and is light and fluffy. If, after 5 minutes, it hasn’t come together, refrigerate the mixing bowl for 5-7 minutes, to cool the mixture down, and whip it again. Add the vanilla extract and salt.
- The buttercream can be made in advance and kept at room temperature if you’re going to use it the same day, or refrigerated. If it has been chilled, let it sit at room temperature until completely soft, then re-whip it to get the smooth texture back before you use it.
To Assemble:
- Combine the Pop Rocks and 1/4 cup melted coconut oil in a bowl, and stir until the candy is evenly coated with a thin layer of oil. If it seems like the candy is a little dry, add a bit more oil, a little at a time, until well-covered. Scrape the Pop Rocks onto a baking sheet covered with waxed paper, and spread it out into a single layer. Refrigerate to solidify the oil, about 10 minutes.
- Use a sharp paring knife to cut a cone-shaped hole out of the top of the cupcakes. Scoop the Pop Rocks off of the baking sheet, separating any large clumps with your fingers. Scoop a spoonful of Pop Rocks into the center of each cupcake, coming almost all the way to the top. Cut the bottom off of the cupcake cone, and replace the top of the cupcake on top of the candy.
- If you want to make multi-colored swirls like the ones picture, scoop a cup of frosting into two different bowls. Add a teaspoon of red gel coloring to one bowl, and a teaspoon of blue gel coloring to the other bowl, and mix well.
- Fit a piping bag with a large star tip. Scoop the red and blue frosting into two separate plastic bags, and snip off a corner of each bag. Holding the piping bag in one hand, pipe two red stripes of frosting up the inside of the bag, then pipe two blue stripes up the inside of the bag. Fill the bag with white frosting—when you squeeze it, the colors will blend together and you’ll get nice multi-colored stripes! Pipe a generous swirl of frosting on top of each cupcake.
- Exploding Cupcakes are best enjoyed soon after they are assembled, but I have found that the Pop Rocks stay “poppy” for about 8 hours after assembly.
Recipe Notes
Measuring Tips
Our recipes are developed using weight measurements, and we highly recommend using a kitchen scale for baking whenever possible. However, if you prefer to use cups, volume measurements are provided as well. PLEASE NOTE: the adage “8 oz = 1 cup” is NOT true when speaking about weight, so don’t be concerned if the measurements don’t fit this formula.
Want to learn more about baking measurements and conversion?
Nutrition


I remember eating popping candy by the handful when I was a kid and we used to get it in almost every store but now there’s just one small shop that keeps this candy and I still find myself buying packs of this exploding goodness! I’m SOOOOOOOOOO making these cupcakes!!!!! They look INCREDIBLE, especially the frosting! Wooooow! those colors merge beautifully and loving the cupcake topper too!!!!! 😀 Pinnnnnnnnnning!!!!! <3
Awesome, another popping candy fan! Hopefully you’re able to find enough to make the cupcakes. 🙂
love the idea of rock candy in a cupcake..so so clever!! these look adorable!! xoxo
Thanks Johlene!
Whoa! Hilarious idea and perfect for the fourth! It’ll suck though if someone drinks a bunch of soda before digging into a cupcake. Because you know.. there’ll be a lot more exploding than just the cupcakes!
But I love it. They look great as always! The buttercream looks fantastic and I wouldn’t mind celebrating the fourth with them.
Needs more sparklers though. 😀
Hah! Totally laughing at someone drinking a soda and then eating these. It’ll be the Mentos + Coke of our time!
The coconut oil move is a stroke of genius! You are a scientist, an artisan, and a true hero. RESPECT.
Fist bump, comrade.
What a cute idea! I love that you’re on an exploding food mission. I don’t know why, but exploding hot dogs seem like they ought to be next on the list, for 4th of July. Maybe not with Pop Rocks though. . . we’ll have to brain storm this a little more.
Ha! I will leave the exploding hot dogs to your entirely capable hands. I’m a little too scurred to know what that might look like. 😉
Made these cupcakes tonight. My batter/cupcakes thinned out once cooking. Turned out to be flat cupcakes that melted onto the pan. The sugar seemed to float the the top of the cupcake and burn. 🙁
Way too much butter in the buttercream. I used salted butter, and I did not add the salt. It did not thicken up much after refrigerating. Hoping keeping it in the fridge overnight will kind of keep it thick.
Hi Melissa, I’m sorry the cupcakes have given you trouble! This recipe does produce cupcakes with a somewhat flat top–you might be able to tell that from the picture of the pop rocks being scooped into the middles. They don’t crown like some cupcakes, but if they’re not overfilled then they shouldn’t cause problems during baking. The fact that the “sugar floated to the top” might indicate that something went wrong during mixing? I’m not sure what that means–can you explain?
Regarding the buttercream, it needs to be whipped to thicken it. If it looks thin and soupy after adding the butter, then you can refrigerate it for 5-7 minutes, but then it still needs to be whipped with the mixer until it does thicken. Just refrigerating it won’t make it come together.
Regarding the amount of butter, it might seem like a lot compared to some styles of buttercream, like American buttercream where you mix butter and powdered sugar. It’s actually fairly standard for this style, which is Swiss meringue buttercream, and in fact is much less than some other recipes call for. See for example this recipe, which uses slightly more whites, slightly less sugar, and double the amount of butter:
http://bravetart.com/recipes/swissbuttercream
It is a more complicated recipe than just mixing powdered sugar and butter, but it is my absolute favorite frosting recipe so I use it frequently. 🙂 I hope you’re to get it to work for you!
did you make the toppers too?? I love those as much as the cupcake…..
Haha, yes I did, because I’m crafty (or cheesy) like that! They’re about 1 1/2 inches in diameter, hot-glued onto a toothpick. I used this basic method but cut my paper smaller (and used different colors of paper together) because I wanted smaller poms:
http://www.beautifulmatters.com/2011/12/how-to-make-mini-tissue-paper-poms-html/
Thank you!!!
Whenever i would like to sustain this was totally interesting, I would like to share the best one, do you really like this and i am also, well i am going to exploding the cupcakes over the new items. Would you suggest to me more cupcakes ?
Hey Bill, these cupcakes are so fun! I definitely recommend them, however here is a link to a lot more cupcake options if this isn’t exactly what you are wanting!:) https://www.sugarhero.com/category/cupcakes/