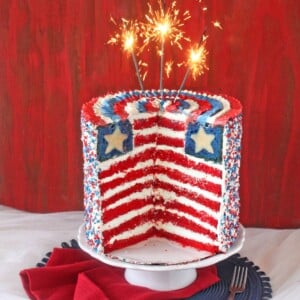
When you want to go big, this American Flag Layer Cake is the cake for you! This ultra tall cake mimics the American Flag on the inside with layers of red and white stripes and even a white star baked right inside. It feeds a big crowd so it’s perfect for barbecues or Fourth of July celebrations.

⭐Tall Patriotic Layer Cake
In the past, I’ve made some simple patriotic desserts like my Strawberry-Dusted Shortbread Stars and Easy Homemade Star Lollipops. They are adorable and perfect for smaller gatherings, but this year I wanted more, I needed more! I needed something to feed a crowd, so I decided to go big…really, really big… with a super tall American Flag Layer Cake.
Is there a better way to celebrate our country than with a larger-than-life American flag layer cake? Absolutely not! This monster of a cake has over a dozen red and white layers, a blue corner, and a white star baked right into the cake. It can easily feed 30-40 people (but I’ll show you how to reduce it for smaller groups!) and is an absolute show-stopper. If you want to wow your guests and totally overshadow the fireworks display this Fourth of July, you need to make this cake!
Table of Contents
🥣Equipment
Some of this list is optional (but recommended, to make your life easier!) and some of it is necessary. The absolute musts are gel food coloring (don’t use liquid! You won’t get the bright colors you need!) and tall 9-inch cake pans. I like using 9×3-inch pans, but 9×2-inch pans will work as well. Do not use 9×1.5-inch pans, they might not be tall enough for the cake to bake.
- 9×3-inch cake pans
- Red gel food coloring (I like Americolor Super Red)
- Blue gel food coloring (I like Americolor Royal Blue)
- Star sprinkles
- Round cutter (I used the 3 1/2-inch cutter as a guide for placing the cookies in the blue cake ring.)
- Star cookie cutter (I used the middle cutter in this set)
- 9” cardboard cake rounds
- Cake turntable (optional but makes decorating easier)
- Offset spatula
Petal piping tip (for the top of the cake)

👩🏽🍳How to Decorate an American Flag Layer Cake
This cake is made with vanilla buttercream and my favorite yellow cake recipe. I was planning on having thirteen red and white layers (for accuracy in flag depiction, naturally) but I mis-counted and ended up with 15. D’oh! You can either see this as a mistake, or an endorsement of how awesome our country is. New National Motto: So Rad It Needs Another Two Flag Stripes. You’re welcome, America.
I wanted to make the outside of the cake as beautiful as the inside, but I am also a lazy cake decorator. So for maximum impact with minimal work, I turned to my good friends, the sprinkles family. An assortment of star-shaped sprinkles saved the day and made the cake look colorful and festive, and I didn’t have to do much more than press them along the outside. (I used star sprinkles similar to these—you will probably need close to 12 oz for the full-sized cake.)
What really made the cake pop, of course, were the sparklers on top! After a wild goose chase than involved driving to the nearest town where sparklers are legal (because apparently they can’t be sold in my town…shhhh don’t squeal on me), scouring all the sketchy parking lot fireworks stands, and STILL not finding any sparklers, a friend took pity on me and gifted me some leftovers from her wedding. They are extra-long and burn extra-bright, and they were extra-perfect! Asher and I had fun playing with them, too. Nothing like some mother-son bonding over pyromania.
A note about the sparklers
Sparklers are not intended for food use. I liked the look for photographing the cake, but while burning, they threw off a little ash on the top of the cake. I scraped that frosting off and re-frosted the top before we served it to people. So, if you want a similar effect, look for cake sparklers (which are food-safe!) or tall cake candles.

📸 Photo Tutorial: How to Make an American FlaG Layer Cake with a Ring of Stars
You’ll want to start your project by making the buttercream. It can be made several days in advance if desired.
You’ll also want to make and bake the red layers of cake. Layer your slices of red cake with buttercream so that they are chilled and ready to be topped with the blue star ring. Check the recipe card below for more detailed information about these steps.
And now you’re probably wondering how the star shape is made in the middle of the blue layer, right? It’s made from star-shaped sugar cookies (Crazy, right?!). I wanted a sharp, well-defined star shape, and thought cookies were my safest bet. If you don’t want to use cookies, check the variation section below for more ideas. Are you ready to learn all the tricks to making this beautiful design? Let’s go!
Prepare the Pan and Make the Cookies
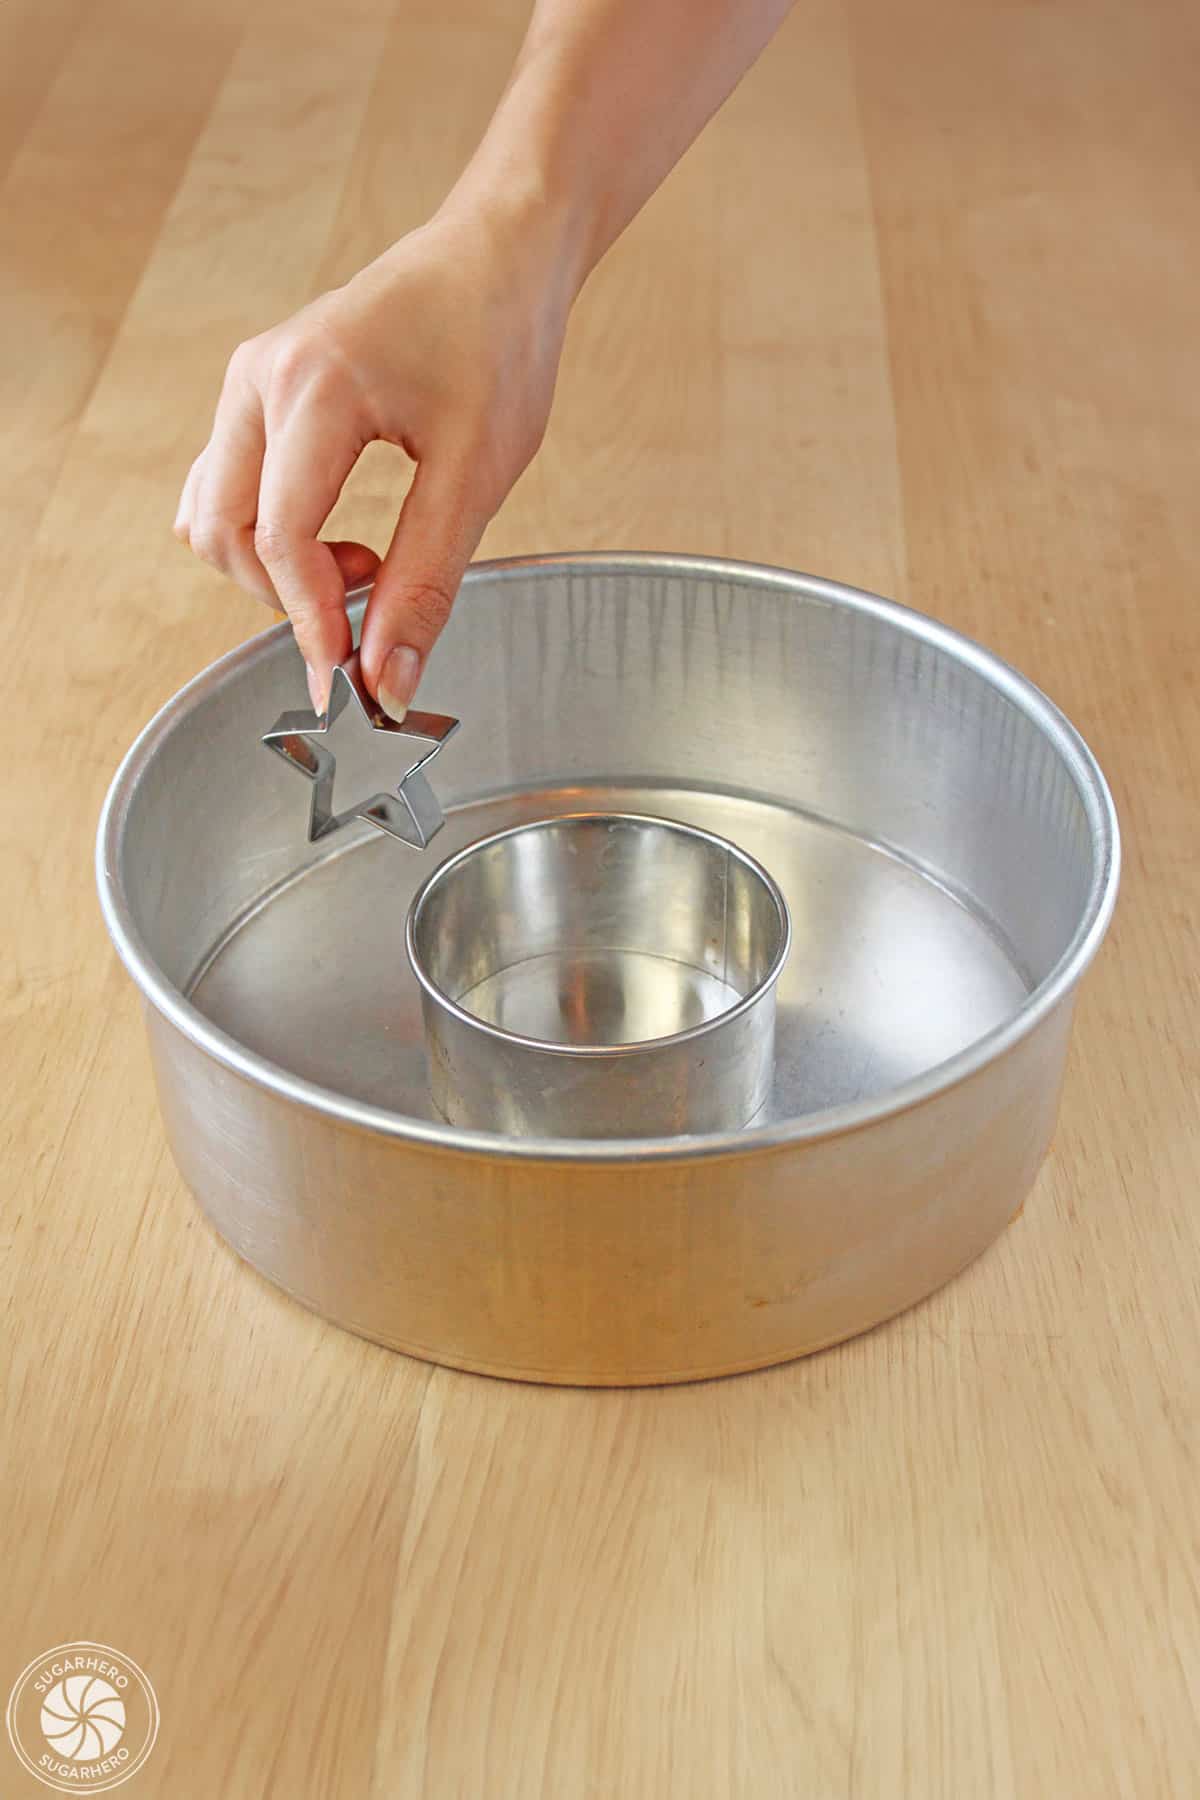
- Before baking the sugar cookies, make sure that your star cookie cutter will fit easily into a 9×3 cake pan with an even margin from the edge on both sides of the star. You can place a 3 1/2-inch circle cutter in the center of the pan to get a good idea of how well the star will fit in the outside ring.
- Remove the cookie cutters and line your cake pan with parchment. Spray it well with nonstick cooking spray.
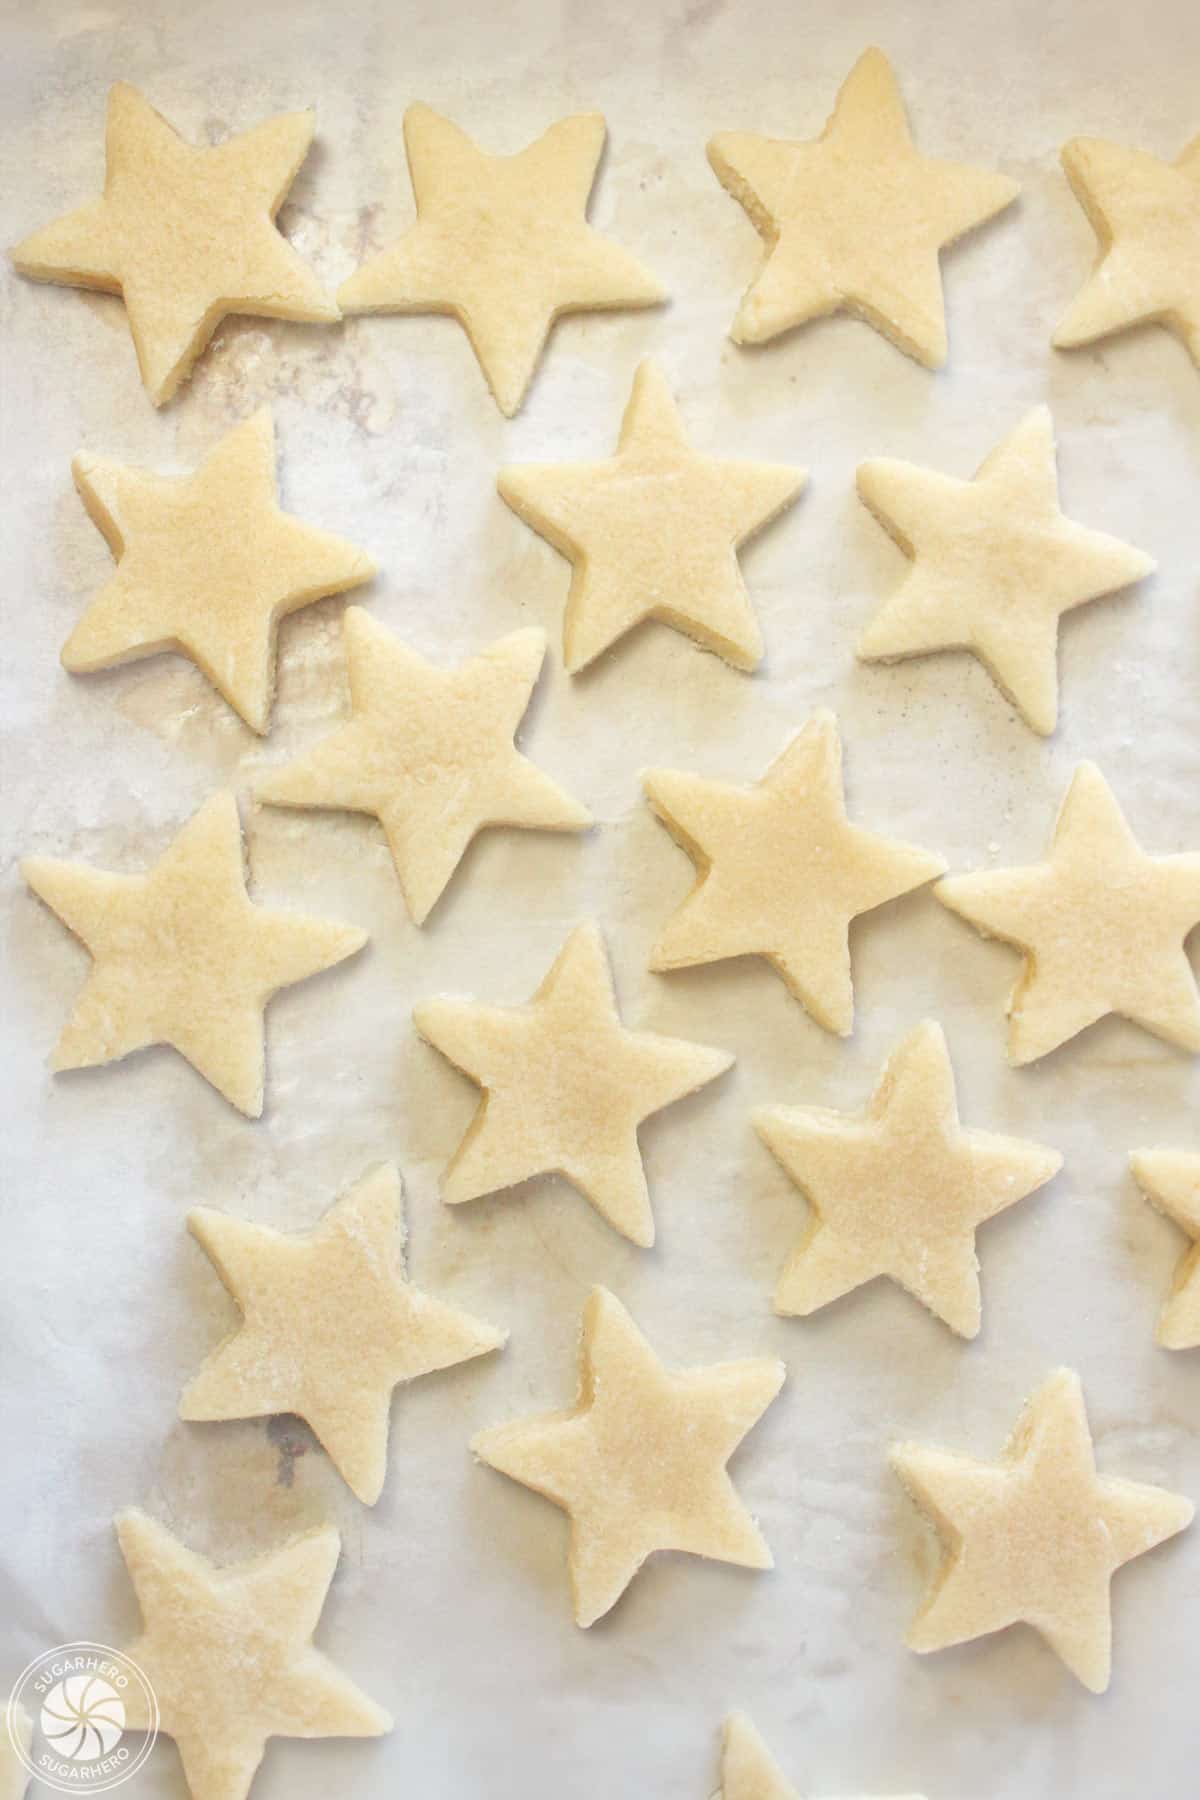
- Bake the cookies at 350 F for 4-5 minutes, just until they lose the raw shine in the middle. Do NOT cook them until they’re fully baked! They should still be completely pale and just barely set when you take them out. You’ll need 50-60 cookies for this recipe.

Begin The Blue Cake Batter Layer and Cookie Ring
- Prepare the blue cake batter as described in the recipe card.
- Spread a thin layer of cake batter (about 1/2-inch thick) in the bottom of the pan.
- Bake the cake for 10-15 minutes, until it puffs up and starts to set around the edges. Chill it in the refrigerator for 15 minutes until the pan is cool to the touch.
- Place the 3 1/2-inch circle cutter in the center of the cake pan and use it as a guide to evenly space the star sugar cookies in a ring around the outer edge of the cake, leaving a small margin at the edge.
- Stand the cookies upright (the partially baked cake should help prevent them from sinking to the bottom or the blue layer or falling over). Press them as close together as possible. You will have some gaps between the outer edges of cookies—cut some cookies in half and press them into the gaps, to make the cookie ring stable and secure.
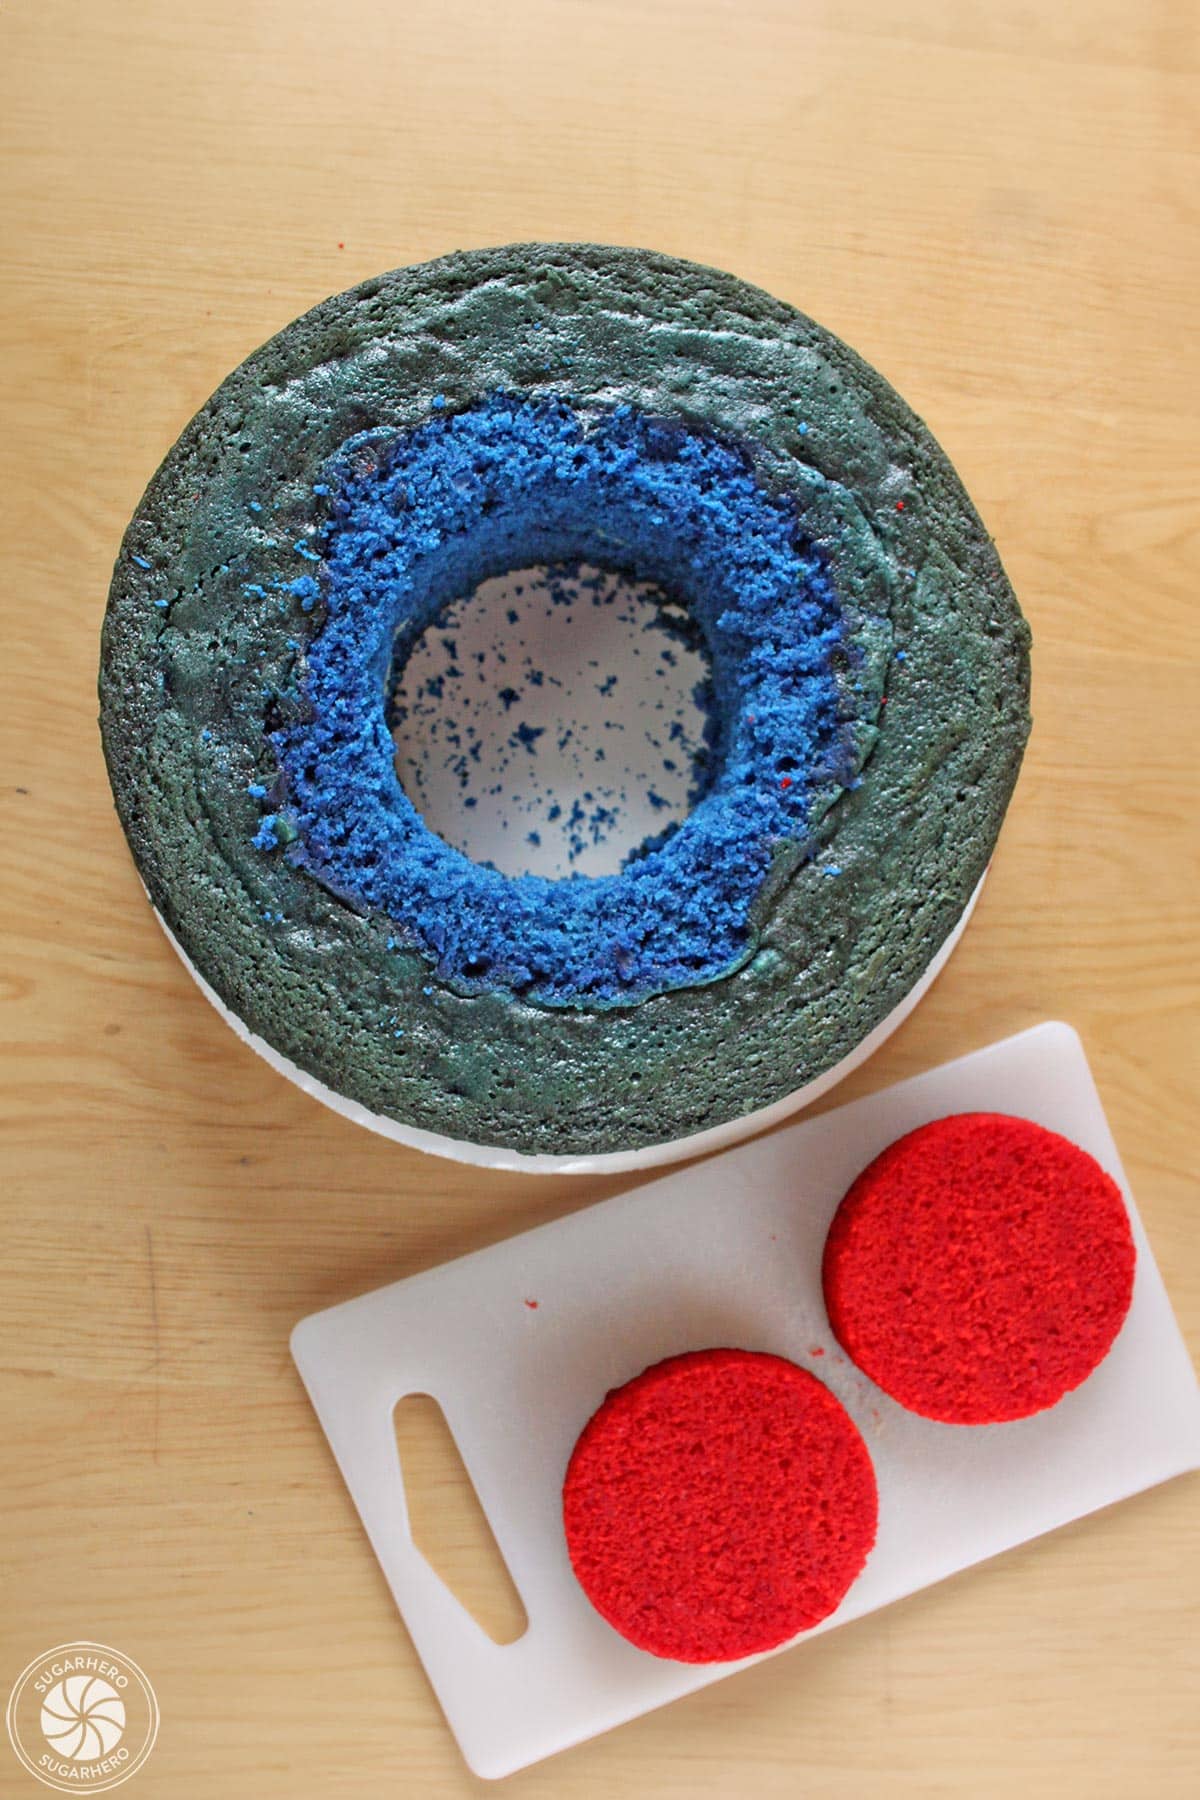
Finish Baking and Assemble the Center of the Ring with Red Mini Cakes
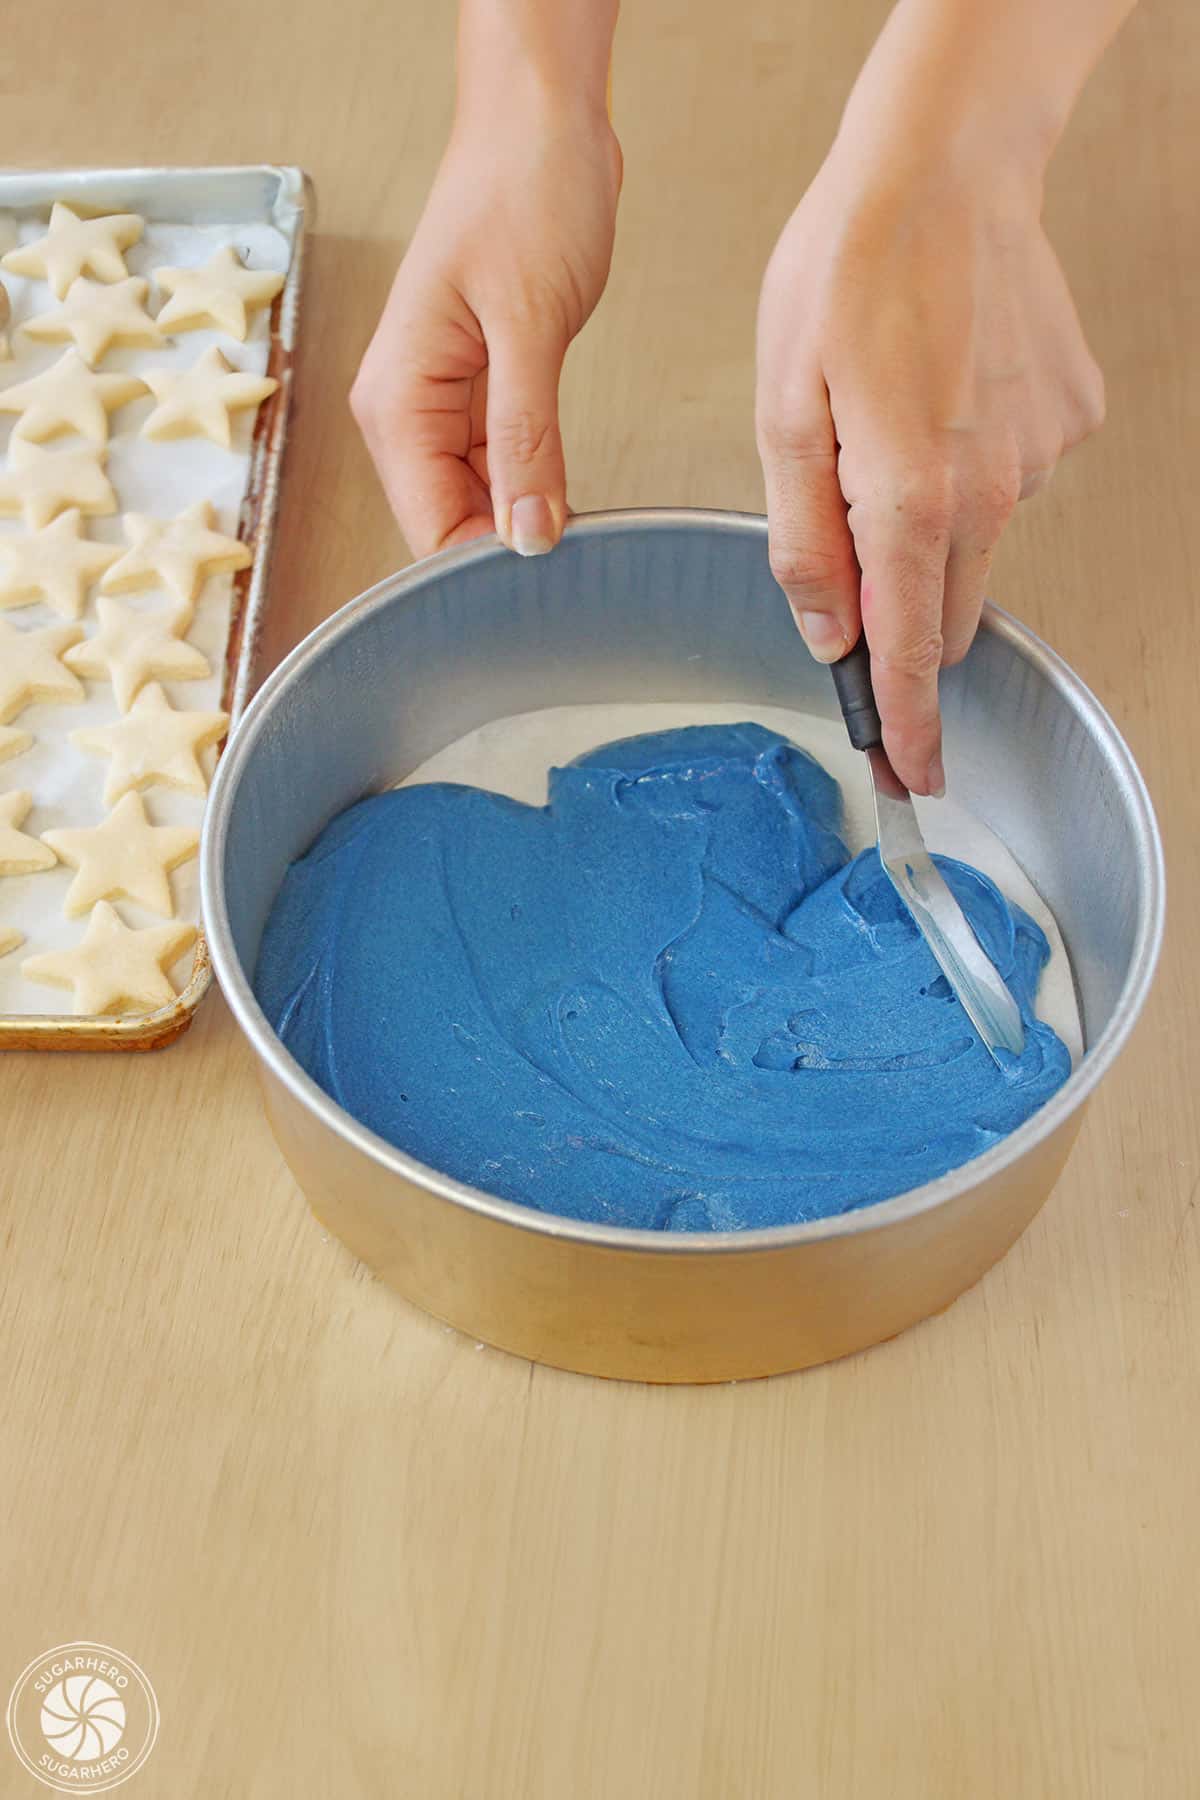
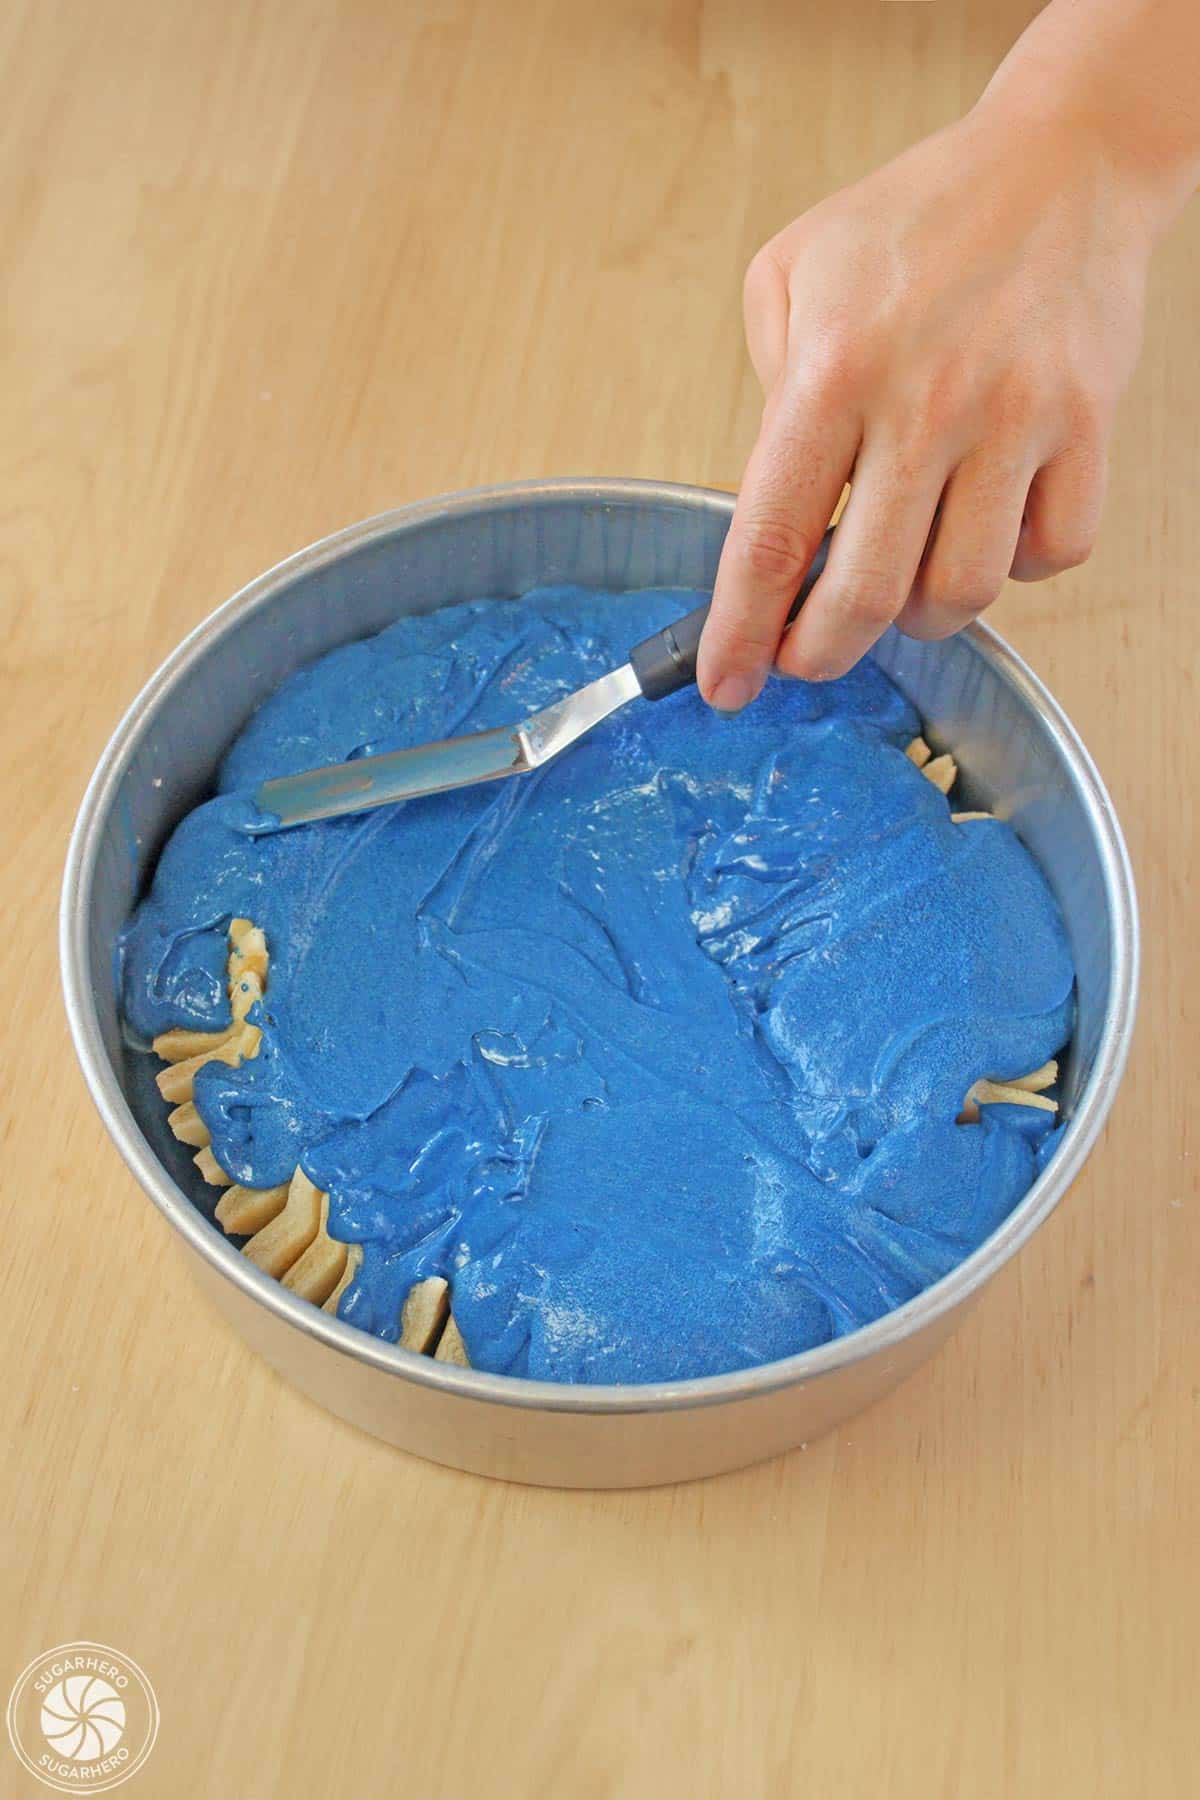
- Remove the round cutter from the center of the cake and scrape the remaining cake batter on top of the cookies.
- Use a spatula to spread the batter over the tops of the cookies, covering them well. Since the center of the cake will be cut out, it’s better to focus on covering the cookies and have less batter in the center of the pan.
- Bake the cake for 60-70 minutes, until a toothpick inserted in the center comes out clean. If it starts to get too dark on top, cover it loosely with foil.
- Let the cake cool on a wire rack for 10-15 minutes, then turn it out of the pan and let it cool completely.
- Cut two 3 1/2-inch rounds out of a red cake layer (you will have red cake scraps left).
- Place the blue cake ring on top of previously assembled layers of red cake and frosting.
- Spread a thin layer of frosting around the inside of the cake’s hole, then insert one of the red mini cakes inside the blue cake. Spread a layer of frosting on top of this red cake, then add the second red mini cake layer. Add enough frosting on top of the red mini cake to make it flush with the top of the blue cake layer.
- Spread buttercream along the sides and top of the cake in a thin layer—this is just to hold the crumbs in. Refrigerate the cake for at least an hour to firm up the frosting and make it easier to decorate. Check the recipe card for decoration instructions.

💭Variations
- Try other extracts. So how does it taste? Just as amazing as it looks! I kept it simple and flavored everything with vanilla, but this would also be good with orange, lemon, or almond extracts (just be sure to use something clear, so the white buttercream doesn’t change color).
- Use pound cake. If you want to keep the stars, but don’t want to mess with cookie dough, consider using pound cake instead. Pound cake is denser than most cake, so it should hold the star shape better, and it’s readily available in many grocery freezers. Cut the cake when it’s semi-frozen to get the cleanest slices and shapes. You will probably need at least 3 frozen pound cakes to get enough stars for this cake. While you might be able to use a regular homemade white cake, I haven’t tried it and can’t guarantee that the stars will hold their shape during the cutting or baking process.
- Use a different cookie dough. I havn’t experimented with other types of cookie dough. If you decide to use another recipe for the cookies, the trick is to use a dough that doesn’t spread, and then to barely bake the cookies—just enough so that you can handle them.

💡Tips For Success
- Omit the stars. I won’t lie, this is a big project. One way to make it easier is to omit the stars from the blue layer entirely. You’ll still have a striking design, but won’t have to spend time on the cookies.
- Make sharp edges. If they have lost their sharp edges, press the cutter into them while they are still warm. Let them cool on the baking sheet before moving them. Re-roll the scraps of dough together and cut and bake more stars, until you’ve used all the dough. You’ll need about 50-60 stars for this recipe.
- Clean cuts. The stars are a little denser than the surrounding cake, so it’s easiest and neatest to cut the slices when the cake is cold. They’re definitely not hard and crispy, though, and they blend nicely with the cake texture. I should add that not every slice had a perfectly shaped star, but even the ones with a more “abstract” star shape looked completely awesome.
- Cut the cold cake in half before slicing it. The full cake, pictured here, will easily serve 30-40 people if you give them small-to-average slices. If you do make the full cake, I recommend slicing it in half before cutting the slices, so you’re serving from two average-height cakes instead of one really tall one. You’ll get the cleanest cuts if you slice the cake while it’s cold.
- Make a shorter layer cake. I assume that many folks might not want to make such a giant cake, so the recipe is written to produce half the amount of red cake and frosting. This will get you a cake with 5 red layers instead of 8. If you want the full 8, be sure to follow the instructions and double the portions that say they should be doubled.
- Take your time. This is a long recipe, and although the individual steps aren’t complicated, please be sure to read the notes and entire recipe through before beginning! While it might be possible to make this in one day, I recommend spreading it over 2 days: make the cookies, cake layers, and (maybe) the frosting one day, then assemble it the second day.
Ready to rumble? Let’s do this thing!
💓More Patriotic Dessert Recipes
Fourth of July Layer Cake
Cream Cheese Cake with Red Velvet Fudge Frosting
American Flag Layer Cake
Ingredients
For the Sugar Cookie Stars:
- 4 oz unsalted butter, cold and cubed
- 5.25 oz granulated sugar, (3/4 cup)
- 1 large egg
- 1/2 tsp vanilla extract
- 1/4 tsp salt
- 9.5 oz all-purpose flour, (2 1/4 cup)
For the Red Cake Layers:
- [Make this recipe TWICE if you want the full-sized cake!]
- 15.75 oz granulated sugar, (2 1/4 cup)
- 15.75 oz cake flour, (4 1/2 cups), sifted
- 2 tbsp baking powder
- 1 tsp salt
- 9 large egg yolks
- 1 1/2 cups milk
- 1 tbsp vanilla extract
- 9 oz unsalted butter, at room temperature
- 3 tbsp red gel food coloring, I recommend Americolor gel food coloring
For the Blue Cake Layer:
- 10.5 oz granulated sugar, (1 1/2 cups)
- 10.5 oz cake flour, (3 cups), sifted
- 4 tsp baking powder
- 6 large egg yolks
- 1 cup milk
- 2 tsp vanilla extract
- 6 oz unsalted butter, at room temperature
- 2 tbsp blue gel food coloring, I recommend Americolor gel food coloring
Full Batch Buttercream:
- [Make this recipe TWICE if you want the full-sized cake!]
- 9 large egg whites
- 14 oz granulated sugar, (2 cups)
- 1 lb unsalted butter, soft but still cool
- 1 tbsp vanilla extract
- 1/4 tsp salt
Half Batch Buttercream:
- 6 large egg whites
- 9.25 oz granulated sugar, (1 1/3 cups)
- 10 oz unsalted butter, soft but still cool
- 2 tsp vanilla extract
- 1/8 tsp salt
Instructions
To Make the Sugar Cookie Stars:
- Preheat the oven to 350 F, and line two baking sheets with parchment paper. Combine the cold cubed butter and sugar in the bowl of a large stand mixer fitted with the paddle attachment. Beat them together on medium speed until the butter is worked into the sugar and you have a smooth mixture. Don’t beat until light and creamy, like you would with many cookie recipes—you don’t want to beat too much air into it, or the cookies will spread!
- Add the egg and beat until it’s incorporated, then mix in the vanilla extract. Add the salt and flour, and mix on low speed until no streaks of flour remain. The dough should be thick, and not sticky. If you started with cold butter, and worked quickly, it should be cool enough to roll out and cut now. If it seems too soft to roll and cut, form it into a disc, wrap it with plastic wrap, and refrigerate for 30-40 minutes.
- Roll the dough between two sheets of parchment until it is 1/4-inch thick. Cut small (2-inch) stars out of the dough and place them on the parchment-lined baking sheets. They won’t spread much, so you can place them close together. Bake the cookies at 350 F for 4-5 minutes, just until they lose the raw shine in the middle. Do NOT cook them until they’re fully baked! They should still be completely pale and just barely set when you take them out. If they have lost their sharp edges, press the cutter into them while they are still warm. Let them cool on the baking sheet before moving them. Re-roll the scraps of dough together and cut and bake more stars, until you’ve used all the dough. You’ll need about 50-60 stars for this recipe.
To Make the Red Cake Layers:
- [Follow this whole procedure TWICE if you want the full-sized cake!]
- Preheat the oven to 350 F. Line two 9×2 or 9×3-inch cake pan with parchment rounds, and spray the parchment and pan sides with nonstick cooking spray.
- Combine the sugar, cake flour, baking powder, and salt in the bowl of the stand mixer fitted with a paddle attachment. Mix on low speed for about a minute to combine the dry ingredients.
- Lightly whisk together the egg yolks and about a quarter of the milk (it doesn’t have to be a precise measurement) and the vanilla extract, and set aside for now.
- Add the remaining milk and the softened butter to the large mixing bowl and mix on low speed until the dry ingredients are moistened. Turn the mixer to medium speed and mix for a minute and a half.
- Add the egg yolk mixture in three batches, mixing for 20-30 seconds after each addition, until you have a smooth batter. Add the red gel food coloring and mix it in. Scrape the bottom and sides of the bowl with a rubber spatula, and give the batter a few more stirs to make sure everything is incorporated. Divide the batter between the two pans and bake at 350 F for 35-40 minutes, until the sides just start pulling away from the pan, and a toothpick inserted into the center comes out clean.
- Let the cakes cool on a wire rack for 10 minutes, then gently turn them out and let them cool completely. I find it’s easiest to cut and stack cakes that have been chilled, so if you have time, wrap them with plastic wrap and put them in the freezer for at least 30 minutes, until they are firm but not frozen all the way through. If you are making these in advance, they can stay in the freezer for up to several weeks. Let them partially defrost, until they are firm but not rock-hard, before assembling.
To Make the Blue Cake Layer:
- Prepare the blue batter as described above, using blue food coloring instead of red. Line a 9×3-inch cake pan with parchment and spray it well with nonstick cooking spray.
- Spread a thin layer of cake batter (about 1/2-inch thick) in the bottom of the pan. Bake the cake for 10-15 minutes, until it puffs up and starts to set around the edges. Chill it in the refrigerator for 15 minutes until the pan is cool to the touch.
- Arrange the star cookies in a ring around the outer edge of the cake, leaving a small margin at the edge. If you have a 3 1/2-inch circle cutter, it might help to place that in the middle of the cake pan, and use that as a guide to evenly space your cookies. Stand them upright (the partially baked cake should help prevent them from sinking) and press them as close together as possible. You will have some gaps between the outer edges of cookies—cut some cookies in half and press them into the gaps, to make the cookie ring stable and secure.
- Scrape the remaining cake batter on top of the cookies and spread it around, making sure that the tops of the cookies are well-covered. It’s better to have less batter in the center of the pan, since that will be cut out anyhow, than to skimp on batter on top of the cookies.
- Bake the cake for 60-70 minutes, until a toothpick inserted in the center comes out clean. If it starts to get too dark on top, cover it loosely with foil. Let the cake cool on a wire rack for 10-15 minutes, then turn it out of the pan and let it cool completely.
To Make the Buttercream:
- [For the full cake, make TWO batches of the full batch, and ONE batch of the half batch. For a half-sized cake, make ONE batch of the full batch and ONE batch of the half batch.]
- Combine the egg whites and the granulated sugar in the bowl of a large stand mixer, and whisk them together. Choose a small saucepan that lets you fit the base of the stand mixer snugly into the top of the saucepan—this is your makeshift hot water bath. (Alternately, you can use a different bowl or an actual bain marie and then transfer the mixture to a mixing bowl once it’s heated.) Add an inch of water to the bottom of the saucepan, and bring the water to a simmer.
- Place the mixing bowl on top of the saucepan, making sure that the bottom isn’t in contact with the water, and heat the egg white mixture. Whisk frequently so that the egg whites don’t cook. Continue to heat the whites until they are hot to the touch, and when you rub a bit between your fingers, you don’t feel any grittiness from the sugar. Once the whites are hot, transfer the mixing bowl to your mixer and fit it with a whisk attachment.
- Beat the whites on medium-high speed until they are no longer warm to the touch—feel the outside of the bowl, and make sure that it is around room temperature. Depending on your mixer and the temperature of your environment, this may take 15-20 minutes, or more. Reduce the speed to medium-low and add the softened but cool butter in small chunks, a tablespoon at a time, making sure to wait in between additions. It may separate or look a little gloopy at this point—fear not. Once all of the butter is added, increase the speed again and whip until it comes together and is light and fluffy. If, after 5 minutes, it hasn’t come together, refrigerate the mixing bowl for 5-7 minutes, to cool the mixture down, and whip it again. Add the vanilla extract and salt.
- The buttercream can be made in advance and kept at room temperature if you’re going to use it the same day, or early the next day. If it has been refrigerated, let it sit at room temperature until completely soft, then re-whip it to get the smooth texture back before you use it.
To Assemble:
- Using a large serrated knife, cut each red cake layer in half. You should have 4 red cake rounds now [or 8 if you’re making the full-sized cake]. Place one layer face-up on a cake cardboard.
- Scoop about 1 cup of buttercream into the center, and spread it in an even layer until it covers the cake and reaches the outer edge. Top the cake round with a second round, and repeat the process of spreading frosting on the layers, until you have used 3 red layers. Top the cake with another layer of buttercream. [For the full-sized cake, you can use 7 red layers.]
- Use a 3 1/2-inch round circular cutter to cut a hole in the middle of the blue cake. If you don’t have a cutter, trace around a similarly-sized bowl instead. Cut two 3 1/2-inch rounds out of a red cake layer. You will have red cake scraps left. Place the blue cake on top of the red layer cake. Spread a thin layer of frosting around the inside of the cake’s hole, then insert one of the red mini cakes inside the blue cake. Spread a layer of frosting on top of this red cake, then add the second red cake layer. Add enough frosting on top of the red cake to make it flush with the top of the blue cake layer.
- Spread buttercream along the sides and top of the cake in a thin layer—this is just to hold the crumbs in. Refrigerate the cake for at least an hour to firm up the frosting and make it easier to decorate.
- To finish the cake, spread another, thicker layer of frosting along the sides. Pour star sprinkles into a shallow bowl, and scoot the cake to the edge of the cake turntable or a plate. Press the sprinkles into the sides of the cake, letting the excess fall back into the bowl below.
- This cake is easiest to cut when cold, but best enjoyed at room temperature.
Recipe Notes
Measuring Tips
Our recipes are developed using weight measurements, and we highly recommend using a kitchen scale for baking whenever possible. However, if you prefer to use cups, volume measurements are provided as well. PLEASE NOTE: the adage “8 oz = 1 cup” is NOT true when speaking about weight, so don’t be concerned if the measurements don’t fit this formula.
Want to learn more about baking measurements and conversion?
Nutrition


What shape piping tip do you use to pipe the top of the cake? And what technique do you use? Inside to our or outside to in? Thanks so much!
What piping tip did you use for the top of the cake? Thank you, looking forward to making this cake for the 4th.
Hey Beverly, I am so excited for you to make this cake! I cannot wait to hear how it goes! I actually used a Wilton 104 piping tip. Here is a link to the one I used https://amzn.to/2WolSer Thanks!
Thank you, Elizabeth! One more question, when doing the blue layer did you leave the 3 1/2 ” circle cutter that you placed in the pan to line up the stars, in while baking? I am thinking if I take it out, when I pour the rest of batter over the stars they will move. Am I not understanding something?
I have a question, when you place the stars on the partially baked blue layer, did you keep the large cookie cutter on the cake while pouring the remainder of the batter over the stars and then baking the cookie cutter in the cake, until you cut the 3 ” circle out? I am stumped and am getting ready to do the blue layer this week. I would appreciate any help, thanks.
Hey Beverly, I am sorry for the late reply and for the confusion. The cookie cutters main goal is just to be a guide when pouring the second half of the batter in. I am sorry for the confusion again, however the cookie cutter shouldn’t be baked into the cake! You will have it there to guide it while you pour the rest of the batter in then remove it before baking.
Hi! The cake is so neat! My question is: When cutting the cake, what happens if you cut down thru the middle or edge of a cookie? Does it make the cooke crumble or pull out of the cake? There should be dough between each cookie, right?
Can I substitute all purpose flour for cake flour and would the blue batter still be enough if I didn’t add the star cookies and added like white sprinkles instead?
Muchas gracias por compartir un trabajo tan original y hermoso.
Es un placer – ¡muchas gracias!