
You’ve never had Oreos like these before! These gourmet homemade Oreos are filled with fun flavors of buttercream, like lemon, orange, raspberry, vanilla bean, and mint chocolate chip!

Make Oreos at home!
I pretend to be an Oreo snob. I always claim that they’re not an exciting cookie. I could take or leave them. If they magically appear on my plate, I’ll eat them—I mean, I’m not a MONSTER—but I never go out of my way to buy them.
That whole laissez–faire attitude toward Oreos changed, however, when I started making my own gourmet homemade Oreos. Now I can’t take or leave them. I just take…and take…and take!
If you want to try these homemade Oreos in another dessert, put them to good use in Oreo Fudge, Cookies & Cream Cake, Dirt Pudding Cups, or Mini Oreo Icebox Cakes!

How to get that authentic Oreo flavor
As any Oreo fan knows, there are 2 important components: the deep, dark chocolate cookie, and the cream filling. Let’s tackle those one at a time.
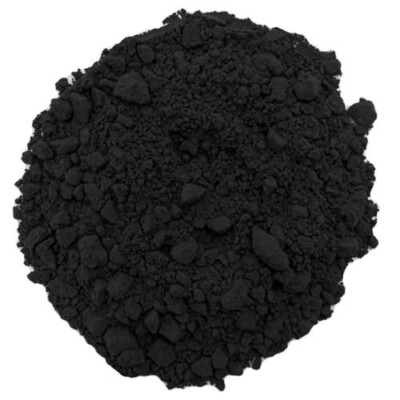
For the cookies, it was important to get them as close as possible to the original. If you taste them on their own, Oreo cookies are not actually all that sweet. They’re more of a chocolate cracker. And they have one very important distinction: they’re BLACK. Not just dark brown, but black. To get this color and deep, not-too-sweet flavor, we turn to black cocoa powder. This is cocoa that is ultra-alkalized, so it has a really strong chocolate flavor and a super-dark color. (Also seen in my Devil’s Food Cake with Pumpkin-Butterscotch Frosting!) Black Cocoa can sometimes be found at gourmet stores or cake supply stores, but your best bet will probably be finding it online.
Black cocoa powder can be drying, so if you’re swapping it into cake recipes, you’ll generally want to use maybe 1/3 black cocoa to 2/3 regular cocoa powder. But for these cookies, which are mean to be crisp anyhow, using 100% black cocoa is fine. And if you don’t have it, regular Dutch-processed cocoa works great! Your cookies will just be a lighter color and flavor, but no harm done.

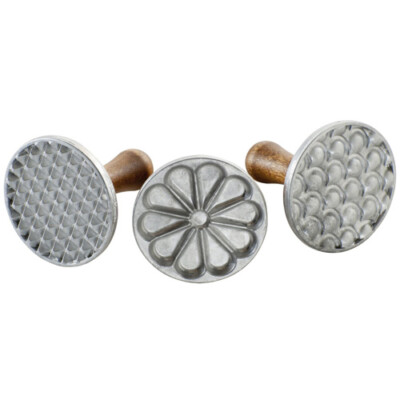
The other thing I did to make these extra-authentic was use a Nordic Ware cookie stamp to put an embossed pattern on the top of each cookie. I know, it’s not the fancy curlique design with O-R-E-O written into it like the real cookie, but for some reason Oreo doesn’t sell custom branded cookie stamps (RUDE) so I had to make do!
Side note, I am OBSESSED with cookie stamps. They are so fun to play with! The specific one I used comes from this 3-stamp set, but there are so many fun ones. (Hello, can I please make honey shortbread cookies just so I have an excuse to use this honeycomb pattern?!) There can be a bit of a learning curve to figuring out the right texture and temperature of the cookie dough to get the best results, but once you nail it, it is SO satisfying to create these beautiful little works of art with zero effort. Aaaahhhhh.

Flavored Fillings
So the cookies are all well and good, but as we all know, it’s the cream filling that can really make or break a cookie, and that’s where I think traditional Oreos fall short. Their standard white (vanilla??) cream filling tastes like nothing. NOTHING! I’m not mad about the mint variety, and I’ve had a few other Limited Edition flavors that are pretty good, but in general, it’s pretty unexciting. We’re going to change all that.
I started with a basic buttercream, made extra-stiff so it could withstand being sandwiched between the cookies and not squishing out the sides. Then I divided it into 5 portions and flavored each one differently: vanilla bean, orange, lemon, raspberry, and mint chocolate chip. Obviously you don’t have to make all of these, or you could go rogue and make even more variations. I wanted to give you a good selection to choose from, and inspire you to start experimenting on your own!

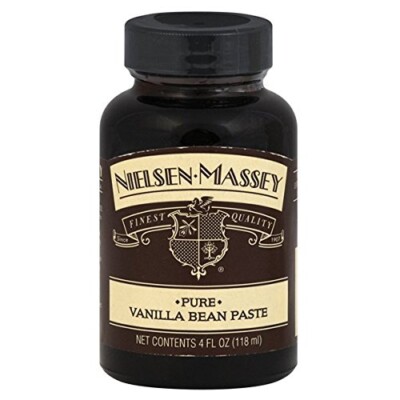
VANILLA BEAN HOMEMADE OREOS: Vanilla bean paste is a MUST for this variety. You can use just vanilla extract, of course, but snoooooooze. (If you’re going to do that you might as well work at the Oreo factory.) The paste adds a gorgeous vanilla flavor, strong but not overpowering, and beautiful flecks of vanilla bean seeds. It’s vanilla but not boring vanilla, if you catch my drift.

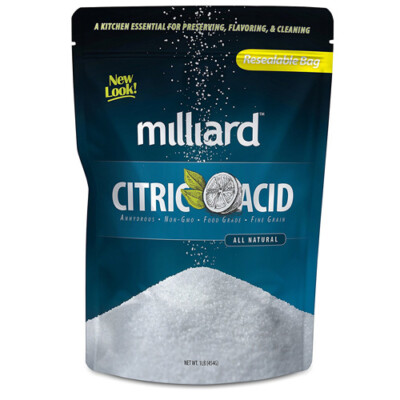
LEMON HOMEMADE OREOS: You’ll need lemon extract (I actually used lemon bakery emulsion), yellow gel food coloring, and—optional but HIGHLY RECOMMENDED—citric acid. Let’s talk about citric acid for a second. You can buy it online, or look for it at your local grocery store—it’s often found by the canning supplies, or sometimes by the bulk spices. It’s an ultra-potent sour powder, and it is my SECRET WEAPON for making realistic fruit flavors!
Think about it: lemon and orange extract do a good job of nailing the basic taste, but they’re missing that tangy ZIP that all citrus has. Just a pinch of citric acid will add that tartness and make the flavor so much more realistic. I use it for almost any fruit flavor, including berry flavors. A little goes a long way, and if you do it right, you won’t even notice it’s there—but you will definitely notice its absence, because your fruit flavors will fall flat. Citric acid is relatively cheap, lasts forever, and is also good for making sour candies, if you like that sort of thing.
Okay—lecture over—but seriously, buy some and try it!

ORANGE HOMEMADE OREOS: Not much to say here that I didn’t say with the lemon variety—just orange extract, orange food coloring, and a bit of citric acid!

RASPBERRY HOMEMADE OREOS: You’ll never guess…raspberry extract (again, I used bakery emulsion), pink food coloring, and…wait for it…citric acid! Yesssss.

MINT CHOCOLATE CHIP HOMEMADE OREOS: So I added citric acid…just kidding! This one had mint extract, a mix of yellow + green food coloring (always add a touch of yellow to give your mint desserts less of a grass-green color!) and finely chopped semi-sweet chocolate. Don’t tell the others, but this one is my favorite!

I loved how cheerful the different colors of Oreos looked, all assembled together, but even more than that, I loved how they TASTED. Each one was bright, and fresh, with a distinctive cream filling flavor that was anything but boring. I can’t wait to try this with even more flavors—coconut, almond, mocha, salted caramel…there are unlimited possibilities!
Do you have a favorite Oreo flavor? Which one would you want to try at home?
🖤 More Delish Oreo Desserts
- Oreo Fudge
- Oreo Milkshakes
- Oreo Peppermint Ice Cream Bonbons
- Mini Oreo Icebox Cakes
- Cookies and Cream Cake

Gourmet Homemade Oreos
Ingredients
For the Oreo Cookies:
- 7.8 oz all-purpose flour, (1¾ cups)
- 1.5 oz unsweetened cocoa powder, (½ cup) – black cocoa powder recommended,
- ¼ tsp salt
- 7 oz granulated sugar, (1 cup)
- 6 oz unsalted butter, (¾ cup), at room temperature
- 1 large egg
For the Buttercream:
- 8 oz unsalted butter, (1 cup), at room temperature
- 16 oz powdered sugar, (4 cups)
- ¼ tsp salt
- Assorted gel food coloring, in yellow, orange, pink, and green
- ½ tsp lemon extract
- ½ tsp orange extract
- ½ tsp mint extract
- ½ tsp vanilla bean paste, can substitute 1 tsp vanilla extract
- ½ tsp raspberry extract
- ½ tsp citric acid, optional, adds a great tart flavor
- .75 oz semi-sweet chocolate, finely chopped
Instructions
To make the Cookies:
- Sift together the flour, cocoa powder, and salt into a medium bowl.
- Cream together the butter and sugar in the bowl of a large mixer fitted with a paddle attachment. Add the egg, and mix until well-combined. Turn the speed to low and add the flour, mixing until just a few streaks of flour remain. Finish mixing the dough by hand, scraping down the bottom and sides of the bowl with a spatula.
- Roll out the dough between two sheets of parchment paper or waxed paper, until it is less than ¼-inch thick. Refrigerate the dough for at least 30 minutes, until firm.
- Preheat oven to 350°Line 2 baking sheets with parchment paper.
- Take the rolled dough, and use a small circular cutter to cut out 2″ circles of dough. If you have a cookie stamp, press it firmly into the top of each cookie to make an impression. If it is sticking, dust it lightly with cocoa powder in between cookies.
- Place the cookies on the backing sheets, and bake for 9 minutes, until they’ve slightly puffed up and lost the raw shine in the middle. Cool the cookies on the baking sheet for 5 minutes, then transfer them to a wire rack to cool completely.
- Take the scraps of dough, re-roll it, and cut out more circles. Repeat until all of the dough is used—you may need to chill it briefly until it’s firm enough to work with again. You should get about 48 cookies from this recipe.
To Make the Buttercream and Assemble:
- Combine the butter, powdered sugar, and salt in the bowl of a large stand mixer fitted with a paddle attachment. Mix on low speed until the powdered sugar is moistened, then turn to medium speed and mix for 1-2 minutes, until it has a lighter color and fluffy texture. Don’t over-mix, because the more you mix, the more air you’ll beat into the buttercream, and the softer it will be. It still needs to be somewhat firm so it doesn’t squish out the sides of the cookie.
- Divide the buttercream equally into 5 portions—each one will be a little less than a cup of frosting. Make the following flavors: VANILLA BEAN: stir the vanilla bean paste into the frosting. LEMON: lemon extract, 1/8 tsp citric acid, and 1-2 drops lemon yellow food coloring. ORANGE: orange extract, 1/8 tsp citric acid, and 1-2 drops orange food coloring. RASPBERRY: raspberry extract, 1/8 tsp citric acid, and 1-2 drops pink food coloring. MINT CHIP: mint extract, 1 drop yellow coloring, 1-2 drops green coloring, and the finely chopped chocolate.
- Spread a generous tablespoon of frosting on top of a cookie, and press down with a second cookie until the frosting spreads out to the edges. Repeat until all of the cookies are assembled. Gourmet homemade Oreos can be stored in an airtight container at room temperature for 4-5 days, or in the refrigerator for up to two weeks.
Recipe Notes
Measuring Tips
Our recipes are developed using weight measurements, and we highly recommend using a kitchen scale for baking whenever possible. However, if you prefer to use cups, volume measurements are provided as well. PLEASE NOTE: the adage “8 oz = 1 cup” is NOT true when speaking about weight, so don’t be concerned if the measurements don’t fit this formula.
Want to learn more about baking measurements and conversion?
Nutrition
Recommended ingredients and tools:


Maybe i didn’t roll them thin enough but mine don’t taste like oreos Great shout on the flavoured filling though, mint choc chip is yum!
Hey Suzanne, I am so glad to hear it was good! I appreciate your feedback!
These are amazing!! Thank you. I made them gluten and dairy free (Cup 4 Cup gf flour blend and dairy free spread) and they turned out wonderful (just don’t slightly flatten these as the spread helped them flatten out by themselves)
Wahoo! I am so thrilled to hear that! Thanks for the review, Mary, and for the gf and dairy free tips! 🙂
This post is fantastic! I can’t way to try these. Thanks for all the filling variations.
Hey Laura, I am so glad to hear you enjoy it so much, Thank you! I would love to hear how it goes once you give it a try!
Very good cookies. I think I will mix the black cocoa half and half with Dutch processed for a slightly more complex flavor. I also got quite a few more cookies out of it than the recipe states. I may try adding Baker’s dry milk to create a stiffer center. Enjoy!
Thanks for the great feedback! I’d love to hear how it goes with the dry milk–I’ve been meaning to revisit this recipe and tweak the filling to make it a bit thicker. Keep us posted!