


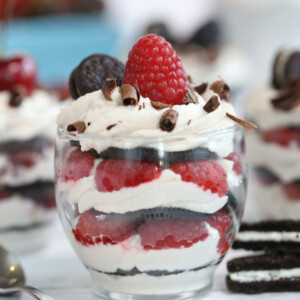
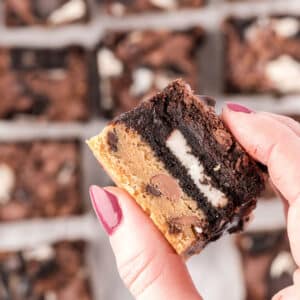
Mini Oreo Icebox Cakes are a simple, no-bake dessert, perfect for hot days when you don’t want to turn on the oven. Oreo cookies, whipped cream, and fresh berries are all you need to make this quick and easy dessert!

❣️ The Cutest Oreo No-Bake Cakes
Icebox cakes, also known as no-bake cakes, are the lazy baker’s best friend. Craving a rich, creamy, cake-like dessert but also craving quality TV-and-couch time? Icebox cakes to the rescue!
With just a handful of easy-to-find ingredients, you can throw together an icebox cake in 10-15 minutes, and have plenty of time left afterwards to binge watch an entire season of Nailed It.
These cakes are incredibly simple to make, so they’re great for when you’re short on time or cooking with kids. But unlike some quickie recipes, they don’t taste like you took any shortcuts, and they’re fabulously rich and satisfying–not to mention adorable!

🤔 What the Heck is An Icebox Cake?
Icebox cakes came to prominence in the 1930’s and 40’s, when refrigerators (or “iceboxes,” in old-timey lingo) became more common in the average household. Packaged convenience foods like graham crackers were gaining popularity at the same time, and icebox desserts were the perfect way to make use of both refrigerators and quickie ingredients.
The two main components in an icebox cake are:
- thin, crunchy cookies
- a moist frosting, like whipped cream or cream cheese frosting
The cookies and cream are layered together, then left to sit overnight in a refrigerator. The cookies soak up the moisture from the cream, and magically the crispy cookies transformed into soft, delicious cake layers.
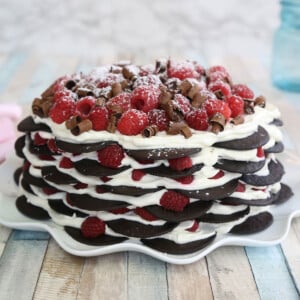
Icebox cakes are most traditionally made in the shape of a round or rectangular cake, and cut into slices to serve. (My Chocolate Raspberry No-Bake Cake is a perfect example!) But they work equally well in smaller serving sizes, and mini cakes have the added advantage of looking cute and helping with portion control, if you’re into that sort of thing. Make them in nice glasses or ramekins for parties, in lidded jars for picnics, a delicious Chocolate Bowl–or in any small containers you have on hand!

🧾 What You’ll Need
Ingredients
For these mini cakes, you’ll need just a few things. Check out these helpful ingredient tips as you gather everything you’ll need. Find full ingredient amounts in the recipe card below. (Links are affiliate links and I earn a small commission from qualifying purchases.)
- Oreos: You only need the cookie portion of the Oreos–the cream part is scraped out and tossed (or eaten… I won’t tell). You can use whole Oreos, but the sweetened filling combined with whipped cream in the cake is too much sugar for most people. Alternately, you can swap in Oreo Thins or chocolate wafer cookies, if you’re able to find them.
- Cream cheese: Use full-fat cream cheese (do not use low-fat). Bring it to room temperature before getting started.
- Powdered sugar: To sweeten and thicken the cream filling.
- Heavy cream: Make sure you buy heavy cream or heavy whipping cream, which has more fat than light whipping cream. More fat means a more stable, more flavorful whipped cream. I like to use manufacturing cream, which has even MORE fat, around 40%, and makes a gorgeously thick, rich whipped cream. I find it at Costco or Smart & Final.
- Vanilla extract: I love this Madagascar Bourbon Vanilla by Nielsen Massey!
- Fresh berries: I like an assortment of different berries in my mini cakes (another advantage to making lots of little ones instead of one big cake!). There’s really no wrong way to make these, so just use whatever is fresh and seasonal where you live!
- Garnishes: If you like being extra fancy, try topping your no-bake cakes with optional garnishes like chocolate shavings, extra fresh fruit, and mini Oreos.

Equipment
You really don’t need much to make these. Feel free to improvise if you don’t have the suggested equipment. (Links are affiliate links and I earn a small commission from qualifying purchases.)
- Mixer: You can use a stand mixer or hand mixer to whip up the creamy filling.
- Half-cup glasses or jars: This recipe will make twelve (4 oz) mini cakes. It’s best to use a clear dessert glass, but don’t stress if you don’t have anything seethrough. They will taste delish no matter how you serve them.
- Piping bag and tip: I think it’s easier (and prettier!) to pipe the cream filling into the cups. Use a piping bag fitted with a large closed star piping tip to make a pretty swirls.
❤️ More No-Bake Desserts


Leave a Review!
If you make this recipe, let us know! Leave a ⭐️⭐️⭐️⭐️⭐️ rating on the recipe below, and leave a comment, take a photo and tag me on Instagram @elabau, or use #sugarhero on IG!
Mini Oreo Icebox Cakes Recipe
Ingredients
- 18-24 Oreo cookies
- 6 oz cream cheese, at room temperature. (Do not use low-fat)
- 2 oz powdered sugar, (1/2 cup)
- 2 cups heavy cream
- 1 tsp vanilla extract
- 3 cups fresh berries, like strawberries, raspberries and blackberries, coarsely chopped
- Garnishes, chocolate shavings, fresh fruit, mini Oreos, optional
Instructions
- Prepare Oreos: Twist apart the Oreo cookies. Scrape out the frosting and discard it (or eat it!).
- Mix cream cheese and powdered sugar: Combine the cream cheese and powdered sugar in the bowl of a large stand mixer fitted with a whisk attachment. Mix them together until the mixture is smooth and creamy, without any lumps.
- Add heavy cream and vanilla: Stop the mixer and add the heavy cream and vanilla extract. Whip on medium to medium-high speed until the cream is dense and thick and holds firm peaks when you remove the whisk.
- Pipe cream filling into dessert glasses: Transfer the whipped cream to a piping bag fitted with a large star tip. Pipe a dollop of cream on the bottom of twelve ½-cup glasses or jars.
- Add Oreo layer: Place an Oreo cookie on top of the cream, and press down gently to embed it in the cream. Depending on the size of your glasses, you may need to break apart a second cookie to fill in any blank spaces around the edges—just try to fill in all the space with a single layer of cookies
- Pipe second layer of cream and top with berries: Pipe a swirl of whipped cream on top of the cookie layer, then press chopped fresh berries into the whipped cream.
- Add second layer of cookies, repeat until cups are filled: Add a second layer of cookies on top of the berries, and repeat this process until you’ve reached the top of the cup.
- Finish icebox cakes: Finish with a final swirl of whipped cream on top. Add any additional garnishes you’d like—I used chocolate curls, fresh berries, and mini Oreo cookies.
- Chill: Refrigerate the icebox cakes for at least 4-6 hours to soften the cookies, then serve and enjoy!
- Storage: For the best taste and texture, keep refrigerated and enjoy within 2-3 days. You can also freeze your icebox cakes: let them sit overnight, then wrap them very well in cling wrap or freezer bags, and freeze for up to a month. Defrost in the refrigerator overnight, then enjoy the next day. (The sliced frozen berries will likely weep and become mushy upon defrosting. I recommed only layering the cookies and cream together when freezing. Leave space at the top to add fresh berries later, once the cakes have defrosted.)
Video

Recipe Notes
Measuring Tips
Our recipes are developed using weight measurements, and we highly recommend using a kitchen scale for baking whenever possible. However, if you prefer to use cups, volume measurements are provided as well. PLEASE NOTE: the adage “8 oz = 1 cup” is NOT true when speaking about weight, so don’t be concerned if the measurements don’t fit this formula.
Want to learn more about baking measurements and conversion?
Nutrition
💡 Tips for Success
Making Perfect Whipped Cream
Because whipped cream is such an intrinsic part of this recipe, it’s important to make it properly! Whipped cream seems like it should be a no-brainer (after all, the name is basically the recipe!), but there are some steps you can take to ensure successful whipped cream, every time.
- Avoid light whipping cream. For the best results, use heavy cream or heavy whipping cream, not light whipping cream.
- Keep it cold. Use cream straight from the refrigerator, and chill the mixing bowl and beaters for at least 15 minutes before you use them. Cold ingredients and tools produce a more stable whipped cream.
- Stabilize your whipped cream. Why do I keep talking about “stable” cream? Because there’s nothing worse than whipped cream that is too runny, or that has separated! It doesn’t look good, or taste good, and it will ruin your icebox cake, too. Stability is KEY to success, so to stabilize the cream in this recipe, I mix in a little cream cheese at the very beginning. You can’t really taste it in the final product, but it makes a really thick, gorgeously textured cream.

❓ FAQs
Berries are great because their natural juices work well in icebox cakes, but there are many different fruits you can use. Sliced bananas go well with graham crackers and vanilla bean whipped cream, while sliced and diced mangoes give a nice tropical twist. Try stone fruits like peaches, nectarines, or plums, or go for a fall vibe with sauteed apples. Anything juicy and not too acidic is perfect!
There are lots of possibilities when it comes to no-bake cake ingredients. The most common cookies are probably either chocolate wafers or graham crackers, but any thin, crunchy cookie or sweet cracker should work. Gingersnaps, sugar cookies, vanilla wafersu002du002deven crunchy chocolate chip cookies or crunchy oatmeal cookies are delicious!
Plain cakes, with just whipped cream and cookies, will keep for up to 5 days in the refrigerator. Because of the addition of the sliced fresh berries in this recipe, the shelf life on these is more like 2-3 days. After that time, the taste and texture of the berries suffers.
Yes! Here’s how to freeze your icebox cakes: let them sit overnight in the refrigerator so the cookies can absorb maximum moisture, then wrap them very well in cling wrap/freezer bags, and freeze for up to a month. Let them defrost in the refrigerator overnight, then enjoy the next day.
Note that the sliced berries will probably weep and become mushy upon defrosting, so if you know in advance you want to freeze these, I recommend only layering cookies and cream together, and leaving space at the top to add fresh berries later, once the cakes have defrosted.


What can I use instead of International Delight OREO creamer? I cannot get this where I live.
Janet Schager
Hi Janet, you can replace it with an equal amount of heavy cream.
We love Oreos and these little individual desserts look adorable! Definitely putting these together soon!
What a simple and delicious treat! These were so easy to make and so tasty. Thanks for sharing!
Thanks, Angela, I’m so glad to hear that you liked them!
Such a fun and gorgeous dessert! My kids loved it!
Thanks Toni, I’m so glad to hear it was a hit with your kids!
These look out of this world tasty! Can’t wait to make these! They will be a big hit here at the house! So excited!
Thank you, Beth! I hope your family loves them!
We are into individual desserts in our house because everyone HAS to have equal proportions, so this is perfect! Especially love that it’s no bake!
Haha, YES! Totally forgot that key point! My kids are crazy detectives when it comes to figuring out what’s “fair.”
This oreo icebox cake looks like the perfect summer dessert!
Thank you, Scarlet! We eat them year-round, but it definitely shines in summer when it’s way too hot to cook. 😀
How far ahead can these be made? I’d like to do them a day ahead (or more) if possible.