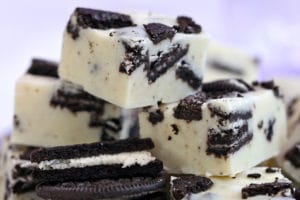
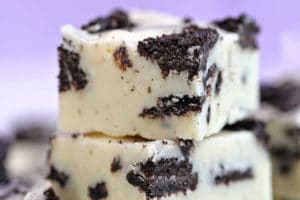
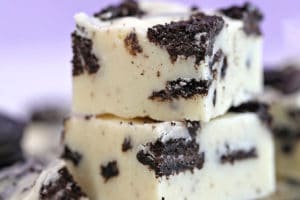
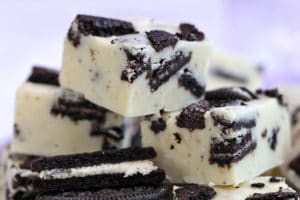
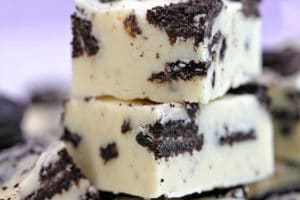


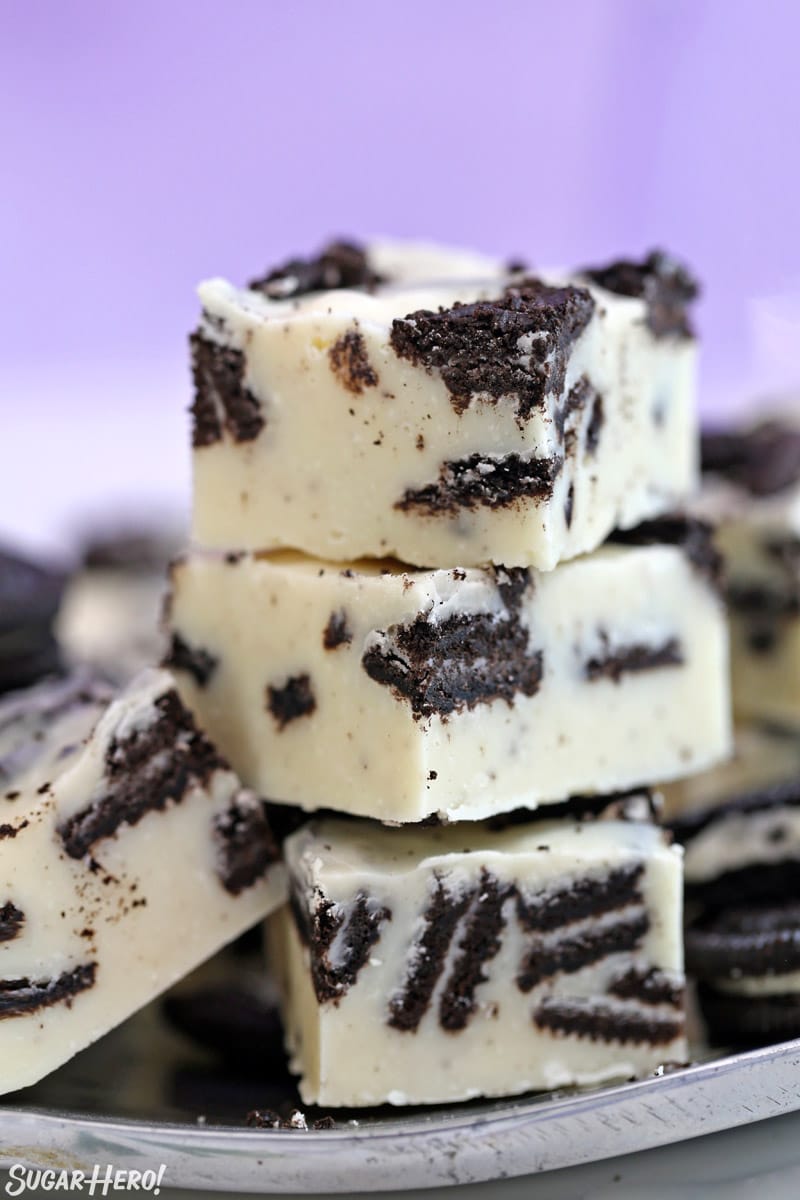
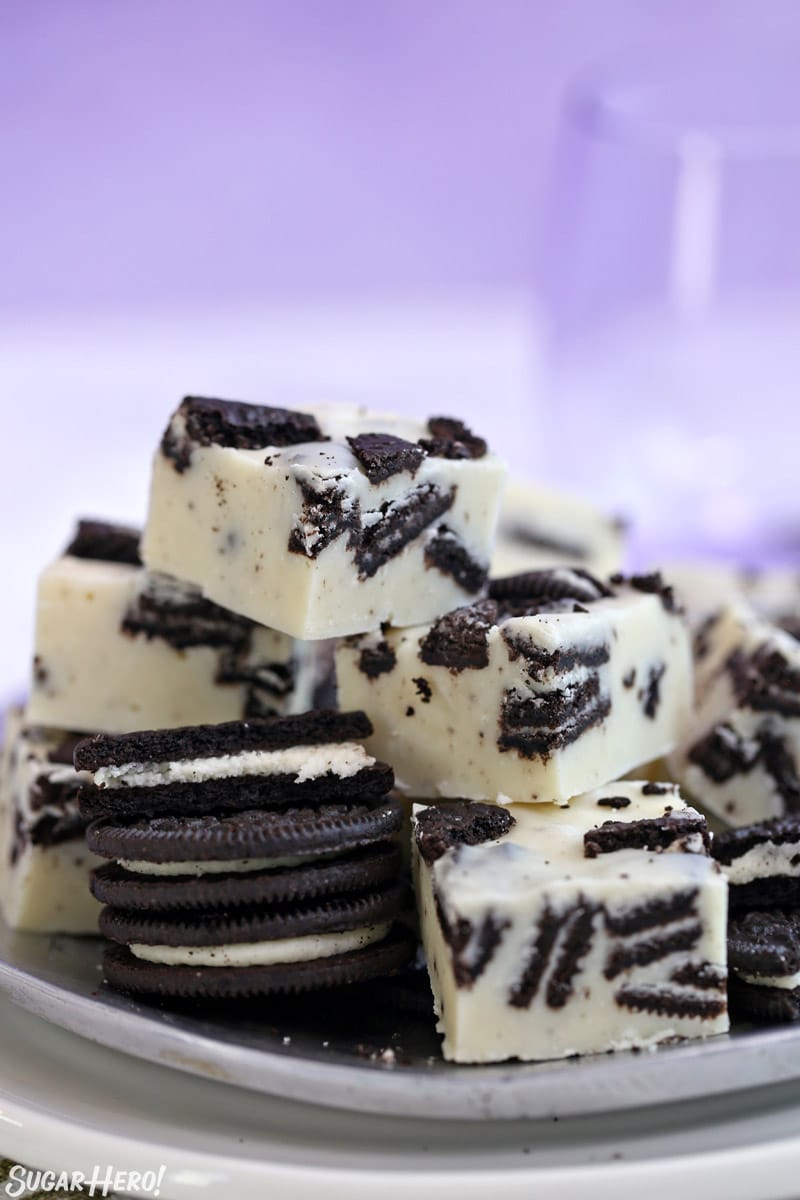
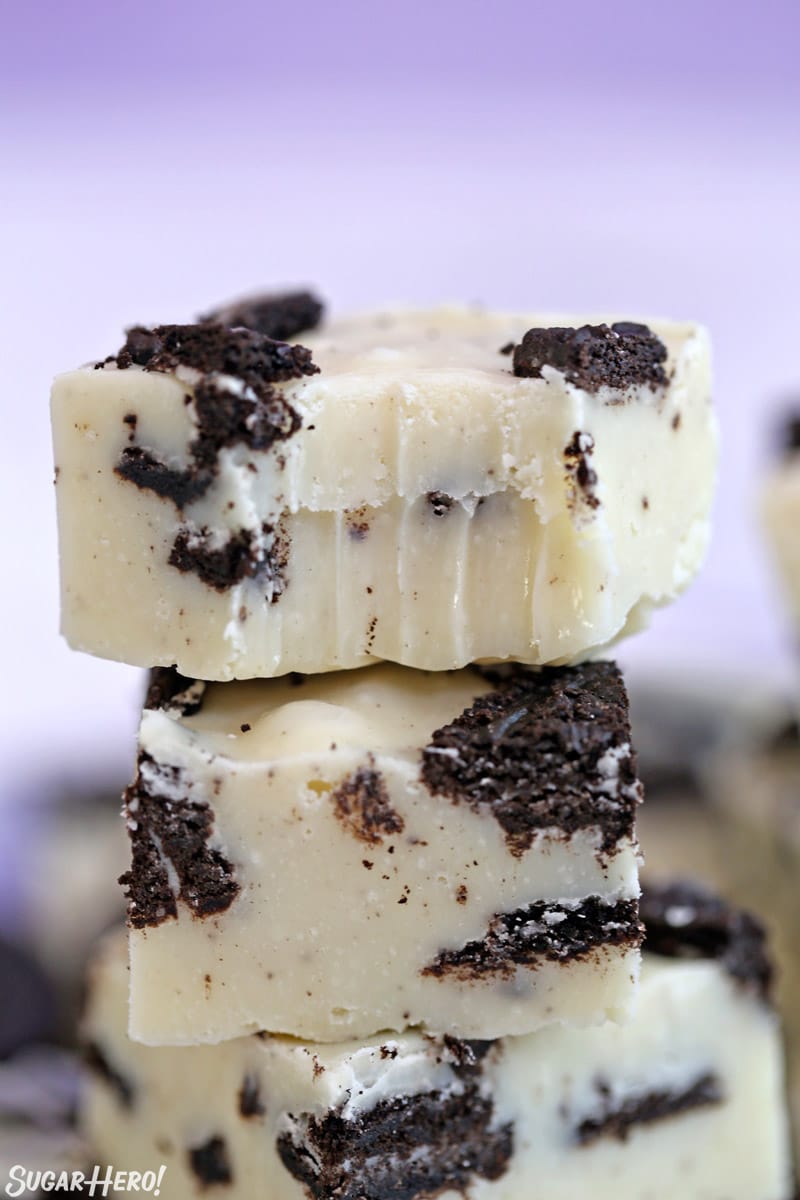
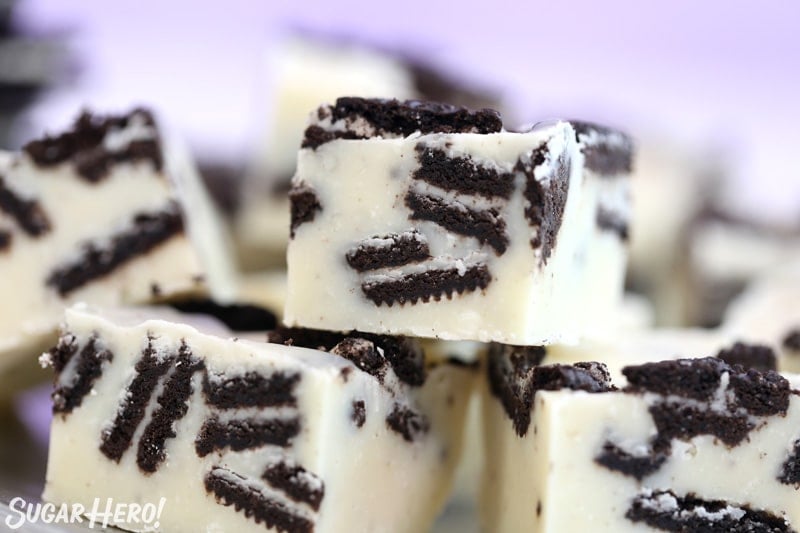
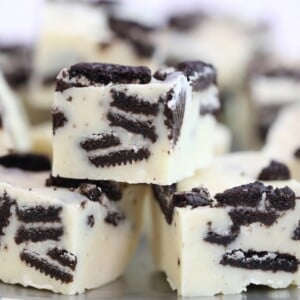
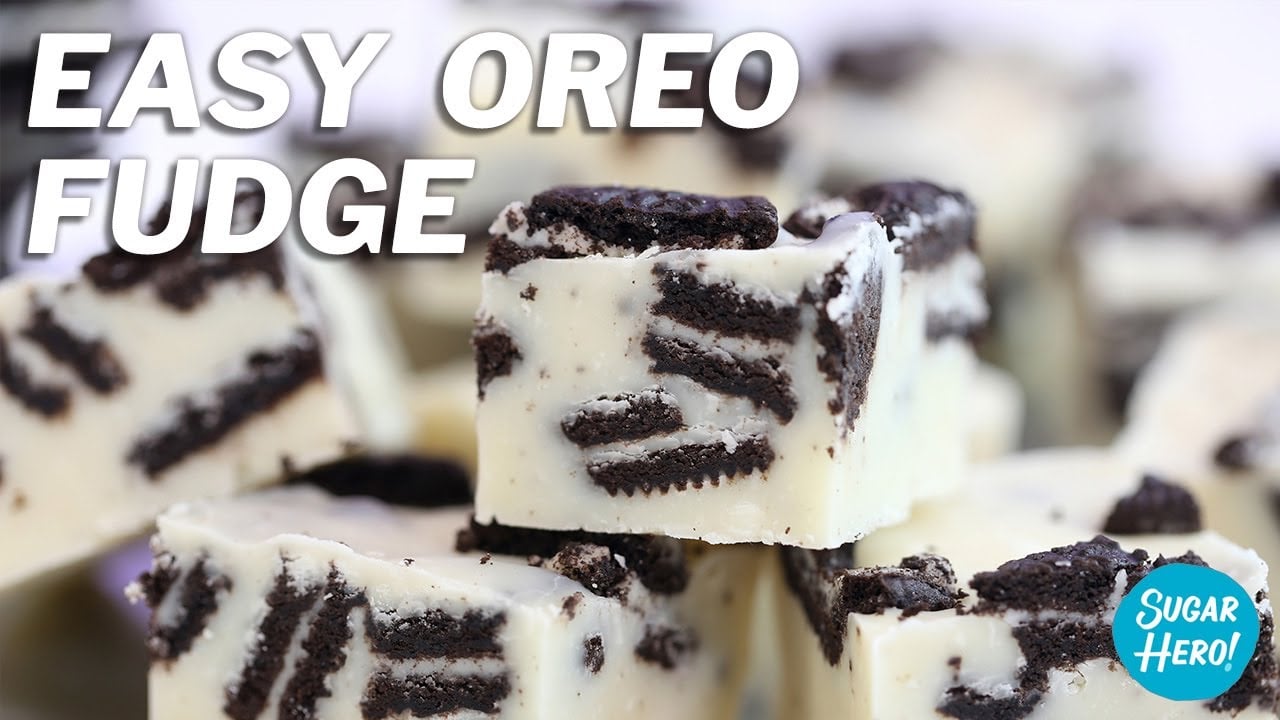
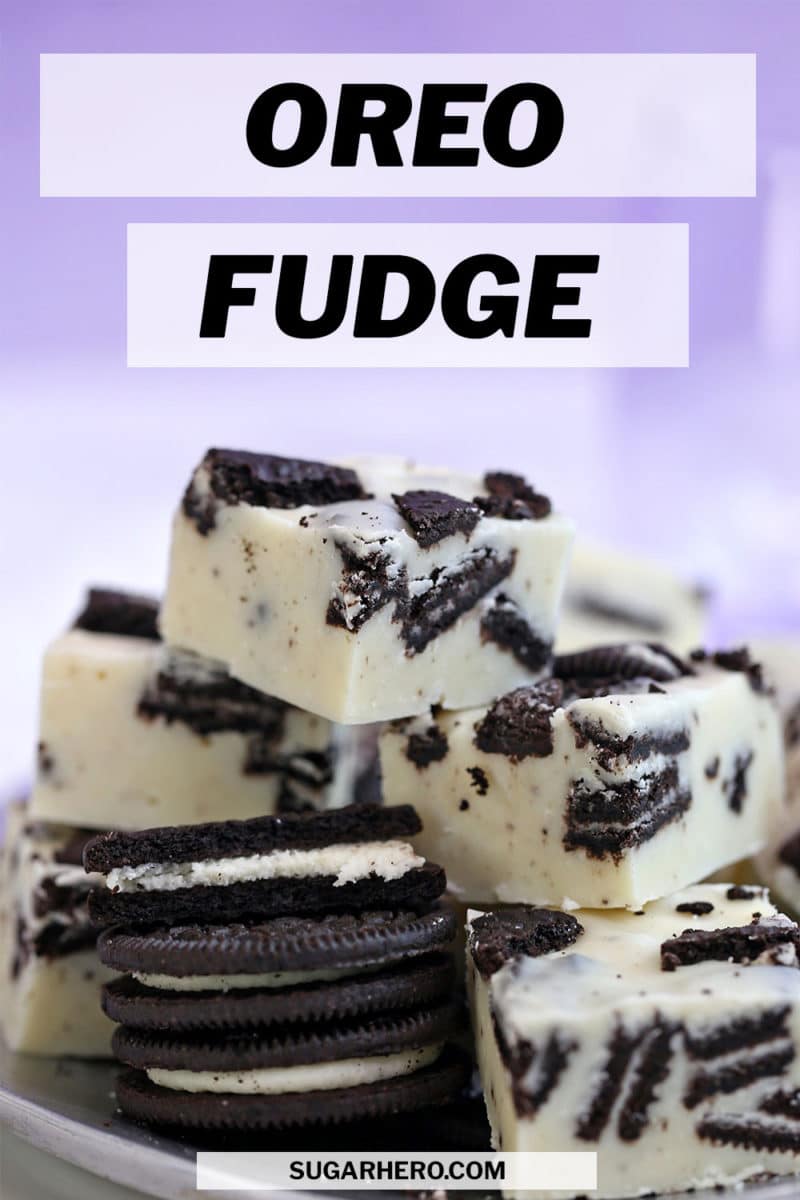
Like Oreos? Like white chocolate? Then you are going to LOVE this Oreo Fudge! The smoothest, creamiest, packed-full-of-cookies-est fudge you’ll ever taste. Best of all, you can make it in 5 minutes!
Oreo Fudge- A Cookies and Cream Filled Dessert
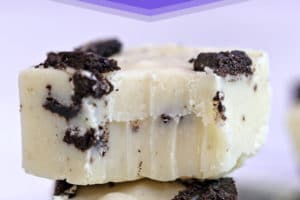
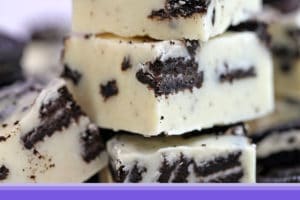
Oreo fudge is a cookie and fudge lover’s dream come true! This fast & easy microwave fudge is the perfect marriage between creamy white chocolate and crunchy Oreo cookies. You don’t need a special occasion to make up a batch of this cookies and cream goodness!
This fudge is a variation of my Easy Microwave Fudge, swapping in white chocolate for the semi-sweet chips, and adding big handfuls of chopped Oreo cookies. I usually find plain white chocolate fudge a bit boring and sweet for my tastes, but I LOVE the addition of Oreo cookie pieces! Don’t miss the Variations section below for more ways to customize this recipe, and please drop a comment if you come up with your own twist on this fudge!
If you’re nuts for homemade candy and fudge, don’t miss my other fudge recipes like Peanut Butter Cup Fudge, Pumpkin Fudge, and Dirty Coke Fudge! Do you prefer hard candy? Try my Breaking Bad Candy Recipe, Easy Homemade Lollipops, and Candy Cane Cups! And, don’t forget about TRUFFLES! Check out Marbled Easter Egg Truffles, Champagne White Chocolate Truffles Recipe, and Rosemary Raspberry Truffles! Too many candy options said no one ever!
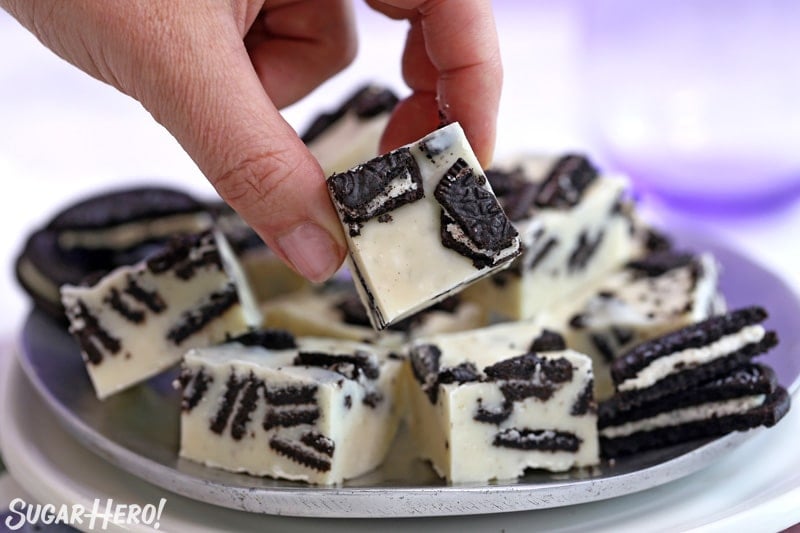
Table of Contents
🧾 What You’ll Need
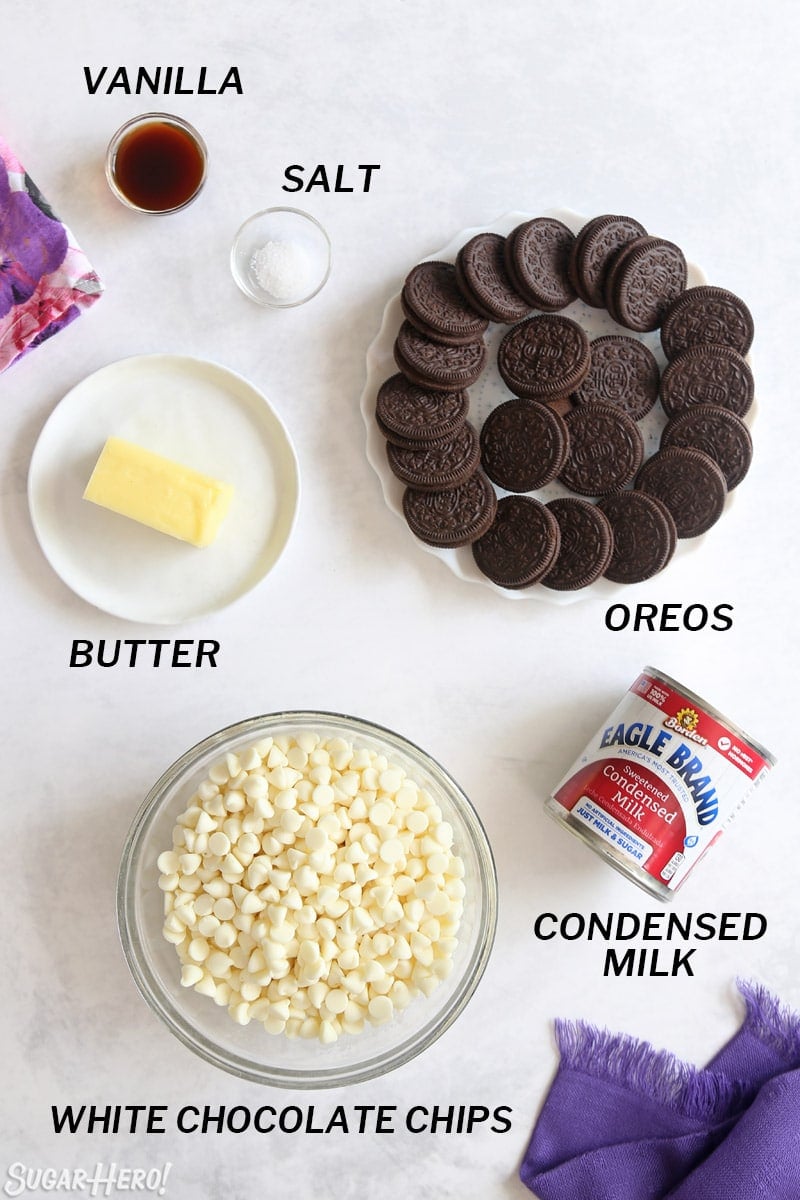
Ingredients
One of the best parts of this recipe is that it’s fast & easy to make when you’re in a rush or baking with kids. Part of what makes it so simple is that you probably have most of the ingredients you need on hand. This is especially true if you do a lot of baking (like me) and have a sweet tooth (also like me).
- Chocolate sandwich cookies: Sure, you can use any old chocolate sandwich cookie, but I’m an Oreos purist. You could even make your own Oreos if you’re looking to level up your fudge. Other cookies work as well: Biscoff, shortbread, and crunchy chocolate chip cookies are all good choices.
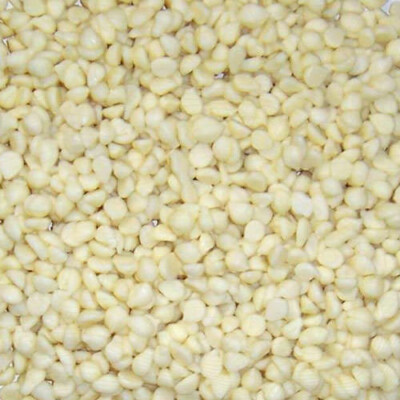
- White chips: Just so I’m clear, white chips are not white chocolate chips. The main difference is the white chips don’t contain cocoa butter, which can make the fudge softer. You can use any brand of white chips you want, like Nestle, Guittard, and Ghirardelli, or you can substitute almond bark or chopped white chocolate bars.
- Sweetened condensed milk: No substitutions here! You really need the combination of sugar, text, and milk solids from the sweetened condensed milk to make the fudge come out right.
- Butter: Butter makes everything better! In this recipe, it adds fat (= creamier texture) and it shouldn’t be omitted. You can use salted or unsalted butter, but if you use salted, consider reducing the amount of added salt, at least until you’ve had a chance to taste the fudge mixture.
- Salt: Salt is candy’s best friend! It keeps this fudge from being too one-note and cloying. I recommend using kosher salt. If you are using table salt, only use half the amount in the recipe–table salt is much saltier.
- Vanilla: Vanilla extract gives the fudge a similar flavor to the cream you find in the cookie sandwiches. But don’t limit yourself to JUST vanilla. Experiment with different extracts and pair them with different flavors of Oreos. Mint extract + mint Oreos is one of my favorite combos!
Equipment
You really don’t need specialized equipment to make the white chocolate oreo fudge. Here’s what I use in the recipe to get you started: (Links are affiliate links and I earn a small commission from qualifying purchases.)
- Microwave: Chances are great that you already have a microwave. (And if not, I have suggestions down below for making this on the stovetop!) I recommend cooking this fudge at 50% power in your microwave, so before you begin, brush up on your particular model to make sure you know how to change the power setting.
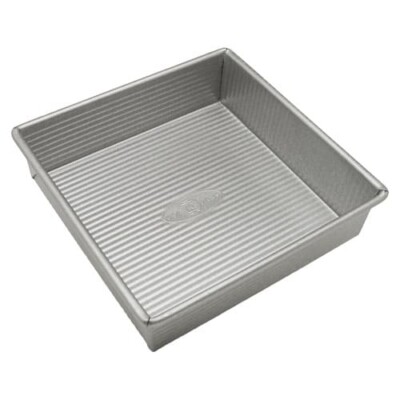
- 8×8-inch pan: I typically make this fudge in a square 8×8-inch cake pan, but you can make it in a 9×9-inch pan if you want a thinner fudge.
- Microwave safe bowl:Nothing too fancy here, just a bowl that doesn’t get too hot when you microwave it and doesn’t cause it to catch fire either. Both good things! I own and love this pretty, sturdy glass set.
- Parchment paper or foil: Take your pick, you can use either to line the pan with, just use whatever you have on hand.
📋 Instructions
Here’s a quick overview showing how to make Oreo Fudge. Full printable instructions are included in the recipe card down below.
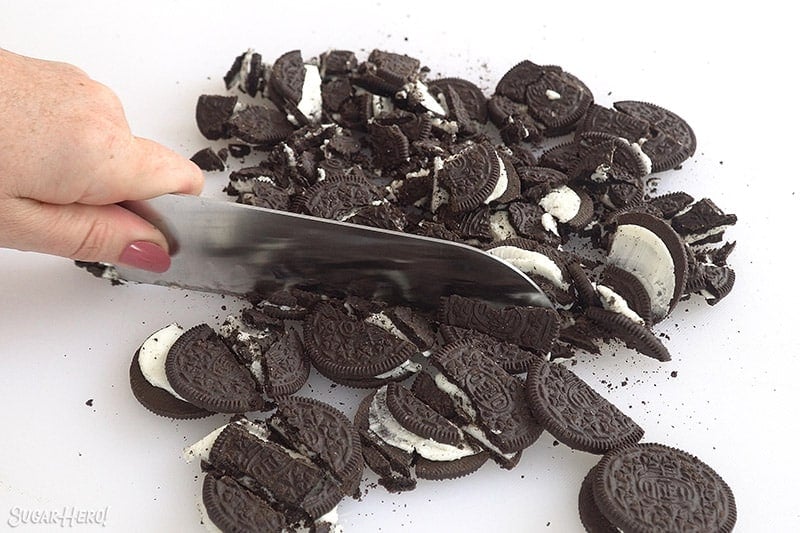
Chop up your Oreos
- Gather your cookies, and use a large sharp knife to chop them into small pieces. It’s okay if you have some crumbs and some medium pieces too. Separate out about 3 TBSP of chopped Oreos to use for the topping, then set all the cookies aside momentarily.
Combine ingredients and start melting
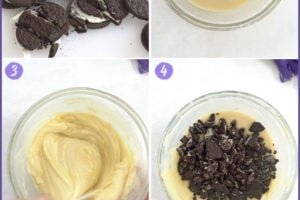
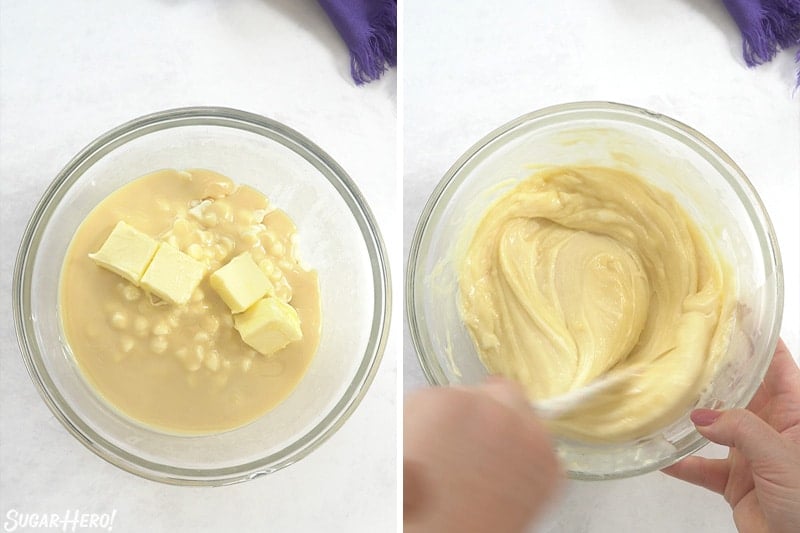
- Combine the white chips, condensed milk, and butter in a large microwave-safe bowl. Microwave at 50% power for 30 seconds. I recommend 50% power because this fudge works best if the white chocolate is melted gently and gradually. If you don’t know how to change the power setting on your microwave, shorten the cooking time and stir frequently so you don’t end up with “hot spots” or scorched bits in your fudge.
- After 30 seconds, stir the mixture well. At this point, the butter and chips will have started to melt, but you will still have a lot of unmelted chips in the bowl.
- Keep microwaving and stirring, until everything is well-melted and smooth. Depending on your microwave, this will probably take 2-3 minutes. If all of the chips are melted, but the mixture looks broken or chunky, heat at low power for 15 to 20 seconds and continue to stir until it becomes smooth.
Add the Oreos!
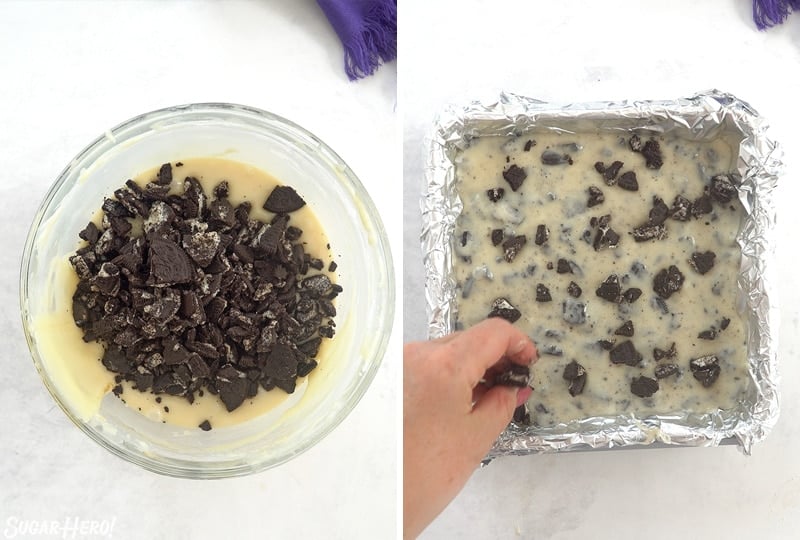
- Once the fudge is melted and smooth, add the vanilla extract and salt, and stir well. Then add the cookies! Stir in most of the chopped Oreos (except the ones you set aside for the topping) and mix well.
- Scrape the fudge into a square 8×8-inch pan lined with foil or parchment. Scatter the remaining Oreo pieces on top, and press down gently to embed them in the fudge.
- Let the fudge set completely.
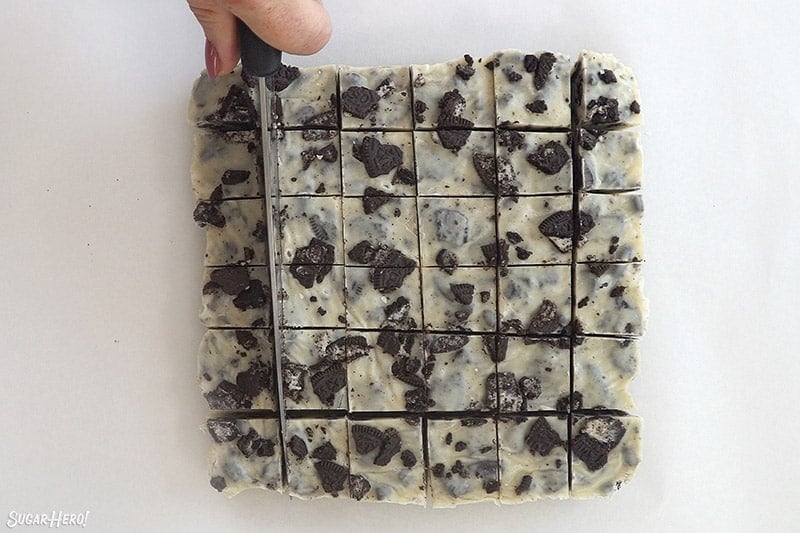
Cut and serve
Once the fudge is completely set, use a large sharp chef’s knife to cut it into small pieces to serve. I periodically run my knife under hot water, then wipe it off, to get the cleanest cuts.
💭 Variations
You have lots of choices when it comes to making this cookies and cream fudge your own! Try one or more of these ideas:
- Experiment with Oreo flavors. Oreo makes quite a few different flavors and varieties. Sure, some are seasonal, but that just means there’s more excuses to make fudge! From red velvet to carrot cake to coconut, there’s an Oreo for every mood and every fudge.
- If you’re a cream filling lover, try the Double Stuffed or Mega Stuffed Oreos.
- Use other cookies: Milanos, vanilla wafers, shortbread, Biscoff, or other crunchy cookies are a great choice.
- Get creative with extracts. You don’t need to stick to only vanilla. Lemon, orange, almond, coconut, or mint all make delicious fudge flavors.
💡 Tips and FAQs
Oreo Fudge on the stovetop
The stove top directions for this recipe are super simple. You take the same ingredients, butter, chips, and condensed milk and stir them together in a heavy bottom saucepan set over medium-low heat.
It’s very important to use a heavy pot because it helps regulate the heat and prevent the ingredients from burning. Also, make sure you stir it frequently to avoid scorching your fudge. Once it is melted, you can stir in the vanilla extract, salt, and then Oreos.
Using chopped white chocolate instead of chips
Real white chocolate often has the best flavor and texture, but because quality and fat content varies so much between brands, it can be a bit tricky to give a definitive, will-work-for-everyone recipe using real white chocolate! This recipe calls for white chips, which are different from white chocolate. You can substitute real white chocolate chips or chopped white chocolate bars (my favorite is Lindt) in this recipe.
The cocoa butter in real white chocolate usually makes the fudge softer, so you’ll either need to keep it refrigerated or increase the amount of white chocolate to 20 or even 22 ounces.
How to store Oreo Fudge
If you can’t eat all the fudge at once, I can’t blame you! It’s super rich and filling. Extras can be stored in an airtight container at room temperature for up to a week. To keep them longer, you can place them in the refrigerator for up to 3 weeks.
As it ages, the fudge will slowly dry out, so be sure to wrap it well if you are planning on storing it for an extended period of time. If you KNOW you’re making it well in advance, keep it in one block rather than cutting it into squares, to help it stay fresher.
🖤 More Oreo desserts
You really can’t go wrong with Oreo or cookies and cream flavored desserts. Some of my other favorites are:
- Oreo Cookie Christmas Ornaments
- Oreo Peppermint Ice Cream Bonbons
- Mini Oreo Icebox Cakes
- Gourmet Homemade Oreos
- Cookies and Cream Cake
- Oreo Brookies

Easy Microwave Fudge
Dirty Coke Fudge
Don’t miss the step-by-step tutorial showing how to make Oreo Fudge – check out the web story here!
Leave a Review!
If you make this recipe, let us know! Leave a ⭐️⭐️⭐️⭐️⭐️ rating on the recipe below, and leave a comment, take a photo and tag me on Instagram @elabau, or use #sugarhero on IG!
Oreo Fudge
Ingredients
- 18 chocolate sandwich cookies, like Oreos, (approx 7 oz)
- 18 oz white baking chips, (3 cups), can substitute almond bark or chopped white chocolate
- 14 oz sweetened condensed milk, (1 can)
- 2 oz unsalted butter, (4 TBSP)
- 1 tsp vanilla extract
- 1/2 tsp salt
Instructions
- Line an 8×8-inch square pan with parchment or aluminum foil extending up the sides. Spray lightly with nonstick cooking spray.
- Chop the Oreo sandwich cookies until they are in small pieces. Set aside about 3 TBSP of chopped Oreo pieces for the top of the fudge.
- Combine the white chips, condensed milk, and butter in a large microwave-safe bowl. Microwave at half power for 30 seconds.
- After 30 seconds, stir well. At this point, the butter and chips will have started to melt, but you will still have plenty of unmelted chips in the bowl.
- Continue to microwave the fudge in 30-second increments at half power. Stir well after every 30 seconds. Depending on your microwave, it will most likely take about 2 minutes of total heating time to melt everything.
- If all of the chips are melted but the mixture looks broken or chunky, heat at low power for 15-20 seconds and continue to stir until it becomes smooth.
- Once the fudge is melted and smooth, add the vanilla extract and salt, and stir well. Then add most of the chopped Oreos except the ones that were set aside.
- Immediately scrape the fudge into the prepared pan and smooth it into an even layer. Take the reserved Oreo pieces and sprinkle them over the top, pressing in gently so they adhere to the fudge.
- Refrigerate the fudge until set, for about 2 hours. Once set, cut into 1-inch squares and serve at room temperature.
- Extras can be stored in an airtight container at room temperature for a week, or in the refrigerator for up to 3 weeks. It will gradually dry out, so be sure to wrap it well if you are planning on storing it for an extended period of time.
Video
Measuring Tips
Our recipes are developed using weight measurements, and we highly recommend using a kitchen scale for baking whenever possible. However, if you prefer to use cups, volume measurements are provided as well. PLEASE NOTE: the adage “8 oz = 1 cup” is NOT true when speaking about weight, so don’t be concerned if the measurements don’t fit this formula.
Want to learn more about baking measurements and conversion?
Nutrition


This was absolutely delicious! Loved every bite!
Thank you Liam, I’m so glad to hear that!
My kids are going to love this fudge. They adore Oreos and white chocolate!
Yesssss! Your kids and I have that in common. 😀 Let us know how it turns out!
my grandson just flipped over this photo so I am making them today!! THANK this sounds easy and looks fabulous! He also wants me to top the fudge with his favorite sprinkles! THANKS SO MUCH!!
Yay! I love that idea! What a cutie your grandson is. Bon appetit!
My kids love Oreo. I can’t wait to surprise them with this fudge. Thanks for sharing the recipe. Looks extra delicious and it’s easy to make. Win!
Thank you Natalie–you have some lucky kids! 🙂
This fudge looks great and very yummy! We love fudge here and this one looks great. So excited to make this with my daughter soon! This is going to be a hit!
I hope you guys love it!
I have been looking for the perfect fudge to add to my current collection of fudge recipes. I have found it with this easy Oreo fudge and my family and friends are going to love getting this in their gift baskets this Christmas!!
omg I love that! Thank you Sherry, I’m so glad to hear it was a hit and I love the idea of adding it to Christmas goodie baskets!
Looks delicious! Can’t wait to try it.
Let us know what you think!
This looks wonderful. Does it freeze alright?
Hi Larissa! Yes, this fudge should freeze just fine. I would recommend freezing it in a large block (or several large blocks if you need to break it up for freezer space–it’ll stay freshest if it’s not cut into a bunch of small pieces. Wrap it tightly with plastic wrap, then put it in a freezer-safe ziploc bag or container. To defrost it, keep it wrapped and let it sit on the counter at room temp for a few hours, this should help prevent a lot of condensation from forming as it defrosts. Hope this helps!
What is not to like about this delicious fudge??? From the first time I made this, it has become my familys favorite fudge. They just love it. I always have to make a double batch when I make this one. What a great idea you have here…
Thank you Donna!! So glad that are enjoying the recipe. I love how easy it is to make! Thanks for leaving a recipe rating, too. All the best to you!