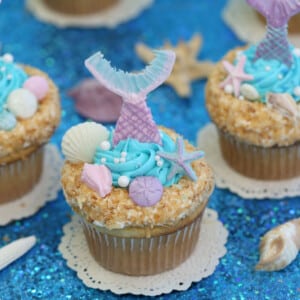
Mermaid Cupcakes are gorgeous cupcakes inspired by the ocean and the magic of mermaids! Cupcakes of your choice are decorated with toasted coconut “sand”, edible mermaid tails, sugar pearls, and shimmering chocolate seashells.


I was never a mermaid-obsessed girl. Looking back, I have trouble remembering exactly what was on my pencil cases and Trapper Keepers, but I’m pretty sure it wasn’t mermaids or ponies or Lisa Frank rainbow-dipped puppies. I liked The Little Mermaid just fine, but most of the time I could take or leave those weird half-fish ladies.
But mermaid desserts? This magical renaissance we’re living in where we celebrate mermaids through all the edible sugary things under the sun? I am DEFINITELY a mermaid desserts girl.

I’ve seen so many fun mermaid dessert variations–from cakes to cake pops to macarons to rice crispy treats, and everything in between! But I’m going through sort of a cupcake phase right now (after ignoring them for literally years, it’s all I’ve been wanting to make lately…go figure!) so I thought it only appropriate that I tackle the mermaid craze in cupcake form. Since mermaids feel really summery, I wanted a cupcake that felt similarly beachy and carefree.
Table of Contents

Jumbo Cupcake Shortcut
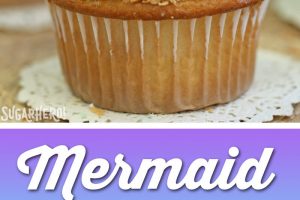
So let’s break down these babies! I used a cake mix to speed up the process of making these.They start with moist jumbo cupcakes–and yes, I said jumbo cupcakes! I wanted maximum room to decorate with all of my hoozits and whatzits galore (Little Mermaid shoutout) so I made 10 extra-large cupcakes.
If you are less of a glutton than I am, this recipe should make about 20 regular sized cupcakes. I would encourage you to fill your cupcakes a little more than you normally would, to give you a nice big crown and some extra surface area on top for decorating!

Buttercream Frosting
There’s an outer ring of white buttercream frosting that’s covered with toasted coconut, which looks like sand and boosts the coconut flavor.
Then there’s a big swirl of aquamarine frosting in the middle, sort of like an ocean wave if you tilt your head and squint just right. Same frosting, just different colors and piping tips. I love simple recipes that look more complicated than they actually are!
Sea-Inspired Decorations
SPEAKING of simple things that seem fancy, can we please drool over the adorable decorations for a second?!

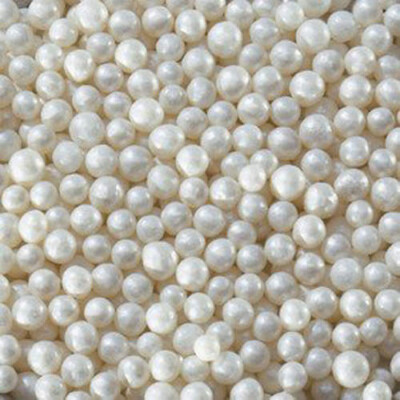
I decorated the cupcakes with a mix of blue sprinkles, two sizes of sugar pearls, and chocolate seashell decorations. I made the decorations myself, so I could control the size and colors of the shells, but store-bought chocolate seashells are pretty common and would work just as well. You could also look outside the chocolate box and use ANY ocean-inspired goodies: gummy candies like fish, sharks, or octopus, or even goldfish crackers would all be really cute.
If you want to make the same decorations I did, I used this mold from Michaels craft store. I love it because it makes really small, delicate shells that are the perfect size for putting on top of cupcakes. It’s technically intended for molding clay, so the cavities are pretty shallow and some of them are difficult to unmold–the seahorse in particular usually required some mending, as it would break when I tried to remove it. But, I was happy to do surgery if it meant I ended up with cute edible decorations!

I experimented with painting and piping contrasting colors on the insides of the mold, and once they were fully set and unmolded, I brushed all of them with edible pearl dust, to give them a fresh-from-the-sea shimmer.
(PS I dare you to look at that chocolate seahorse and NOT say “awwwww.” Double dare you!)
How to Make a Mermaid Tail from Candy Coating
The final piece of the puzzle, the mermaid tail, was also made with edible candy coating, and it was fun to design all of them so they looked slightly different. I drew myself a little template so that I could be sure all my tails were approximately the same size, and if you’d like to use the template I made, you can click here and download it to your own computer. (Note that it’s sized for these jumbo cupcakes, and if you’re making regular ones, you might find the tails are too large. Use your best judgment!)
💜More Fun Desserts
- Unicorn Milkshakes
- Narwhal Cupcakes
- Unicorn Cakes
- Flamingo Cupcakes
- Hamburger Cupcakes
- Sugar Cookie French Fries
- Even more cupcakes!
Mermaid Cupcakes
Ingredients
For the Cupcakes:
- 1 white cake mix, (approx. 16 oz), or other flavored cake mix of choice, see Note below
- 1 cup milk
- ½ cup vegetable oil
- 3 large eggs
For the Frosting:
- 8 oz unsalted butter, at room temperature
- 24 oz powdered sugar, (6 cups)
- 6-8 TBSP milk
- 2 tsp vanilla extract, see Note below
- ¼ tsp salt
- Assorted gel food coloring, I used Americolor Electric Blue and Turquoise
To Decorate:
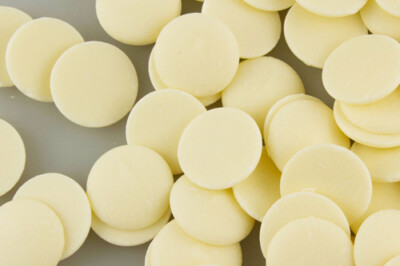
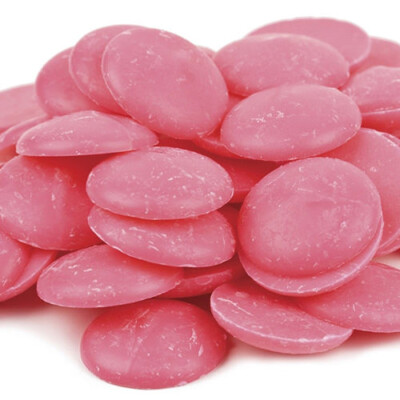
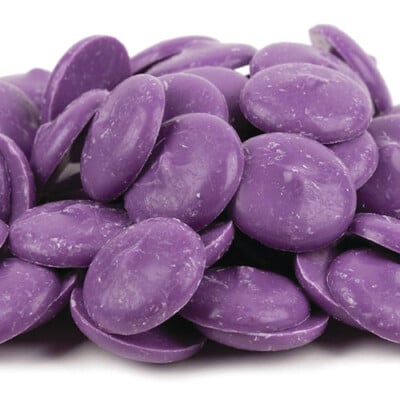
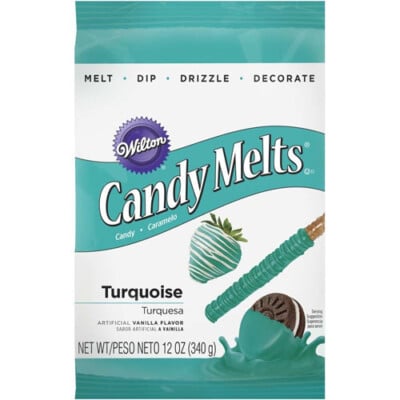
- 8 oz assorted colored candy coating melts, I used white, pink, purple, and turquoise
- Pearl dust
- 1 ½ cups sweetened shredded coconut, toasted, see Note below
- Assorted sprinkles, and candy pearls
Instructions
To Make the Cupcakes:
- Fill 10 jumbo cupcake cavities with paper liners. (Alternately, you can make approximately 20-24 regular sized cupcakes.) Preheat the oven to 350 F.
- Combine all the ingredients for the cupcakes and mix on medium speed for 2 minutes, then scrape down the bottom and sides of the bowl well. Divide the batter between the cupcake cavities, filling them about ¾ full.
- Bake the cupcakes for 22-25 minutes, until golden around the edges and the tops spring back when lightly pressed. (If you are making regular-sized cupcakes, baking time will most likely be around 18-20 minutes.) Cool completely before decorating.
To Make the Frosting:
- Beat the butter with an electric mixer on medium speed for 1-2 minutes, until creamy and light in color. Add the powdered sugar, 6 TBSP of milk, vanilla extract and salt, and mix well, until light and fluffy. If the frosting is too stiff for your liking, slowly stream in the remaining 2 TBSP milk, a bit at a time, until you get a texture you like.
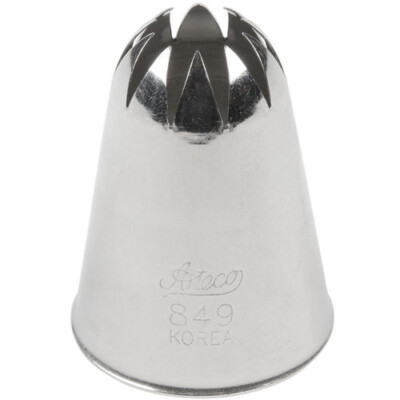
- Divide the frosting in half: place half of it in a large piping bag fitted with a large round tip or coupler, and color the other half blue. Place the blue frosting in a large piping bag fitted with a large star tip. (I used Ateco tip #849).
To Decorate:
- Print out the mermaid tail template, or draw your own. Tape it to a baking sheet and set a piece of parchment or waxed paper on top of it. Melt the colored candy coating in individual bowls in the microwave, and place each color in a disposable piping bag with a small hole snipped in the end.
- Trace the template with one color of candy coating. Embed a toothpick into the bottom of one of the tails, leaving at least 1.5 inches sticking out. If desired, outline the end of the tail in a second color and drag a flat, dry paintbrush through the end of the tail, feathering out the chocolate and blending the colors. (If you use the paintbrush, it does thin the coating, so you might want to do 2 layers of this if you tail seems too thin.) Take a contrasting color and drizzle it over the bottom of the tail to create a cross-hatch design. Repeat until you have as many tails as you have cupcakes.
- Chill the mermaid tails for about 10 minutes. Gently remove them from the parchment, and trim off any stray pieces of coating coming off the sides. Brush the tails with a dry coat of pearl dust, if desired, to give them a little glimmer.
- Pipe the white buttercream in a fat ring around the outside edge of a cupcake. You’ll probably want to go around twice, to get the ring of frosting at least ½-inch tall. Gently press toasted coconut into the white frosting, to represent the sand.
- Pipe a big swirl of blue frosting inside the toasted coconut ring, making sure that the swirl comes up a few inches above the coconut. Insert a chocolate mermaid tail into the middle of the blue swirl. Decorate the frosting with blue sprinkles, various sizes of sugar pearls, and chocolate shells. (You could also use gummy fish or sharks, graham cracker goldfish, or any other ocean-themed edible decorations you can find!)
- For the best taste and texture, store these cupcakes in an airtight container and serve at room temperature. They are best eaten within 2-3 days of assembly.
Video

Recipe Notes
Measuring Tips
Our recipes are developed using weight measurements, and we highly recommend using a kitchen scale for baking whenever possible. However, if you prefer to use cups, volume measurements are provided as well. PLEASE NOTE: the adage “8 oz = 1 cup” is NOT true when speaking about weight, so don’t be concerned if the measurements don’t fit this formula.
Want to learn more about baking measurements and conversion?


These mermaid cupcakes are absolutely stunning! The vibrant colors and intricate details are so enchanting. I can’t wait to try making them for my daughter’s birthday party. Thank you for the amazing recipe and tips!
Thank you, Carla! I hope you’ll come back and let us know how they turn out for you. 🙂
These mermaid cupcakes are absolutely stunning! I love the vibrant colors and the whimsical design. Can’t wait to try making them for my next party. Thanks for sharing the recipe! ♀️✨
You’re welcome! Enjoy!
These mermaid cupcakes are absolutely stunning! The colors are so vibrant and the designs are so creative. I can’t wait to try making them for my daughter’s birthday party! Thank you for the amazing recipe and inspiration!
You’re welcome! Enjoy!
These mermaid cupcakes are absolutely stunning! I love the way you’ve incorporated the colors and the design—it really brings the ocean theme to life. Can’t wait to try making them for my next party! ♀️