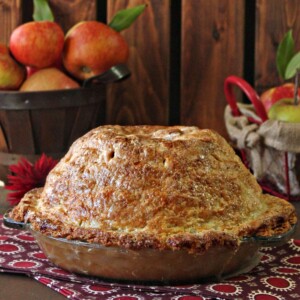
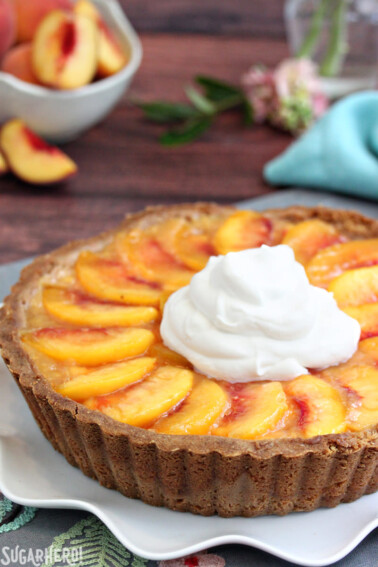
This Mile High Apple Pie has an amazing 5 pounds of apple crammed into a single 9-inch pie pan! This big beautiful beast of a pie is laced with cinnamon and sugar and begs to be topped with ice cream.

I hope you’re a filling person. Crust people, you might want to keep on scrolling. Because in the great pie battle of crust vs filling, this Mile High Apple Pie is allllll about that bass filling.
Five pounds of filling, to be exact! It’s amazing that a giant basket of apples (five pounds! eighty ounces!) can be crammed into one 9-inch pie pan and turned in this big beautiful beast of a pie. Thanksgiving, we are so ready for you.

A few weeks ago we drove about an hour and a half to go apple picking in the hills. Asher has had a lot of questions about food lately (where does it come from? how does it grow? etc) and we thought it would be fun to take our city mouse to the country and show him how his favorite grocery store apples actually grow!
We ended up at an orchard that grows Winesap apples, an heirloom variety that’s a nice balance of sweet and tart. They keep well and are a good cooking apple, so with visions of baking dancing in my head, we quickly filled a big bag with freshly picked apples. I’m not saying my kid’s an apple-picking prodigy, but I’m not saying he’s not…

Apple picking was fun, but all of the orchards and cafes in town were so busy when we were there. We ended up skipping a lot of the activities we had planned, just because we didn’t want to wait in long lines. One of the things I was most looking forward to was eating at a local café and enjoying their famous mile high apple pie, but when we saw the long line snaking out of the restaurant and across the parking lot, we just kept driving in search of a less crowded lunch.
As we whizzed by the café, I let out a little disappointed sigh, then turned to look at our bag of overflowing apples in the back seat. “Oh yes….” I whispered to them, steely determination in my voice. “You will be a mile high apple pie…”

I never got my slice of pie from the café, but in the end I got something much better: an entire pie, baked fresh in my kitchen, making my house smell amazing and my family and friends very happy. Turns out, anyone can be a filling person when the filling in question is a stack of perfectly spiced, perfectly juicy apples, fork-tender and super flavorful!
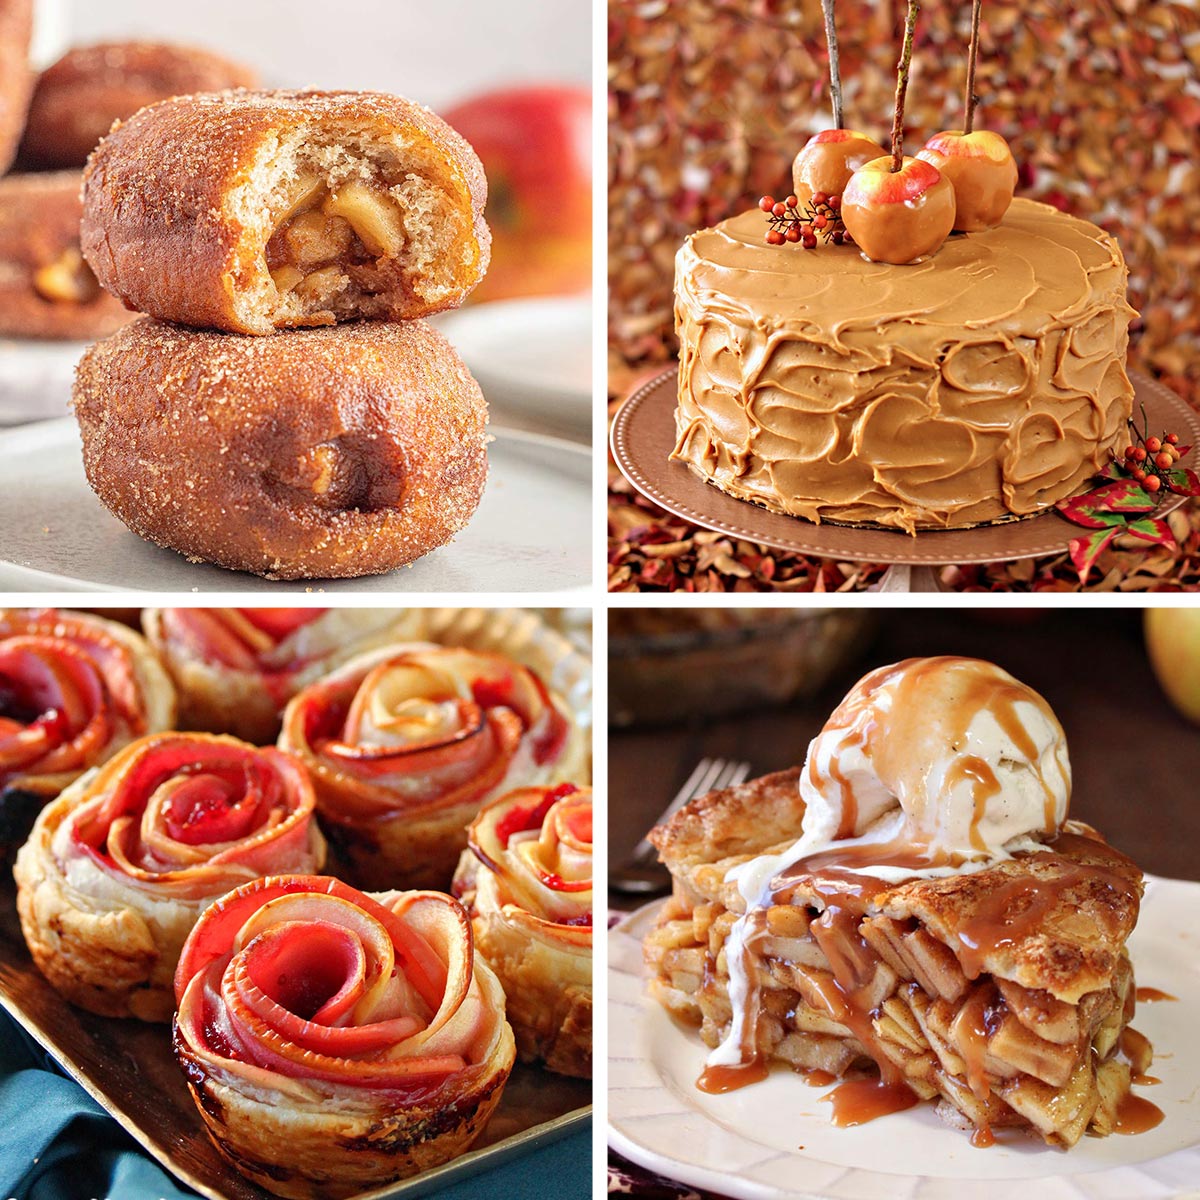
Love apple filled desserts? Check out my Apple Donut Recipe!

I don’t actually think the traditional apple pie needs much tweaking, so this recipe isn’t about a surprising new ingredient. There will be no deconstructing here, no re-imagining, and you can keep your trendy foods far away from my apple pie. We’re sticking with the basics, just amping them up a little.
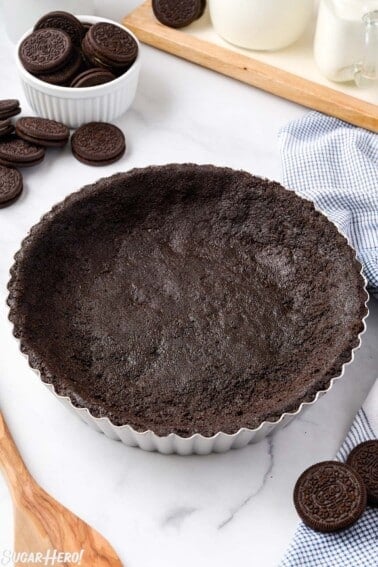
The biggest trick to this pie, and the reason I’ve included a little photo tutorial, is that you want to assemble it a little differently than a regular apple pie. Rather than just piling the apple slices into the crust willy-nilly, you want to stack most of them in a bowl, neatly lining them around the sides and compacting them a bit, to make a perfect half-sphere of apple slices. Then all it takes is a little flip of the bowl onto the pie shell, and you’ve constructed a beautiful pie that’s also stable and easy to cover with pie crust. Hat tip to Paula Deen for turning me on to this method!

It’s natural for the apples to cook down a little bit while they bake, so after baking you’ll have a small air pocket between the top of the crust and the apples. Wait, did I say air pocket? I meant ice cream pocket. How awesome would it be to stuff that empty space with a few scoops of ice cream?! Be right back, making another pie just to test this theory…

Although we had lots of Winesaps from our trip, I actually used a mix of apples in this pie. Mostly Winesaps, yes, but also some Granny Smiths and a few Gala apples. Whenever possible, I always like making my pies with an assortment of apples. I love the variety of flavors and textures that using different types provides—some are tart, some sweet, some get mushy and some hold their shape, so each bite is interesting and a little different.
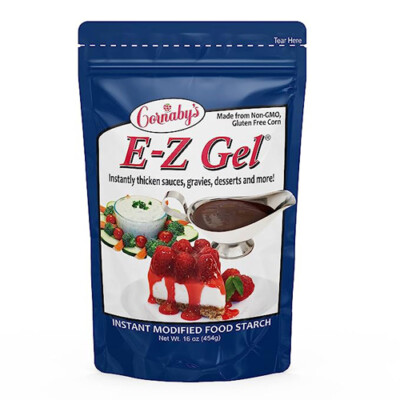
The other thing I tried in this pie is using UltraGel as my thickener of choice. I’m always experimenting with different thickeners, and most recently had success with ground-up tapioca in my Strawberry Rhubarb Pie. But I think UltraGel might be my new favorite! It’s a gluten-free, non-GMO corn-based starch that instantly thickens—no heating or whisking required—and it does a great job of absorbing extra moisture, while not imparting any sort of starchy, gummy, or glue-y texture. The apple filling stayed moist but there wasn’t any liquid pooling in the bottom—score! Apparently UltraGel is also great for puddings, pastry cream, and gravy, so I’ll be doing more experimenting and will report back! (There are lots of different versions of this product that have different names. I linked to the specific brand that I bought, but I imagine many of them work similarly well.)

And finally, the question everyone asked—how do you serve a pie this big? With a big spatula! Ba-dum-ching.
Seriously, though, it’s actually not hard at all. If you wait a few hours after baking, it’ll be more stable and you should be able to cut clean-ish slices fairly easily. I took a multi-step approach and first cut through the crust, then sawed through the apples using a sharp serrated knife, then cut through the bottom crust. Slow and steady wins the pie game! You’ll probably want to serve these slices in shallow bowls or on large plates so all the apple pieces have a place to spill out when they go for a bite.

Oh, and ice cream is a must. Preferably with some caramel sauce drizzled on top. But you probably already knew that, didn’t you? Happy baking!
🥧More Pie Recipes You’ll Love
Mile High Apple Pie
Ingredients
For the Crust:
- 15.5 oz all-purpose flour, (3 2/3 cups)
- 2.25 oz granulated sugar, (1/3 cup)
- 1/4 tsp salt
- 12 oz unsalted butter, cubed and frozen for at least 30 minutes
- 3 oz shortening, cubed and frozen for at least 30 minutes
- 2/3 cup water, very cold
For the Filling:
- 5 lbs apples, (about 12 large apples), I recommend using a variety—I used Winesaps, Granny Smith, and Gala
- 2.2 oz all-purpose flour, (1/2 cup), or use 1.33 oz (1/2 cup) UltraGel)
- 3.5 oz granulated sugar, (1/2 cup)
- 1.75 oz brown sugar, (1/4 cup)
- 1 tbsp ground cinnamon
- 1/4 tsp salt
- 1 large egg, for the egg wash
- Additional sugar for dusting
Instructions
To Make the Crust:
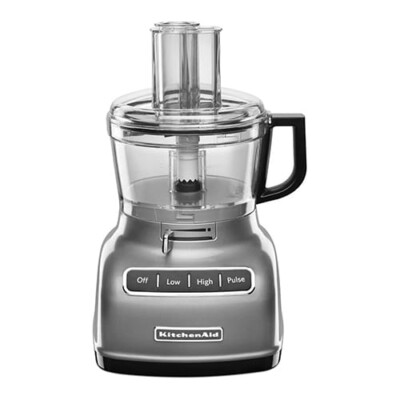
- Combine the flour, sugar, and salt in the bowl of a large food processor (10 cups or larger size) and pulse a few times to combine.
- Add the cold cubed butter and shortening, and pulse in short bursts until they’re cut into the dry ingredients and the mixture has the texture of coarse crumbs. Add half of the cold water and pulse in 5-second bursts, adding the rest a little more at a time just until the dough starts to come together. You may not need to use all of the water—stop when the dough starts to come together, and don’t overwork it!
- Turn the dough out onto a lightly floured board and knead it just enough to incorporate any dry patches of flour. Divide it in approximate halves, making one portion a little larger than the other. Wrap the two pieces of dough well in plastic wrap, and refrigerate them for an hour to chill. The dough can be made several days in advance and kept in the refrigerator until ready to use.
To Make the Pie:
- Preheat the oven to 350 F. Flour your work surface and rolling pin, and roll the smaller disc of dough out until it is a little thinner than 1/4-inch thick. Transfer it to a 9-inch pie tin and gently press it into the bottom and up the sides. Let the excess hang over the sides, and refrigerate the crust while you prepare the apple filling.
- Peel and core the apples, and cut them into thin slices about 1/4-inch thick. Place them in a large bowl—if you don’t have a bowl large enough to comfortably hold them, divide them into several bowls.
- Mix together the flour or UltraGel, sugars, cinnamon, and salt in a small bowl. Sprinkle the dry ingredients over the apples and toss them with your hands until they’re evenly coated.
- Fill the bottom of the pie crust with apple slices, until they comes almost to the top of the pie tin, and return to the refrigerator for now. Get a mixing bowl with a top that is the same size as the interior of your pie tin. Carefully layer the apple slices in the bowl, placing the rounded edges around the edge of the bowl, overlapping the apples slightly, making sure the layers are even and tidy. Layer them until you run out of apples, or until you reach the top of the bowl.
- Carefully flip the mixing bowl over on top of the pie plate, and gently pull it up so you have a nice, neat stack of apples on the pie.
- Roll out the second portion of dough until it is a large circle, and drape it over the top of the pie, smoothing out as many creases as possible. Press down around the edges to seal it to the bottom crust. Trim around the edge of the pie tin with a sharp knife to remove excess dough, then crimp the dough together.
- Lightly beat the egg, then brush the top of the pie with the beaten egg. Sprinkle a generous amount of granulated sugar all over the pie. Use a sharp paring knife to poke a few small vent holes near the top of the pie. Don’t put the holes on the very top of the pie, or it might collapse during baking.
- Place the pie on a foil-covered baking sheet and cook for 70-80 minutes, rotating it occasionally so it bakes evenly. It is done when the crust is a dark golden brown and, if you can get a glimpse inside the vent holes, the apples are bubbling. If the crust starts to get too dark, you can cover the pie loosely with foil.
- After baking, let the pie cool for at least 2 hours before cutting into it. It’s delicious warm, but it’s less messy to cut and serve if it’s had a chance to sit and cool down after baking.
Recipe Notes
Measuring Tips
Our recipes are developed using weight measurements, and we highly recommend using a kitchen scale for baking whenever possible. However, if you prefer to use cups, volume measurements are provided as well. PLEASE NOTE: the adage “8 oz = 1 cup” is NOT true when speaking about weight, so don’t be concerned if the measurements don’t fit this formula.
Want to learn more about baking measurements and conversion?
Nutrition


Oh my WOW! This is indeed the best mile high pie I have ever seen.
Thank you so much for your recipes. Made this pie yesterday, it was so good!
I hate to say this but mine did not turn out like this pie at all. There was an enormous gap with the top and it sunk down really low. I am really sad because it took me a long time to make.
I’ve had that experience with this type of recipe before, but it tastes delicious and I’ve seen that the solution is to heat the apples a bit in a pan to reduce just a bit, then add sugar and such and bake…no big gap.
Is there a way to make this in a spring form pan? And would it keep together and not fall apart? Sorry, I come up with weird ideas. Thank you
Hi. Sorry for the delay. I’ve never tried making it in a springform pan but you could definitely try it. I would highly recommend cooking it on a baking sheet to help keep your oven clean and because spring form pans typically have a very thin bottom. The bottom of the pie might burn if you put it in directly on the oven rack. Let me know how it goes. Good luck.