
This Gingerbread Christmas Cookie Tree is the ultimate holiday dessert! It’s easy, delicious, feeds a crowd, and is so gorgeous it can double as a centerpiece!

Is there anything better than gingerbread for the holidays? Just one bite of a gingerbread cookie brings back so many cozy feelings for me—cocoa by the fireplace, baking with my mom in the kitchen, delivering Secret Santa plates to our friends and neighbors…it’s like a time machine back to the happy holidays of my childhood. I think it’s because I don’t make or eat gingerbread at any other time of the year, so just one bite is the mental equivalent of snuggling up in a warm, fuzzy blanket and feeling so safe and warm. I love it.
I want to create these same memories for my own family now, so I make sure to bake at least a few batches of gingerbread every December.
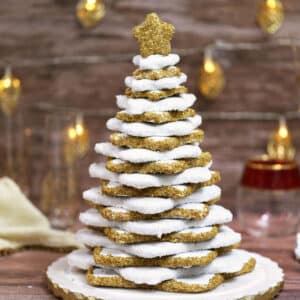
This year I decided to go a little bigger: instead of making small cut-out cookies, I made a whole cookie TREE out of star-shaped gingerbread cookies. The cookies are covered with a simple powdered sugar glaze, some sparkling sprinkles along the edges, and stacked more than a foot high on a serving plate. It’s rustic with a touch of glam, cozy with a hint of chic, and absolutely perfect for the Christmas season.

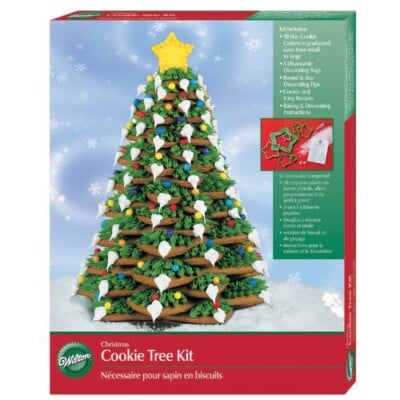
So how does a cookie tree come to be? First up, you will need a LOT of star cookie cutters in graduated sizes. I used this 10-cutter set from Wilton. It’s very affordable, and I have a feeling I’ll use the star cutters in a million different ways in the future. You will need to cut 2 of each size for the tree—if you want to make a star topper like I did, make 3 of the smallest size.
You’ll also need a good gingerbread cookie recipe. My favorite is below, but if you have one that you love, that is sturdy and doesn’t spread too much, by all means, use that one! And if you’re not a gingerbread fan, sugar cookies would work just as well.

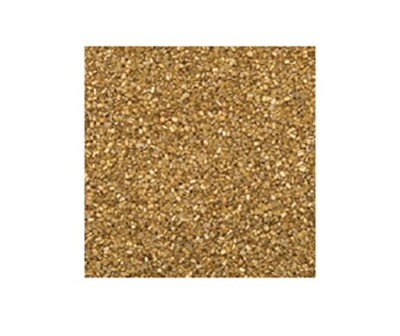
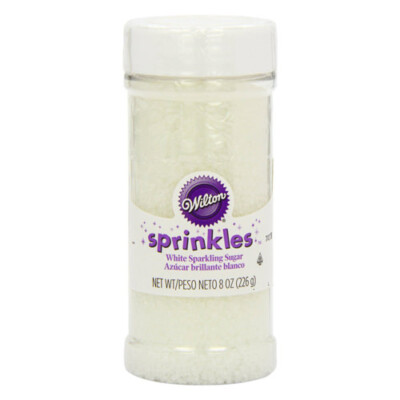
After the cookies are baked and cooled, they get covered with a thin powdered sugar glaze, then the edges are coated with some gorgeous gold and white sparkling sugar to give it that glamorous touch you know I can’t resist.
Speaking of the powdered sugar glaze: it’s totally optional! If the thought of glazing 24 stars (some of which are quite large) gives you the willies, please, skip it and do some other decorations instead. You can add some green buttercream “leaves” along the top, do some royal icing designs, or bust out your favorite fancy sprinkles and attach those around the edges of the cookies. You could also just keep things REALLY simple and finish with a light dusting of powdered sugar!

The finished cookies are stacked on top of each other to make a tree that’s about 14 inches tall. It’s beautiful and striking, and can double as a centerpiece—put it on your Christmas table, and after dinner everyone can just reach in the center and help themselves! The cookies are glued together with a bit more of the glaze, so it’s not difficult to separate them for serving—the hardest part is watching the lovely tree be disassembled!

⭐More Gingerbread Recipes
- Gingerbread Cookie Mug Toppers
- Gingerbread Cheesecake
- Soft Chocolate Gingerbread Cookies
- Rainbow Gingerbread House Village + Decorating Ideas
- Gingerbread Chocolate Chip Cookies
Gingerbread Christmas Cookie Tree
Ingredients
For the Gingerbread Cookies:
- 28 oz all-purpose flour, (6 1/4 cups)
- 1 tsp baking soda
- 3 TBSP cornstarch
- 2 TBSP ground cinnamon
- 2 TBSP ground ginger
- 2 tsp ground cloves
- 1 tsp salt
- 8 oz unsalted butter, at room temperature
- 15 oz brown sugar, (2 cups), packed
- 3 TBSP fresh orange zest
- 2 large eggs, at room temperature
- 1 cup unsulphured molasses
- 1 TBSP vanilla extract
- Star-shaped cookie cutters
For the Frosting and Decorating:
- 40 oz powdered sugar, (10 cups), sifted after measuring
- 2/3 cup milk
- 2/3 cup light corn syrup
- ½ – 1 tsp almond extract
- white sparkling sugar
- gold sparkling sugar
Instructions
To Make the Cookies:
- Sift together the flour, baking soda, corn starch, spices, and salt in a large bowl. Set aside.
- In the bowl of a large stand mixer, cream together the butter, brown sugar, and orange zest for 2-3 minutes until fluffy and well-mixed. Add the eggs one at a time, beating well after each addition, then add the molasses and vanilla. Mix on low speed until the molasses is incorporated.
- Turn the mixer off and add the dry ingredients. Turn the mixer to low and mix slowly until just a few streaks of flour remain. Stop the mixer and finish stirring in the flour with a spatula, scraping the bottom and sides of the bowl to make sure that everything is well-mixed.
- Divide the dough into thirds and roll each third out between two pieces of parchment paper, so that the dough is ¼-inch thick. Refrigerate the rolled dough for 45-60 minutes, until firm.
- Cut out two of each size of star, except for the smallest size—cut out three of those. Place the cut-out cookies on baking sheets covered with parchment, Try to keep similar sizes of stars on the same sheet, so they bake evenly, and space the cookie about 2 inches apart. Preheat the oven to 350 F and refrigerate the trays while the oven preheats, so that the cookies are chilled going into the oven—this will help them hold their shape and not spread too much. Re-roll the scraps of dough if necessary, until you’ve cut out all of the stars you need.
- Bake the smaller stars for 7-10 minutes and the larger stars for 10-12 minutes, until light brown, slightly puffed, and no longer shiny in the center. Transfer the cookies to a wire rack to cool completely. Cookies can be made in advance and kept in an airtight container at room temperature for 3 days, or for 3-4 weeks in the freezer.
To Make the Glaze and Decorate:
- Combine the powdered sugar, milk, corn syrup, and ½ tsp almond extract in the bowl of a large stand mixer fitted with a paddle attachment. Mix on low speed until the sugar is moistened, then raise the speed to medium-low and mix until you have a fluid glaze with the consistency of liquid glue. Taste it, and add more almond extract if desired. If your glaze is very thick, add a bit more milk, and if it seems too thin, add more powdered sugar.
- Spread parchment out over your work surface, and place wire drying racks over the parchment. Place a small wire rack over the bowl of glaze, and put a cookie on top of the rack. Dollop some glaze on the cookie, and use a small spatula to spread it all over, covering the top and sides of the cookie completely and letting the excess glaze drip back into the bowl.
- Once the cookie is covered, transfer it to the wire racks over the parchment to set, and repeat with the remaining star cookies. Let them sit at room temperature for 1-2 hours, until the glaze is hard and set. Press a layer of cling wrap on top of the excess glaze in the bowl so it doesn’t harden and dry out.
- When the cookies are set, stir a few more spoonfuls of powdered sugar into the bowl of glaze, so it’s thick enough to pipe on the sides of the cookies and not drip down. Fill a disposable piping bag or a gallon-sized plastic zip-top bag with the thickened glaze, and put your sparkling sugar in two shallow pie tins.
- Pipe a thin line of glaze along the side of one of the stars, then press the sparkling sugar into the glaze. Set it back on the wire rack to dry, and repeat with the remaining stars and sprinkles. Alternate colors of sprinkles so that for each pair of stars, 1 is gold and 1 is white. For the smallest size, after you do 2 of the stars with gold and white sprinkles along the edge, spread a thin layer of glaze all over the remaining smallest star and cover it with gold sprinkles.
- Place the largest star on your serving platter, and pipe a quarter-sized dollop of glaze in the center. Top it with its mate, the other largest star, but offset the star so that the points go in a different direction. Add another dollop of glaze and top it with the second-largest star, then repeat with the remaining stars. When you get to the top and have only the gold sprinkle-covered star remaining, place a dollop of glaze on the top star and stick a toothpick into the stack of cookies. Set the gold star on top, in the glaze, leaning back against the toothpick. Let the cookie tree set for at least 15 minutes before you move it. For the freshest taste and texture, serve within 2-3 days.
Video
Measuring Tips
Our recipes are developed using weight measurements, and we highly recommend using a kitchen scale for baking whenever possible. However, if you prefer to use cups, volume measurements are provided as well. PLEASE NOTE: the adage “8 oz = 1 cup” is NOT true when speaking about weight, so don’t be concerned if the measurements don’t fit this formula.
Want to learn more about baking measurements and conversion?
Nutrition


That looks awesome, never come across sparkly sugar before looks like a load of fun 🙂
This gorgeous gingerbread tree is such a showstopper! And so easy to assemble! I can’t wait to make this and feature it as the centerpiece for the desserts table during Christmas brunch!
Luci’s Morsels | fashion. food. frivolity.
What a beautiful showstopper! Love the sparkly sugar.
That’s a masterpiece! We make gingerbread cookies, but never tried making a tree. Sounds like lots of fun though
This looks brilliant! I love the sparkles, such a great idea. I’ve never even thought of making anything like this. I now have to buy star shaped cookie cutters!
Edible Christmas Tree, courtesy of Elizabeth. Everyone loved the cookies. Once cookies are baked, it was very easy to assemble and decorate. It made for a nice centrepiece.
Hey Diane, I am so happy to hear that! It looks amazing, thank you so much for sharing! I am glad it worked so well!!
It turned out good. It took way more time than 2 1/2 hr. More like 6 hrs total. Of course we were newbies to making trees thanks for the recipe, friends loved the tree.
Thanks for the feedback, and I am so thrilled that it worked out for you!