


These Candy Cane Cookies are a classic, must-make Christmas recipe. Peppermint-flavored sugar cookie dough is gently formed into the shape of candy canes—perfect for holiday parties or a treat for Santa!

🎄A Fun Candy Cane Cookie Recipe for Christmas
These Candy Cane Cookies are a twist on the usual sugar cookie recipe. (pause for groans) Cheesy jokes aside, they are a fun and delicious change from standard sugar cookies, and their bright, vibrant color, minty flavor, and signature shape make them a great addition to any holiday cookie assortment.
There are many different ways to make candy cane cookies, but after a lot of experimentation I’ve found the assembly method I like best. Traditionally, they’re made by twisting two different strands of dough together. However, I’ve found that I prefer starting with a two-tone layered dough, because you can get a smoother cookie with more twists that way.
Read on for a full tutorial showing how to make, shape, and bake these candy cane cookies, and don’t miss the video taking you through the steps! I’m sharing lots of tips and tricks so you can nail these cookies the first time, but if you want to skip right to the recipe, you can jump to the recipe card at the bottom.
More Christmas Cookies
If you’re looking for more Christmas recipes, you’ll love some of our most popular cookie recipes, like Pinwheel Cookies, Pecan Snowball Cookies, and Big Soft Sugar Cookies – these are a reader favorite!
And, if you love peppermint as much as I do, don’t miss my collection of 35 Peppermint Dessert Recipes!

Table of Contents
🧾 What You’ll Need
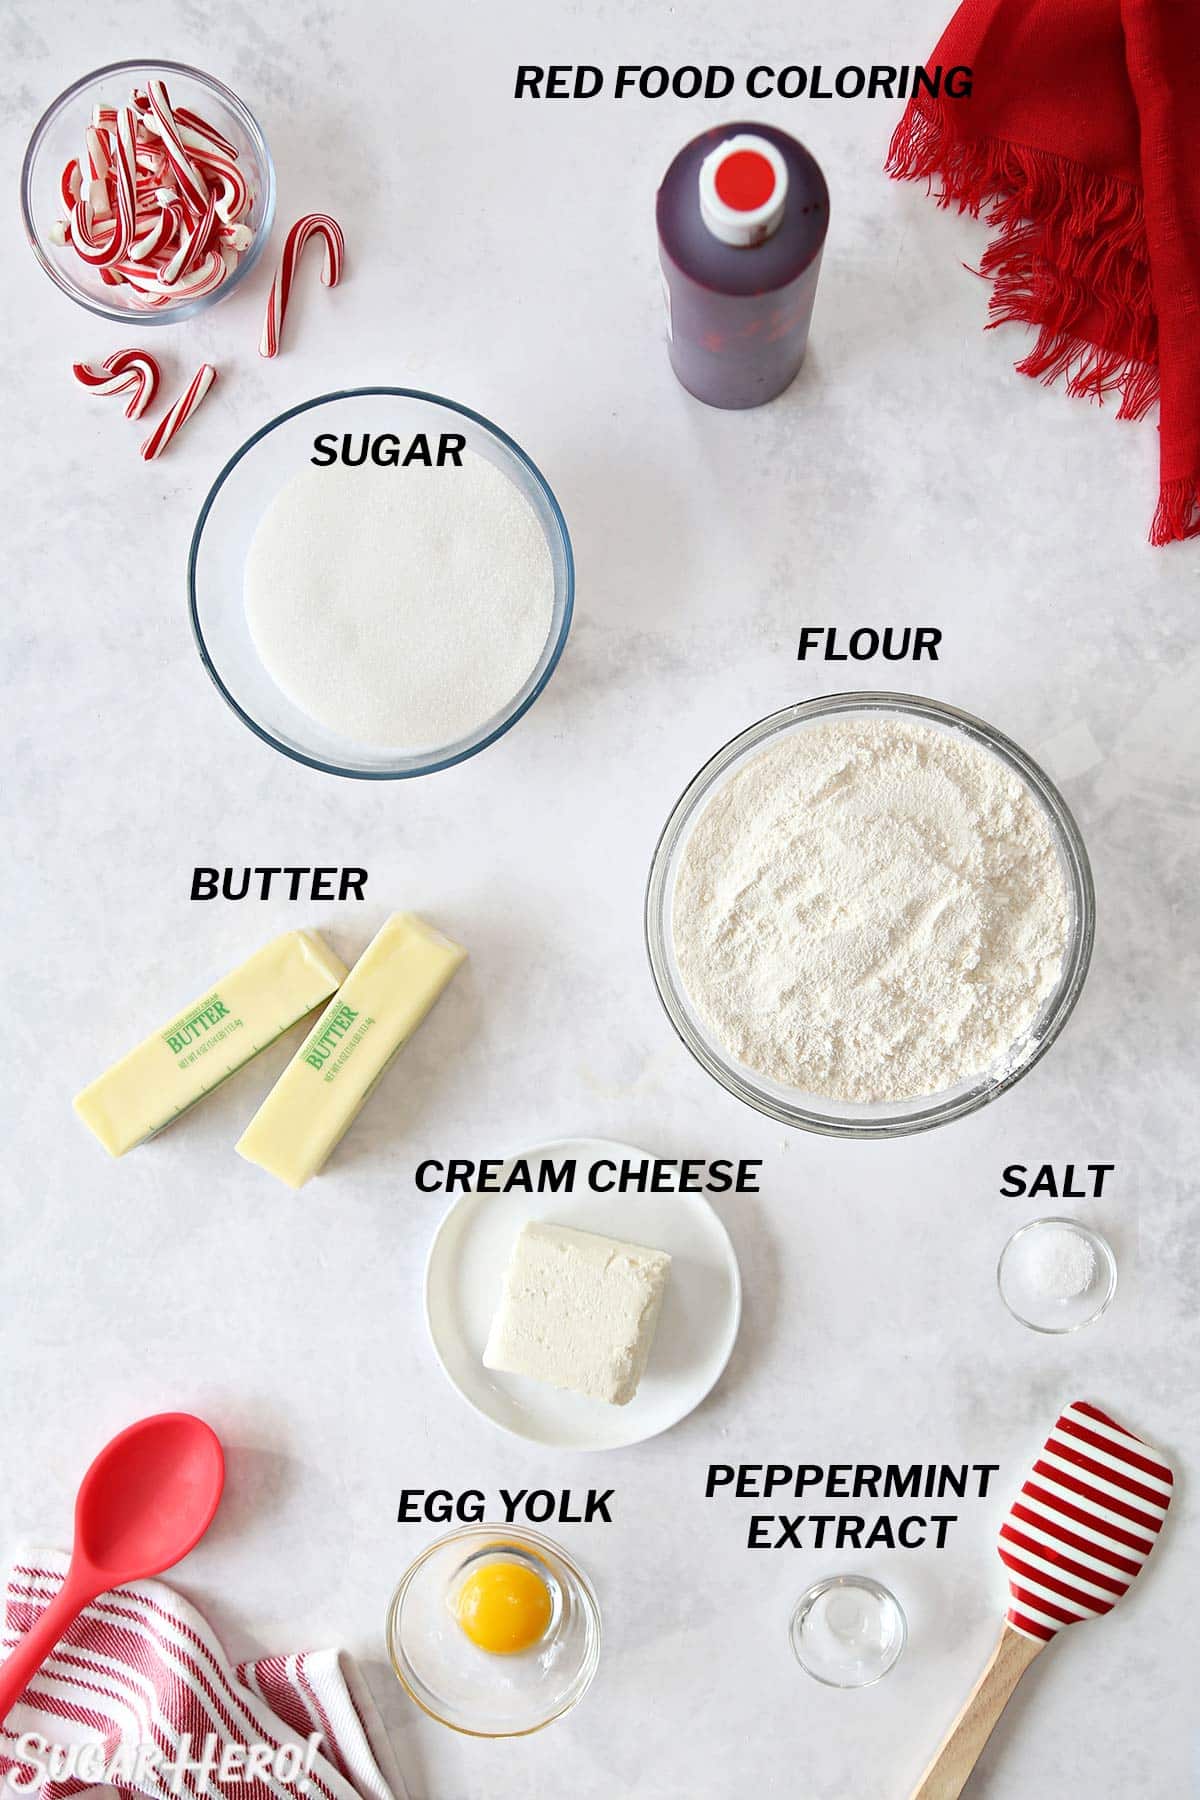
Ingredients
This recipe uses standard baking ingredients, so chances are you have most of the necessities on hand. Here are a few tips to keep in mind as you gather ingredients. (Links are affiliate links and I earn a small commission from qualifying purchases.)
- Butter: Your butter should be at room temperature to make these cookies. This means it’s pliable but cool–you don’t want it to be greasy and melty. I always recommend unsalted butter in baking, so you can control the precise amount of salt. If you only have salted butter, use that but omit the additional salt in the recipe.
- Cream Cheese: Cream cheese gives these cookies a soft, tender texture. Be sure to use blocks of cream cheese and not the “whipped” variety in the tub. I always recommend using full-fat cream cheese instead of light varieties.
- Egg Yolk: You’ll need one egg yolk. Here’s my full guide to separating egg yolks and whites if you need a refresher, and don’t throw away that egg white–you can save it for a future batch of Meringue Cookies or buttercream!
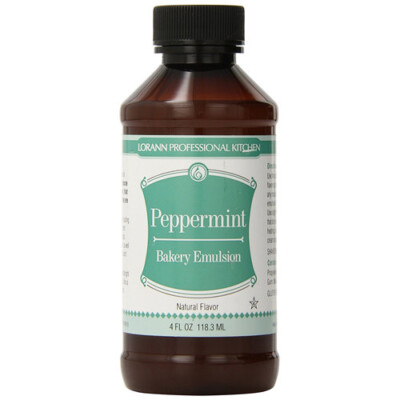
- Peppermint Extract: Peppermint extract adds a minty, holiday flavor to these cookies. It’s easy to find in grocery stores, usually in the baking or spices section. If you’re purchasing online, I prefer this Peppermint Bakery Emulsion from LorAnn over a traditional alcohol-based extract. It can stand up to high heat, so the flavor doesn’t evaporate during baking and it produces consistent results, every time.
- Red Food Coloring: For the best results, you will want to use gel food coloring. It is more concentrated than typical water-based colorings, so you don’t have to use as much coloring to get strong, vibrant shades. I use and recommend Americolor gel coloring. For this recipe, I used Americolor Super Red.

Equipment
- Baking Sheet: Quality aluminum baking sheets will keep the bottoms of the cookies from burning and help cookies bake evenly.
- Mixer: You’ll need a mixer to make the dough. Either a stand mixer or hand mixer will work fine.
- Parchment Paper: I never bake directly on my baking sheets–it’s all about the parchment, baby! Save time and cleanup by using silicone liners or parchment paper when baking cookies.
- Rolling Pin: I love the French style rolling pin.
- Kitchen Scale (Optional): When possible, I recommend using a kitchen scale to measure out ingredients by weight. Weighing ingredients is faster and more accurate than using volume measurements, plus there’s less clean-up!


Leave a Review!
If you make this recipe, let us know! Leave a ⭐️⭐️⭐️⭐️⭐️ rating on the recipe below, and leave a comment, take a photo and tag me on Instagram @elabau, or use #sugarhero on IG!

Candy Cane Cookies
Ingredients
- 8 oz unsalted butter, (1 cup), room temperature
- 4 oz cream cheese, (1/2 cup), room temperature
- 10 oz granulated sugar, (1.33 cups)
- 1 large egg yolk
- 2 tsp peppermint extract
- 1/2 tsp salt
- 16 oz all-purpose flour , (3.5 cups)
- red gel food coloring, Americolor Super Red recommended
Instructions
- Place the butter in the bowl of a stand mixer fitted with a paddle attachment, and beat for about 30 seconds, until creamy.
- Add the cream cheese, mix together until combined, then add the granulated sugar. Mix on medium speed for 30 seconds.
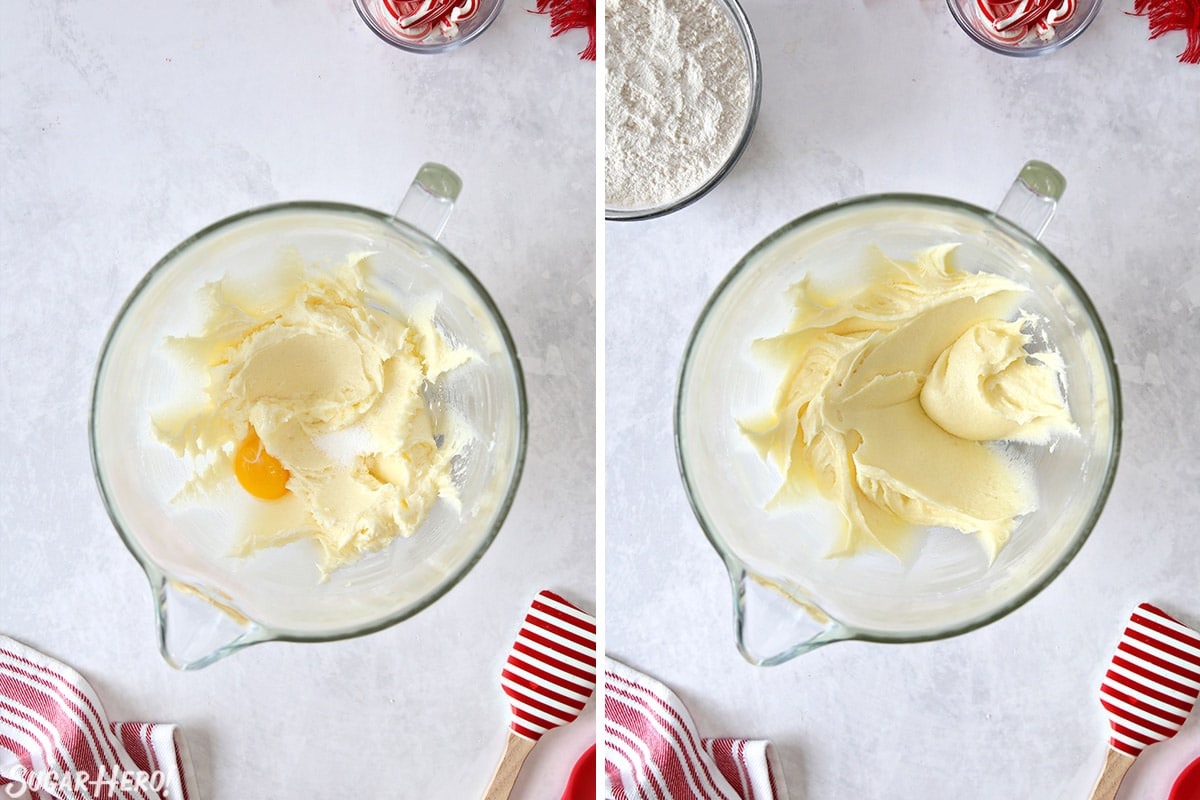
- Add the yolk, peppermint extract, and salt, and mix until everything comes together.
- With the mixer running on low, add the flour in a steady stream, and mix just until combined.
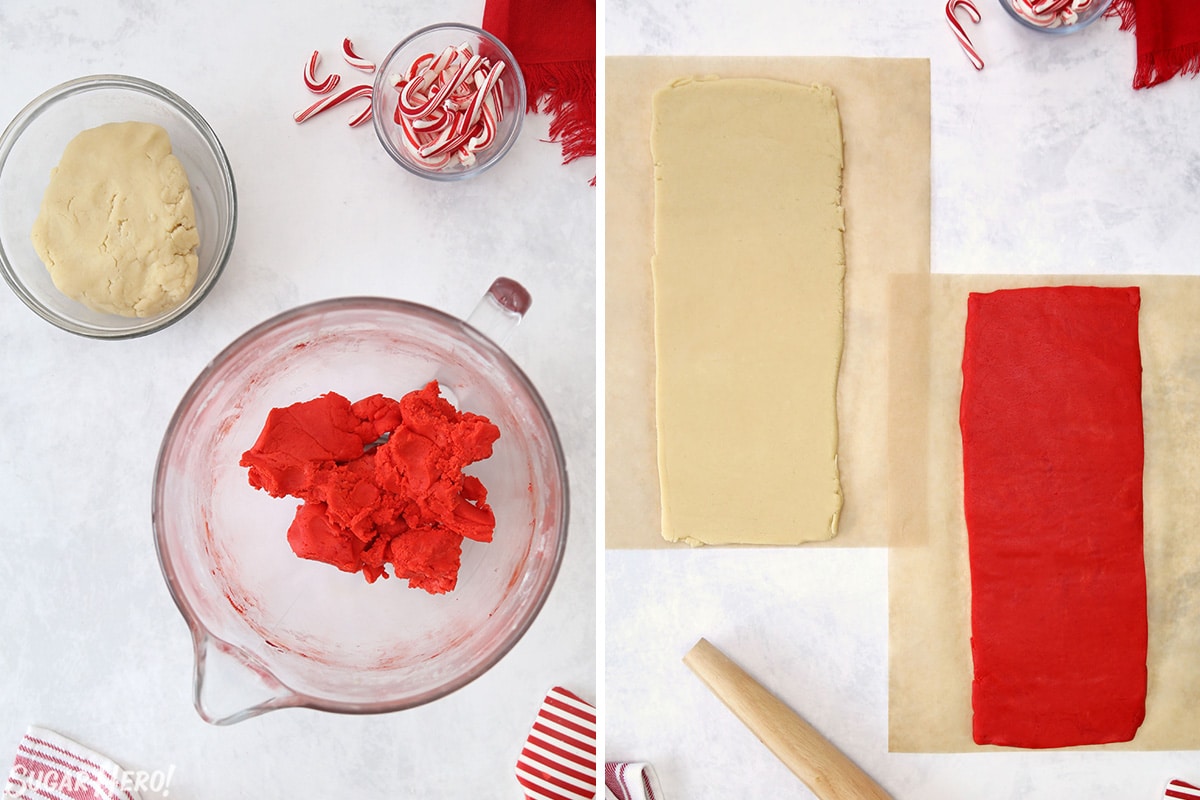
- Divide the dough in half. If you have a kitchen scale, each half should be about 18 ounces. Keep one half in the mixer, and add red gel food coloring to the dough. Mix just until the food coloring is incorporated and your dough is red.
- Roll each color out between two sheets of parchment to a long rectangle, approximately ¼" thick, 5” wide, and 18” long. The dough will be soft, but by using the parchment paper, you should be able to work with it and form it into a rectangle. If you have too much trouble, refrigerate the dough briefly just until it’s easier to work with.
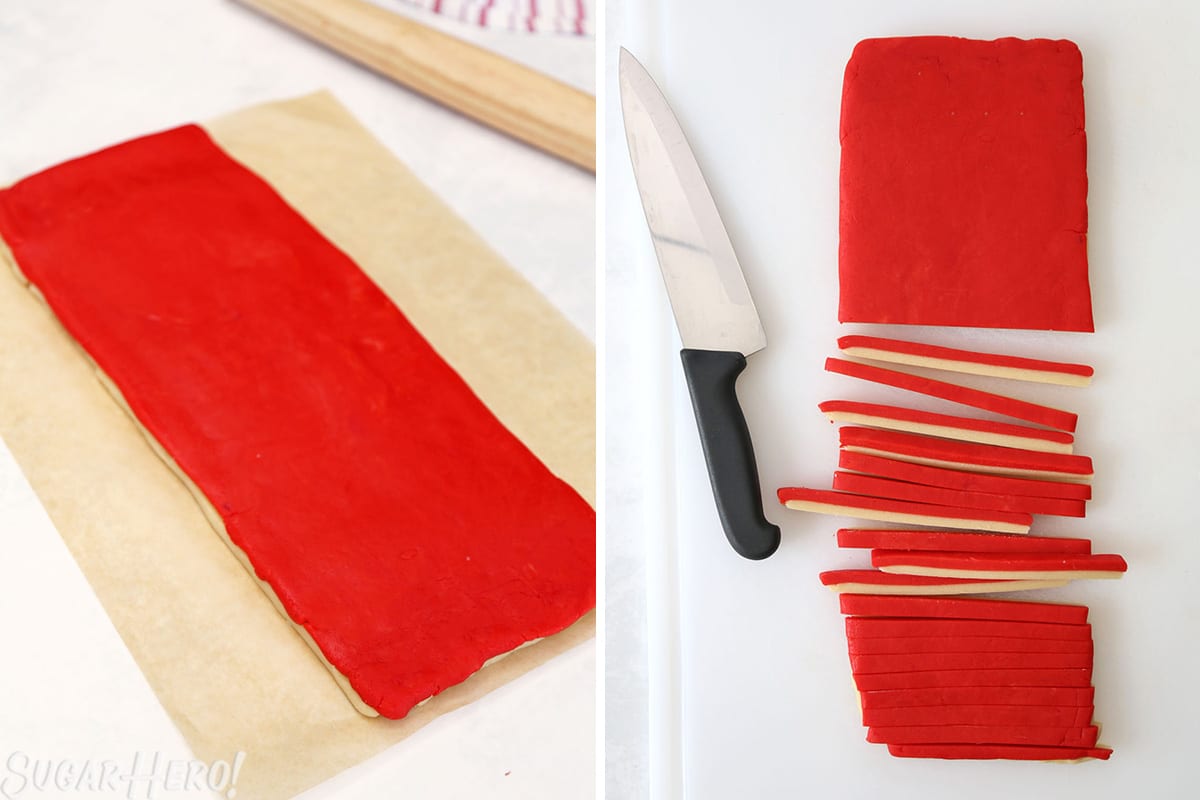
- Chill the dough rectangles in the refrigerator for 10 minutes, then carefully stack the red on top of the white. Use a rolling pin to gently roll over the rectangle and meld the two colors together. You should now have a two-toned rectangle about ½” thick, 5" wide, and 18” long. Wrap it in plastic wrap and refrigerate until firm, about 45 minutes.
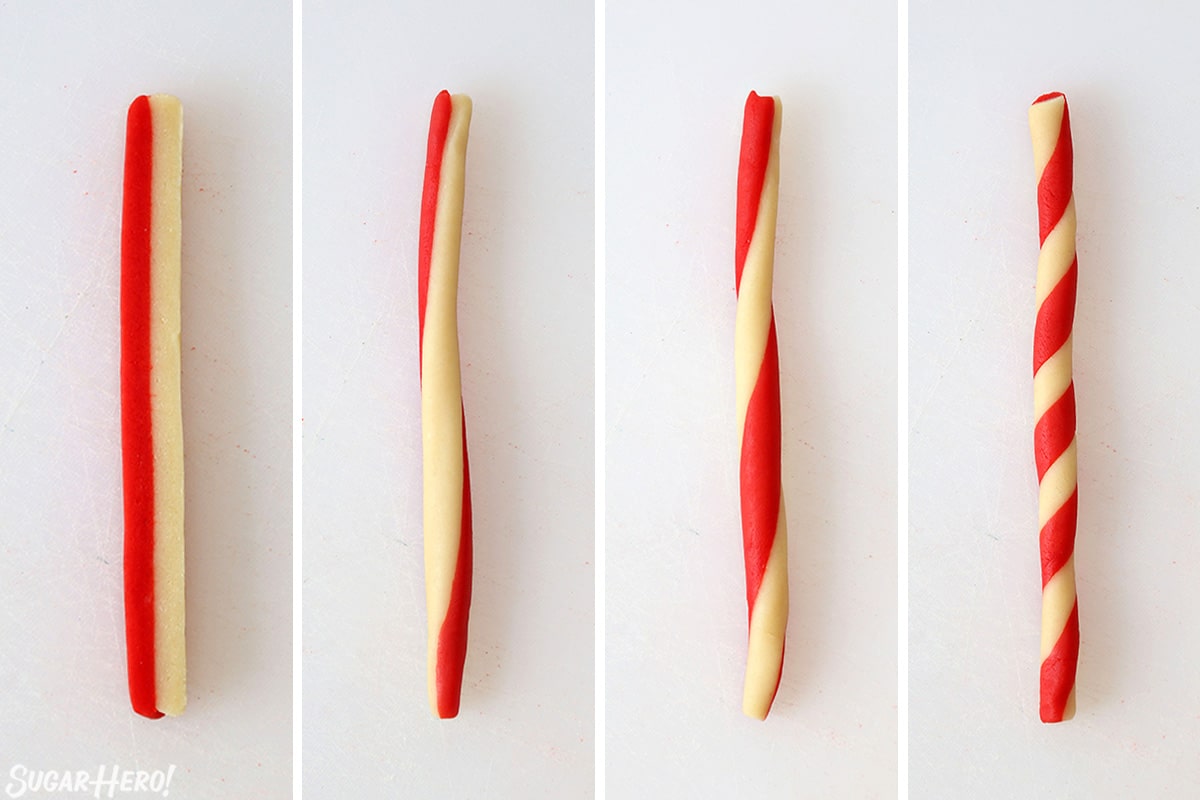
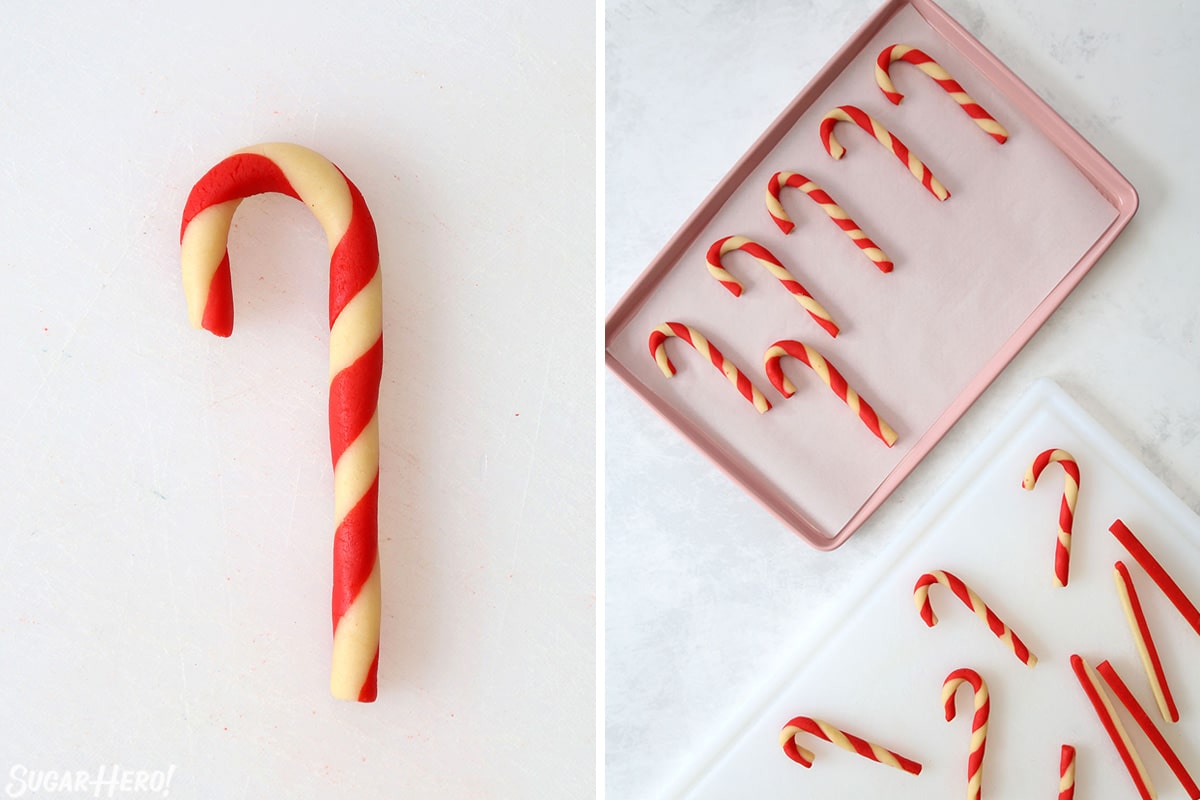
- Use a sharp knife to cut thin strips from the rectangle. Start cutting at the top of long side and cut across the short side. Each strip should be about ½-inch wide and 5-inches long. Roll the strip between your hands until the edges round out. Start to twist the dough gently with your fingers, creating a red-and-white spiral pattern. Curve one end of the dough around to form a hooked candy cane shape, and place on a baking sheet covered with parchment paper.
- Repeat with the rest of the dough and more baking sheets until you’ve made about 36 candy cane cookies. If the dough starts to tear and becomes hard to work with during this process, refrigerate it briefly to firm up.
- Preheat the oven to 350 F (175 C). Stick one of the baking sheets of cookies in the freezer while the oven preheats, so the cookies are chilled but not actually frozen when going in to bake.
- Bake the cookies for 12-14 minutes. The color won’t change much, but they will puff up and lose their raw shine, and the bottoms will be light golden.
- Cool completely before removing from the baking sheet. Store Candy Cane Cookies in an airtight container at room temperature for up to a week, or in the freezer for up to 3 months.
Measuring Tips
Our recipes are developed using weight measurements, and we highly recommend using a kitchen scale for baking whenever possible. However, if you prefer to use cups, volume measurements are provided as well. PLEASE NOTE: the adage “8 oz = 1 cup” is NOT true when speaking about weight, so don’t be concerned if the measurements don’t fit this formula.
Want to learn more about baking measurements and conversion?
Nutrition
Don’t miss the step-by-step tutorial showing how to make Candy Cane Cookies – check out the web story here!
📋 Instructions
Here’s a photo tutorial showing how to make Candy Cane Cookies. Full instructions and nutrition information are included in the recipe card down below.
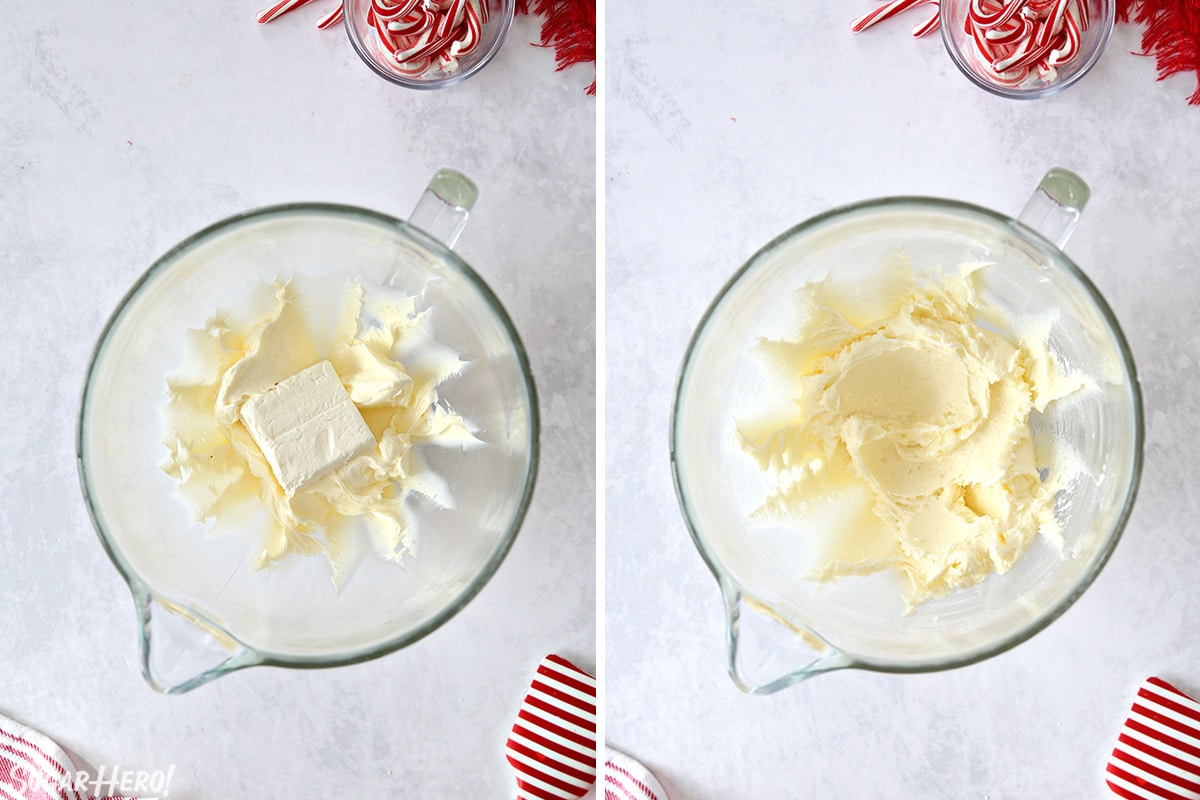
Cream together ingredients
- Beat room-temperature butter with a mixer until cream. Add cream cheese and sugar, and mix again until light, smooth, and fluffy.
- Add the egg yolk, peppermint extract, and salt, and mix until everything comes together.
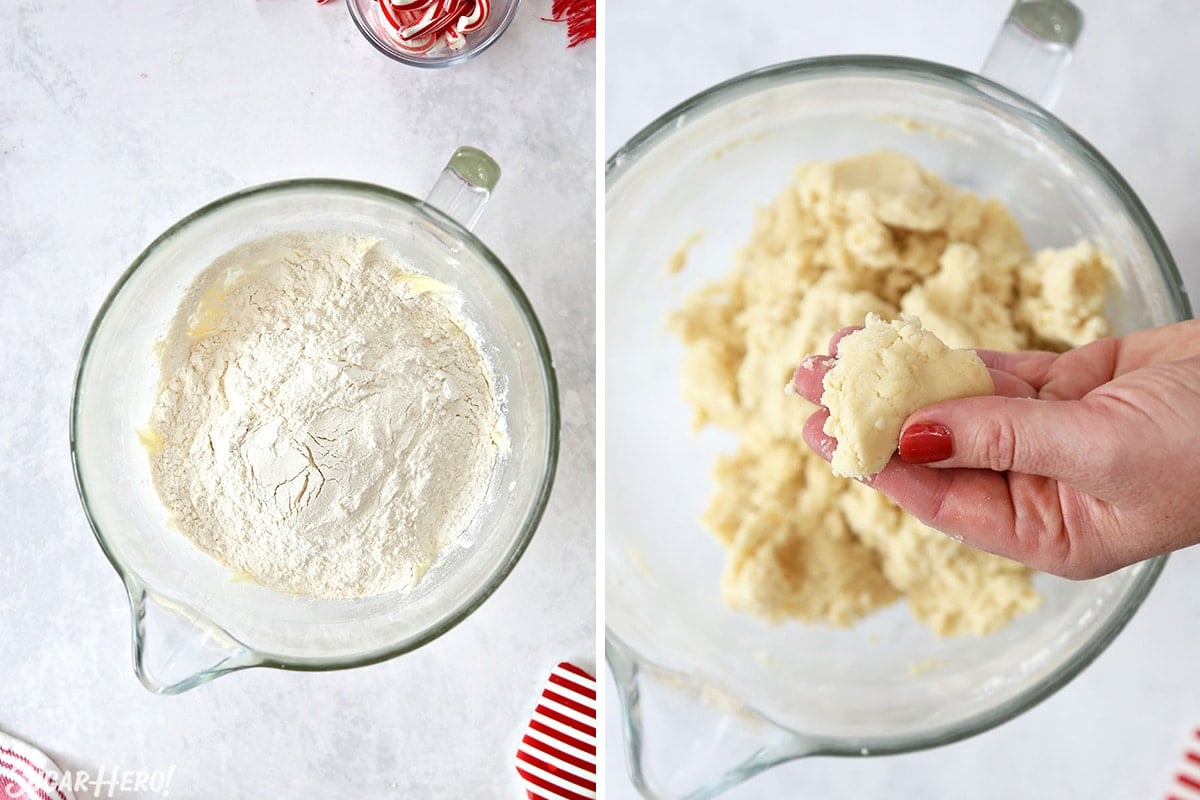
Add the flour
- Turn the mixing speed down to low and steadily stream in your flour. Mix until everything just comes together. Finish by scraping down the bottom and sides of the bowl with a spatula, so everything gets incorporated.
- The dough should be soft but not sticky.
Divide the dough
- Divide the dough in half. Use red gel food coloring to dye one half of the dough a vibrant red color.
- Place each half of your dough between two sheets of parchment paper. Use a rolling pin to roll each into a long, 1/4-inch thick rectangle, about 5″ wide x 18″ inches long.
- Chill your dough briefly before stacking the red rectangle on top of the plain rectangle. Use your rolling pin to meld the colors and flatten the dough to about ½” thick. Refrigerate again until firm.
- Starting at the top of the longer side, use a sharp knife to cut thin strips across the width of the rectangle. Each strip should be about ½-inch wide and 5-inches long.
Shape the cookies into candy canes
- Roll one strip of cookie dough between your hands until the edges round out.
- Start to twist the dough gently with your fingers, creating a red-and-white spiral pattern.
- Continue to twist –gently!– until you’re happy with the stripe design.
Create the candy cane shape
- Curve one end of the dough until your cookie resembles a candy cane.
- Place your cookies onto a parchment-lined baking sheet and repeat with the remaining dough.

Bake and enjoy!
- While you wait for the oven to preheat, pop the cookie sheets briefly into the freezer. Chilling the cookies before baking helps them keep their shape and prevents them from spreading too much.
- Bake for 12-14 minutes. They will puff up and lose their raw shine, but won’t take on much color.
- Allow your baked candy cane cookies to cool completely before serving and enjoying!

💡 Tips For Cookie Success
To make picture-perfect cookies, follow these important tips:
- Follow the recipe exactly. If you make substitutions, skip steps, or change the method, I can’t guarantee your results. It’s very important to use room temperature butter and cream cheese. I recommend reading through the recipe at least twice to make sure you feel comfortable with the entire process.
- Measure with precision. Occasionally, readers have had problems with the dough becoming dry. This is almost always a result of accidentally adding too much flour. It’s best to measure the flour by weight on a kitchen scale. If measuring by volume with measuring cups is your only option, use the spoon and level method: carefully spoon the flour into your measuring cup taking care not to compact it, then use the back of a knife to level off the top. Do not dip your measuring cup into the flour bin to fill it. This will compact the flour and you’ll end up with more flour per cup than the recipe calls for. More flour = dry cookies that don’t spread.
- Don’t overmix the dough. A common mistake when making cookies is overmixing the dough. (It’s especially common if you use cold butter and cream cheese: it takes much longer to fully mix in cold ingredients.) If you continue mixing after the ingredients are combined, the gluten in the flour will become over-actived, and you’ll end up with tough, dense cookies.
💡 Troubleshooting and FAQs
- Getting a bright red shade takes a lot of food coloring — it’s just the nature of the beast! Using a high-quality gel color like Americolor Super Red is helpful, because you need to use less of it, so the texture and flavor of your cookies won’t be affected. You can always use less food coloring if you prefer, but be aware that your cookies will probably be pink instead of red.
- These cookies make great edible gifts: add them to cookie plates, wrap them individually in cellophane, or package them with a cute mug and a packet of hot cocoa!
This dough is fairly easy to work with, but that doesn’t mean it’s foolproof! You might find it gets too soft to roll out or work with, depending on your kitchen’s temperature and how long the dough sits out at room temp. If you start struggling to roll or shape the cookies, give the dough a brief chill in the refrigerator. About 10-15 minutes is usually enough to make it workable again.
You can also add a bit of flour to your hands or work surface as a last resort, but I prefer to avoid adding additional flour whenever possible. Too much flour can make the cookies tough or dry.
I prefer to bake my candy cane cookies on an aluminum, non-insulated baking sheet. I have found that dark-colored or thin baking sheets cook the bottoms of these cookies too quickly, leaving the centers underbaked. Insulated cookie sheets can give your cookies pale bottoms and non-crispy edges. If you’re not sure which of your baking sheets to use, I suggest baking one or two cookies on each sheet and see which cookie texture you prefer.

Make-Ahead and Storage Instructions
Candy Cane Cookies can be stored in an airtight container at room temperature for up to 1 week, or in the freezer for up to 3 months. As with most cookies, their taste and texture is usually best within 3-4 days of baking.
Alternatively, you can freeze the cookie dough to bake at a later date. You have 2 choices here: you can make your cookie dough, dye it, and layer your two colors, then store your dough in the freezer for up to 3 months. When you’re ready to bake, let your dough defrost in the fridge, shape into candy canes, and bake as normal.
Or, you can fully form the candy cane cookies, then freeze the cookies on baking sheets so they retain their shape. Once frozen, transfer them into an airtight freezer container, and freeze for up to 3 months. When you’re ready to bake, they can be baked from the freezer, but the cooking time might need to be slightly longer.


What can I use to substitute for the cream cheese? It’s quite pricey where I live, so can I just omit it?
Hi Hannah! Thanks for your question. I’ve been pondering this and I don’t think there is a good substitution for the cream cheese. You could try using an equal amount of butter, but the texture of the cookies will be slightly different; not bad, just different. The cream cheese acts as a softening agent and is one of the main reasons the cookies are so tender. So, if you make the switch don’t be surprised if the cookies look a little different than pictured. I hope that helps. Sorry cream cheese is so expensive. That’s frustrating. I’d love to hear what you think if you try the recipe with more butter. Best of luck.
Hi Elizabeth,
I don’t have a stand mixer can I use a hand mixer with whisk attachments?
Hi Gina! You can definitely use a hand mixer for this recipe. You’ll want to use the beaters and keep in mind that you might need to mix slightly longer to get everything incorporated. Merry Christmas!
I want to make these cookies but I need to make it eggless. What can I substitute for the egg yolk? Thanks!
Hi. We’ve never tested this recipe with egg yolk substitutions so I can’t promise that the results will be the same. I do know that Bob’s Red Mill has a great egg replacer but it replaces a whole egg. You could try it and see what you think. I’d also recommend making a half batch if you experiment with the egg replacement so that your ingredients don’t go to waste. We’d love to hear how it turns out if you give it a try. Merry Christmas!
I love this recipe! Very cute! This is a very easy recipe, but it does take some time not too bad. I rolled out using saran wrap worked like a charm put them in the fridge at the correct size to firm up, peeled the saran wrap off and put the two layers together then I let it soften on the cookie sheet with one layer of saran on the bottom as soon as it softened enough, I use mine bench scraper to cut the thin strips then I let them sit to warm up a little bit before rolling be sure to clean your knife often so the red dye doesn’t get into the white dough or it doesn’t look very good when it bakes. The door rolls very nicely when it has warmed up so cute only puffs up a little bit cut your strips thin so you don’t get huge cookies unless you want them like that great addition to my cookie tray I am not a fan of peppermint flavor maybe because I used the wrong one. I used 365 peppermint extract did not care for the taste. I may try just using vanilla next time. My husband said they were good Elizabeth your recipes are so easy to follow organized in on point thank you. When I move onto to someone else’s recipe, I get frustrated you are very organized lol
Hi! Thank you so much for the recipe review, rating and super helpful tips for other readers. We are so glad you are enjoying our recipes and that the details are helpful. We hope you have a very merry Christmas!
Very time consuming and then they didn’t turn out at all. While baking they were all pock marked and cracked. Needless to say I won’t be serving these to my family.
I’m sorry to hear that you had troubles with the recipe. I know how frustrating that can be, and I’d be happy to help you troubleshoot. My first guess is that too much flour got added to the dough on accident or that the dough got overmixed. Another possibility is that your oven might be running a little high. Either way, I’m sorry for a frustrating experience.
delicioso! made for a cookie exchange and everyone loved them.
Hi Marilinda! Thanks for leaving a comment. So glad you enjoyed the recipe! Merry Christmas!