


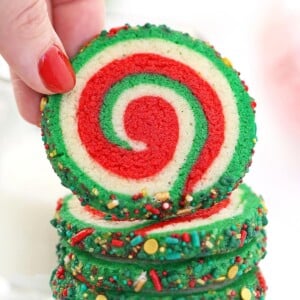
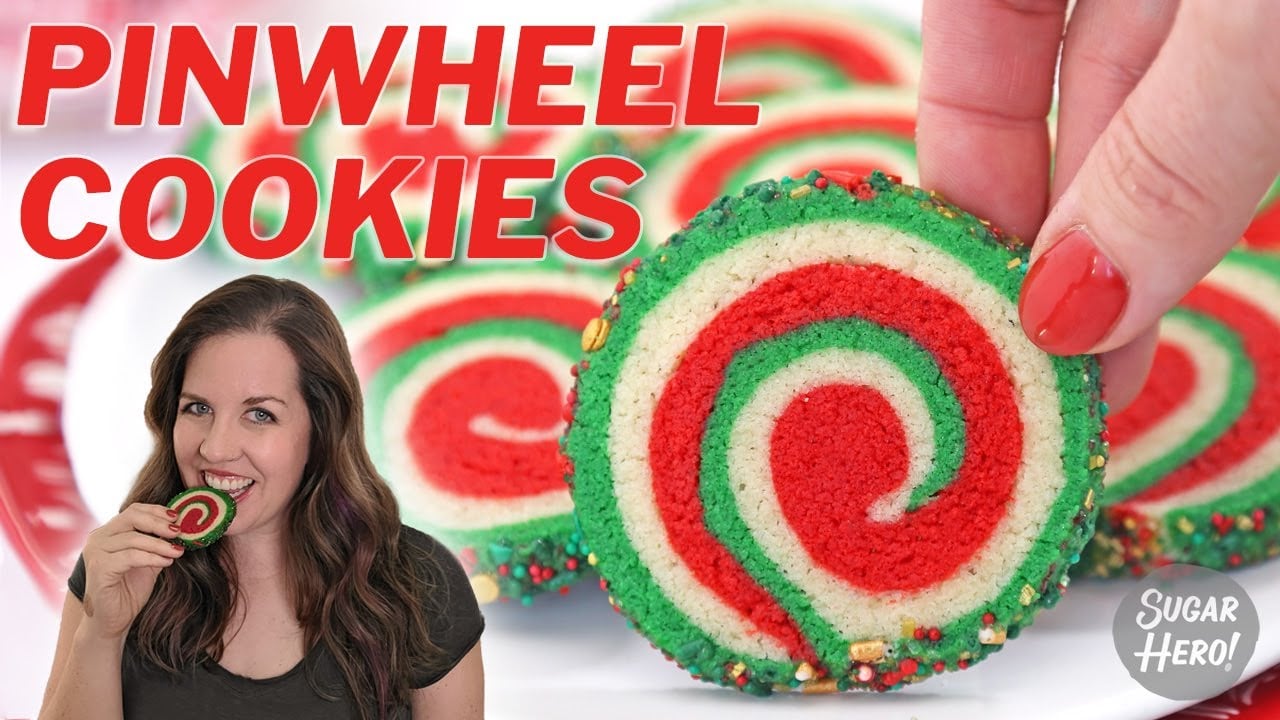
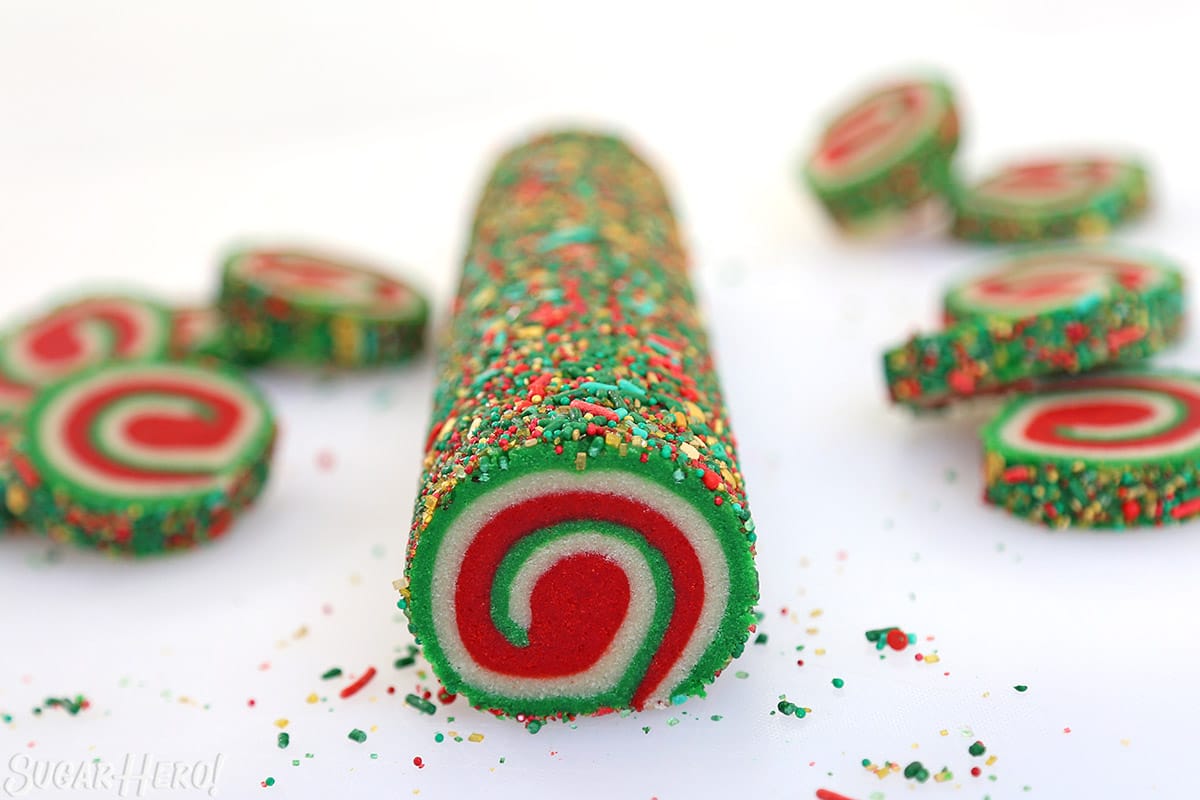
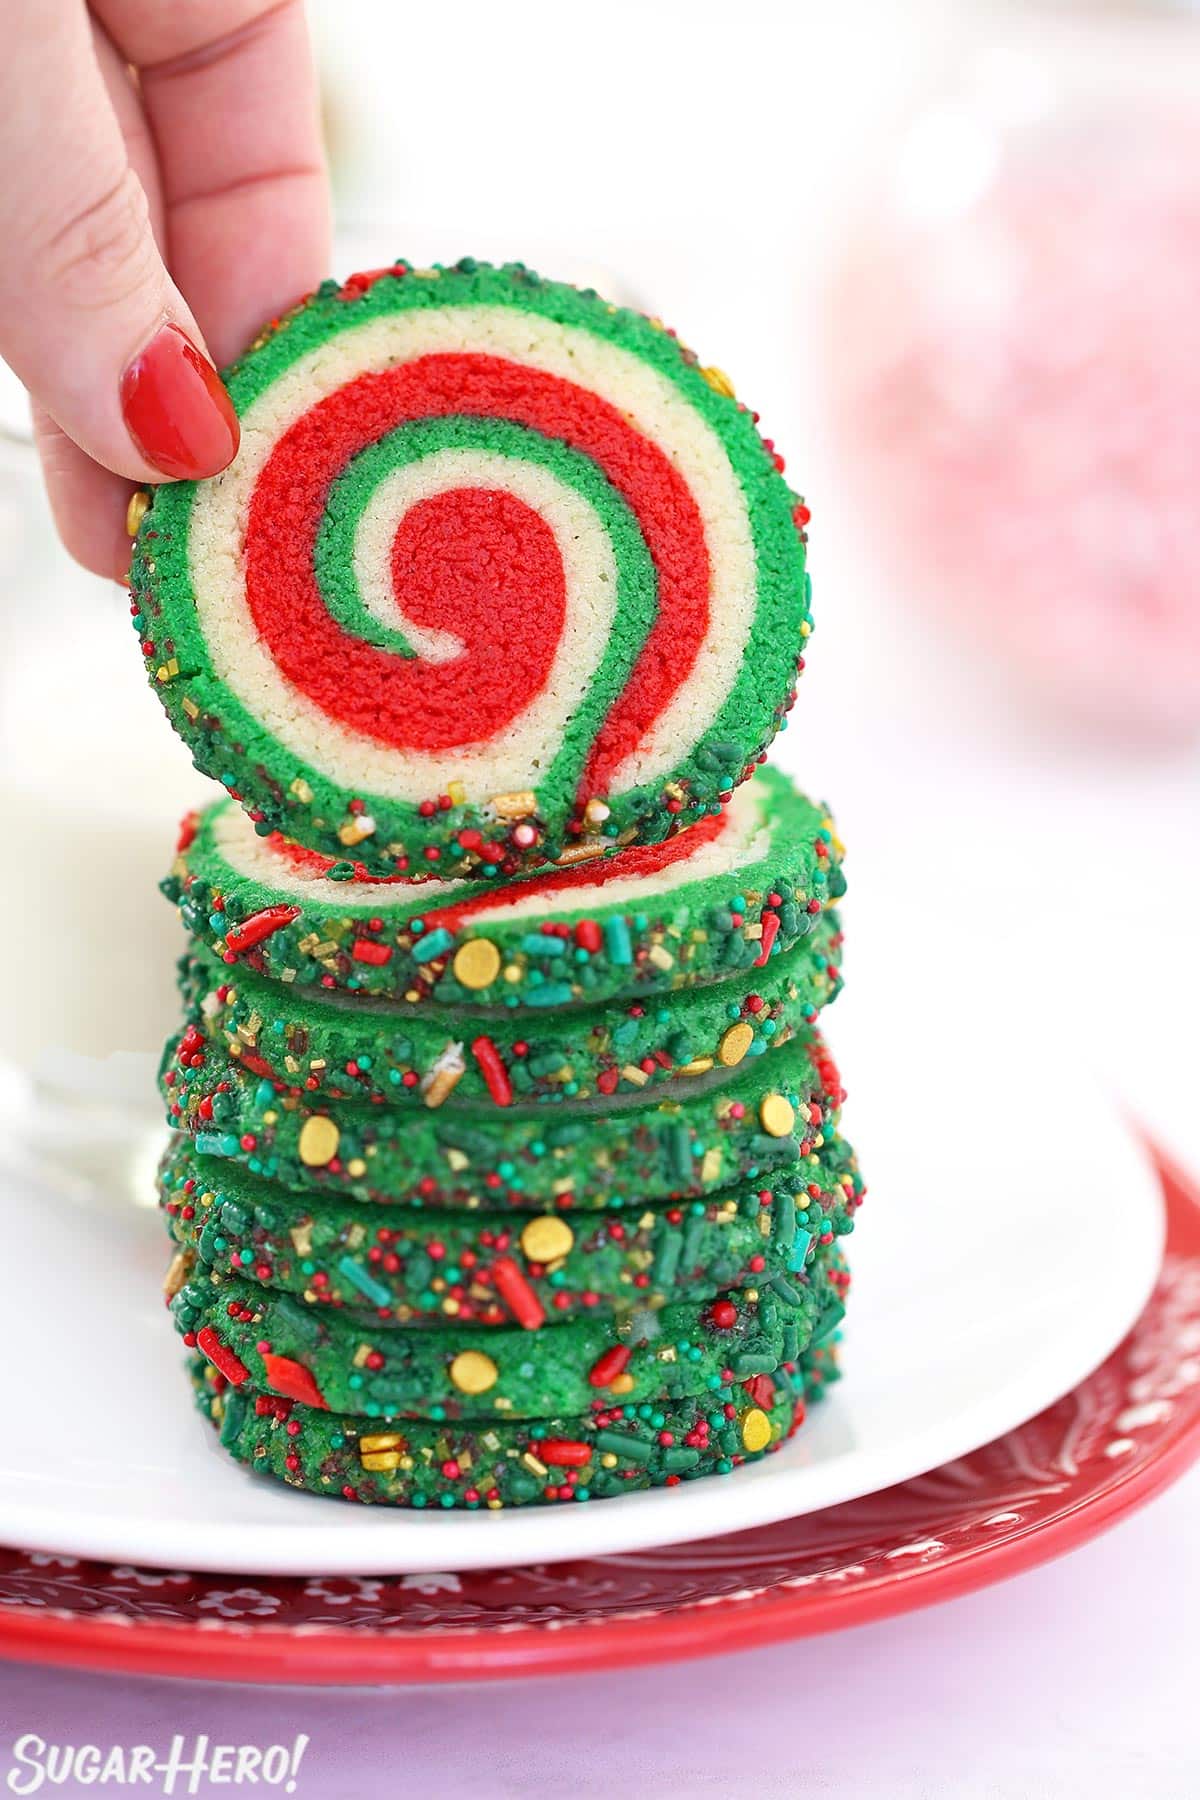
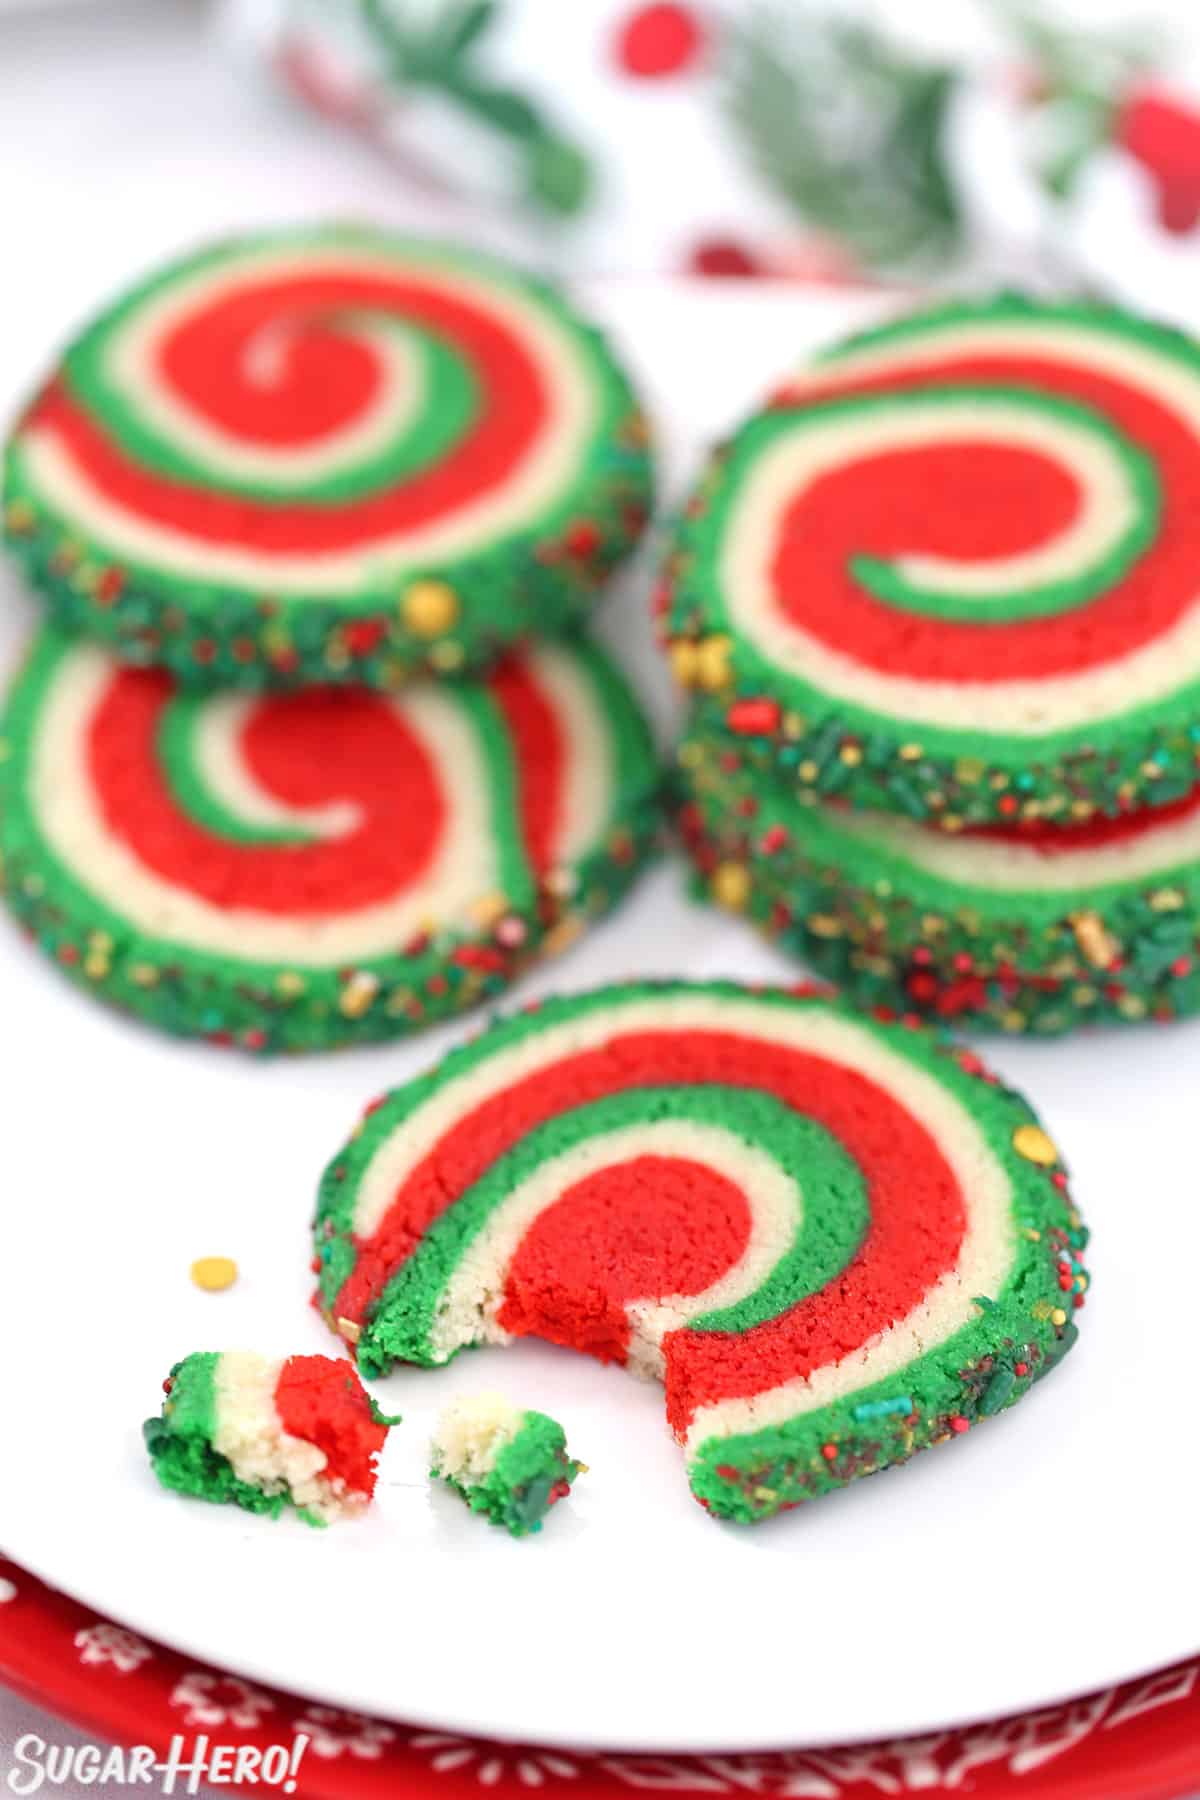
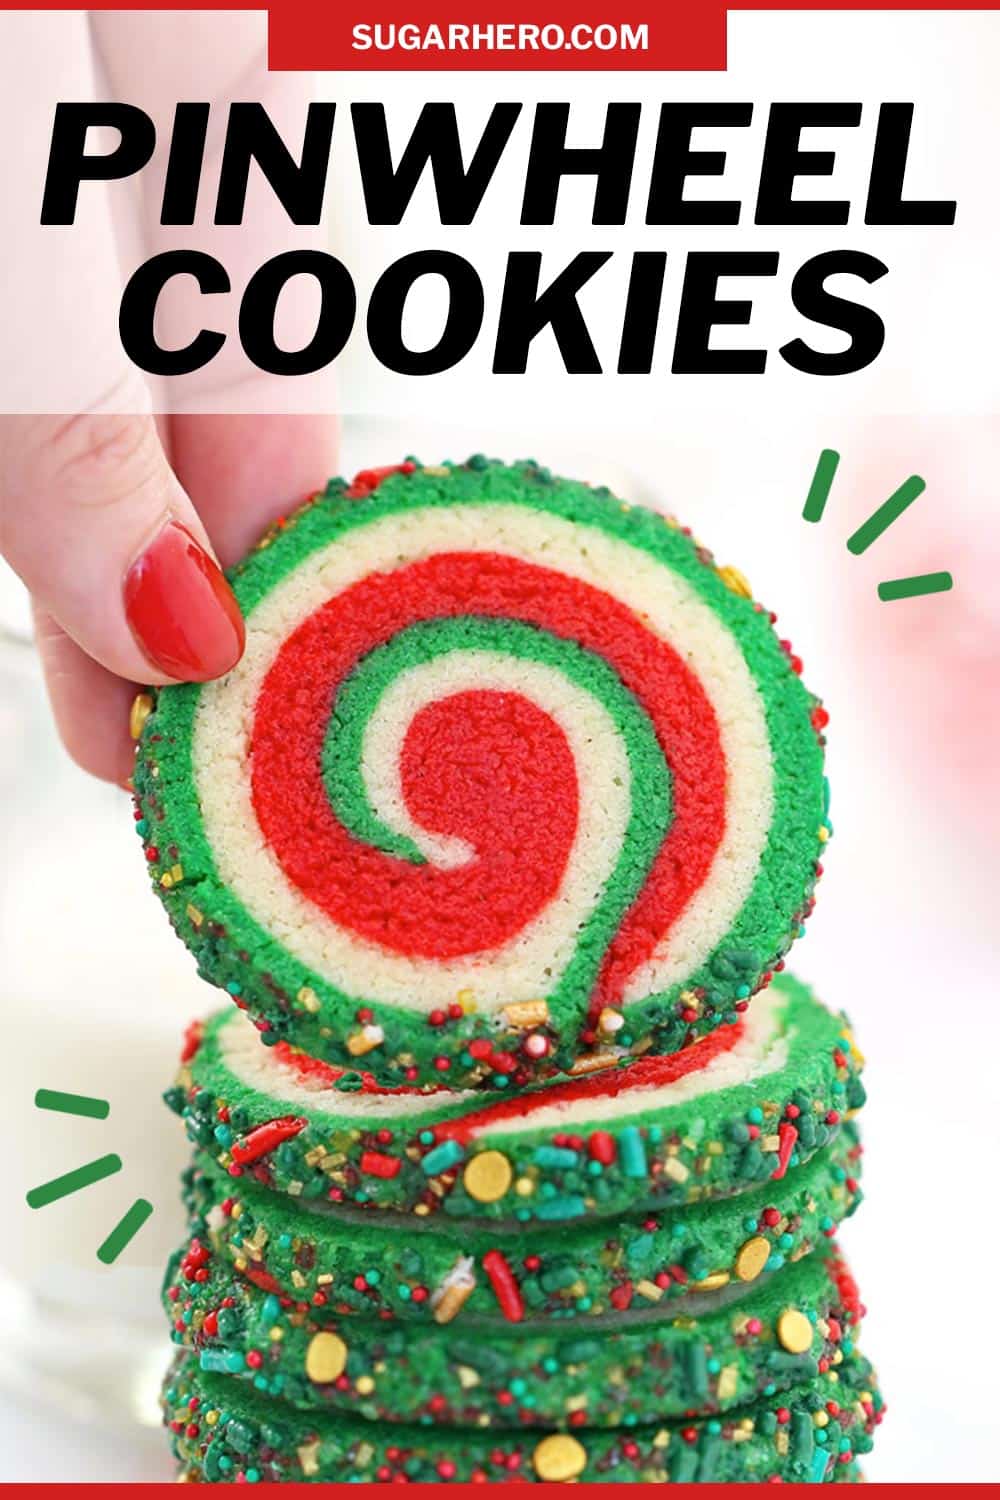
These festive Pinwheel Sugar Cookies might be the best Christmas cookie recipe ever! They’re made with a simple sugar cookie dough formed into a beautiful red, white, and green spiral design.
🎄 The Surprisingly Easy Christmas Cookie!
I’m so excited to share this recipe for pinwheel sugar cookies with you, because they are guaranteed to make you feel like a dessert magician. I hope you’re ready to sit back and let the compliments roll in, because these cookies will make you the most popular person at the holiday potluck.
Don’t let the gorgeous red, white, and green swirls fool you–these cookies are basically a sugar cookie wearing a fancier outfit. They start with a simple 5-minute cookie dough, and from there you roll a little here, cut a little there, abracadabra, and voila–you have beautiful swirled cookies!
More Christmas Cookies
Need a few more easy Christmas cookie ideas for a platter or cookie swap? Try some of my other favorites like Oreo Cookie Christmas Ornaments, Chocolate Peppermint Kiss Cookies or Black Sesame Shortbread Cookies!
🌀 Pinwheel Cookies: Not Just for Christmas
The best part is, these are not just a Christmas dessert! Once you get the hang of making them, you can make endless varieties of pinwheel cookies, with other color schemes, sprinkles, and flavoring variations. You could even add some chocolate to make chocolate-swirled pinwheel cookies.
Ready to make these? I’m going to show you how to make pinwheel sugar cookies from start to finish, with step-by-step photos and all the info you need to make them right on your first try!
More Sugar Cookies
If you’re on a cookie roll after making these (get it??) you’ll love my other cookie recipes, like Big Soft Sugar Cookies, Cinnamon Roll Sugar Cookies, and Watercolor Rose Sugar Cookies. Or get playful and make some Sugar Cookie French Fries!
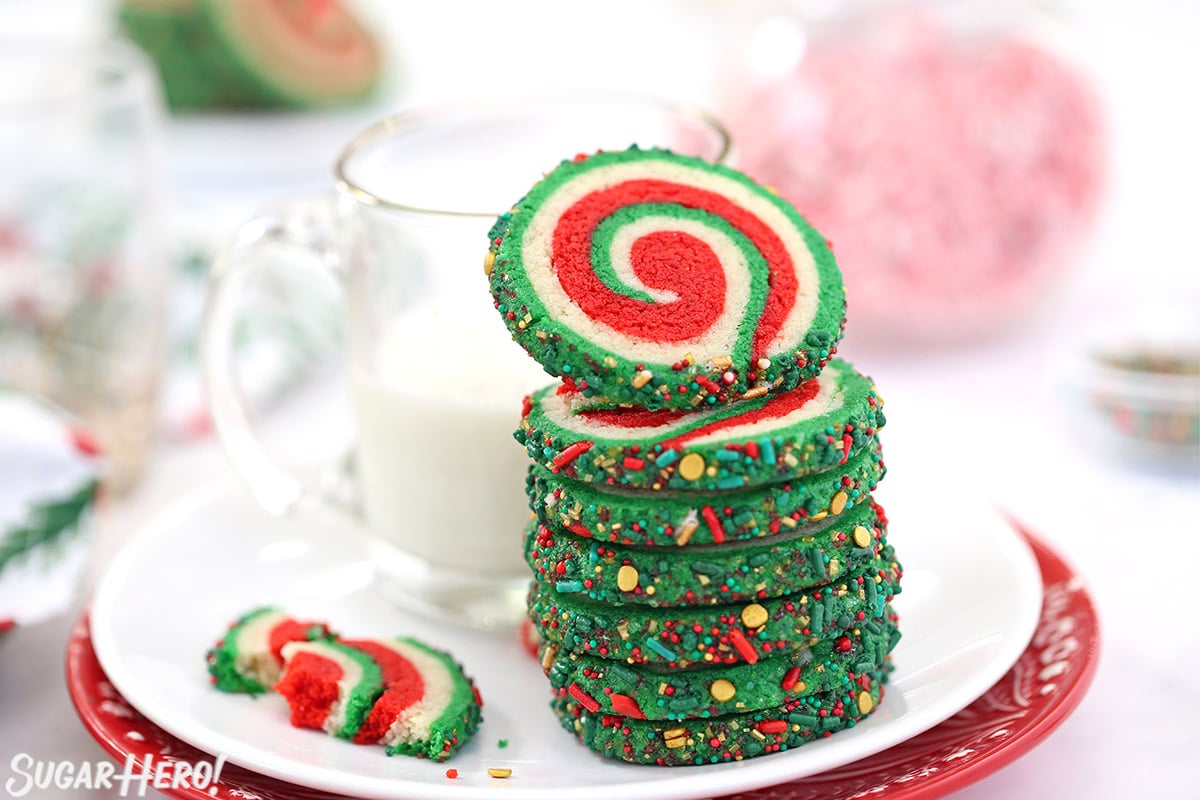
Table of Contents
🧾 What You’ll Need
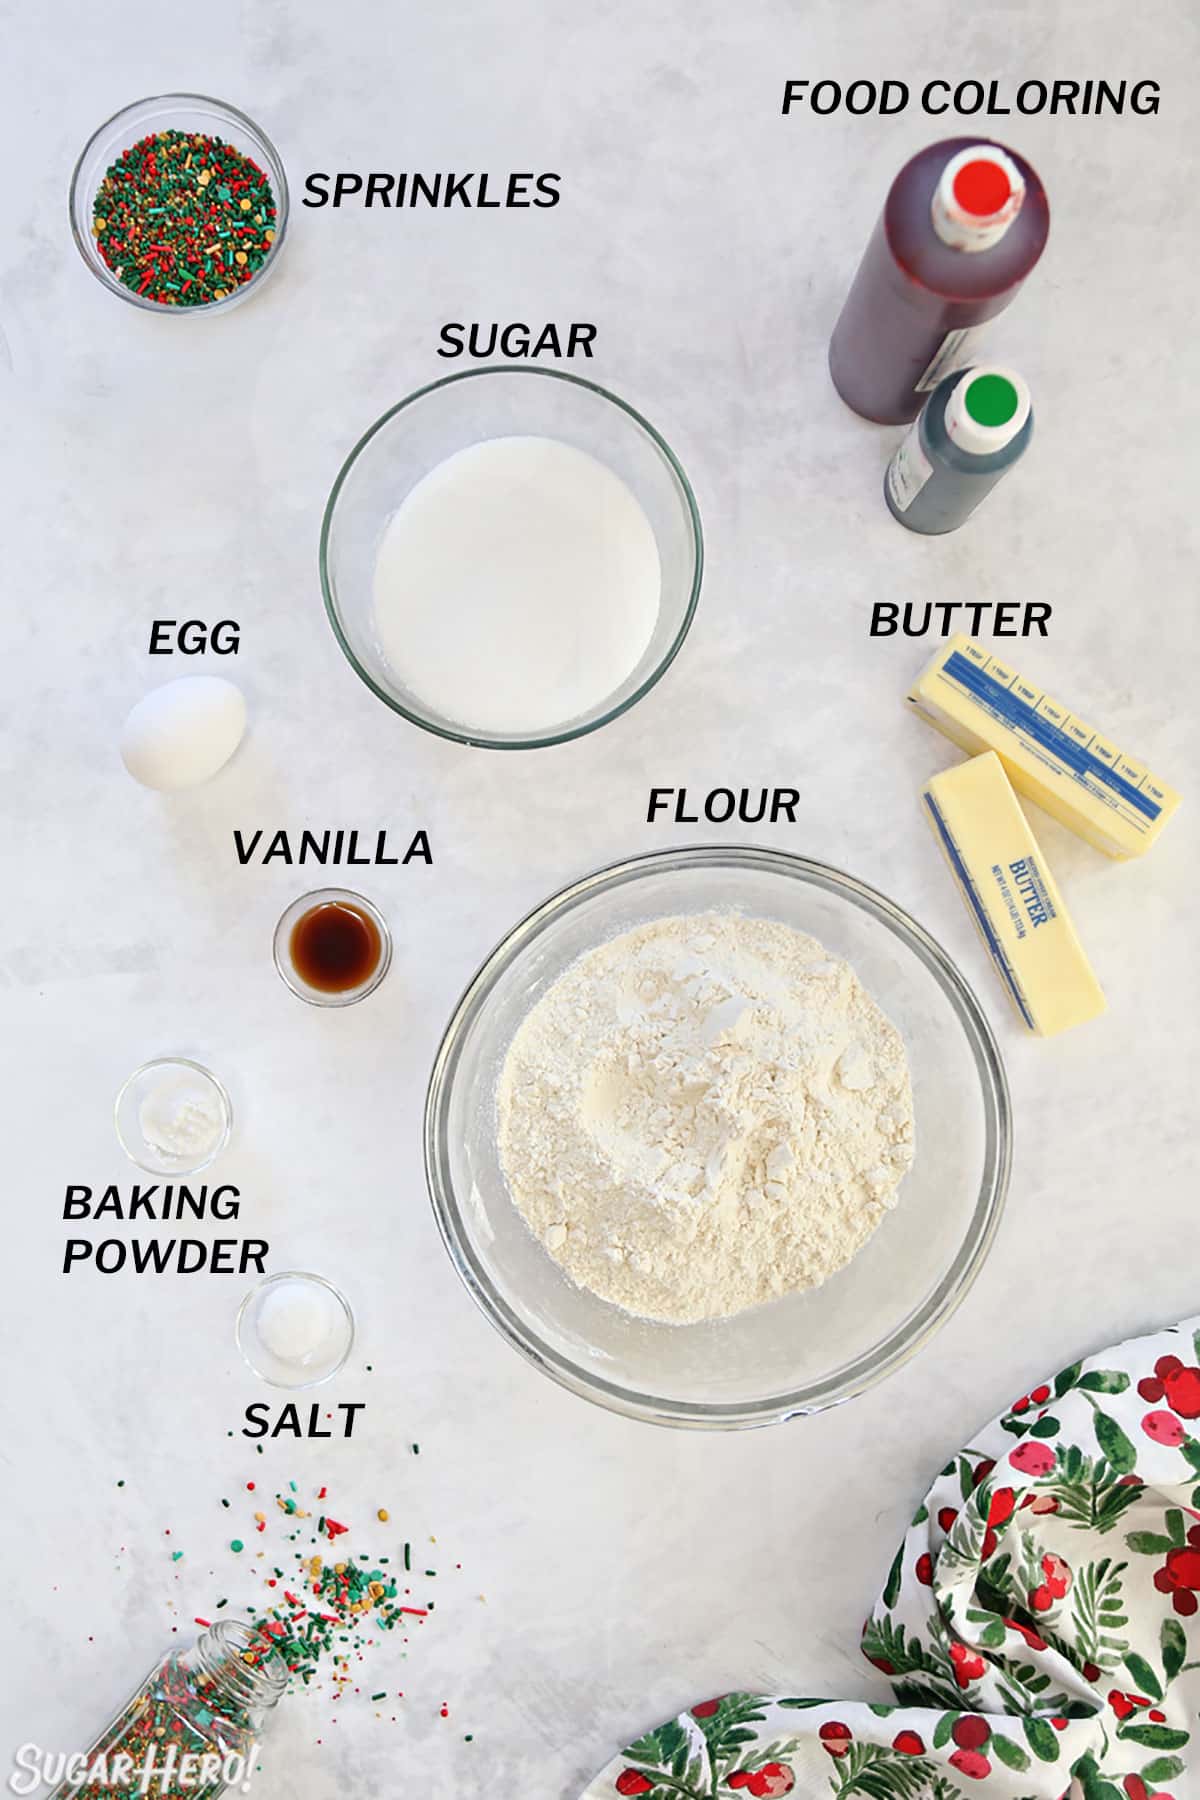
Ingredients
The best part of these pinwheels (aside from the taste, texture, and appearance…) is the short and simple ingredient list! Like many cookie recipes, they require just a handful of pantry staples, most of which you probably have on hand already. Here are a few tips to keep in mind when assembling the ingredients. (Links are affiliate links and I earn a small commission from qualifying purchases.)
- Butter: Your butter should be at room temperature to make these cookies. This means it’s pliable but cool–you don’t want it to be greasy and melty. I always recommend unsalted butter in baking, so you can control the precise amount of salt. If you only have salted butter, use that but omit the additional salt in the recipe.
- Egg: The egg you use should be large size, and at room temperature. Tip: if you need to warm up an egg quickly, place it in a bowl of hot water for 5 minutes. This won’t cook the egg, but will bring it to room temperature so it’s perfect for baking.
- Vanilla extract: Vanilla is the classic sugar cookie flavor, but you can experiment and add other extracts in addition to or instead of vanilla. Try almond, orange, or lemon!
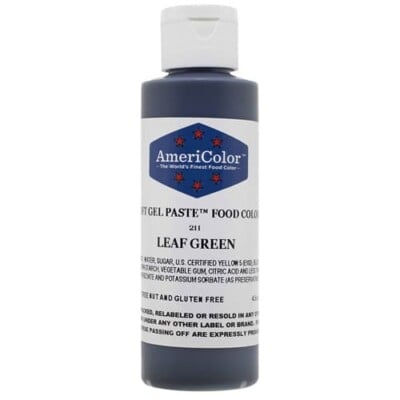
- Food coloring: For the best results, you will want to use gel food coloring. It is more concentrated than typical water-based colorings, so you don’t have to use as much coloring to get strong, vibrant shades. I use and recommend Americolor gel coloring. For this recipe, I used Americolor Super Red and Americolor Leaf Green shades.
- Sprinkles: Most sprinkles will work in this recipe. Jimmies, nonpareils, and sparkling sugar are all great choices. Avoid any chocolate pieces (like Sixlets), crushed hard candies (like candy cane pieces), or sprinkle mixes with royal icing decorations. I mixed up my own sprinkle blend for these cookies, but it is very similar to these sprinkle blends: Christmas Past, Elfin Around, and Christmas Magic.
Equipment
Great news, sugar heroes — no special equipment required for these babies! All you need are some common cookie tools to make your life easier. (Links are affiliate links and I earn a small commission from qualifying purchases.)
- Baking sheets: Heavy-duty aluminium baking sheets will keep the bottoms of the cookies from burning and help cookies bake evenly.
- Parchment paper: I never bake directly on my baking sheets–it’s all about the parchment, baby! Save time and cleanup by using silicone liners or parchment paper when baking cookies.
- Mixer:a stand mixer or a hand mixer will both work in this recipe.


Leave a Review!
If you make this recipe, let us know! Leave a ⭐️⭐️⭐️⭐️⭐️ rating on the recipe below, and leave a comment, take a photo and tag me on Instagram @elabau, or use #sugarhero on IG!
Christmas Pinwheel Cookies
Ingredients
- 12.75 oz all-purpose flour, (3 cups)
- 1 tsp baking powder
- ½ tsp salt
- 8 oz unsalted butter, (1 cup), at room temperature
- 8.75 oz granulated sugar, (1.25 cups)
- 1 large egg, at room temperature
- 2 tsp vanilla extract
- Red and green food coloring, I used Americolor gel colors
- 6.75 oz sprinkles, (1 cup)
Instructions
- Whisk together the flour, baking powder, and salt in a medium bowl, and set aside temporarily.
- Combine the butter and granulated sugar in the bowl of a large stand mixer fitted with a paddle attachment. Mix the butter and sugar together at medium speed for 2-3 minutes until light and fluffy.
- Turn the mixer to low, add the egg and vanilla extract, and mix until well-incorporated.
- With the mixer stil on low speed, slowly add the flour and mix until just a few streaks of flour remain. Stop the mixer, and finish scraping down the bottom and sides of the bowl with a rubber spatula. The dough should be soft and supple but not sticky.
- Divide the dough into 3 equal parts. If you have a kitchen scale, each portion should be approximately 10 ounces.
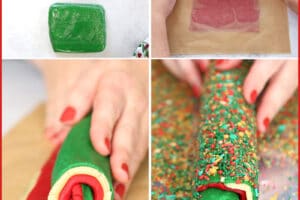
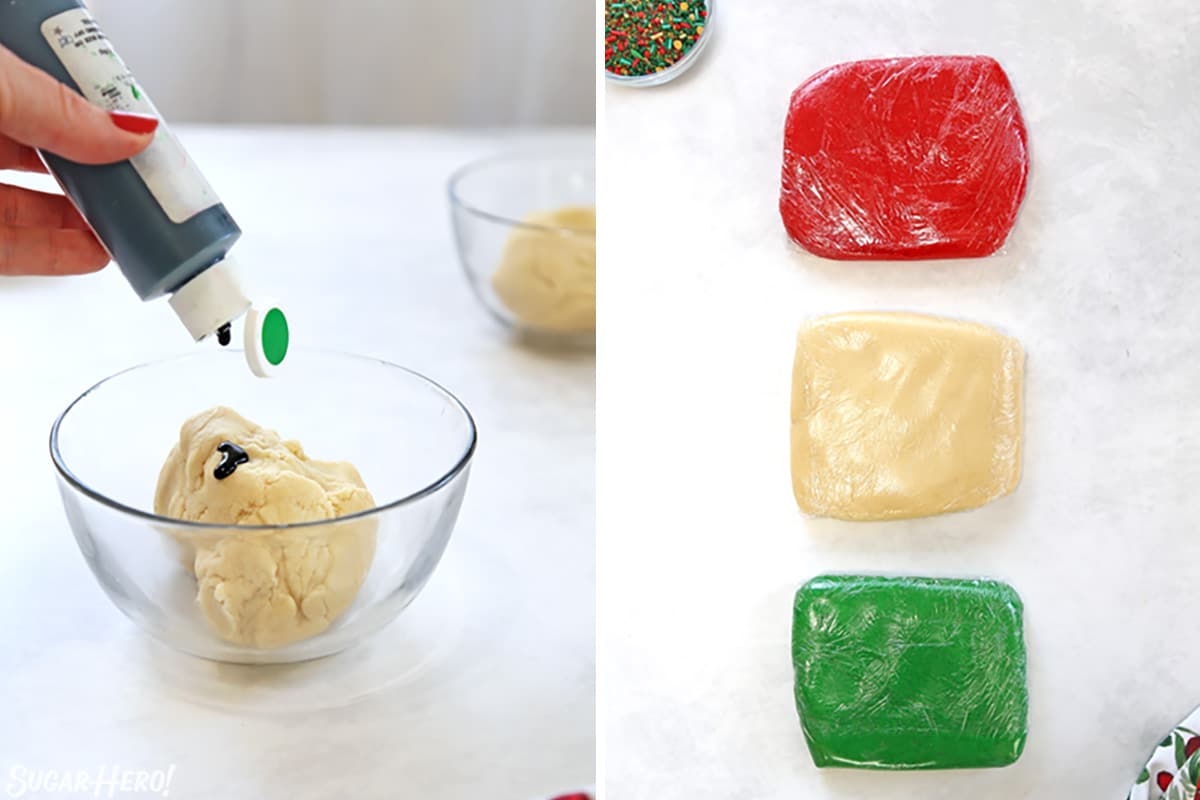
- Leave one portion uncolored, and use gel food coloring to color the other two portions red and green. You can stir the food coloring in by hand, knead it in like bread dough, or mix it in using the mixer. (If you use the mixer, keep a close eye on the dough and run it for a short time so the dough doesn’t get overmixed and tough.)
- Form each color into a disc and wrap them tightly in plastic wrap. Refrigerate for at least 45 minutes, until firm.
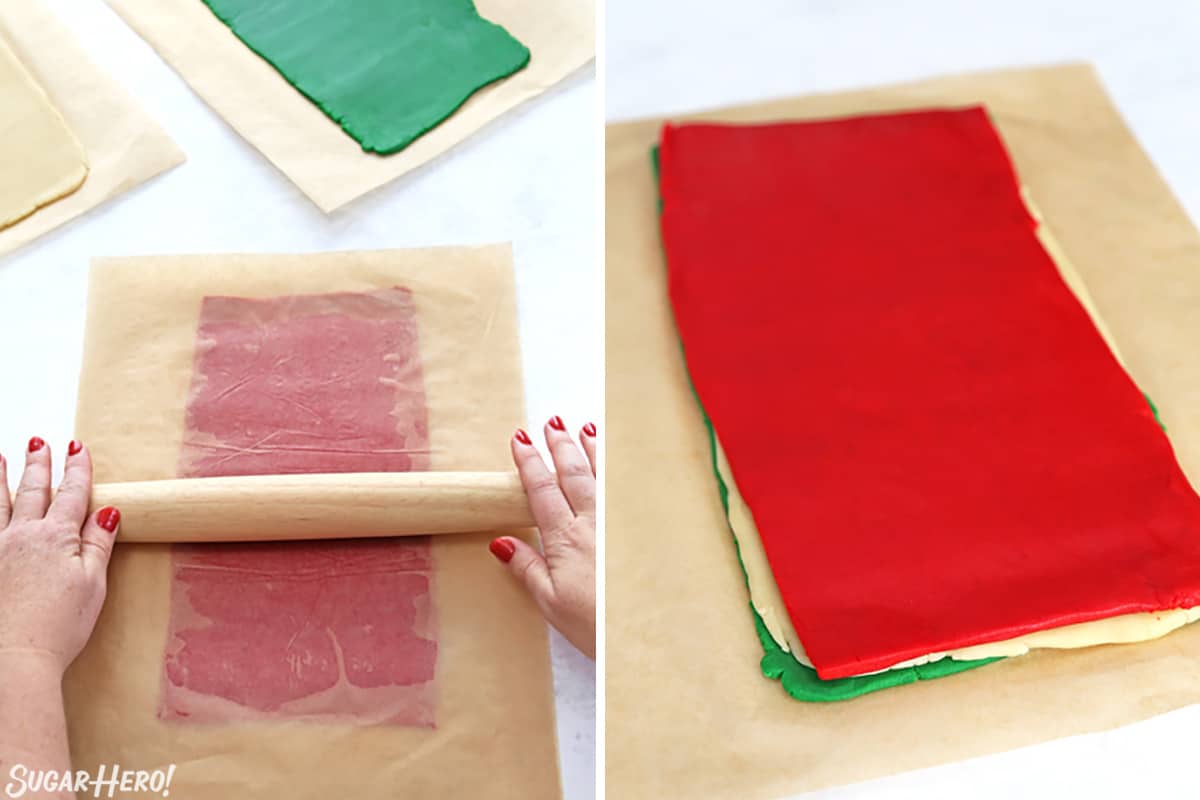
- Roll each color out between two sheets of parchment to a long rectangle, approximately 6 x 13” long. Try to avoid adding additional flour at this step, or else the cookies might be tough. If the dough starts to feel too soft to work with at any point in the rolling/stacking process, chill it again in the refrigerator until you can work with it easily.
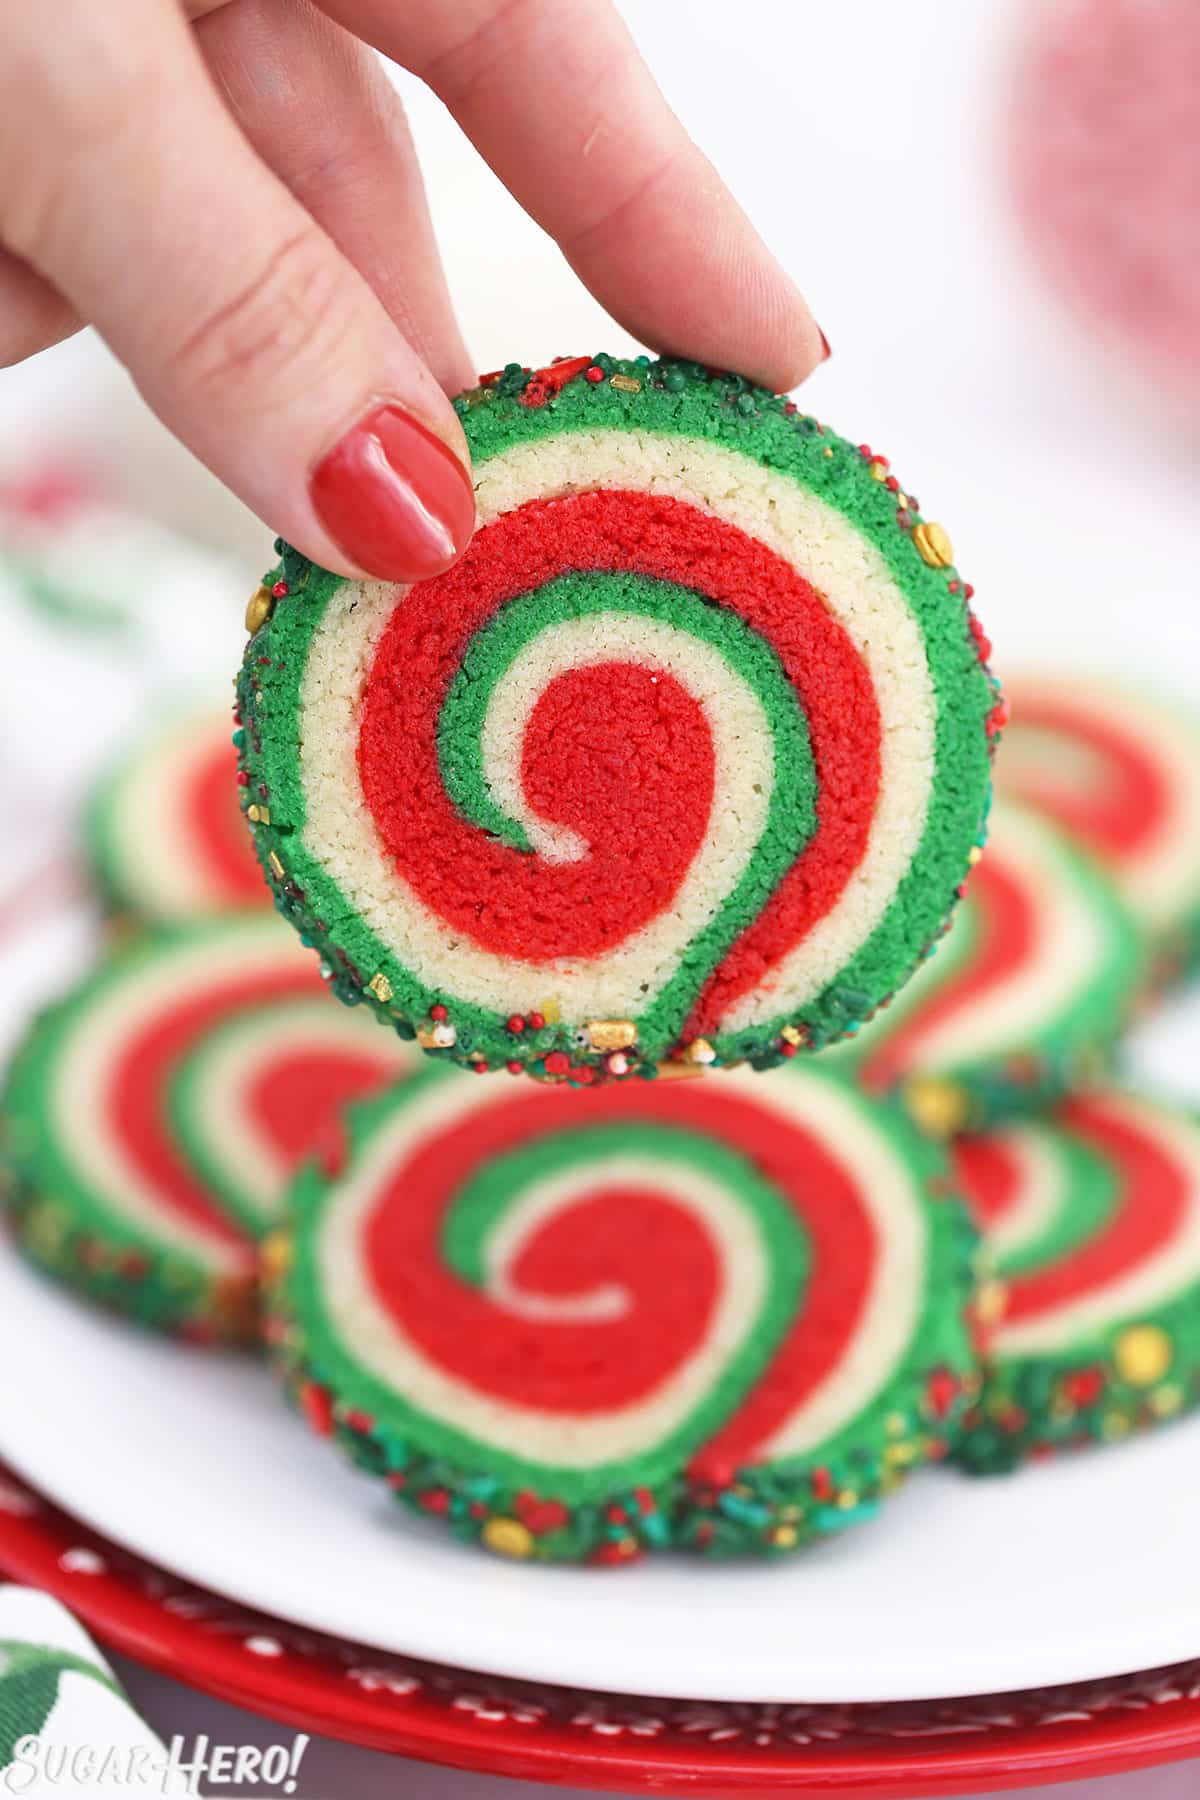
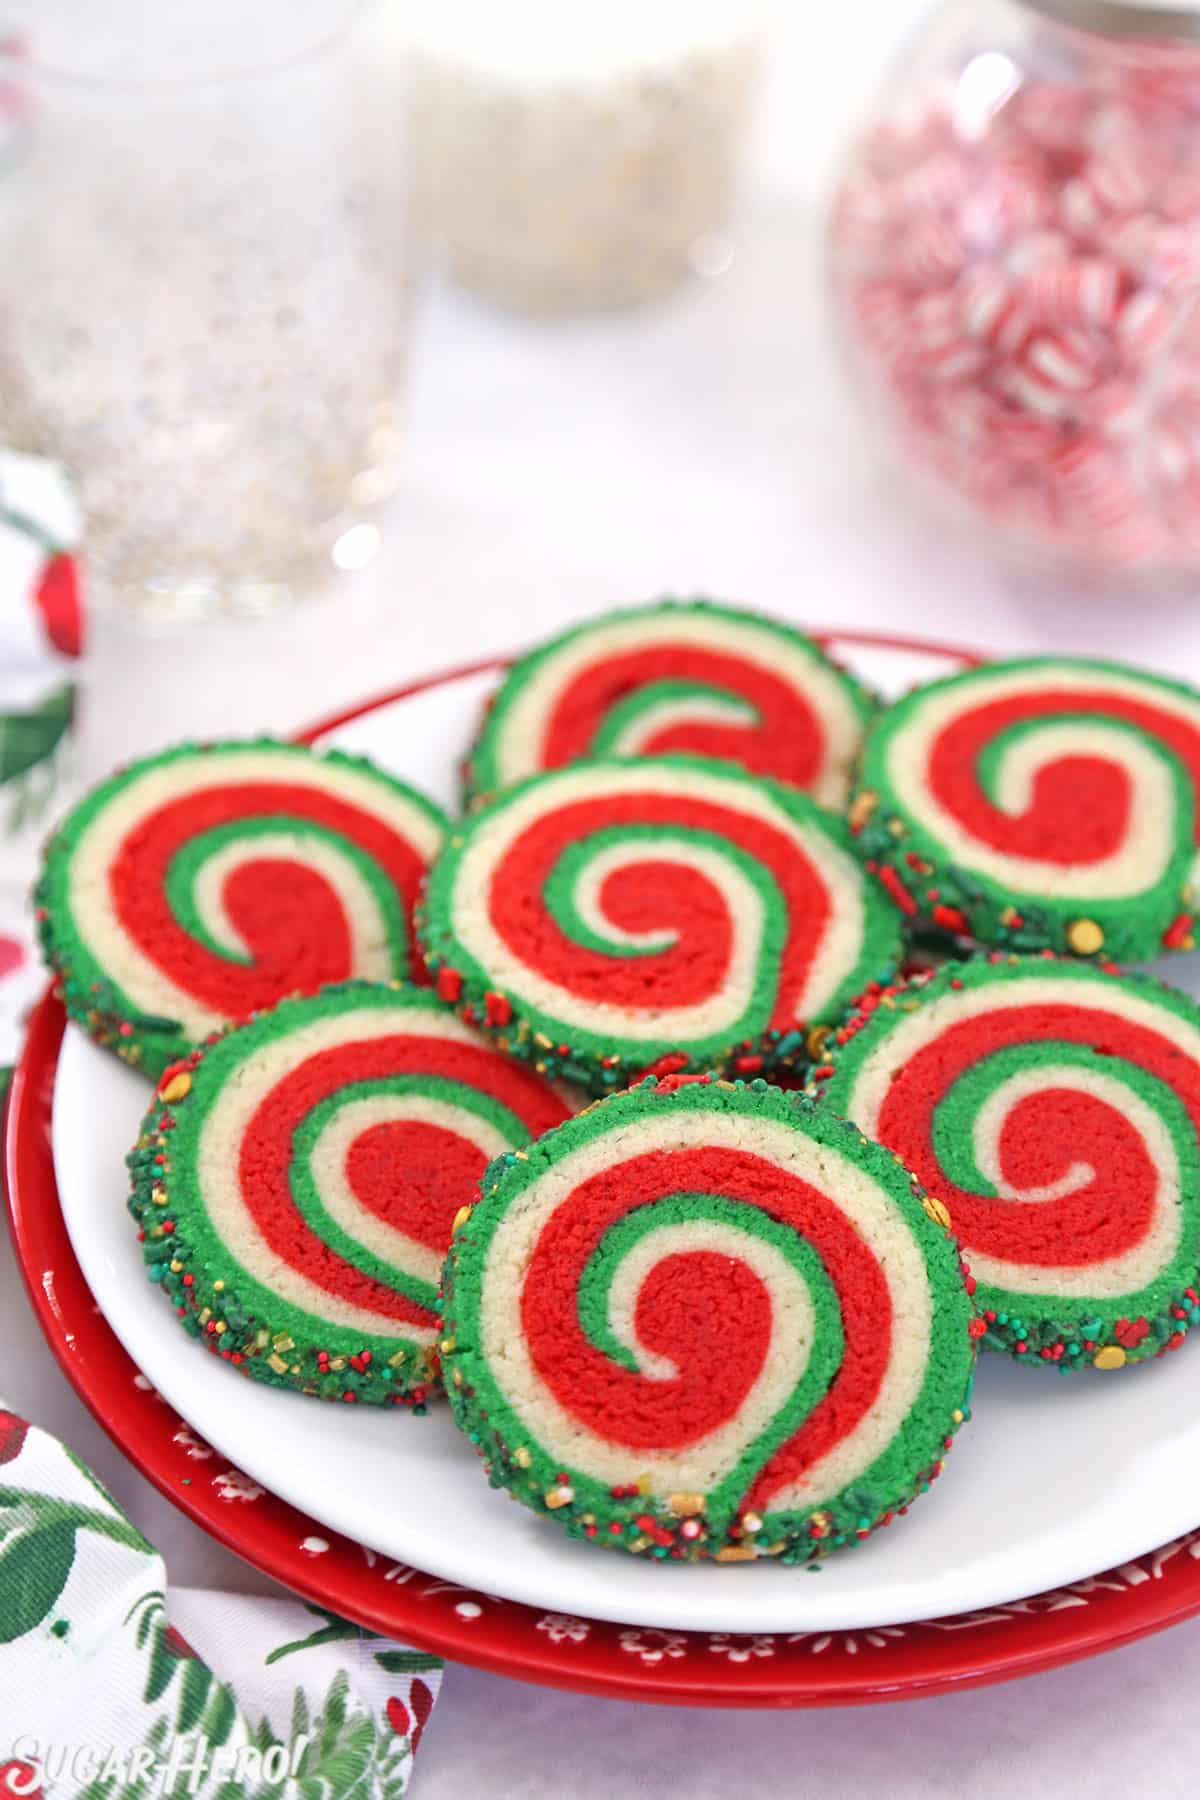
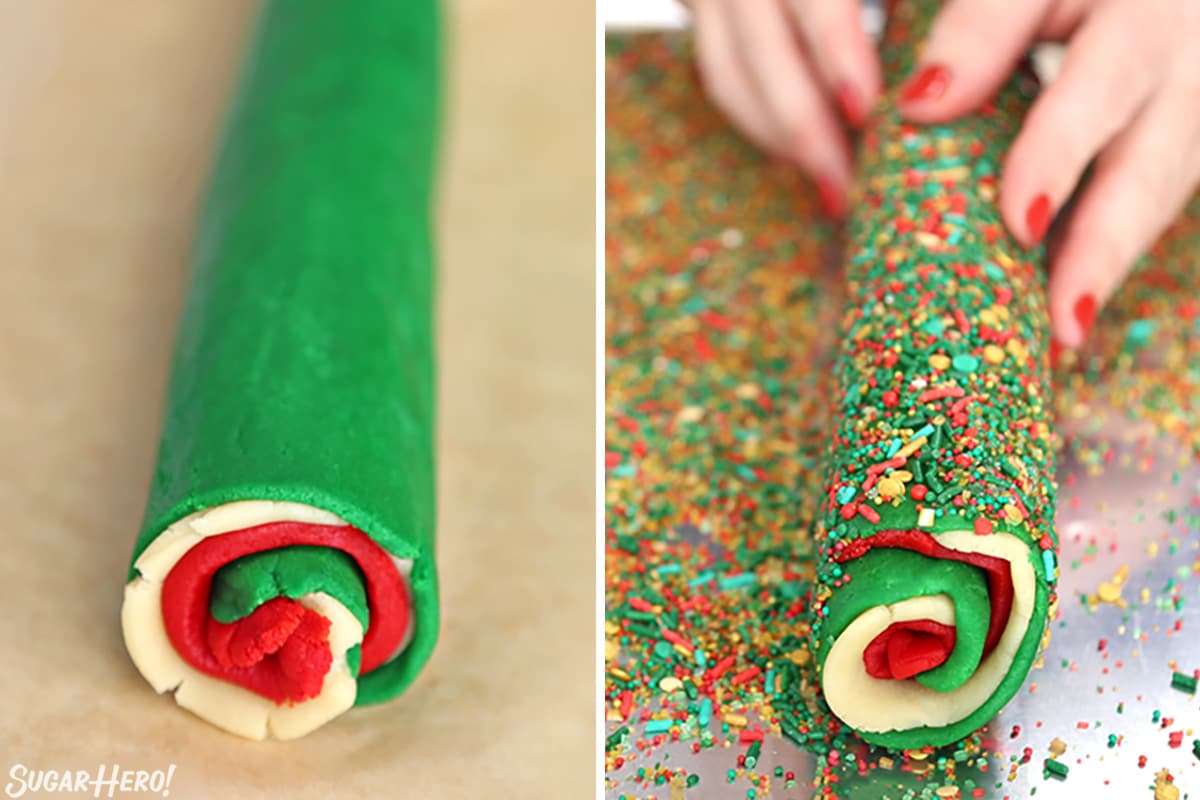
- Stack the dough rectangles on top of each other in this order: green, white, then red on top. Roll the dough up into a long, tight spiral.
- To roll the edges in sprinkles, brush the outside of the dough log with a very thin layer of corn syrup – you just want enough to make the sprinkles stick. Scatter the sprinkles on a baking sheet, and roll the log around the sprinkles, pressing it into the sprinkles so they adhere and it is completely covered. You can also skip this step and leave the edges plain.
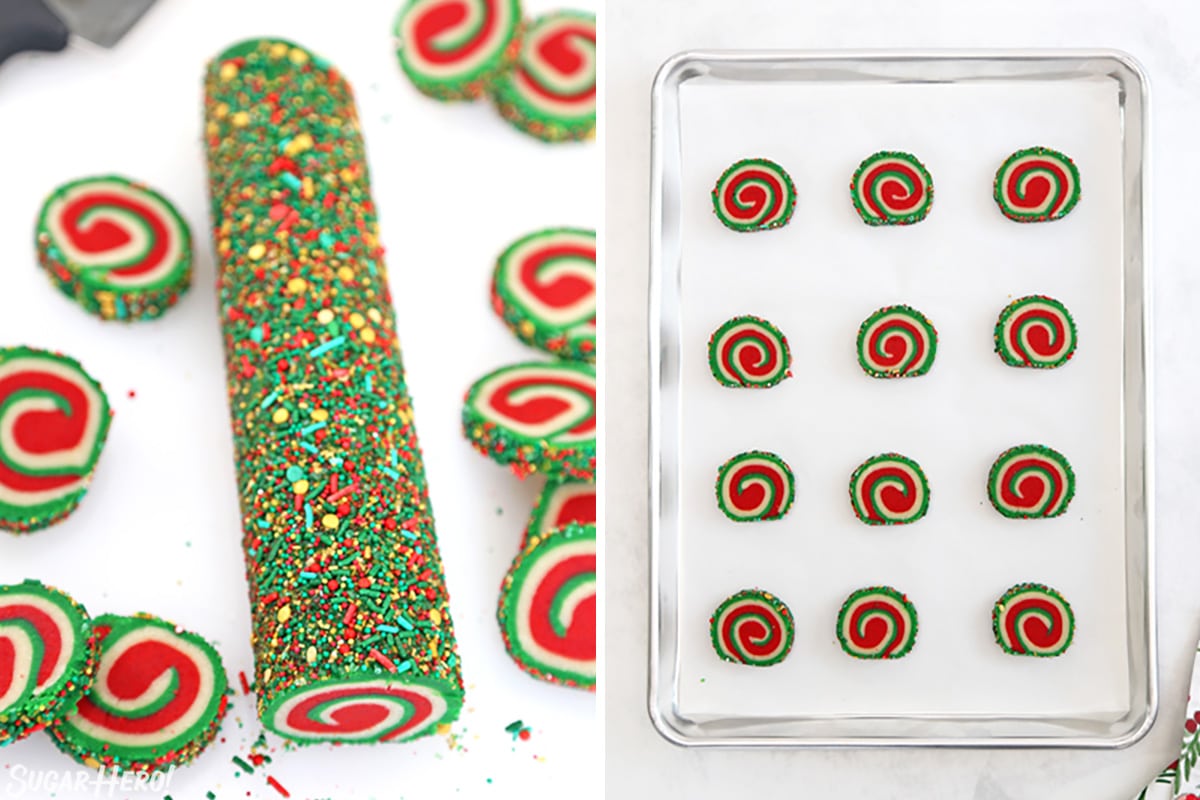
- Wrap the dough log in plastic wrap, and refrigerate for at least 45 minutes, or until firm.
- Preheat the oven to 350 F, and cover 2 baking sheets with parchment.
- Use a large, sharp chef’s knife to slice the log into rounds a little under ½” thick. (You can do thinner, ¼” rounds for a larger yield.) Place them on the baking sheets with a few inches between each cookie.
- Bake the cookies for 13-15 minutes, until they have spread and puffed, and no longer have a raw shine in the center. They will continue to cook for a few minutes after they’re out of the oven, so don’t wait until they feel firm in the center or they will be overcooked. The perfect pinwheel cookie is crunchy around the edges and soft and tender on the inside!
- Once cool, remove from the baking sheets and enjoy! Pinwheel cookies can be stored in an airtight container at room temperature and should be enjoyed within 4-5 days for maximum freshness. Unbaked cookies can be frozen, well-wrapped, for up to 3 months.
Video
Measuring Tips
Our recipes are developed using weight measurements, and we highly recommend using a kitchen scale for baking whenever possible. However, if you prefer to use cups, volume measurements are provided as well. PLEASE NOTE: the adage “8 oz = 1 cup” is NOT true when speaking about weight, so don’t be concerned if the measurements don’t fit this formula.
Want to learn more about baking measurements and conversion?
Nutrition
Don’t miss the step-by-step tutorial showing how to make Pinwheel Cookies – check out the web story here!
📋 Instructions
Here’s a quick photo overview showing how to make Christmas Pinwheel Cookies. Grab the full printable instructions in the recipe card down below!
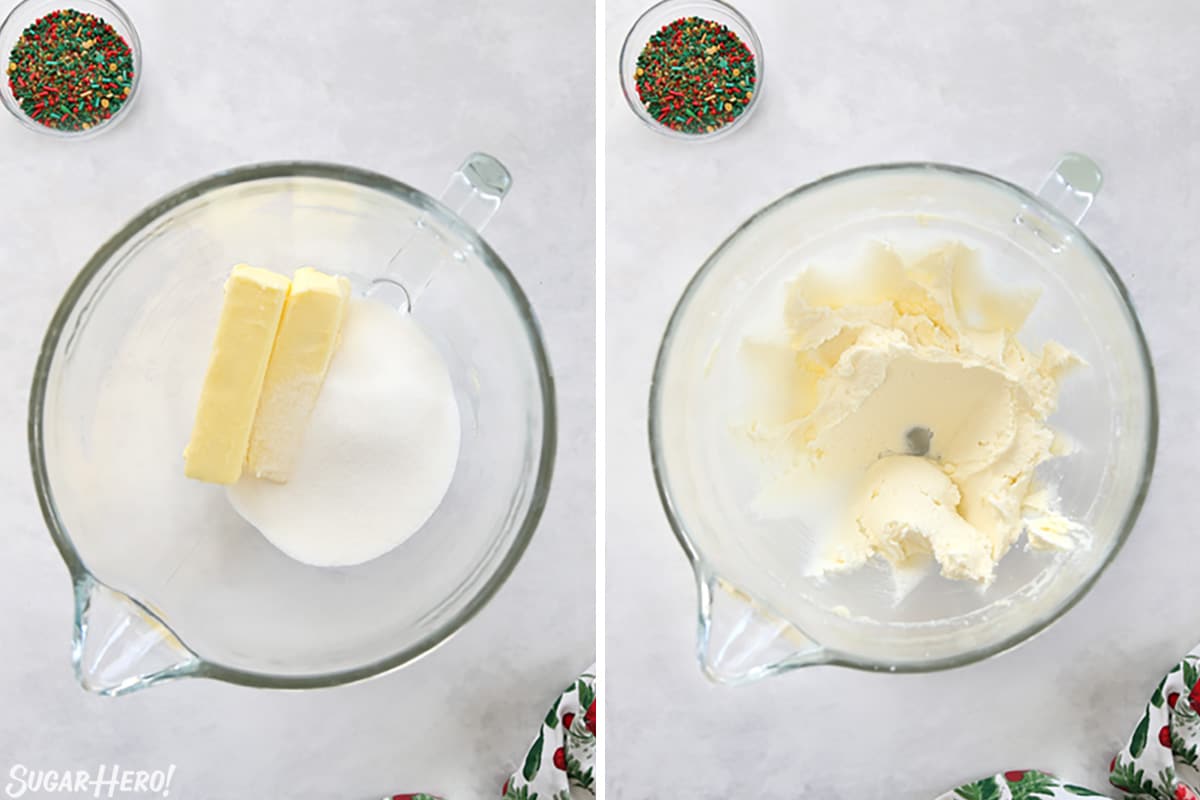
- Combine the room temperature butter and sugar in the bowl of a large stand mixer, or use a hand mixer and a large mixing bowl.
- Beat the butter and sugar together with a paddle attachment at medium speed for 2-3 minutes, until light and fluffy.

- Add a large egg and vanilla extract (or other flavoring) to the mixing bowl.
- Mix on medium-low speed until the egg is completely incorporated.
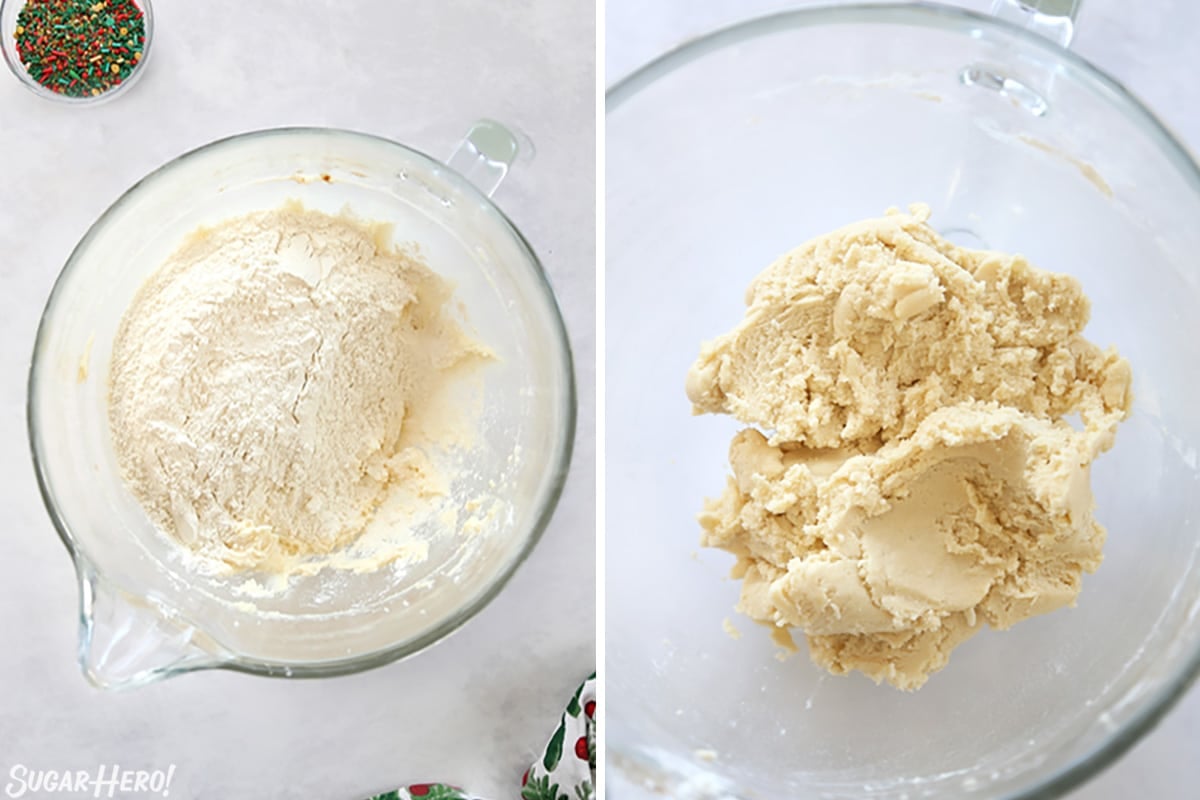
- Add flour, baking powder, and salt to the mixing bowl.
- Mix on low speed until just a few streaks of flour remain. At this point, stop the mixer and finish by hand, using a spatula to scrape the bottom and sides of the bowl.
- Divide the dough evenly into three portions. If you have a kitchen scale, each portion should be about 10 oz. Leave one part of dough plain, and color the remaining parts red and green. You can do this by hand, either stirring the food coloring in or kneading it in. You can also use a mixer, but if you do, only mix for a short period of time so the dough doesn’t become over-mixed and tough.
- Form each portion of dough into a disc and wrap well with plastic wrap. Refrigerate for at least 45 minutes, until cool and firm.
- Roll out each color of dough between two sheets of parchment paper. Try to avoid using extra flour in this step, because too much flour can make the cookies tough. Roll each piece into a rectangle approximately 6.5″ x 13″.
- Stack the rectangles on top of each other in this order: green on bottom, then white, then red on top.
- Roll the dough up tightly into a long, spiral log. You can use the parchment underneath to help roll the cookie dough around itself.
- The sprinkle coating is optional (but gorgeous!). If you want to add sprinkles, brush the outside of the dough lightly with watered-down corn syrup–just enough to help the sprinkles stick.
- Scatter sprinkles on a baking sheet, and roll the dough log over the sprinkles until the outside is completely covered.
- Wrap the log in plastic wrap, and refrigerate again for at least 45 minutes, until firm.
- Use a large sharp knife to cut rounds out of the cookie dough log. I like making my cookies just under 1/2″ thick, which results in about 30 3-inch wide cookies. If you cut thinner rounds, you’ll get a larger yield, and your cookies will be a bit smaller. You might also want to adjust the baking time since they’ll probably be done sooner.
- Place the cookies on parchment-covered baking sheets, and bake at 350 F for 13-15 minutes. They’re done when the cookies are puffed and have spread, and have lost the raw shine in the center.
- Let them cool, then enjoy!
💡 Tips For Cookie Success
To make cookies that look like the pictures, you’ll want to follow these important tips:
- Follow the recipe exactly. If you make substitutions, skip steps, or change the method, I can’t guarantee your results. It’s very important to use a room temperature egg and butter. I recommend reading through the recipe at least twice to make sure you have a good feel for the entire process.
- Measure with precision. Some readers have reported that their dough became dry and crumbly. This is almost always a result of accidentally adding too much flour. It’s best to measure the flour by weight on a kitchen scale. If you decide to measure by volume with measuring cups, use the spoon and level method: carefully spoon the flour into your measuring cup taking care not to compact it, then use the back of a knife to level off the top. Do not dip your measuring cup into the flour bin to fill it. This will cause the flour to get compacted and you end up with more flour per cup than the recipe calls for. More flour = dry cookies that don’t spread.
- Cream the butter and sugar. There’s more to creaming butter and sugar than simply mixing them together. It takes 2-3 minutes to fully cream the mixture. You’re looking for visible changes in color and texture; the color should get lighter and it will look fluffy (not lumpy). Under-creaming = cookies that don’t spread and have a coarse texture. Over-creaming = cookies that are too flat.
- Don’t overmix the dough. A common mistake when making cookies is overmixing the dough. (It’s especially common if you use cold butter: it takes much longer to fully mix in cold ingredients.) If you continue mixing after the ingredients are combined, the gluten in the flour will become over-actived, and you’ll end up with tough, dense cookies.
- Use the right baking surface. Bake the cookies on a parchment-lined aluminum, light-colored, non-insulated baking sheet. There’s no need to grease the parchment or pan
💭 Variations
Christmas-themed pinwheel cookies are just the beginning! Mix it up and try one of these ideas:
- Change up the colors you use–consider a simple black-and-white swirl for Halloween, or a vibrant 5-color rainbow swirl for St. Patrick’s Day or Pride month.
- Instead of sprinkles, roll the cookies in finely chopped nuts or toasted coconut. You can also bake them without rolling the edges in anything!
- Mix up the flavorings–add some almond in addition to the vanilla (start with 1/2 tsp and add more to taste), or swap in coconut instead. Or, add some lemon or orange zest and extract to make citrus pinwheels.
- Make a chocolate variation: follow this recipe to add a chocolate swirl to your cookies.
- Feeling ambitious? Embed shapes in your cookies like in this Stars and Stripes Sugar Cookies.
💡 Tips for Pinwheel Cookies
Here are some of the most common questions people have had when making pinwheel cookies:
Many common sprinkle types will work for pinwheel cookies. You can use just 1 type of sprinkle, or a mix of multiple types–I like to make my own mixes by combining different sprinkles I own, so that my cookies have a variety of colors, shapes, and textures around the edges.
Sprinkles that work well include: jimmies, nonpareils, sparkling sugar, sanding sugar, sequins, confetti/quins, and edible metallic glitter shapes. Sprinkles to avoid include: anything with chocolate (like Sixlets), anything made of hard candy (like candy cane pieces), anything too large (like some sugar pearls), or any royal icing pieces. If you aren’t sure if your sprinkles will work, you can always bake a test cookie using some dough scraps and see how they do!
Yes! As long as you stick to the sprinkle types mentioned above, you should be fine. Some of them will probably bleed or melt a little, but you’ll still get the sparkling sprinkle effect. (This is also why I like using sprinkle mixes, because even if some melt, others will most likely be fine.) And of course, you can always skip the sprinkles entirely!
Here are my top tips for making sure the cookies look round when you bake them.
1. After wrapping the cookie dough log in plastic wrap, roll it until it seems nice and round before putting it in the fridge to chill.
2. If the cookie log develops a flat spot after removing it from the fridge, you can also do a little more rolling before cutting it.
3. Make sure that the cookie log is quite cold when you start to slice it. If it isn’t well chilled the pressure of cutting with a knife can warp the shape of the cookies.
4. And, if despite your best efforts you still have a few wonky cookies, you can always do a little last minute shaping by hand. Just gently press them into a round shape as you place them on the cookie sheet.
I can’t guarantee it will work with your favorite recipe, but I can tell you that it is pretty flexible and forgiving! If you have a sugar/rolled cookie recipe that’s medium textured–meaning not too dry/stiff, and not extremely soft/sticky, then odds are good you can use this technique. If you do try other recipes, please come back and let us know how it goes!
Pinwheel cookies can be stored in an airtight container at room temperature and should be enjoyed within 4-5 days for maximum freshness.
If you want to make the dough in advance, you have a few options. You can freeze the whole rolled cookie log, wrapped well, for up to 3 months. I recommend letting it defrost in the refrigerator overnight, then adding the sprinkle layer, slicing, and baking as directed.
You can also freeze individual unbaked cookie slices. I don’t recommend adding sprinkles if you are planning on freezing unbaked cookies, since many sprinkles will bleed color due to condensation. Freeze the sliced cookies in single layers in an airtight container or freezer zip-top bags for up to 3 months. To bake, let the frozen cookies sit at room temperature while the oven preheats, then add a few extra minutes to the baking time to make sure they’re baked all the way through.
Finally, you can freeze baked cookies to eat later. Make sure to wrap them tightly and place them in a freezer safe container/storage bag to prevent freezer burn. For the best taste, thaw at room temperature, and enjoy the cookies within 3 months of their freeze date.
❤️ Must-Make Christmas Cookies
- Big Soft Sugar Cookies
- Candy Cane Cookies
- Gingerbread Cookie Mug Toppers
- Chocolate Truffle Peppermint Crunch Cookies
- Soft Chocolate Gingerbread Cookies
- Gingerbread Chocolate Chip Cookies
- Edible Christmas Cookie Boxes
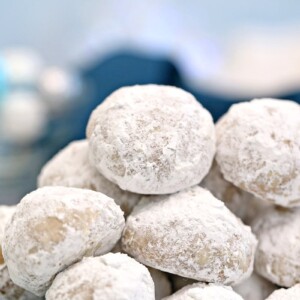
- Pecan Snowball Cookies


Just finishing up 4 batches using this recipe. 1 for each son and family. It is a lot of tedious work but follow recipe EXACTLY (having weight measurements in a good recipe is paramount). These will be given to each of our sons/daughter in laws so our 13 grandchildren can slice & baķe for Santa! Thank you for sharing this, I read thru about 20 recipes looking for one with weight measurement and 4 or 5 stars.
Hi April! So glad you found our recipe and I think it’s so cool that you are giving it as gifts to your kids! Here’s to a wonderful holiday season.
Hi can u use peppermint extract or is it better and vanilla extract
Hi Kim! You can definitely use peppermint extract. You can just swap it for the vanilla 1:1. It will taste delish! Merry Christmas!
Could you store the dyed dough in plastic wrap, in a Tupperware, for like a week until you’re ready to bake? Similar to an icebox cookie? Or do these not store well?
Hi Sydney! Great questions. These cookies can definitely be made ahead of time and you’ve got a couple of options. I’m going to post some info here for you but for further reference, you can find this on the blog post in the FAQ section.
Pinwheel cookies can be stored in an airtight container at room temperature and should be enjoyed within 4-5 days for maximum freshness.
If you want to make the dough in advance, you have a few options. You can freeze the whole rolled cookie log, wrapped well, for up to 3 months. I recommend letting it defrost in the refrigerator overnight, then adding the sprinkle layer, slicing, and baking as directed.
You can also freeze individual unbaked cookie slices. I don’t recommend adding sprinkles if you are planning on freezing unbaked cookies, since many sprinkles will bleed color due to condensation. Freeze the sliced cookies in single layers in an airtight container or freezer zip-top bags for up to 3 months. To bake, let the frozen cookies sit at room temperature while the oven preheats, then add a few extra minutes to the baking time to make sure they’re baked all the way through.
Finally, you can freeze baked cookies to eat later. Make sure to wrap them tightly and place them in a freezer safe container/storage bag to prevent freezer burn. For the best taste, thaw at room temperature, and enjoy the cookies within 3 months of their freeze date.
I hope that helps. Merry Christmas!
This is the second year I have made these pinwheels. They are adorable not hard to make a tad time-consuming, but not bad this year instead of rolling the whole roll in sprinkles. I slice them and rolled individually. Did not take that much extra time. No need for corn syrup. I felt it hell just fine Without this year. I added some strawberry powder into the red layer for some extra kick of flavor tastes, great, but I found it made the red Moore dull, red looking. I may try to use a different red next year. I used the Anne Clark red gel paste this year. I may try to use a mirror color super red next year in any event. These are great cookies Elizabeth your recipes are very highly organized and on point I love how they print out in a bigger print also, I am a very experienced cookie baker and I love them. These will look great on my cookie tray.
Hi! We’ve never tried rolling them one by one. Glad it worked out. We really appreciate your comment and the helpful tips you’ve left for other readers! And, of course, thank you for the leaving a 5 star rating. We hope everyone enjoys your cookies and that you have a very Merry Christmas!
Such a fun recipe to make with my toddler to leave cookies for Santa! We only had plant-based food coloring so our red and green isn’t as beautiful but the cookies are delicious!
Hi Sherene! Thank you so much for leaving a comment. I’m so glad you enjoyed the recipe. Thanks for giving it a try! Best!
Sorry, but this one didn’t work for me. I swear I followed the recipe to the letter! Dough was crumbly, brittle, and difficult to work with right out of the mixer as I was adding the gel dye by hand, and never got better when it came time to roll the dough and spiral it. I ended up with a tie dye mess patched together on the cookie sheets. Glad I didn’t try adding sprinkles, it would have been a total disaster and waste.
Hi Sharon. So sorry the cookies didn’t turn out for you. Did you happen to measure your ingredients by weight on a scale or by volume with measuring cups? My first guess for what went wrong was accidentally adding too much flour. I’d be happy to help you problem solve. Thanks for leaving a comment.
Mine also were crumbly too, and kneading the dough with the color was a pain. I did measure by volume, but maybe next time I’ll try by weight. They are chilling in the fridge now, so I hope rolling them out to form the log will be easy.
Hi Lacey. I’m sorry you had some troubles. Measuring by volume instead of weight is almost always what causes problems with this recipe. Accidentally adding too much flour will make the dough really hard to work with. If you try the recipe again and measure by volume, please let us know how things go. Might help other readers as well. Thanks for your comment. Best of luck!
This recipe did the same thing to me as what Sharon mentioned. Followed the recipe and the dough was extremely crumbly and difficult to work with. While layering the dough and rolling into a pinwheel, everything fell apart. I didn’t bother with the sprinkles and threw everything out as it was a complete mess.
Hi Dani. I’m so sorry to hear you had trouble with the recipe and had to throw your first batch out. Do you remember if you measured the flour by volume with measuring cups or by weight on a scale? The most common reason the dough becomes difficult to work with is because of accidentally adding too much flour and overworking the dough. I know it won’t bring your cookies back but I’d be happy to help you troubleshoot if you think something else might have been the problem. All the best.
What would you say is the best way to freeze the cookie dough. I plan on making the dough tonight and baking on Friday.
Hi! If you plan to bake the cookies on Friday, you could actually store the dough discs in the refrigerator. If you still want to freeze the dough, you have a few options. You can freeze the whole rolled cookie log, wrapped well, for up to 3 months. I recommend letting it defrost in the refrigerator overnight, then adding the sprinkle layer, slicing, and baking as directed. You can also freeze individual unbaked cookie slices. I don’t recommend adding sprinkles if you are planning on freezing unbaked cookies, since many sprinkles will bleed color due to condensation. Freeze the sliced cookies in single layers in an airtight container or freezer zip-top bags for up to 3 months. To bake, let the frozen cookies sit at room temperature while the oven preheats, then add a few extra minutes to the baking time to make sure they’re baked all the way through. (You can also find this information in the tip section of the post.) Please let us know if you have any other questions. Best of luck!
I loved this recipe! Baked it for my neice’s class! Thank you!
So glad to hear it! Thanks for trying the recipe and leaving a comment. Merry Christmas!
Hi I just made the dough for these and I’m at the roll each one out part. So I took them out of the fridge but them are complete rocks. Should I have rolled these out before putting into the fridge? What’s wrong ?
Hi Linda. I hope we aren’t too late to help you with the cookies. How long did you refrigerate the dough for? You could try giving it a little time to soften on the counter before beginning to roll it out. Was the dough itself hard/crumbly? I’m wondering if perhaps too much flour was added to the dough on accident? Please feel free to respond with more details and we can try to problem solve. Thanks.