


Looking for a great Valentine’s Day sugar cookie recipe? These classic sugar cookies are decorated with royal icing in a variety of gorgeous Valentine’s Day designs. Learn to master four different cookie decorations with our easy step-by-step photo guide.

💗 Royal Icing Valentine’s Day Cookies
Spread some love by baking these cute heart-shaped sugar cookies, perfect for Valentine’s Day celebrations or any special occasion!
These Valentine’s Day Sugar Cookies start with a classic roll-out sugar cookie, lightly flavored with vanilla (or almond, or lemon…baker’s choice!) and baked until golden around the edges but still soft in the middle.
They’re tasty on their own, but since they are so simple, they’re the perfect blank slate for playing around and experimenting with different royal icing decorating techniques.

If you’re a royal icing newbie, never fear! Making and using royal icing is REALLY not as scary as it might seem, and I have a ton of step-by-step photos and tips to take you through it. I’m sharing four different decorating styles, ranging from super simple to moderately skilled, so you can pick and choose your favorites to recreate.
And if you’re looking for a royal icing alternative, you can try topping them with fondant like in my Watercolor Rose Sugar Cookie recipe.
Table of Contents
🧾 What You’ll Need

Ingredients
Great cookies start with great ingredients. Here are my top ingredient tips to help you get started. You can find full ingredient amounts in the recipe card below. (Links are affiliate links and I earn a small commission from qualifying purchases.)
For the Sugar Cookies
- Flour: “Regular” flour, aka all-purpose flour, is what we’re using to give these cookies their structure. I highly recommend weighing the flour (and all of your ingredients!) for a more accurate result, but you can also spoon it into the measuring cup and gently level it off.
- Baking powder: Just a little to help the cookies rise ever so slightly.
- Sugar: Use granulated sugar to give the cookies a touch of sweetness.
- Unsalted butter and salt: I like to use unsalted butter and control the amount of added salt precisely. However, if you only have salted butter, feel free to use it and omit the additional salt. The butter will blend into the cookie dough better (preventing lumps) if you bring it to room temperature first.
- Eggs: Make sure to use large, room temperature eggs (not medium or extra large).
- Vanilla extract: Vanilla is the classic sugar cookie flavor and Nielsen-Massey Bourbon vanilla extract is my favorite. However, feel free to use whatever vanilla extract you have on hand at home. You can also experiment and add other extracts in addition to or instead of vanilla. Try lemon or almond!
- Sour cream: Adding full-fat sour cream to the cookies makes them extra-soft and tender, and I love the very subtle tang it gives to them. Make sure your sour cream is at room temperature so everything blends together nicely.
For the Royal Icing
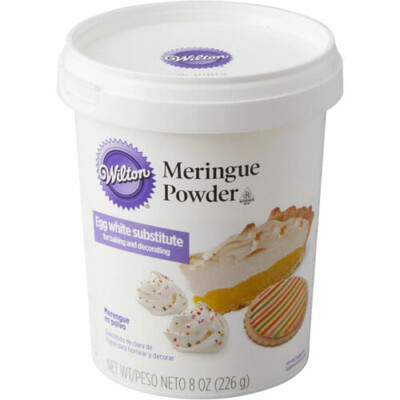
- Meringue powder: This meringue powder by Wilton is great for making royal icing. It stays fresh for a long time, so it’s good to keep as a pantry staple.
- Water: To help get the right consistency for the icing.
- Powdered sugar: For sweetness and thickening.
- Light corn syrup: Just a touch of light corn syrup helps with the texture and glossiness of the royal icing. You can omit it if desired.
- Flavoring: The recipe calls for almond extract to flavor the icing, but you can substitute other flavors like lemon or clear vanilla extract according to preference.
- Gel food coloring: Depending on how you plan to decorate your cookies, you’ll need an assortment of gel food coloring, like green, red, and pink, or whatever other colors you’d like. I use Americolor brand.

Equipment
When it comes to decorating sugar cookies, you will need a few specialty tools to make your life easier. Here are my recommendations to get you started. (Links are affiliate links and I earn a small commission from qualifying purchases.)
- Heart-shaped cookie cutter: You’ll need a 3-inch heart-shaped cookie cutter.
- Piping tips: Depending on the designs you’d like to make, you’ll need a few piping tips. I recommend getting a #2 round tip, a small star tip, and a small leaf tip.
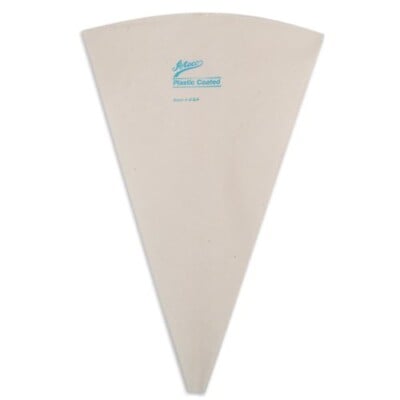
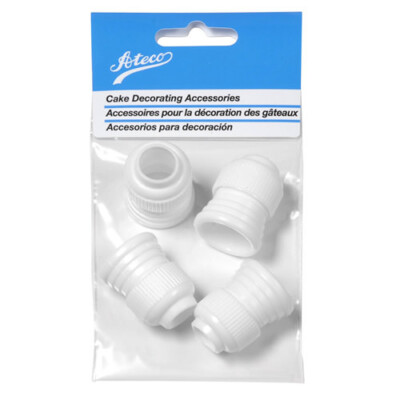
- Piping bags and couplers: I like these disposable piping bags (I wash them and re-use them to reduce waste!) and you’ll need some piping couplers.
- Stand mixer: I highly recommend using a stand mixer to make the cookie dough and icing.
- Rolling pin: You’ll be rolling out the cookies so you’ll need a good rolling pin. And, I recommend rolling the dough between sheets of parchment paper. It helps the dough not to stick to the surface or the rolling pin. Plus it makes clean up easier.
- Plastic wrap: The icing dries out quickly. Make sure to have plastic wrap on hand to place on top of the icing. It will make all the difference in preventing dried out icing.
- Scriber tool (or toothpick): To create some of the cookie designs, you’ll want a small thin tool to drag through the royal icing. You can use a regular toothpick for this, or if you want something a little more precise, pick up a metal scriber tool, a favorite of many cookie artists.

❤️ More Heart-Shaped Desserts


Leave a Review!
If you make this recipe, let us know! Leave a ⭐️⭐️⭐️⭐️⭐️ rating on the recipe below, and leave a comment, take a photo and tag me on Instagram @elabau, or use #sugarhero on IG!

Valentine’s Day Sugar Cookies
Ingredients
For the Sugar Cookies
- 19 oz all-purpose flour, (4 ¼ cups)
- 1 tsp salt
- 1 tsp baking powder
- 12.25 oz granulated sugar, (1 ¾ cups)
- 8 oz unsalted butter, (1 cup) at room temperature
- 2 large eggs, at room temperature
- 1 tsp vanilla extract, can substitute lemon or almond extract
- 1 oz sour cream, (2 TBSP) at room temperature
For the Royal Icing
- 1.8 oz meringue powder, (6 TBSP)
- 3/4 cup water, (6 fl oz)
- 24 oz powdered sugar, (6 cups)
- 2 tsp light corn syrup
- 1/2 tsp almond extract, can substitute lemon or clear vanilla extract
- Assorted gel food coloring, I use Americolor brand (green, red, pink, or whatever other colors you’d like)
Tools
- Heart-shaped cookie cutter, about 3 inches wide
- Piping tips, #2 round tip, small star tip, leaf tip
- Piping bags
- Piping bag couplers
Instructions
To Make the Sugar Cookies
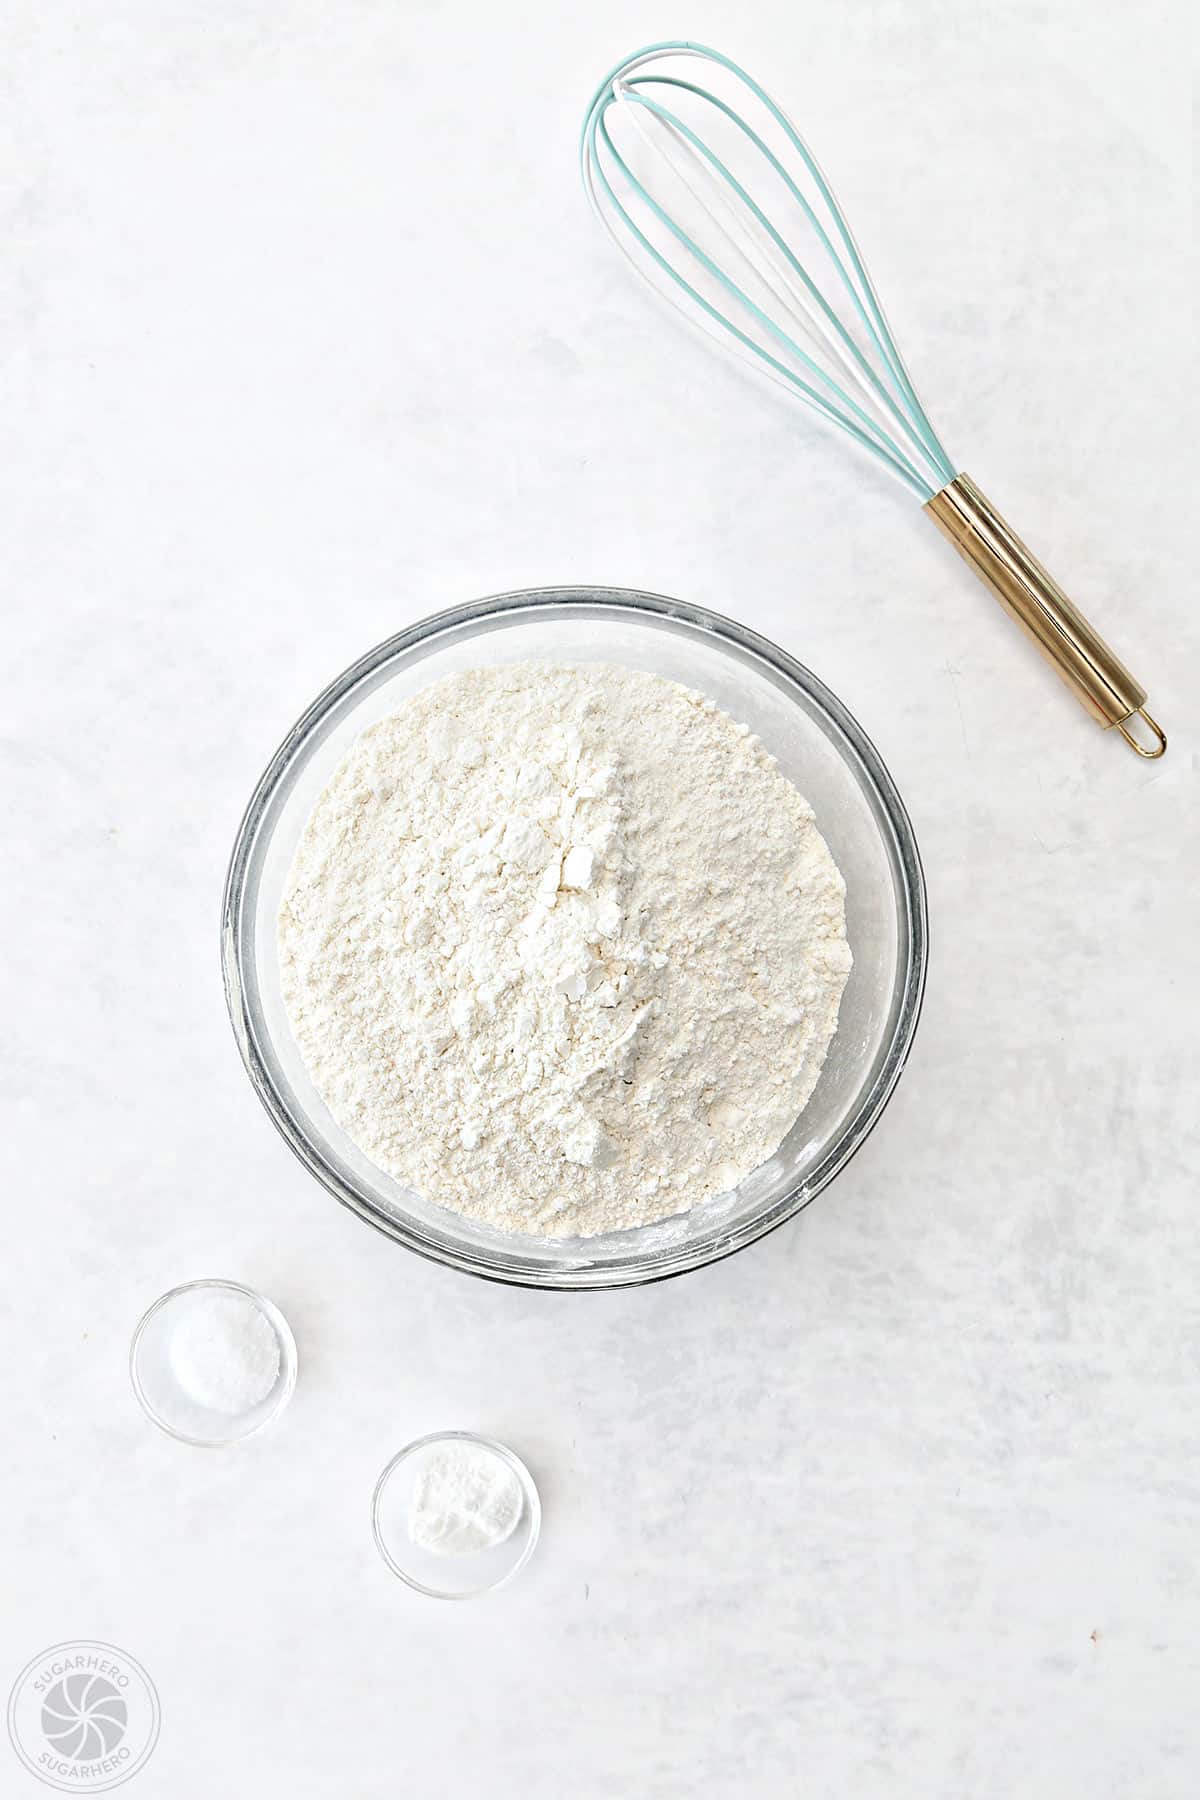
- Combine dry ingredients: In a bowl, whisk together the flour, salt, and baking powder, and set aside for now.
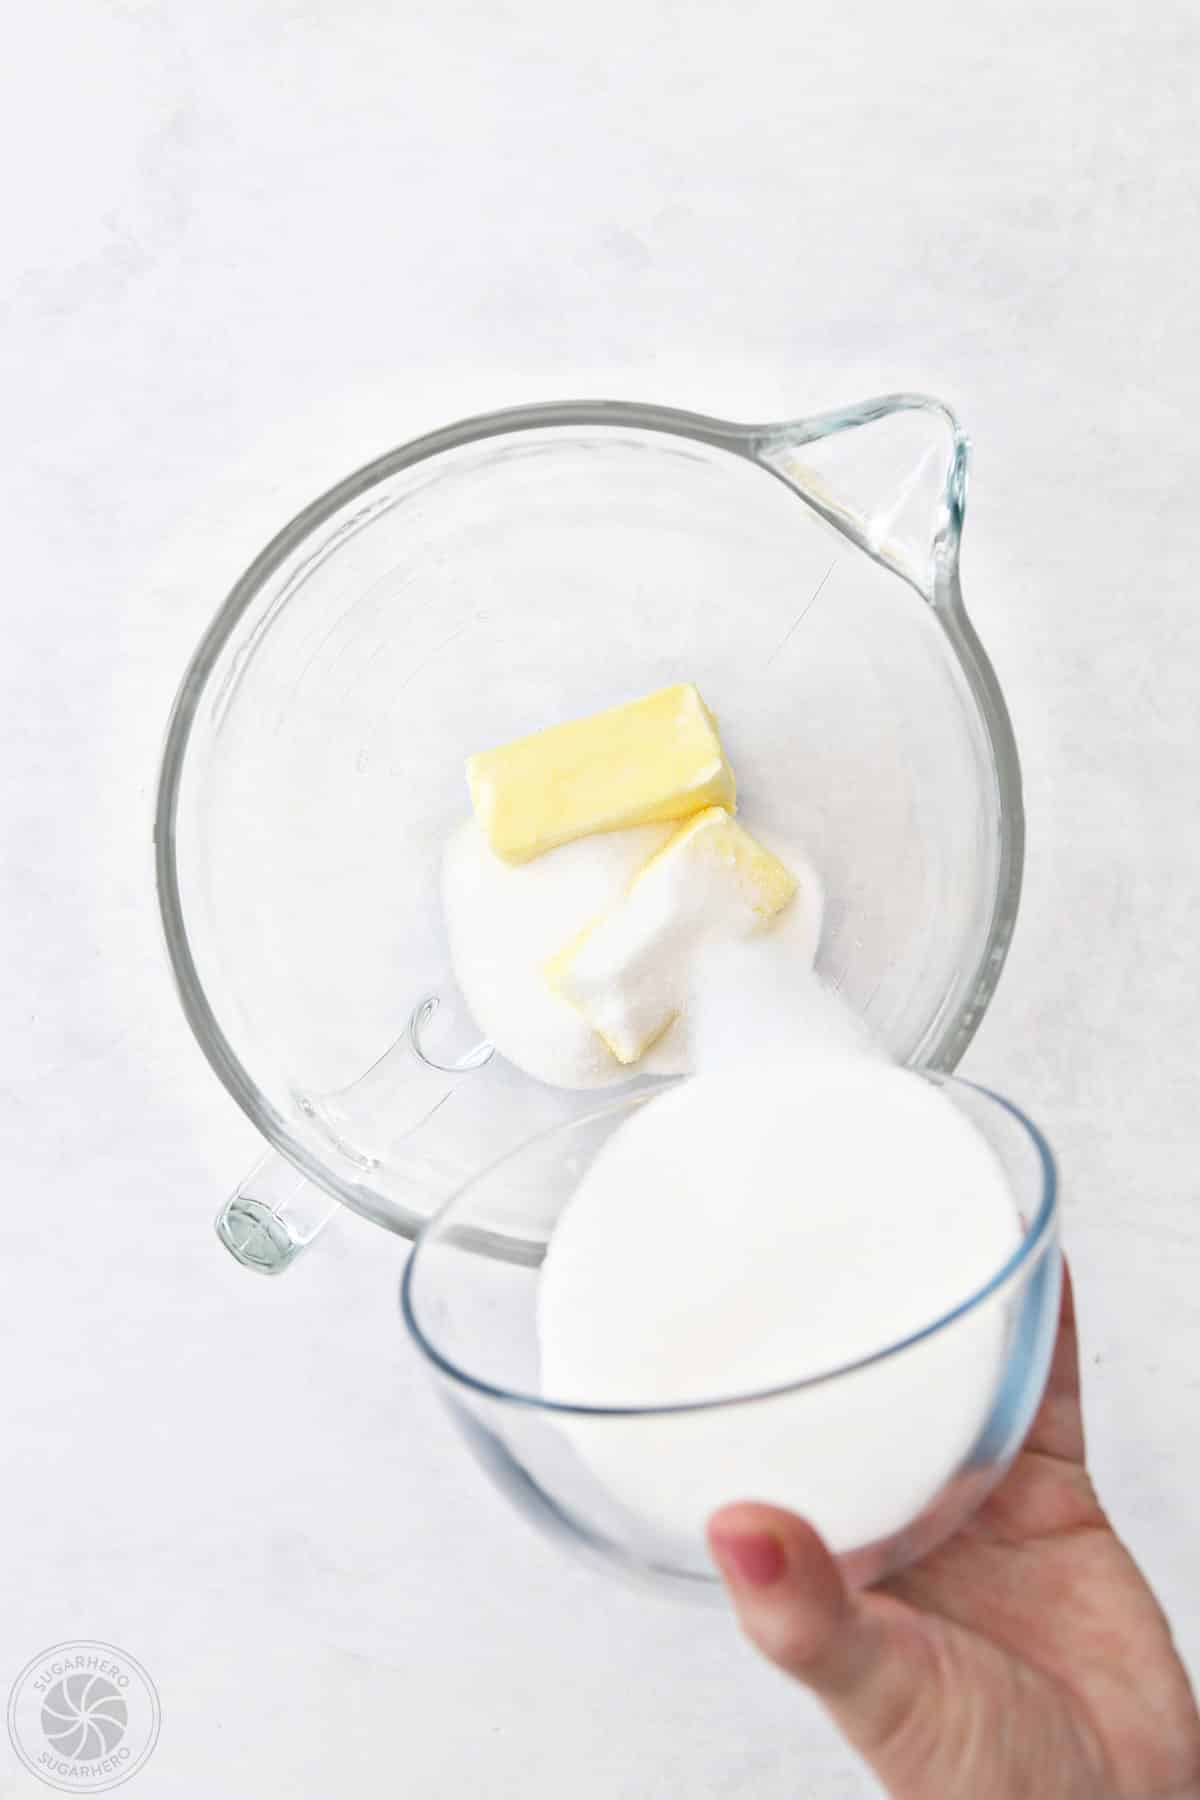
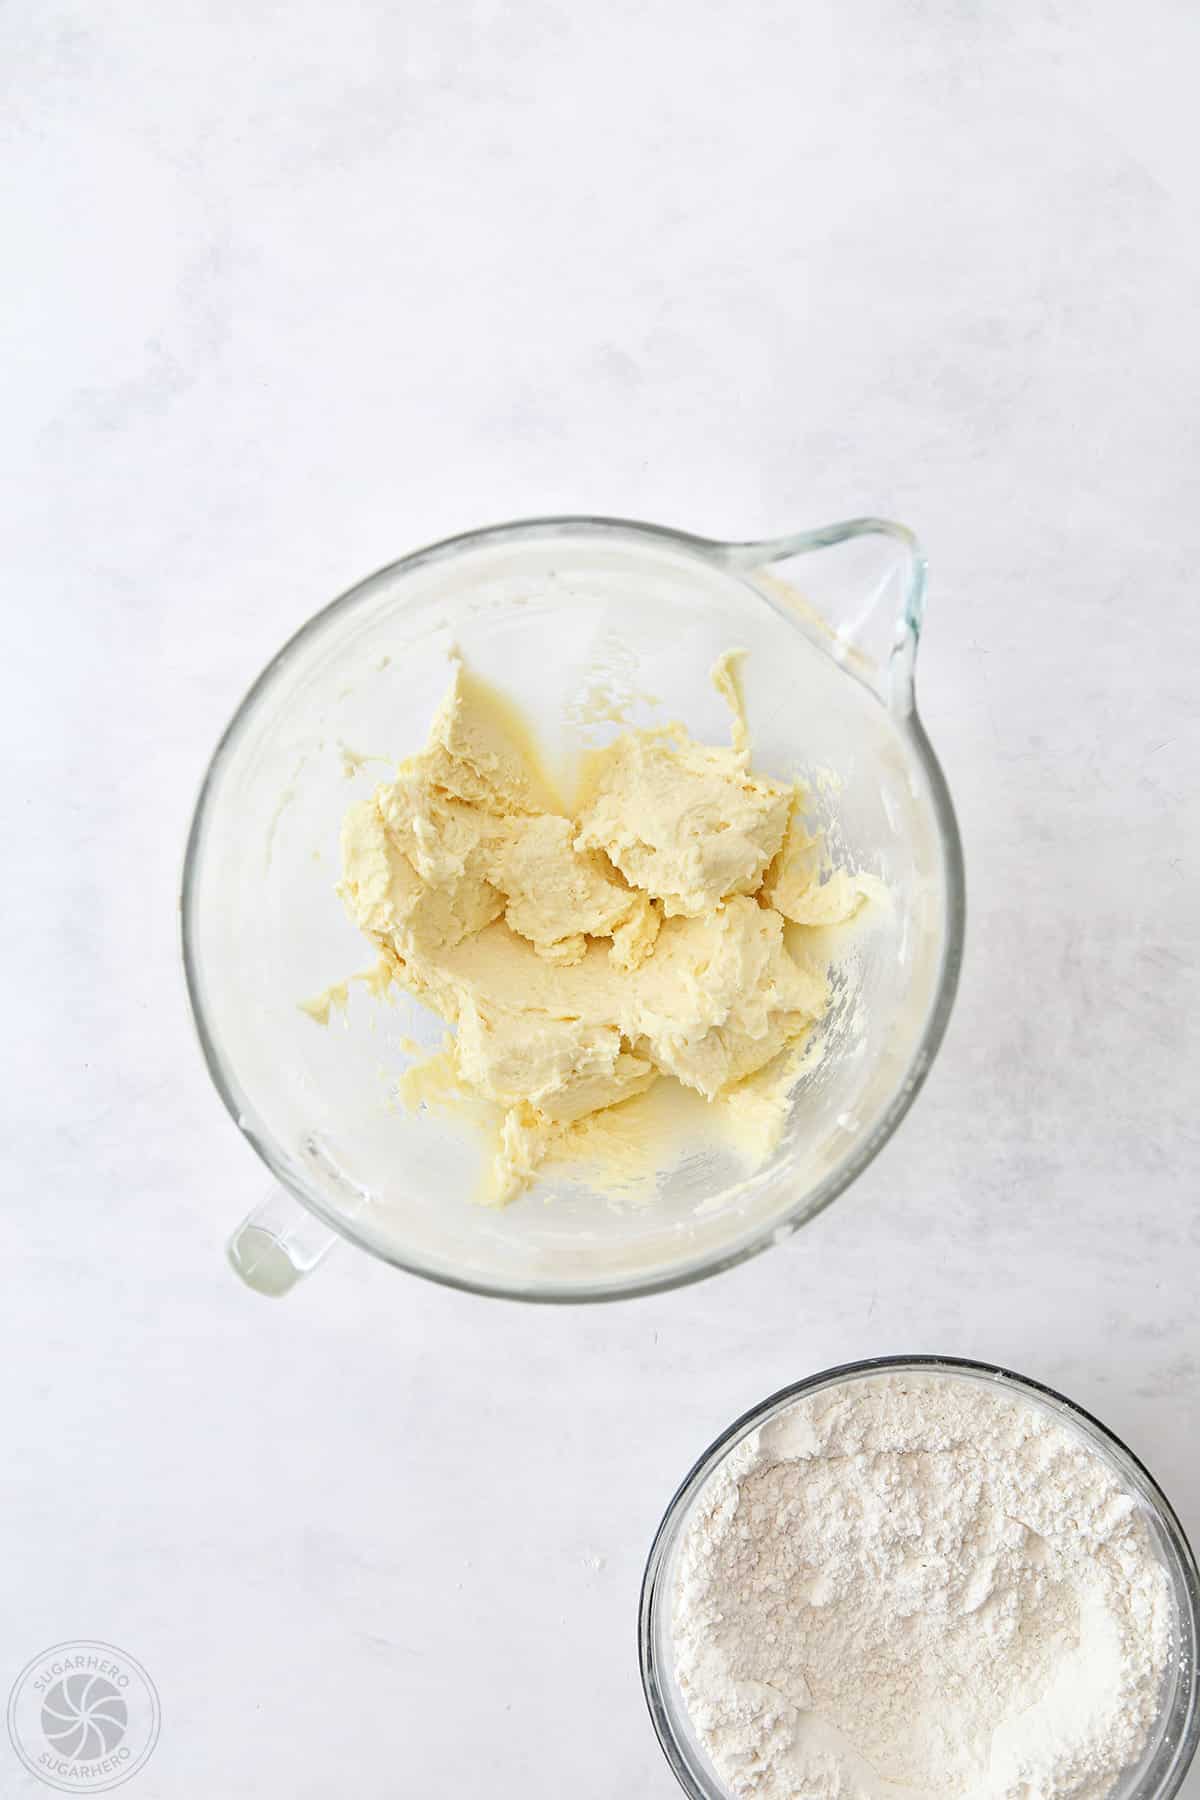
- Cream butter and sugar: In the bowl of a large stand mixer fitted with a paddle attachment, combine the butter and sugar, and mix everything together on medium speed until fluffy and well-mixed, about 1-2 minutes.
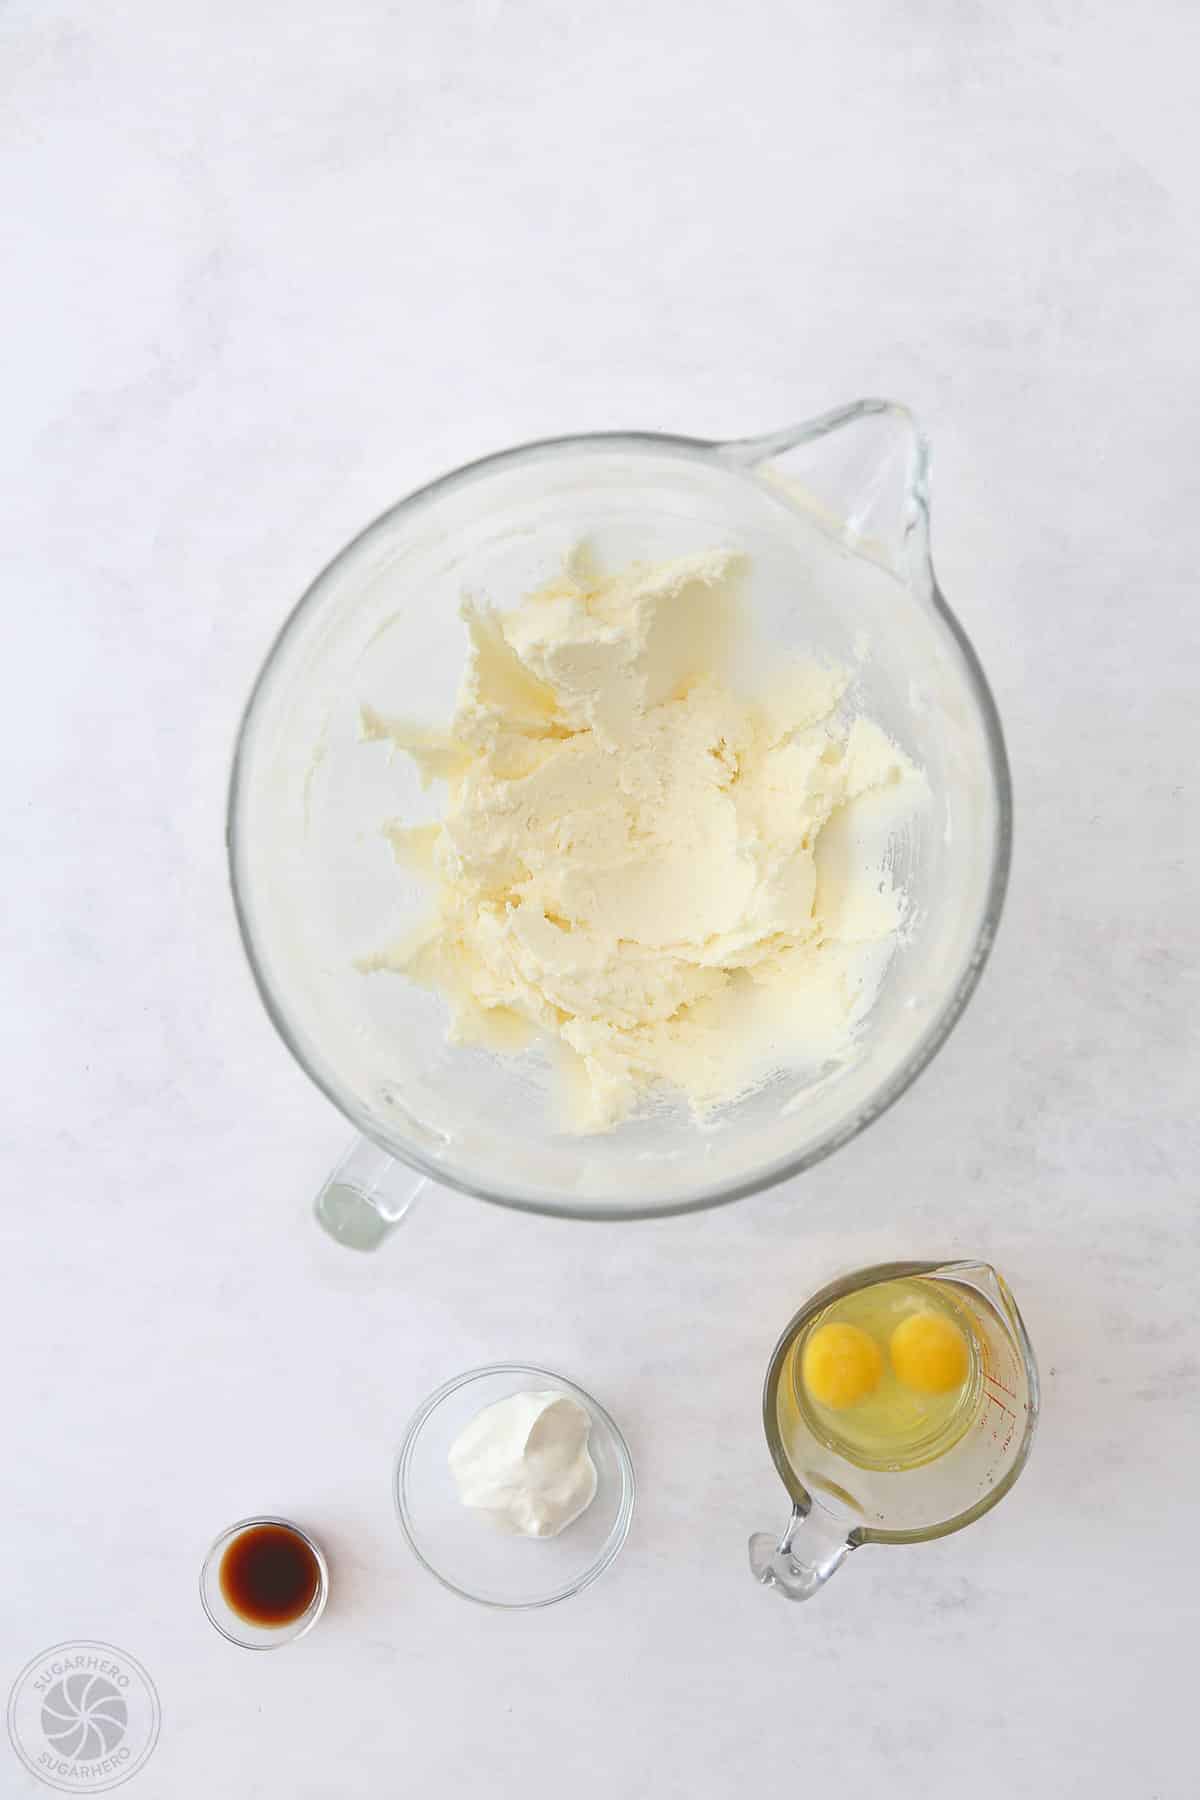
- Add eggs and wet ingredients: Add the eggs one at a time, beating well after each addition, then add the vanilla extract and sour cream.
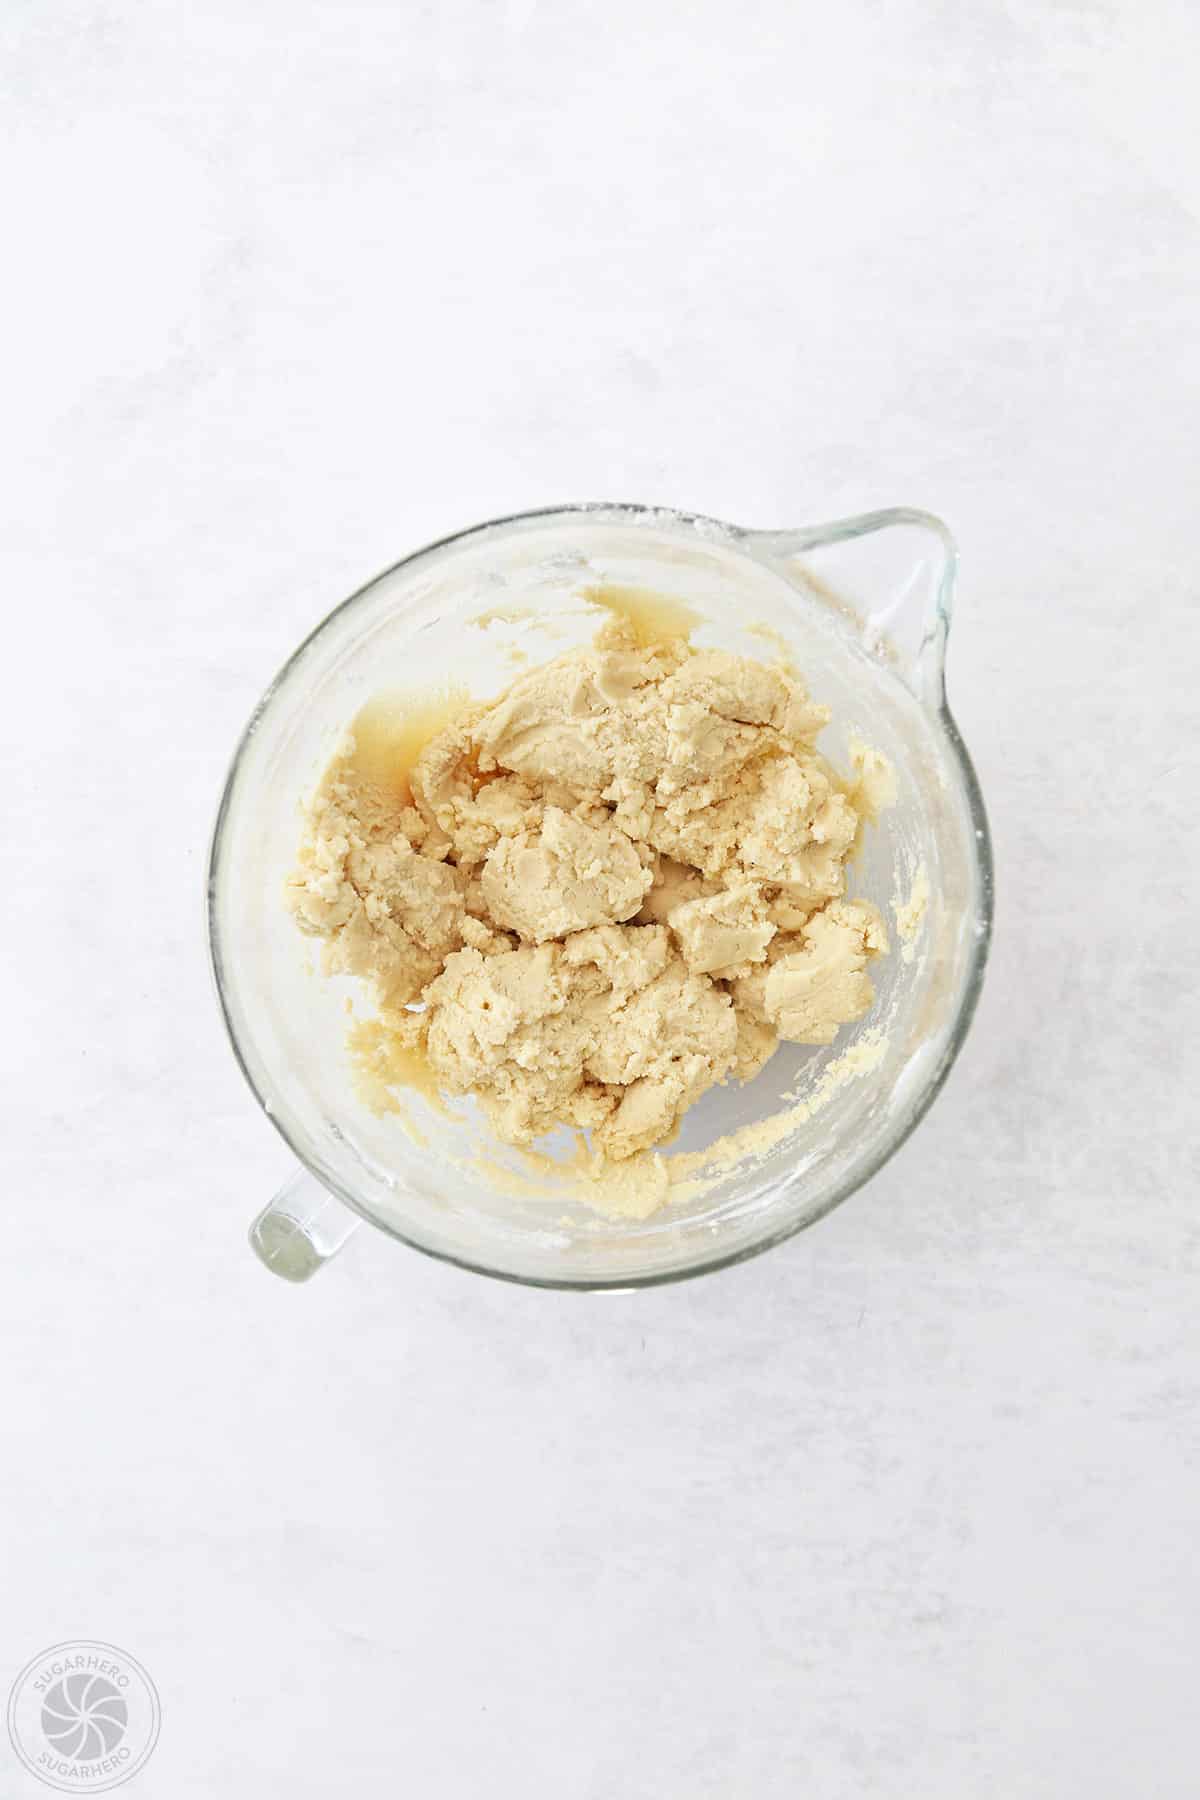
- Add dry ingredients: With the mixer running on low, add the dry ingredients gradually, and mix until they’re just about incorporated. Stop the mixer when only a few streaks of flour remain. Scrape the bottom and sides of the bowl with a spatula, and finish mixing all the dough by hand.
- Chill the dough: Divide the dough in half and press each into a thin disc, wrapping well with plastic wrap. If you want to use a kitchen scale, your dough portions should be about 22 oz each. Refrigerate until firmer but not hard, about 30 minutes. (If you refrigerate it longer, it will probably need to sit on the counter for 10-15 minutes after refrigeration so it’s not rock-hard when you’re trying to roll it out.)
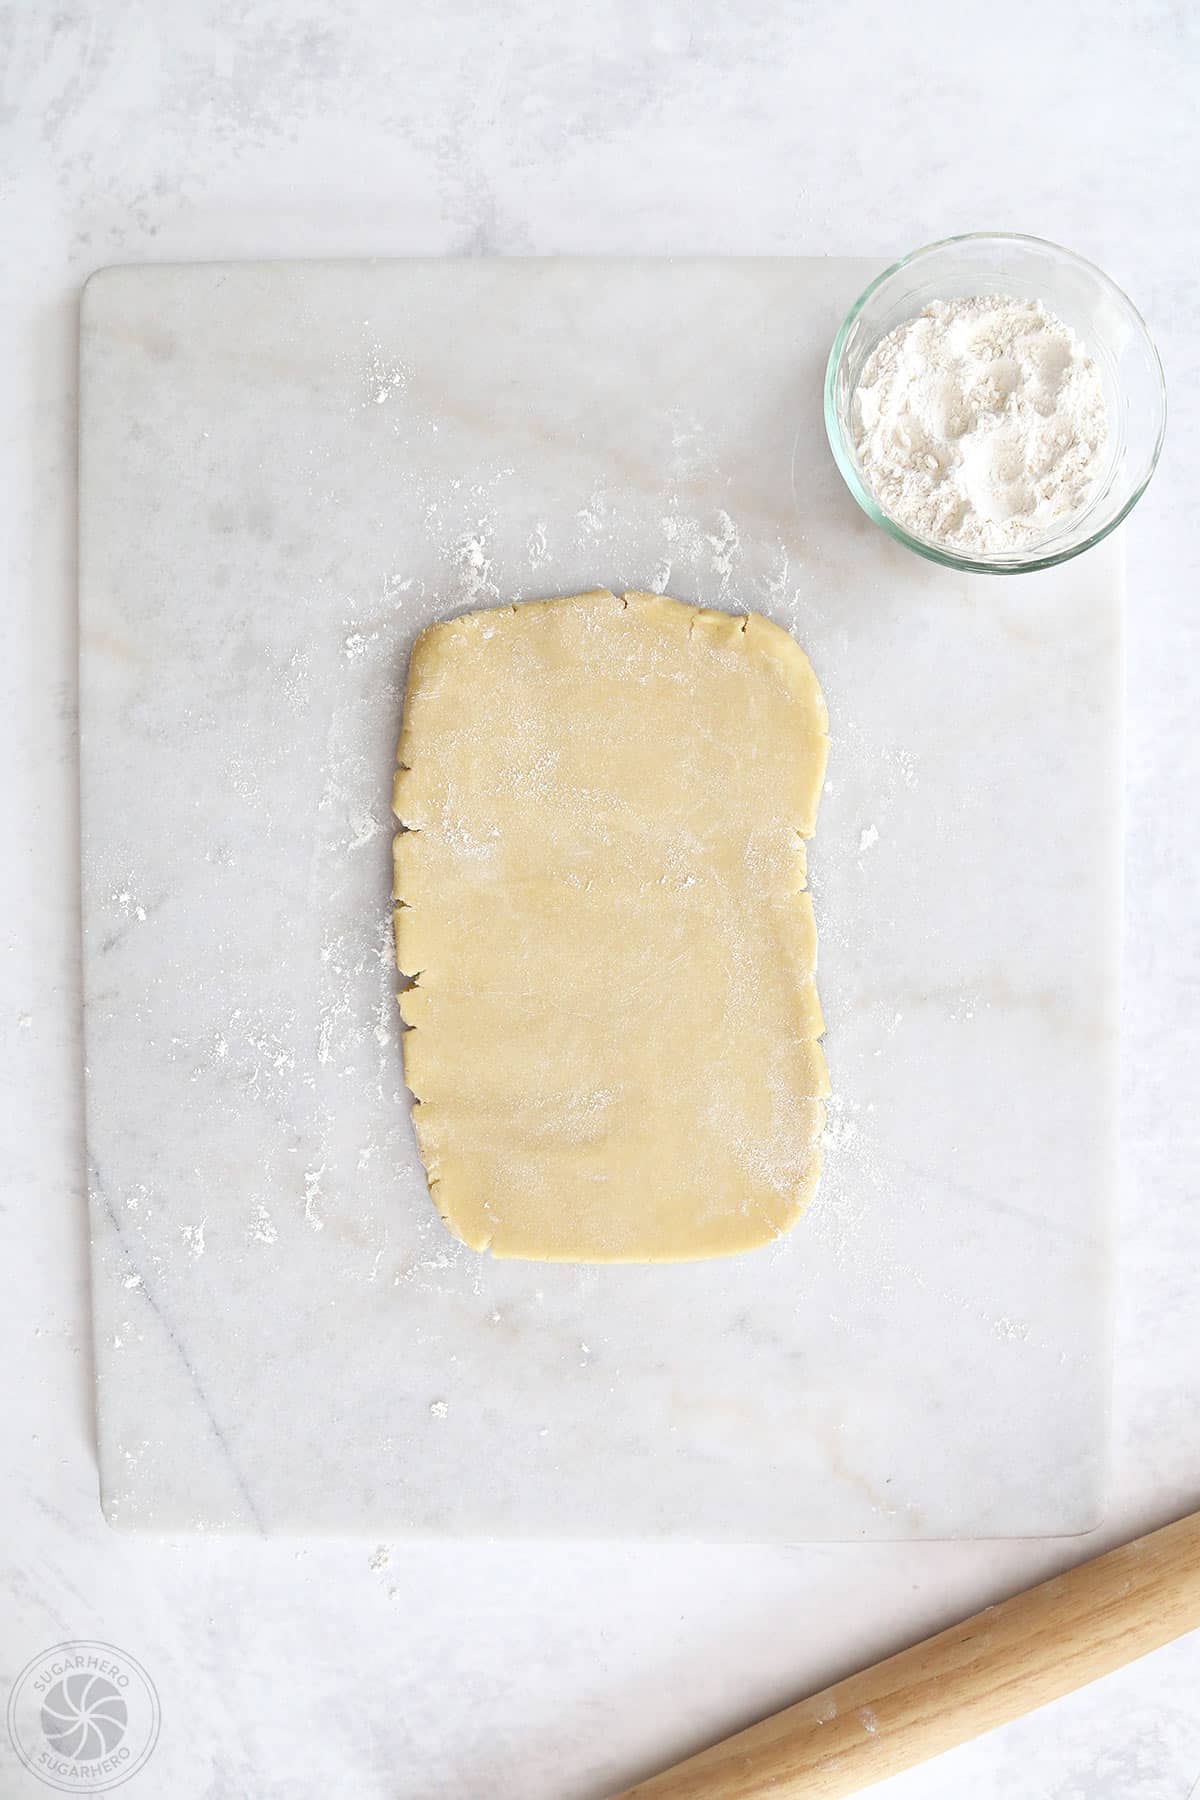
- Roll out the dough: When you’re ready to bake the cookies, preheat the oven to 350 degrees F. Place a disc of dough between two sheets of parchment or waxed paper, and roll out until it is 1/4-inch thick.
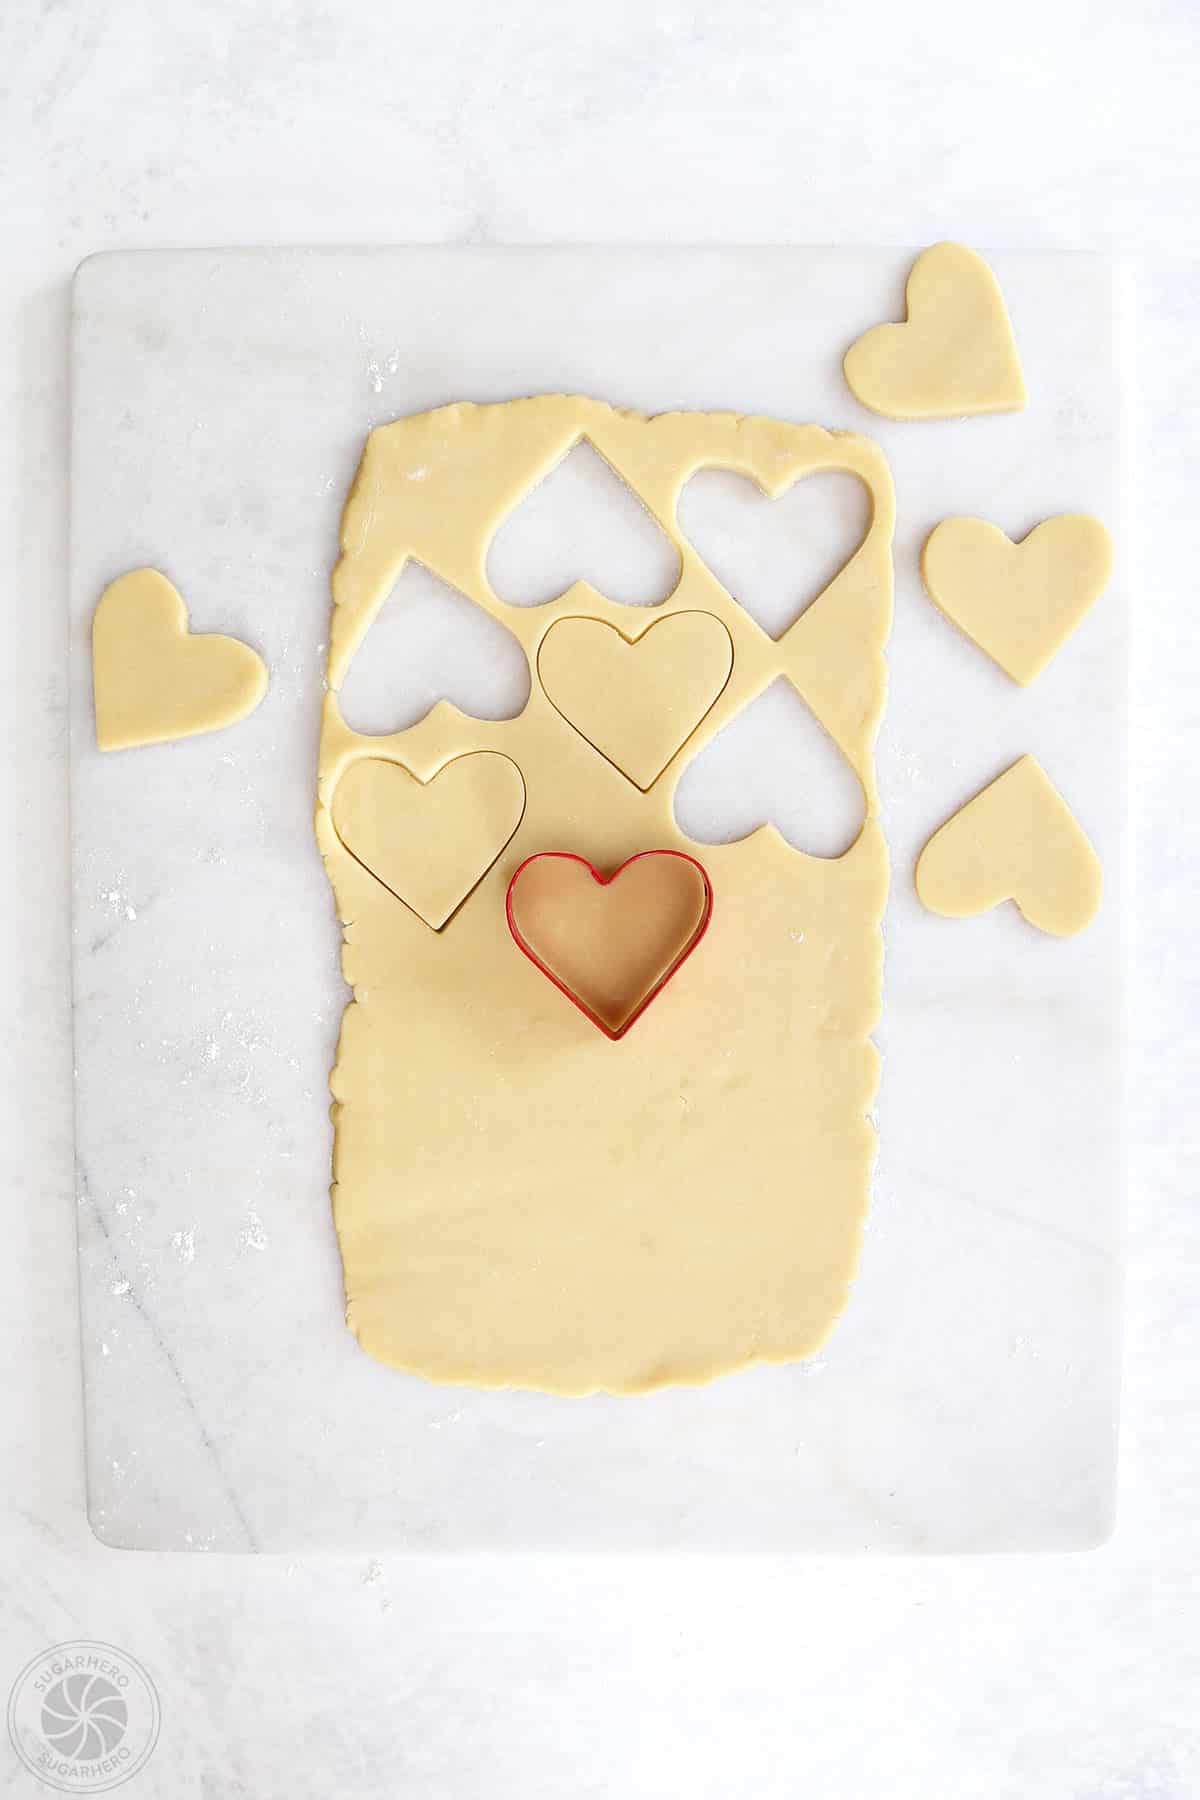
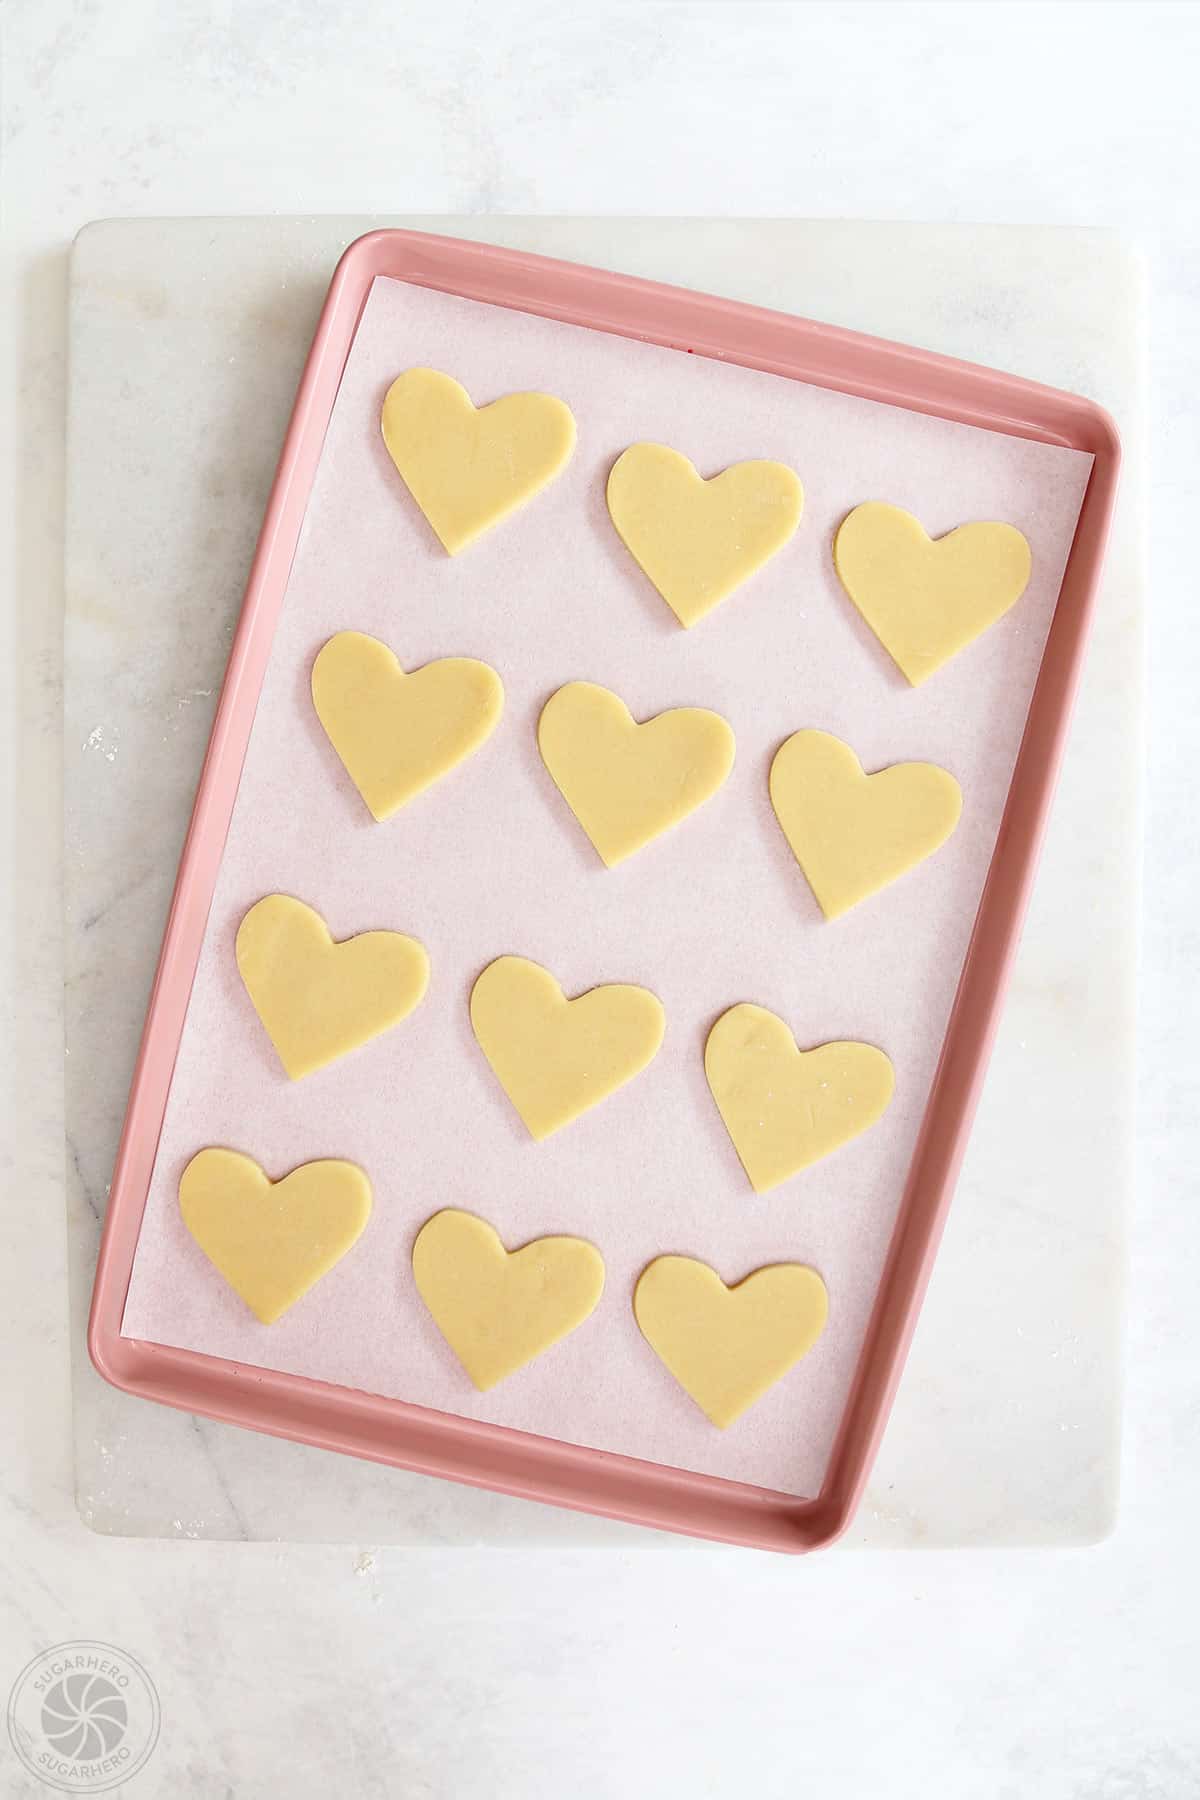
- Cut out the cookies: Use a 3-inch heart cookie cutter to cut out your cookies and place them on a parchment-lined baking sheet. Combine the scraps and re-roll the dough to cut more cookies. You should get about 24 large heart cookies. If at any time the dough becomes too soft and sticky to easily work with, refrigerate it briefly until it firms up again.
- Chill the cookies (optional): Put the sheets of cut-out cookies in the freezer for 10 minutes before baking to help the cookies hold their shape. This is optional, but helpful if your cookies are a more intricate shape.
- Bake the cookies: Bake the trays of cookies for 10-12 minutes, until the edges are just starting to take on color and they have lost the raw shine in the middle. Let them cool on the baking sheet for 5 minutes, then remove them to wire racks to cool completely before decorating them.
To Make the Royal Icing
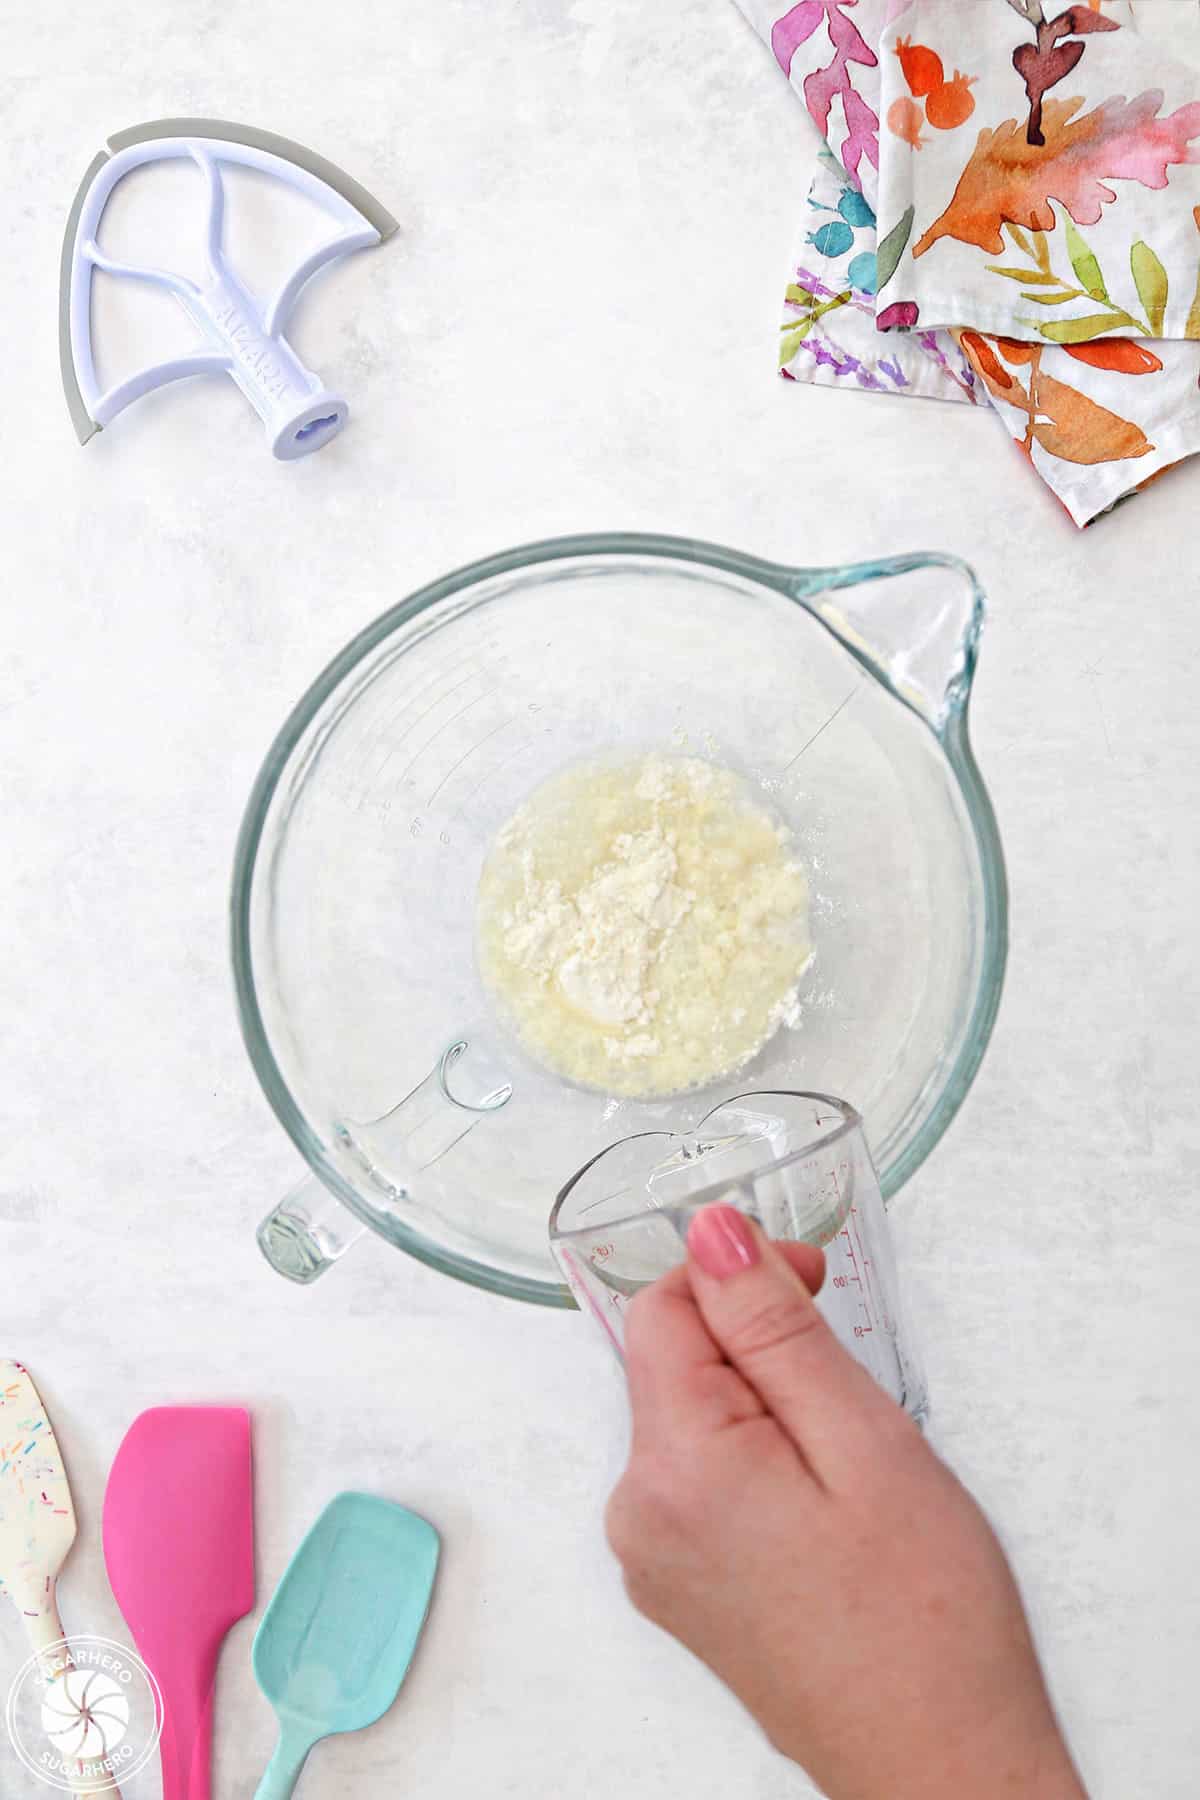
- Mix meringue powder with water: Combine the meringue powder and water in the bowl of a large stand mixer fitted with a paddle attachment. Mix them together on medium speed until foamy.
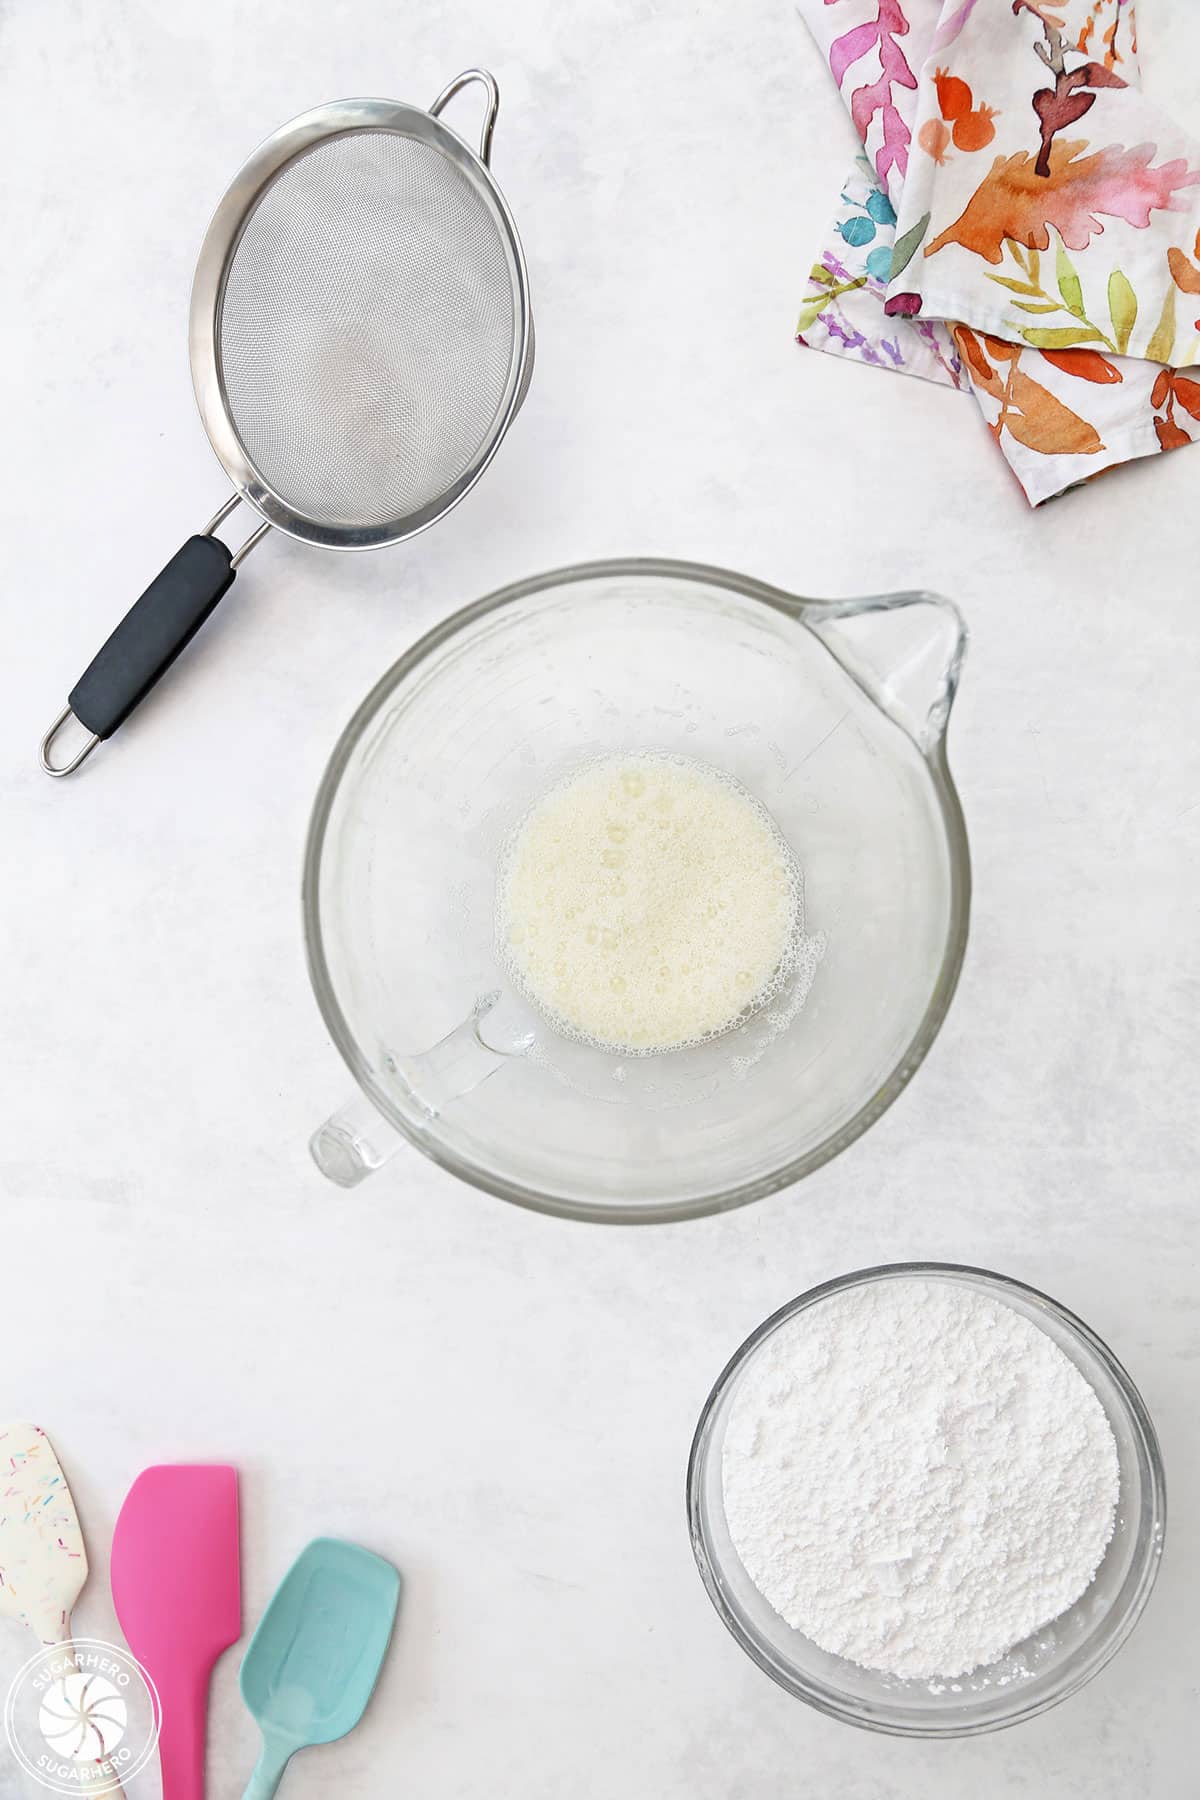
- Add powdered sugar: Stop the mixer and sift powdered sugar over the bowl. Beat on low speed until the sugar is incorporated. Scrape down the bottom and sides of the bowl, then add the corn syrup and flavoring.
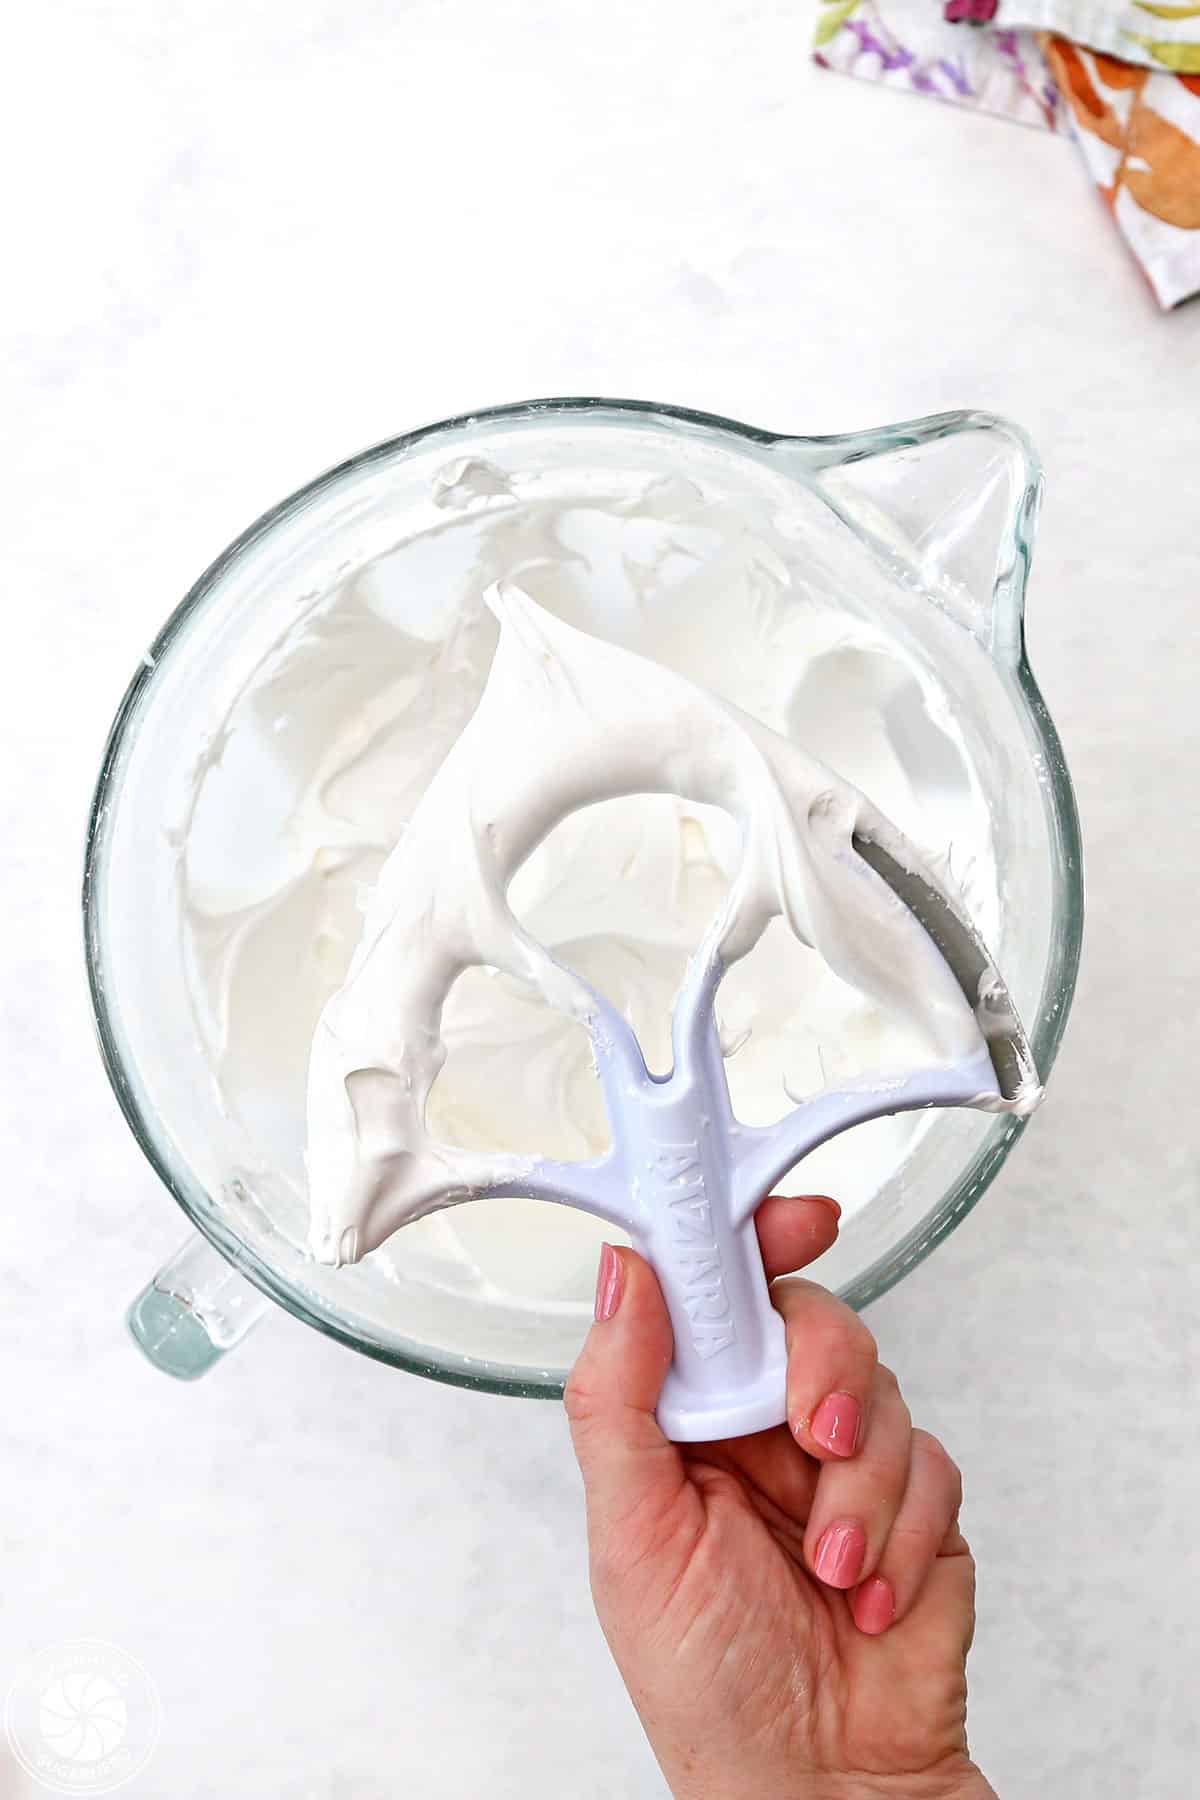
- Mix until thick: Turn the mixer speed back to medium-high and mix for 5 minutes, until the royal icing is shiny, stiff, bright white, and voluminous. Do not mix on the highest speed, and do not mix for more than 5 minutes, or you may incorporate too many air bubbles and change the texture of your royal icing.
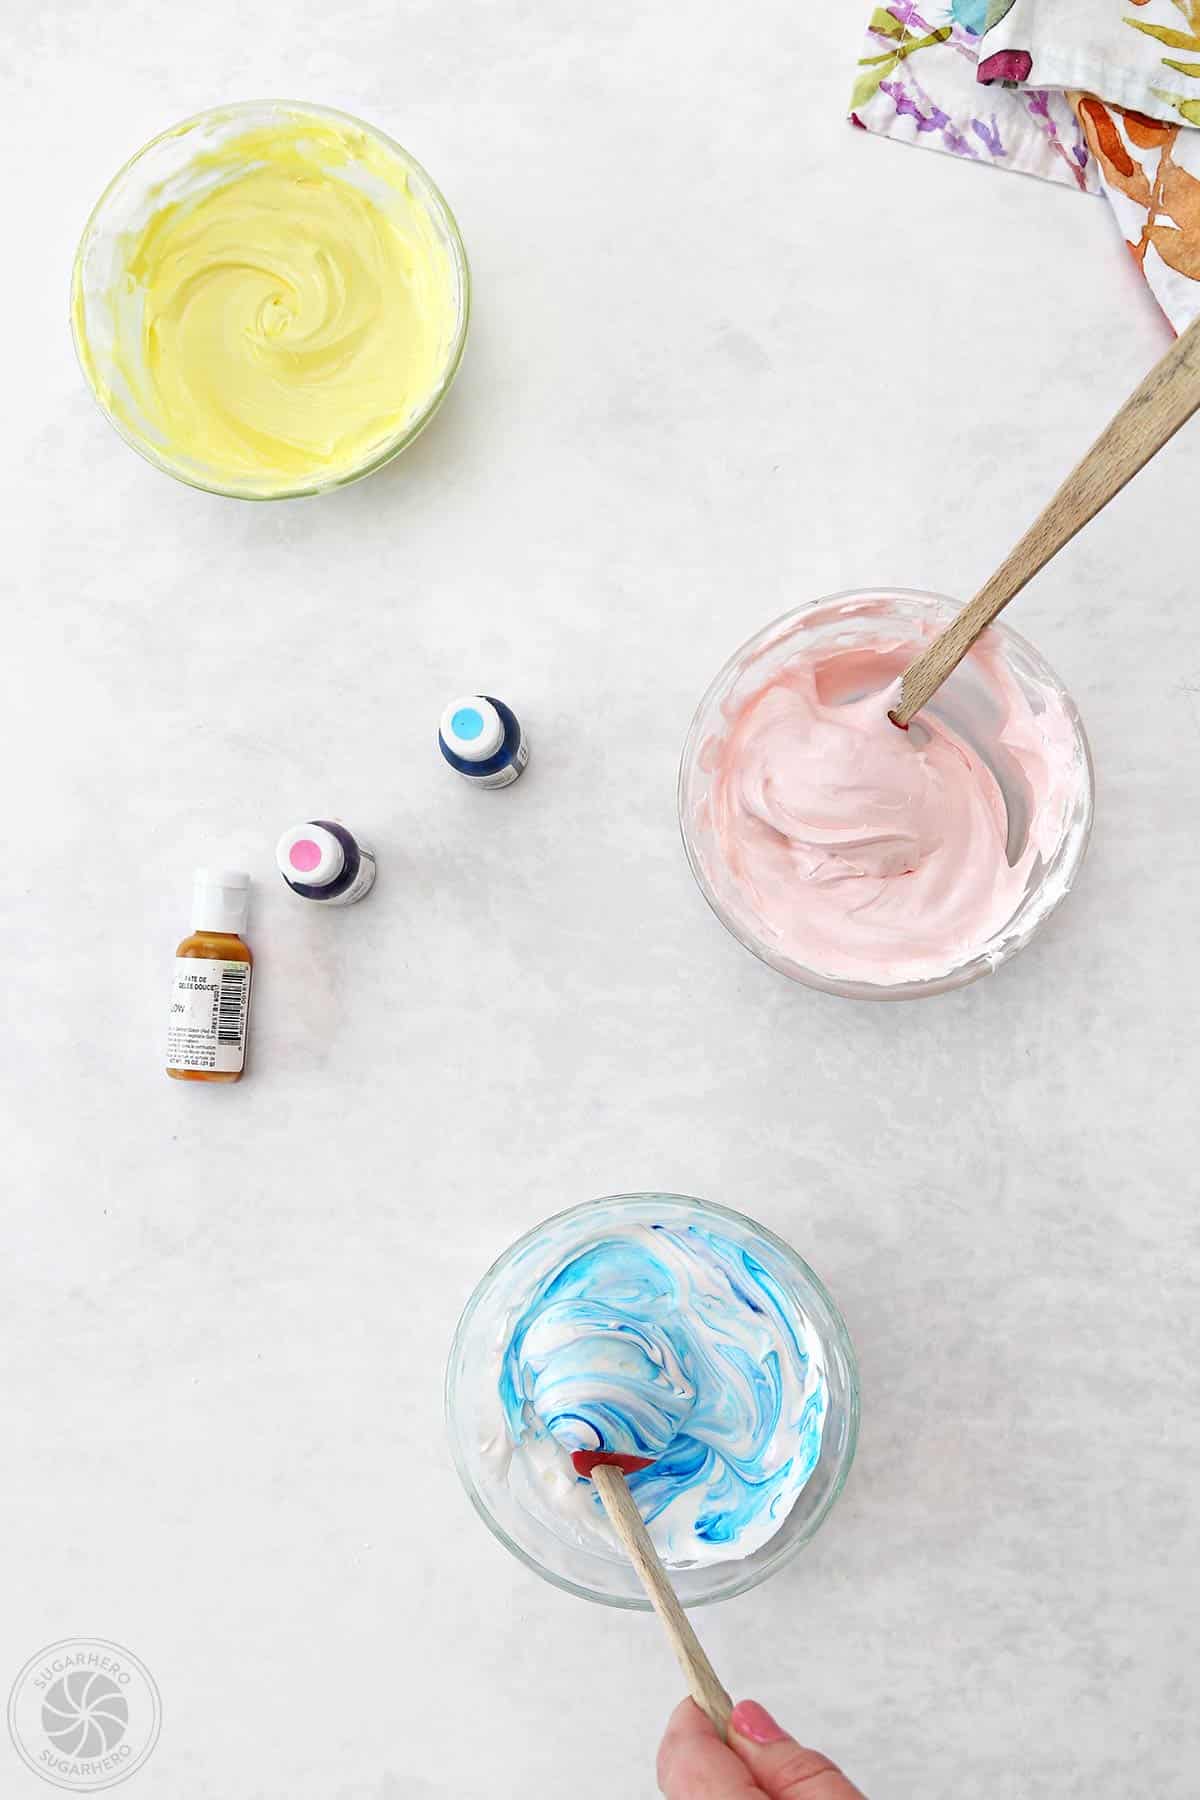
- Divide the icing: Separate out half of the icing to leave plain white, and press a piece of cling wrap on top right away so that it doesn’t form a crust.
- Color the icing: Decide how many icing colors you want, and divide the remaining icing into that many bowls. Add a few drops of gel food coloring to each bowl of icing and stir by hand until the color is evenly distributed. Be aware that royal icing tends to darken a bit as it dries, so if you want pretty pastel colors, keep that in mind and don’t add too much coloring.
- Save out some stiff icing: The frosting consistency right out of the mixer is fairly stiff, but for most of the designs, you’ll want a thinner consistency. The only thing that will require a thicker consistency is piping stiff rosettes onto decorated cookies. If you want to make this design, separate out a portion of stiff frosting in the color(s) of your choice, and store it in an airtight container for now. (Remember to press cling wrap directly on top of the royal icing every time!)
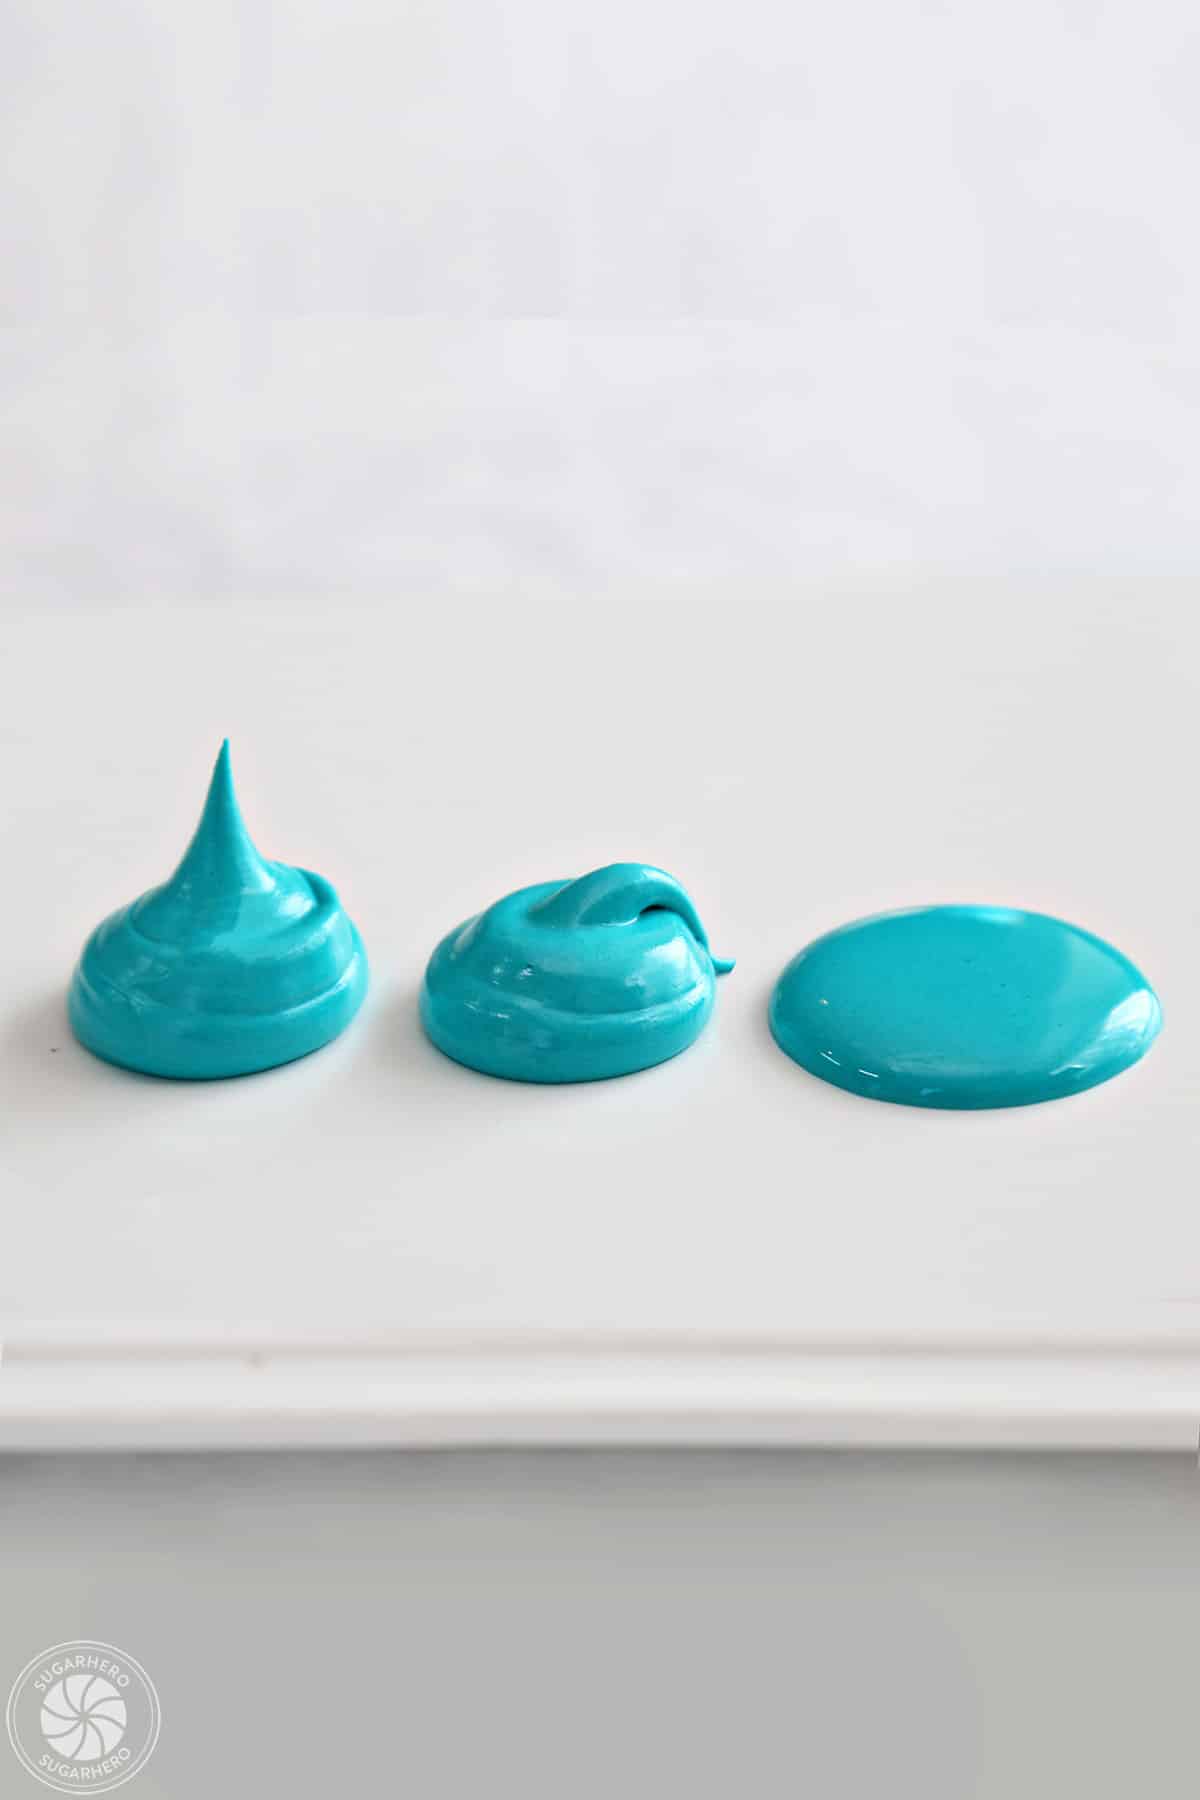
- Add water to thin it out: For all of the other designs, we’ll thin the frosting colors out by adding a small spoonful of water at a time, and stirring slowly until it’s incorporated. You have the right consistency when you lift up a spoonful of icing, let it drip back into the bowl, and it takes about 15 seconds for the trail of icing to fully disappear in the bowl. Add water a little bit at a time to each color until you achieve this consistency.
- Put in piping bags: Place each color in a piping bag fitted with a small round tip (I recommend a #2 tip).
To Decorate the Cookies
- Work in small batches: Most of the designs require piping colors onto wet frosting. I recommend working in small batches and flooding 2-3 cookies at a time with white frosting, then piping the designs on, then doing another small batch, to avoid having the royal icing dry out before the cookies are fully decorated.
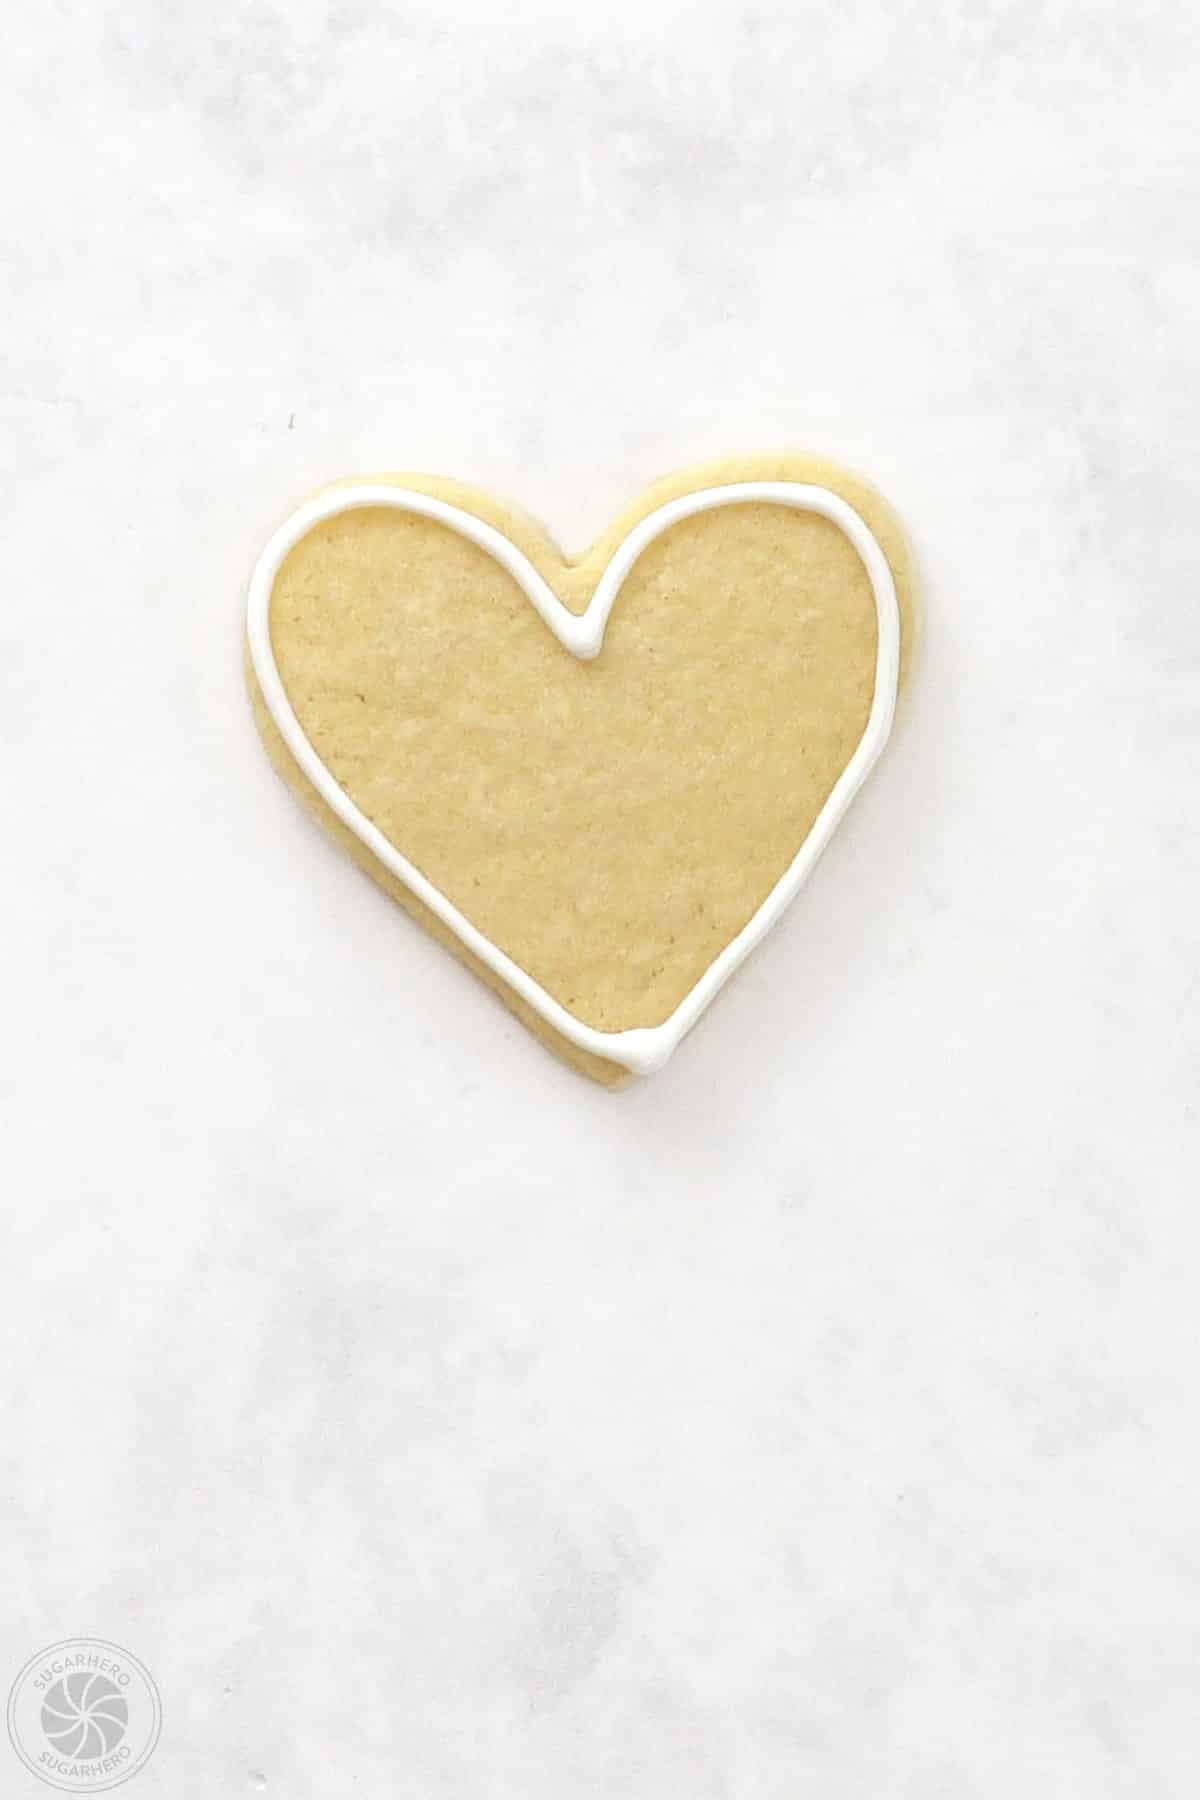
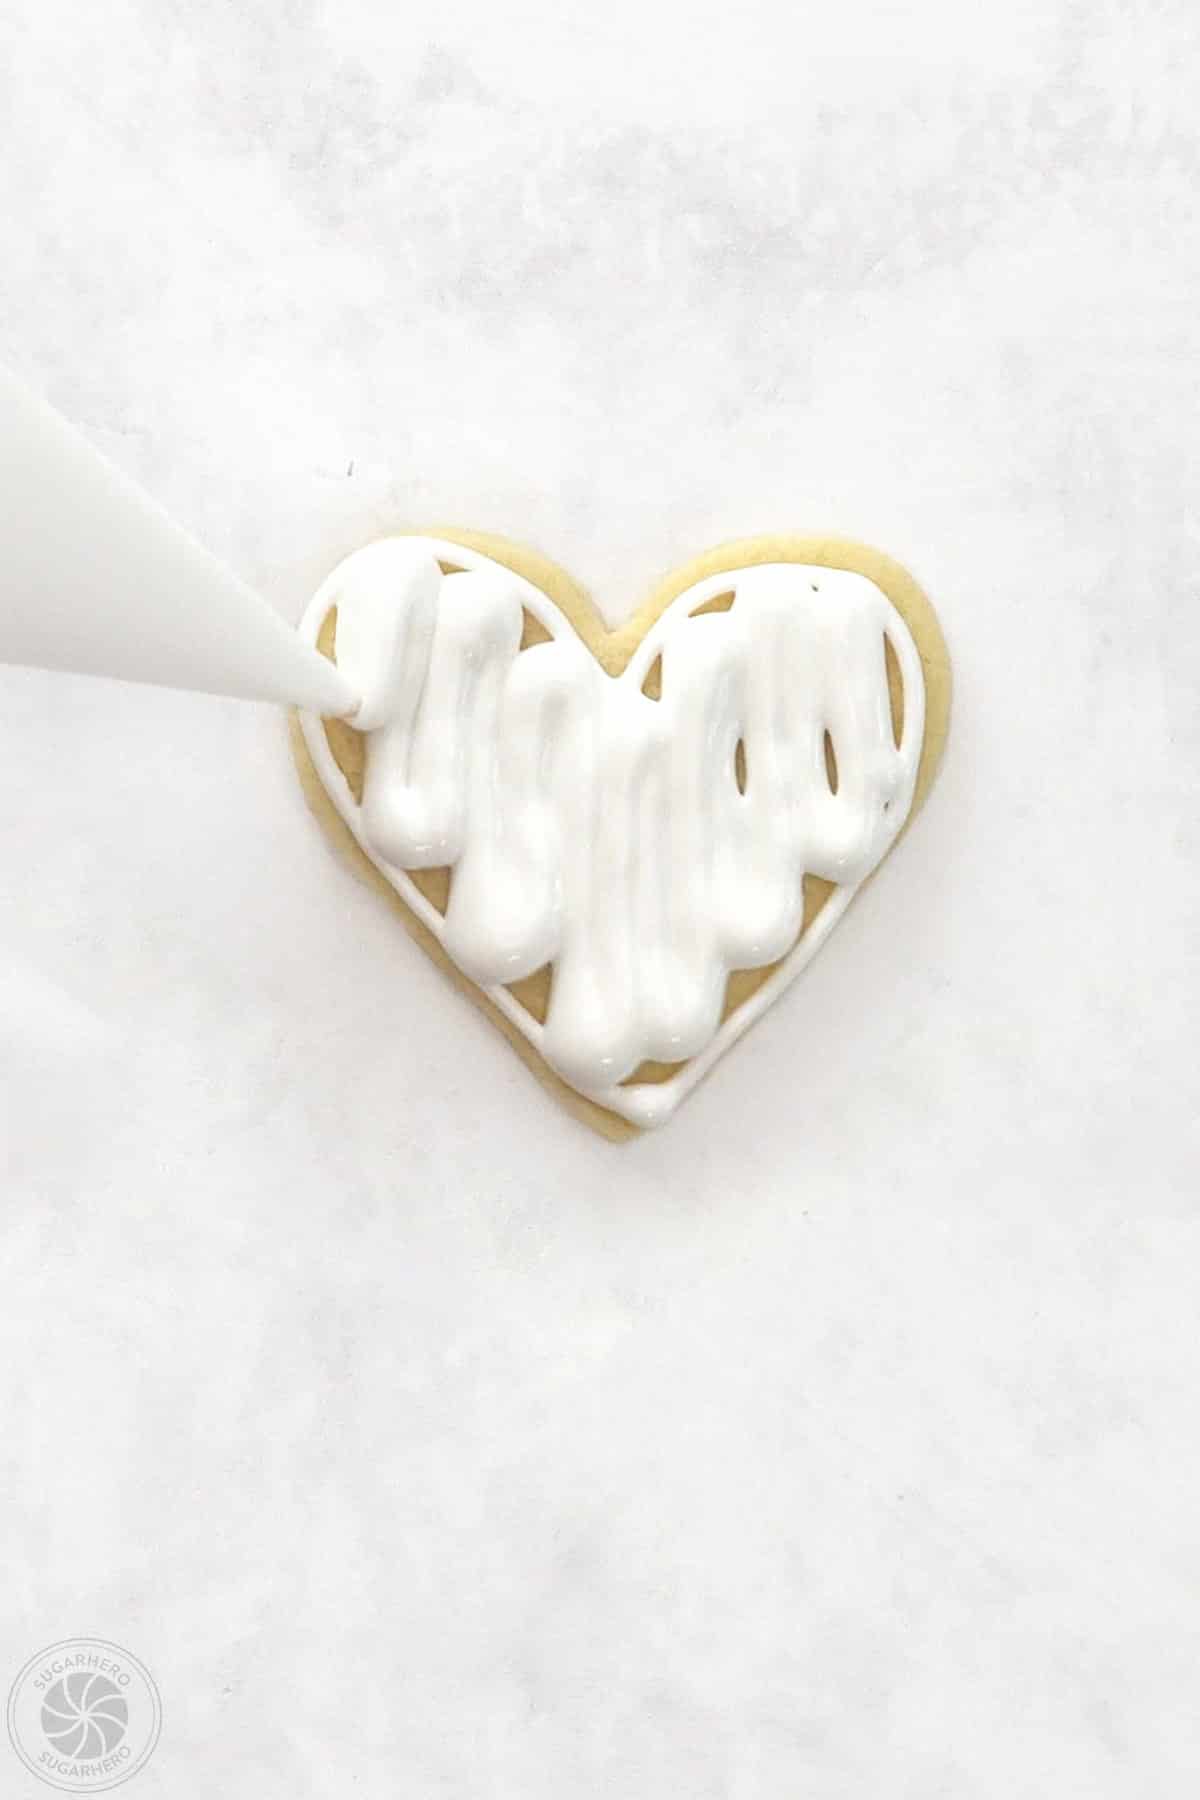
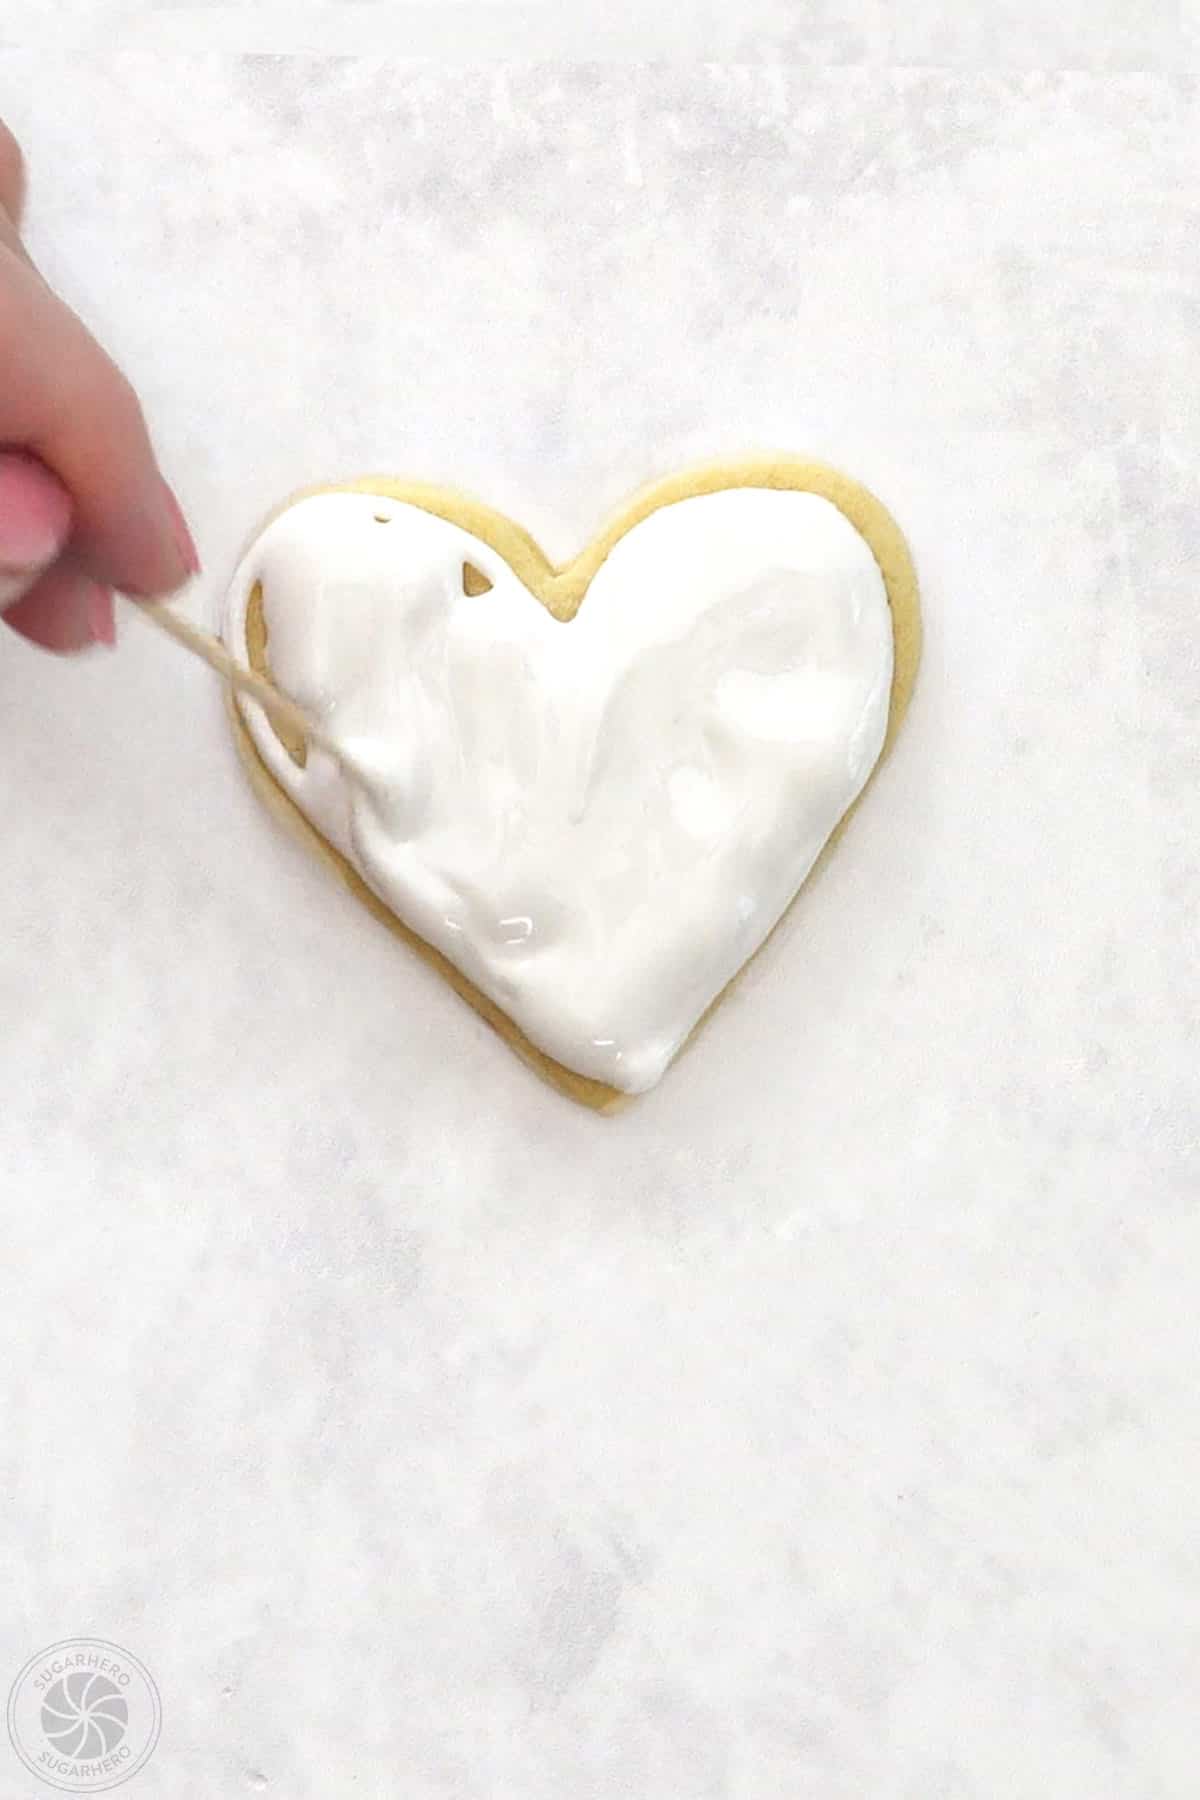
- To flood the cookies: fit a piping bag with a small round tip (I recommend a #2 tip) and fill it with white frosting. Draw a thin outline with the royal icing around the outside of a few cookies. Next, fill the center of the cookie with royal icing. If you miss any spots, use the tip of the piping bag to nudge the icing into place, or use a toothpick to smooth out any rough lines. This is your blank canvas for making all the Valentine’s Day designs! Make sure to work quickly to decorate the cookies after they have been flooded.

- To make swirled heart cookies: pipe dots of color along the outer edge of the cookie, spacing them about ½-inch apart. The dots should sink into the wet white icing fairly quickly. Take a toothpick and, starting at the top center of the heart, drag it through the line of colored dots. The dragging motion will create an elongated heart shape in each dot. You can also pipe randomly placed dots all over the cookie, and drag a toothpick through the dots individually to make hearts.

- To make zigzag cookies: pipe lines of alternating colors horizontally across the white icing. Take a toothpick and drag it through the lines vertically. Once at the bottom of the cookie, move the toothpick over a little bit (about 1/8”) and drag it upwards, creating a zig-zag in the opposite direction. Continue this pattern until you’ve created lines across the whole cookie.

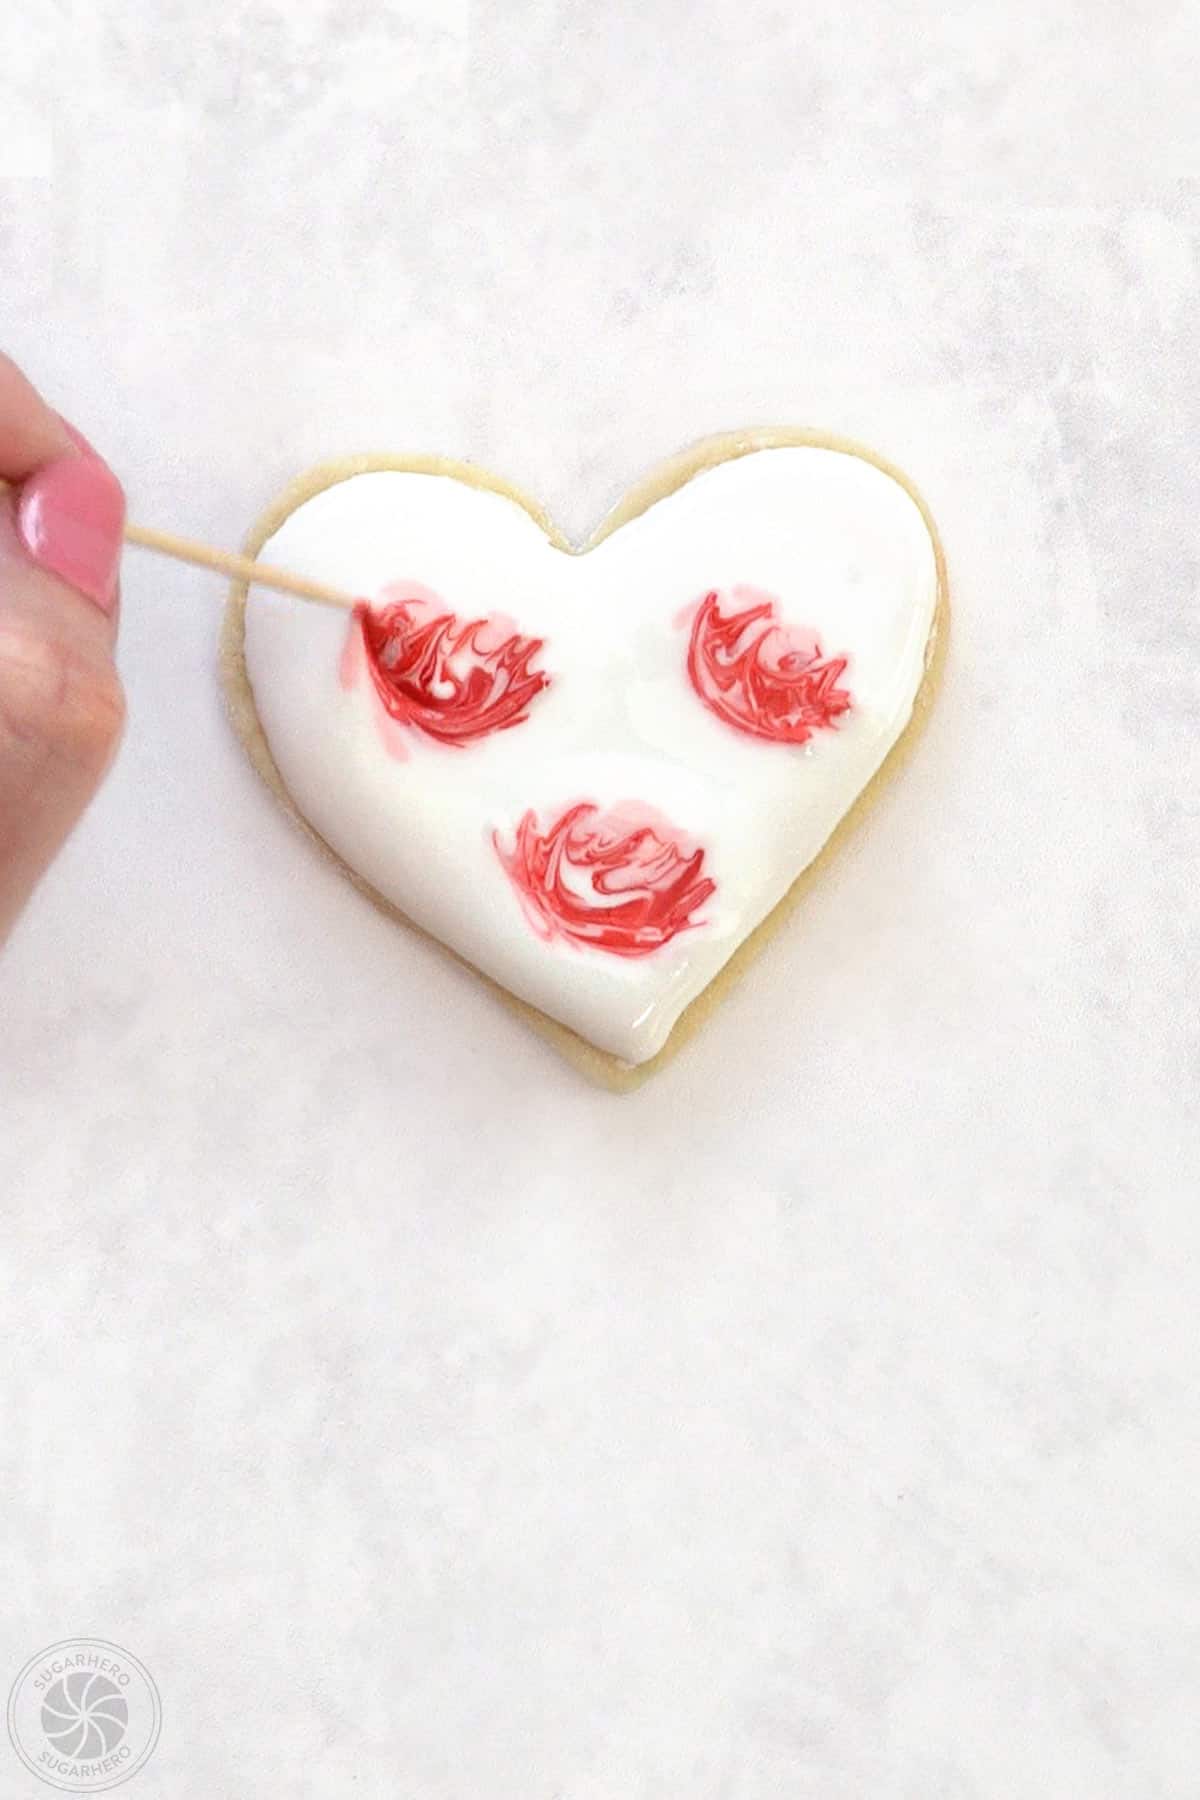
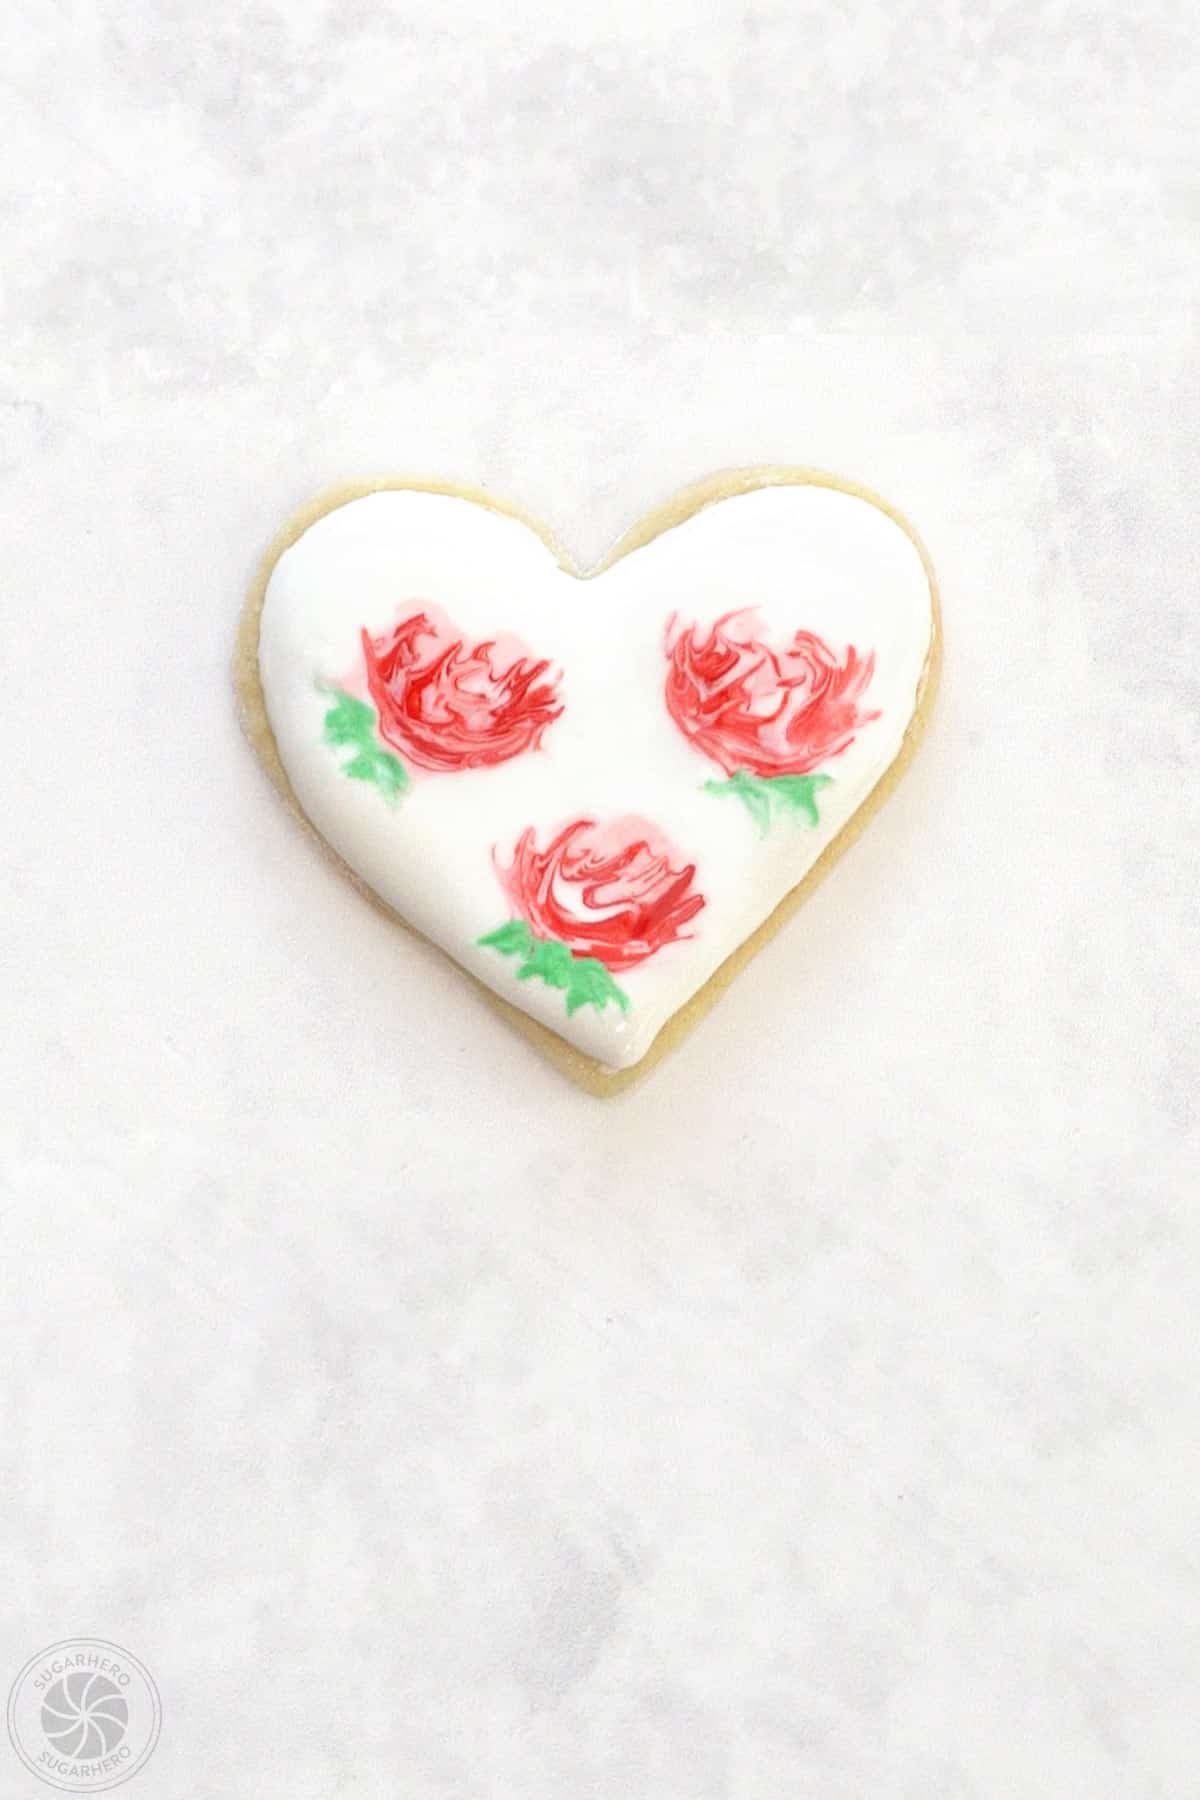
- To make elegant rose cookies: these look best when made with two different shades of the same color, like pale pink and dark pink. Start with the pale pink and pipe several blobs on top of the cookie—refer to the picture tutorial to get a general idea of the shape. Take the darker pink color and pipe a line across the center of the blob. Finally, add a dot of white in the center. Now for the fun part! Take a toothpick and start swirling the colors together. It should only take a few swirls before they start to look like abstract roses. Add a few dots of green around the edges, and pull the dots of green out with a toothpick so they look like leaves.

- To pipe stiff rosettes on cookies: the rosettes can be piped onto plain white cookies, or cookies that have been decorated with dots, stripes, or whatever else you like. Let the base cookies sit and dry for at least an hour before adding the rosettes on top. Place stiff consistency frosting in a piping bag fitted with a small star tip. Start in the center and pipe a small swirl outward in a rosette shape. You can do just 1 flower or several bunched together. Decorate the edges with small leaves piped with stiff green frosting, if desired.

- Storage and make-ahead information: let the royal icing set for at least 2 hours, then you can serve and enjoy your decorated cookies! If you want to stack the cookies on top of each other, you will need to let the cookies sit in a single layer, at room temperature, for at least 12 hours to be sure the royal icing is fully dry and hard.
- Once set, the cookies can be stacked and stored in an airtight container between sheets of waxed paper or parchment. Store the cookies at room temperature for up to two weeks – do not refrigerate them, as the humidity can cause the icing to soften and dissolve.
- Decorated cookies can also be frozen for up to 6 months. For the best results, I recommend packaging the cookies individually and then placing them in a plastic container in the freezer. Let them defrost at room temperature while still in the plastic container – this can help cut down on colors bleeding or other moisture issues.
Recipe Notes
Measuring Tips
Our recipes are developed using weight measurements, and we highly recommend using a kitchen scale for baking whenever possible. However, if you prefer to use cups, volume measurements are provided as well. PLEASE NOTE: the adage “8 oz = 1 cup” is NOT true when speaking about weight, so don’t be concerned if the measurements don’t fit this formula.
Want to learn more about baking measurements and conversion?
Nutrition
📸 Step-by-Step Tutorial: How to Make Valentine’s Day Sugar Cookies with Royal Icing
Here’s a photo tutorial showing how to make these cookies, from dough to decoration. You can easily print these instructions by going to the recipe card above.
To Make the Sugar Cookies
- Combine dry ingredients: In a bowl, whisk together the 19 oz (4 1/4 cups) flour, 1 tsp salt, and 1 tsp baking powder, and set aside for now.
- Cream the butter and sugar: In the bowl of a large stand mixer fitted with a paddle attachment, combine 8 oz (1 cup) softened butter and 12.25 oz (1 3/4 cups) sugar, and mix everything together on medium speed until fluffy and well-mixed, about 1-2 minutes.
- Add eggs one at a time: Add 2 large eggs (one at a time), beating well after each addition.
- Add vanilla and sour cream: Then add 1 tsp vanilla extract and 1oz (2 TBSP) sour cream.
- Mix in dry ingredients: With the mixer running on low, add the dry ingredients gradually, and mix until they’re just about incorporated. Stop the mixer when only a few streaks of flour remain. Scrape the bottom and sides of the bowl with a spatula, and finish mixing all the dough by hand.
- Divide dough and refrigerate: Divide the dough in half and press each into a thin disc, wrapping well with plastic wrap. Refrigerate until firmer but not hard, about 30 minutes.

- Prepare to bake: When you’re ready to bake the cookies, preheat the oven to 350 degrees F.
- Roll out dough: Place a disc of dough between two sheets of parchment or waxed paper, and roll out until it is 1/4-inch thick.
- Cut dough: Use a 3-inch heart cookie cutter to cut out your cookies and place them on a parchment-lined baking sheet. Combine the scraps and re-roll the dough to cut more cookies. You should get about 24 large heart cookies.
- Freeze for 10 minutes: Put the sheet in the freezer for 10 minutes before baking to help the cookies hold their shape.
- Bake: Bake the trays of cookies for 10-12 minutes, until the edges are just starting to take on color and they have lost the raw shine in the middle.
- Cool: Let them cool on the baking sheet for 5 minutes, then remove them to wire racks to cool completely before decorating them.
To Make the Royal Icing
- Mix meringue powder and water: Combine 1.8 oz (6 TBSP) meringue powder and 6 floz (3/4 cup) water in the bowl of a large stand mixer fitted with a paddle attachment. Mix them together on medium speed until foamy.
- Sift in powdered sugar, then add corn syrup and flavoring: Stop the mixer and sift 24 oz (6 cups) powdered sugar over the bowl. Beat on low speed until the sugar is incorporated. Scrape down the bottom and sides of the bowl, then add 2 tsp corn syrup and 1/2 tsp flavoring.

- Mix until stiff: Turn the mixer speed back to medium-high and mix for 5 minutes, until the royal icing is shiny, stiff, bright white, and voluminous. Do not mix on the highest speed, and do not mix for more than 5 minutes.
- Divide and color remaining icing: Separate out half of the icing to leave plain white. Decide how many icing colors you want, and divide the remaining icing into that many bowls. Add a few drops of gel food coloring to each bowl of icing and stir by hand until the color is evenly distributed.
- Reserve thick icing for piped roses, if desired: The frosting consistency right out of the mixer is fairly stiff, but for most of the designs, we’ll want a thinner consistency. The only thing that will require a thicker consistency is piping stiff rosettes onto decorated cookies. If you want to make this design, separate out a portion of stiff frosting in the color(s) of your choice, and store it in an airtight container.
- Thin the icing with water: For all of the other designs, thin the frosting colors out by adding a small spoonful of water at a time, and stirring slowly until it’s incorporated. You have the right consistency when you lift up a spoonful of icing, let it drip back into the bowl, and it takes about 15 seconds for the trail of icing to fully disappear in the bowl.
- Fit and fill piping bags: Place each color in a piping bag fitted with a small round tip (I recommend a #2 tip).

To Decorate the Cookies
For the best results, work in small batches of 2-3 cookies at a time, to avoid having the royal icing dry out before the cookies are fully decorated.
- Outline a few cookies: The first step in all of these designs is flooding your cookie with a white royal icing base. Draw a thin outline with the white royal icing around the outside of a few cookies.
- Flood a few cookies: Next fill the center of the outlined cookies with royal icing. If you miss any spots, use a toothpick or a scriber tool to smooth out any rough lines.
- Choose a design: Make sure to work quickly to decorate the cookies after they have been flooded. Details for swirled hearts, zigzags, elegant roses and small rosettes follow below.
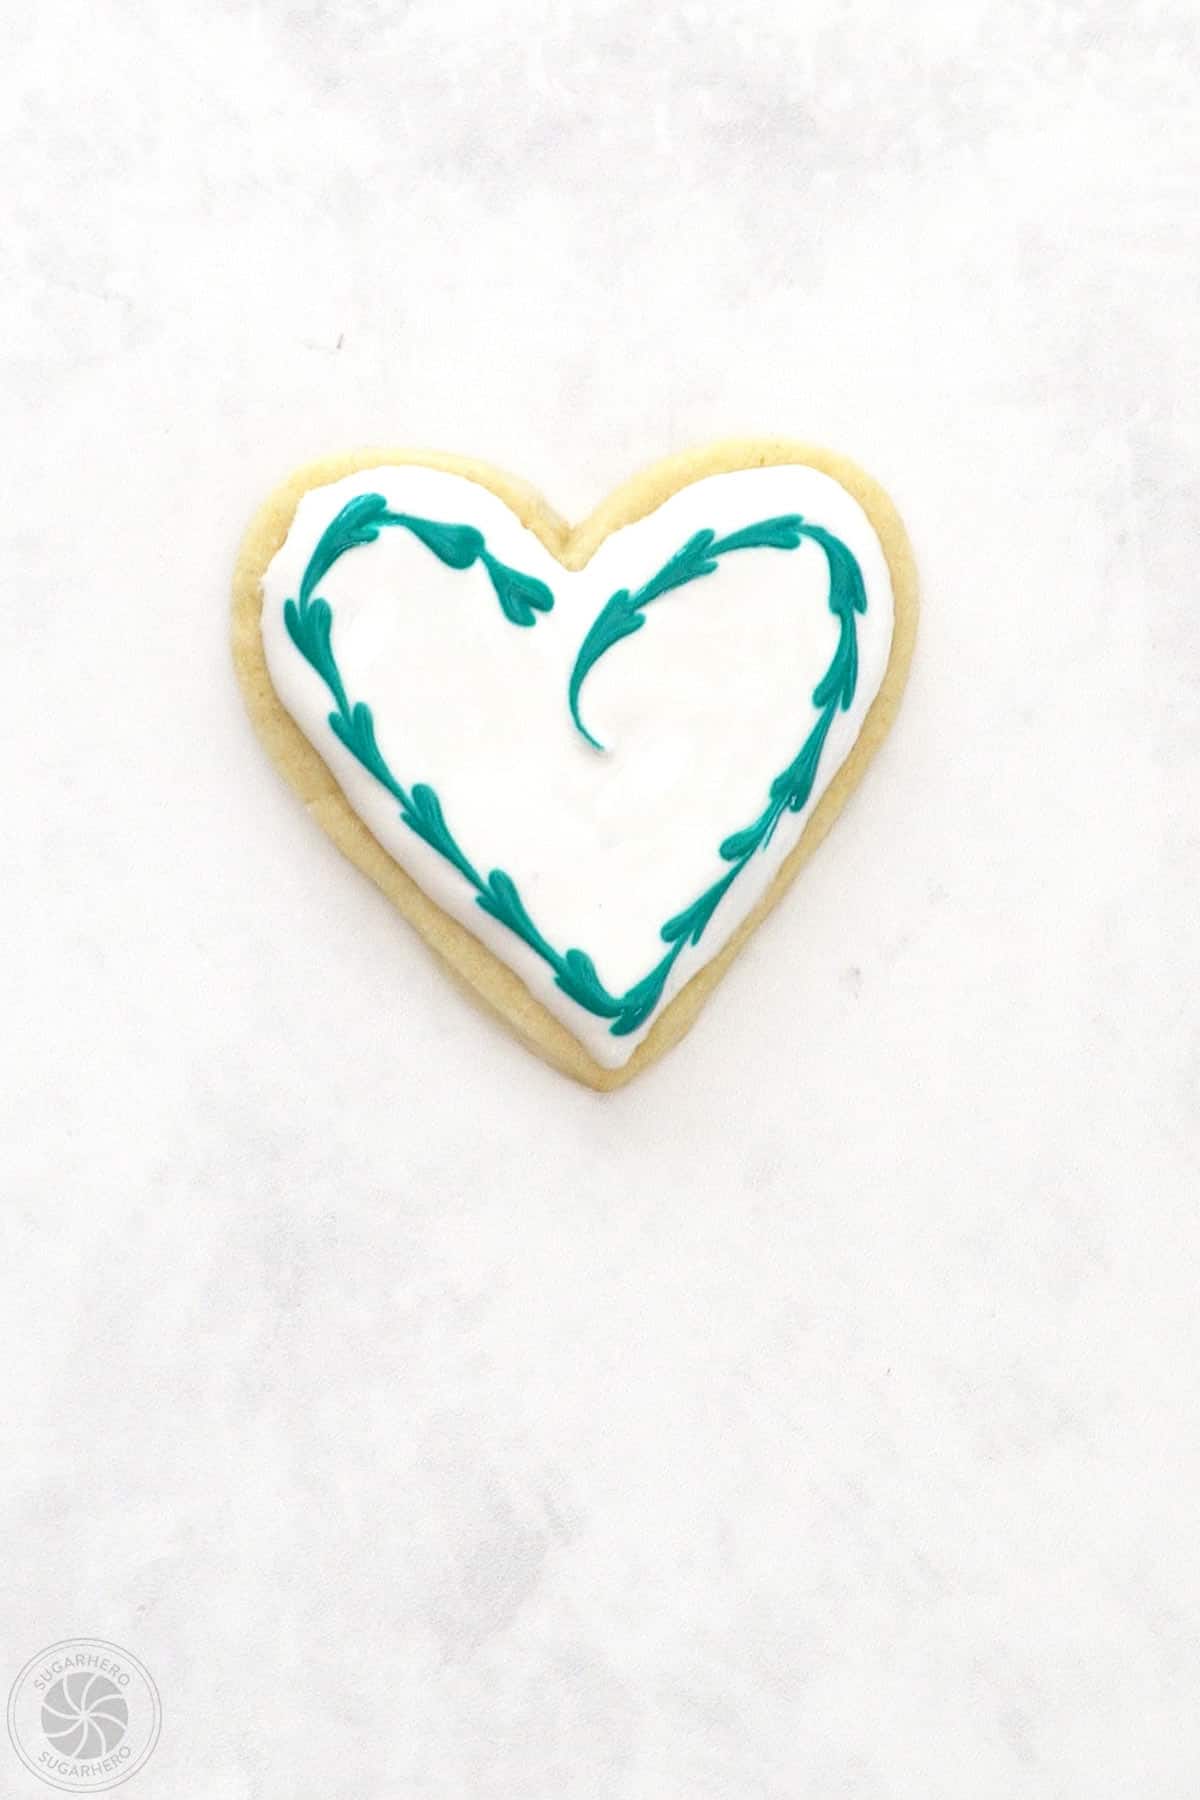
Swirled Heart Cookies
Hearts are probably the easiest design to do, but that doesn’t mean they’re plain or boring! I LOVE a simple border of hearts all along the edge of the cookie–it just looks so classy and elegant. Here’s how you do it:
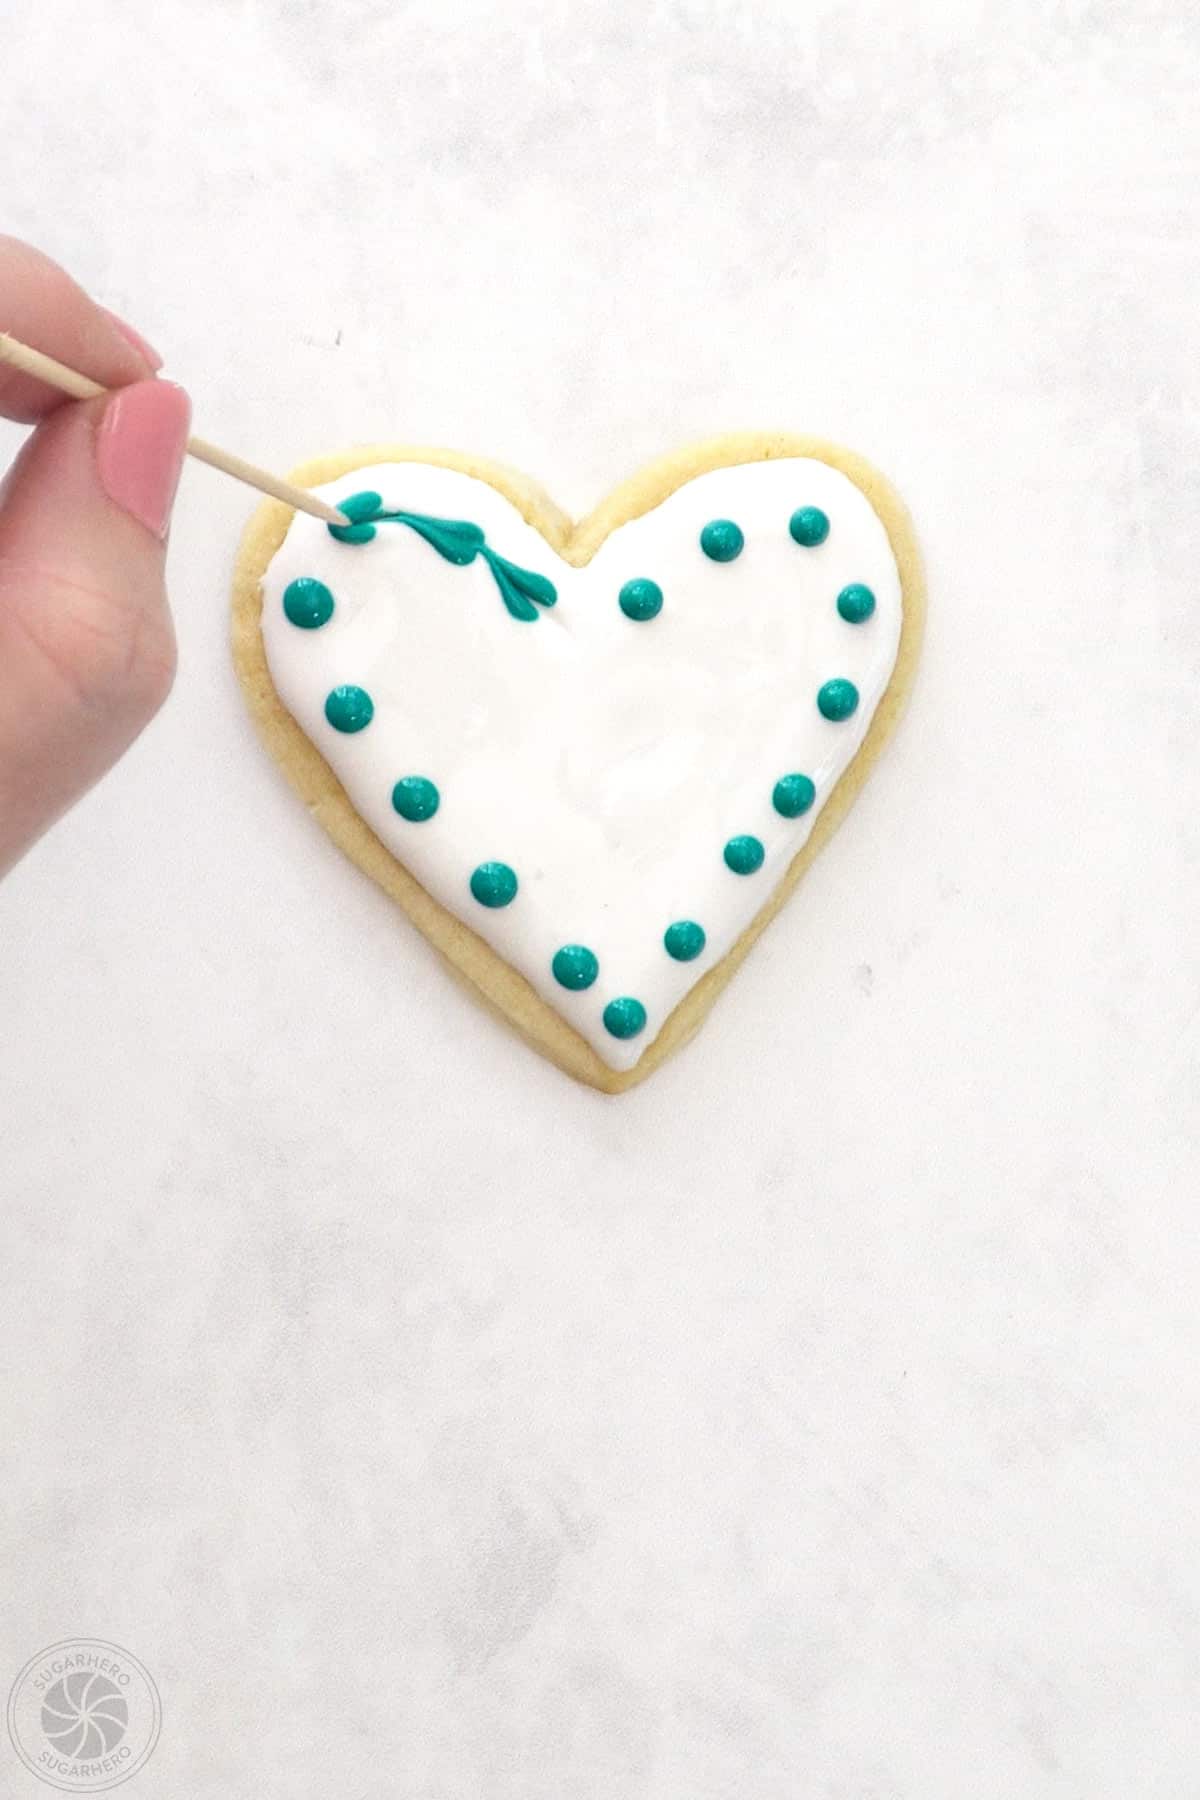
- Pipe dots of icing around the edge: Take a freshly flooded sugar cookie and pipe dots of color along the outer edge of the icing. The dots should sink into the wet white icing fairly quickly.
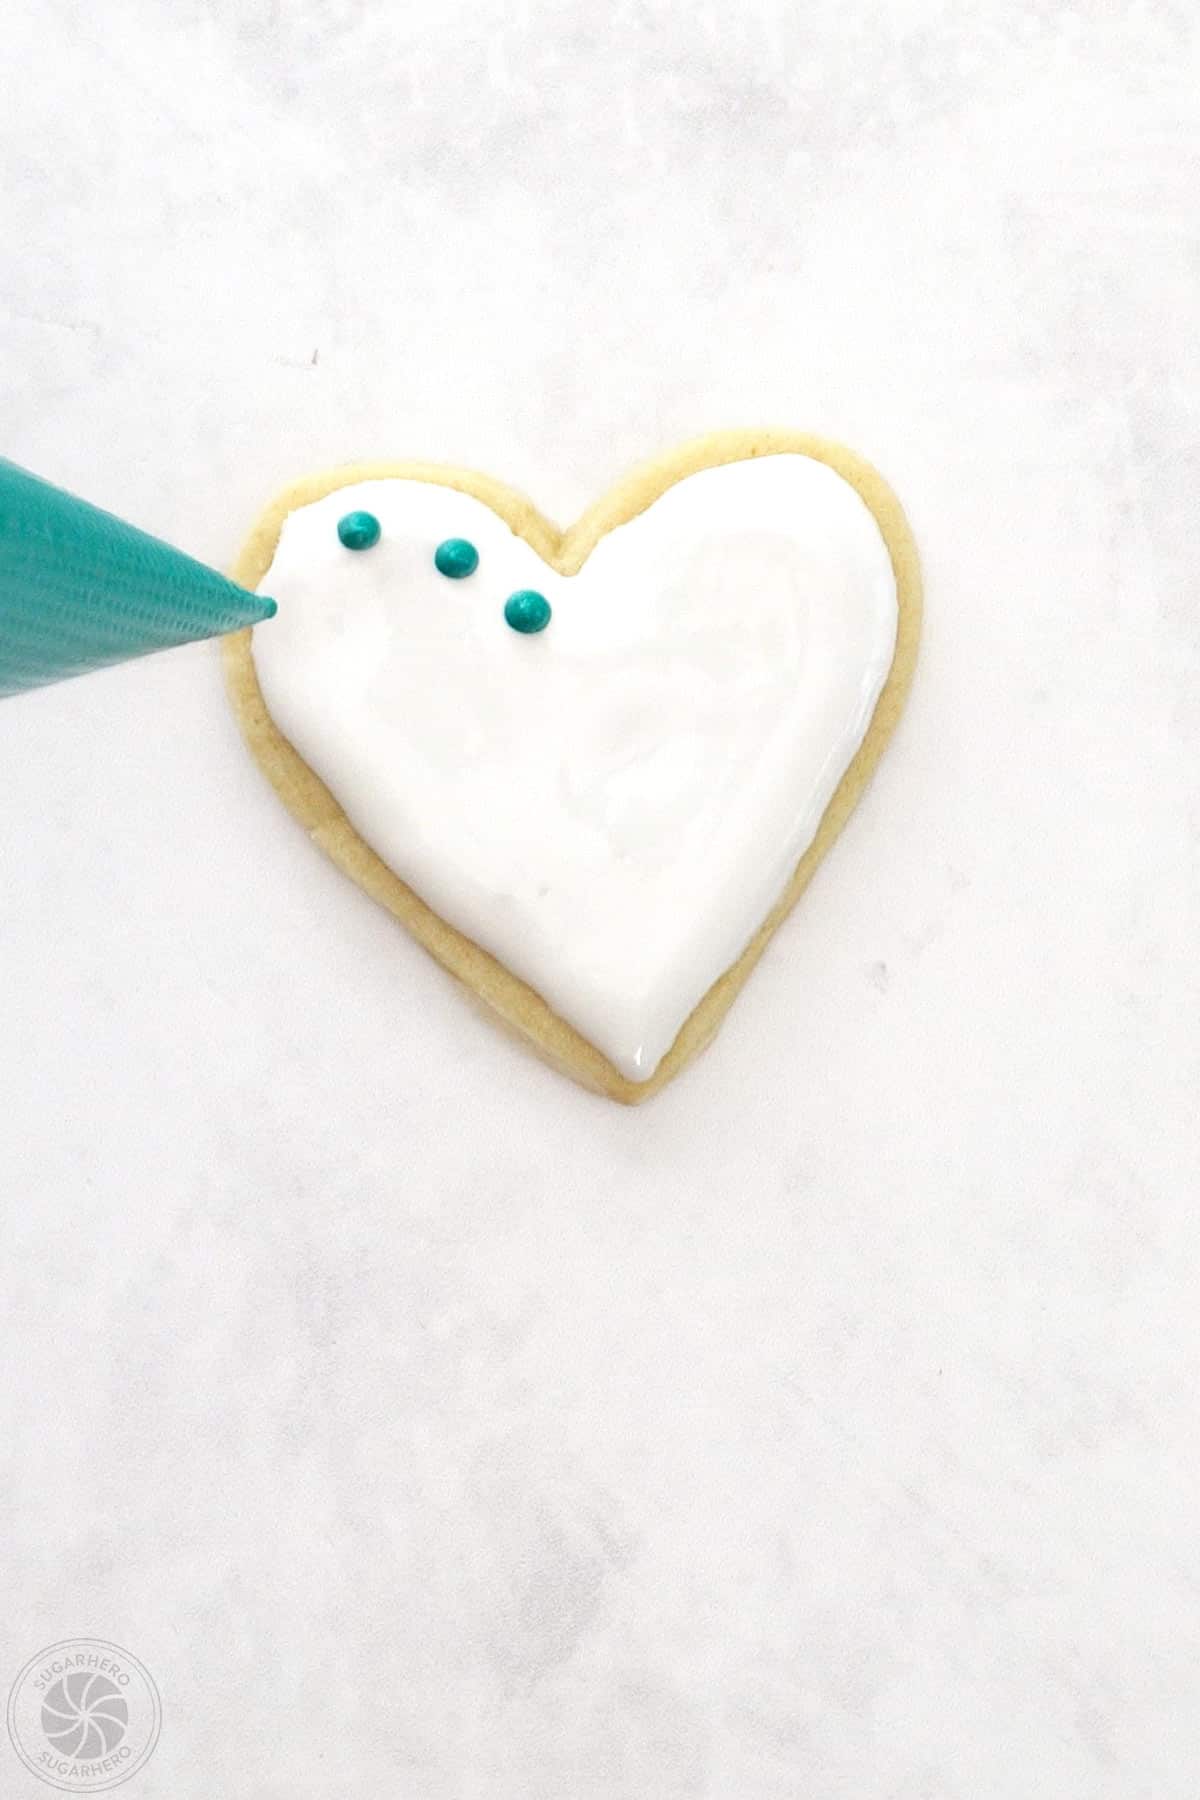

- Drag a toothpick through the dots: Take a toothpick or scriber tool and, starting at the top center of the heart, drag it through the line of colored dots. The dragging motion will create an elongated heart shape in each dot.
Zig-zag Designs
Making zig-zag designs is almost as easy as the hearts!
- Pipe alternating lines of color: First, pipe lines of alternating colors horizontally across the white icing.
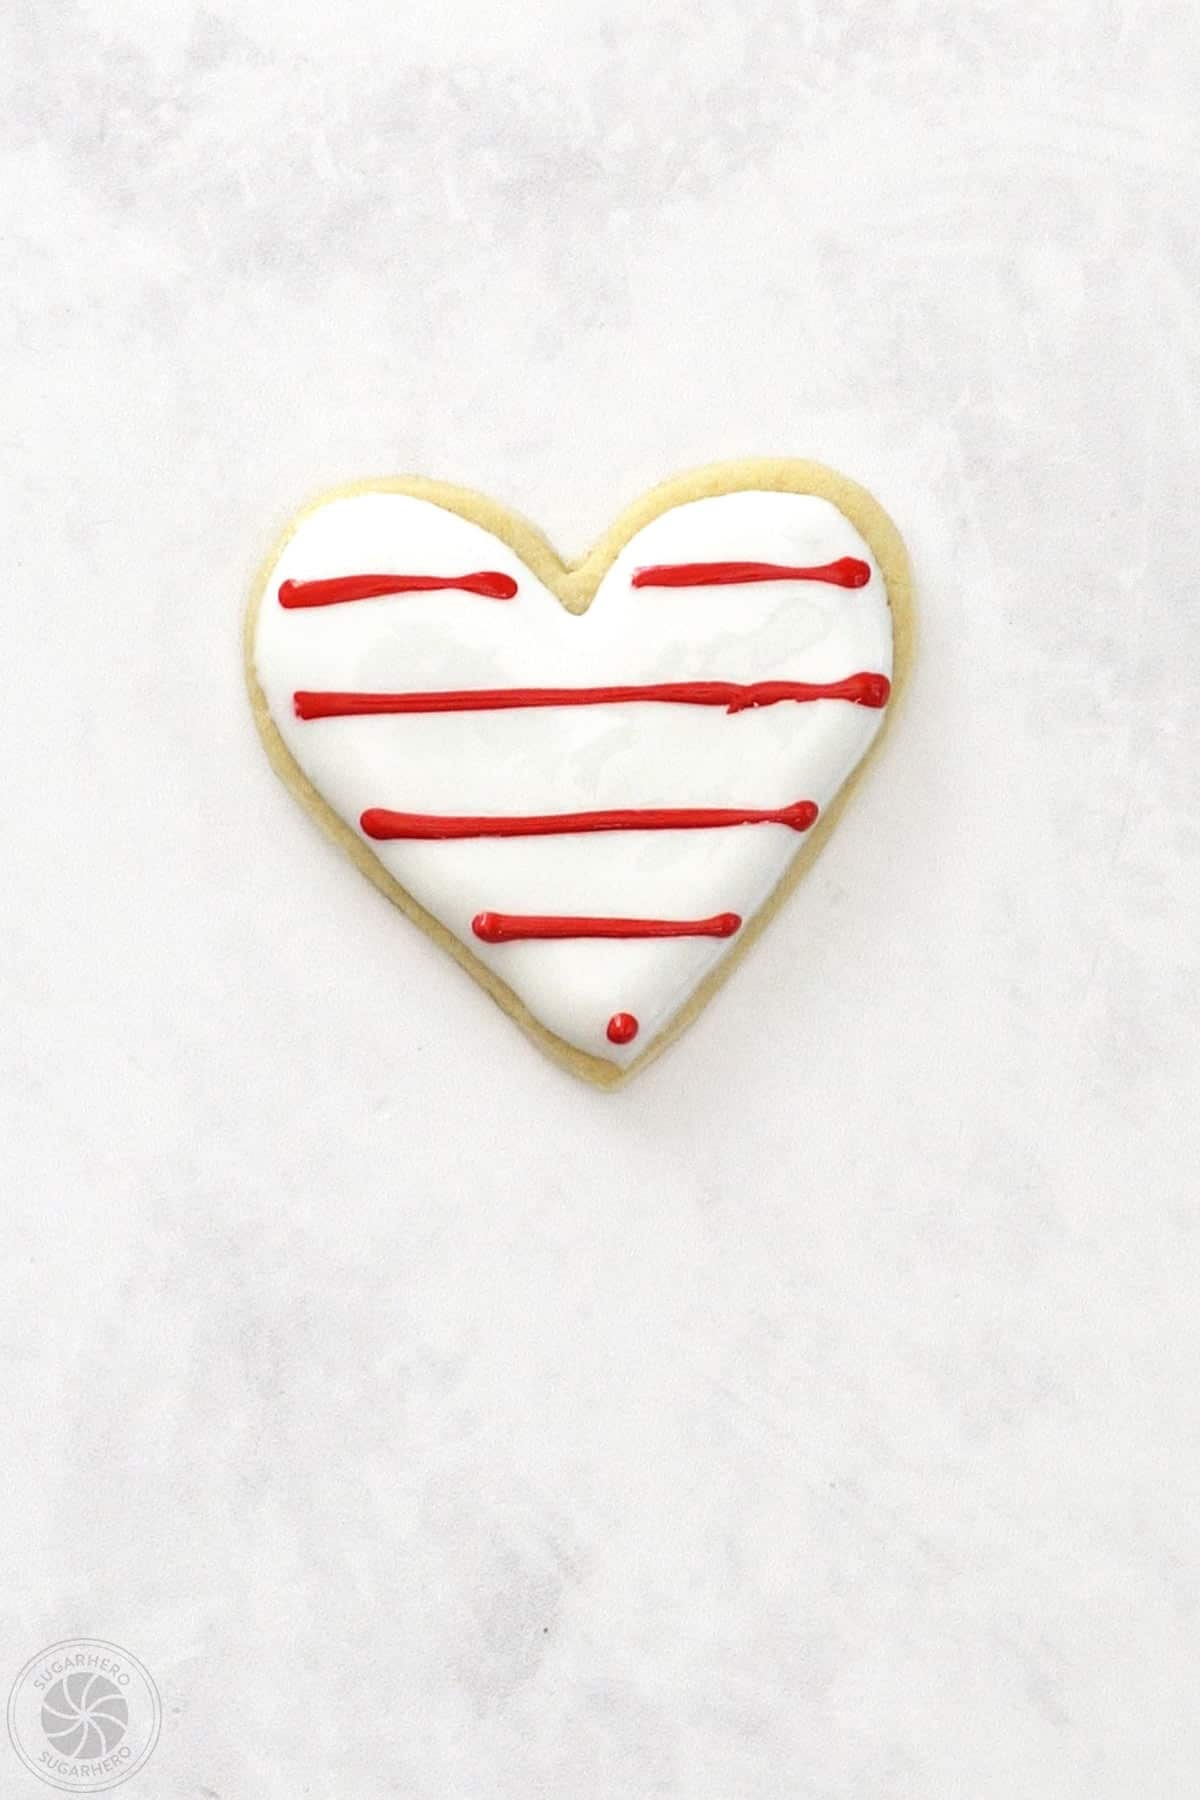
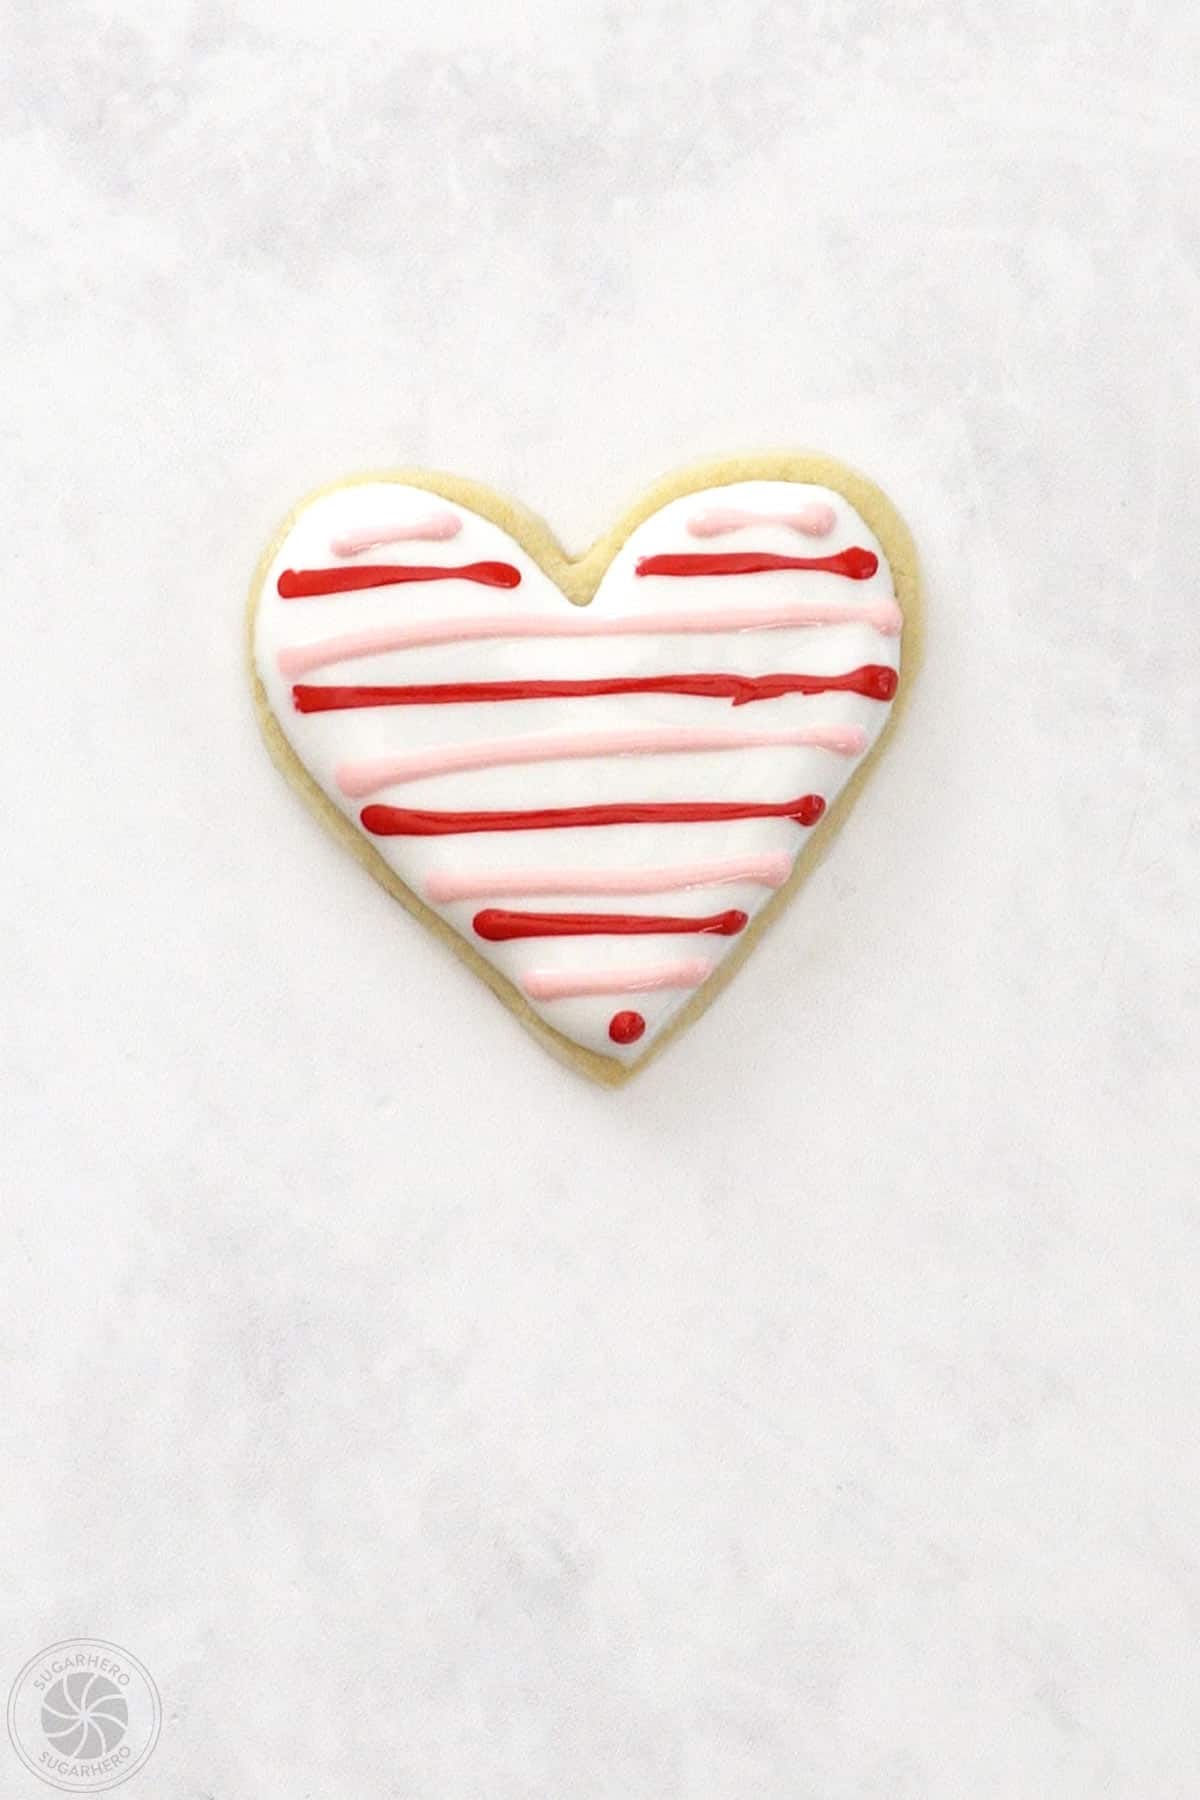
- Drag a toothpick downward through the lines: Take a toothpick and drag it through the lines vertically.
- Next drag upwards: Once at the bottom of the cookie, move the toothpick over a little bit (about 1/8”) and drag it upwards, creating a zig-zag in the opposite direction.
- Repeat: Continue this pattern until you’ve created lines across the whole cookie.

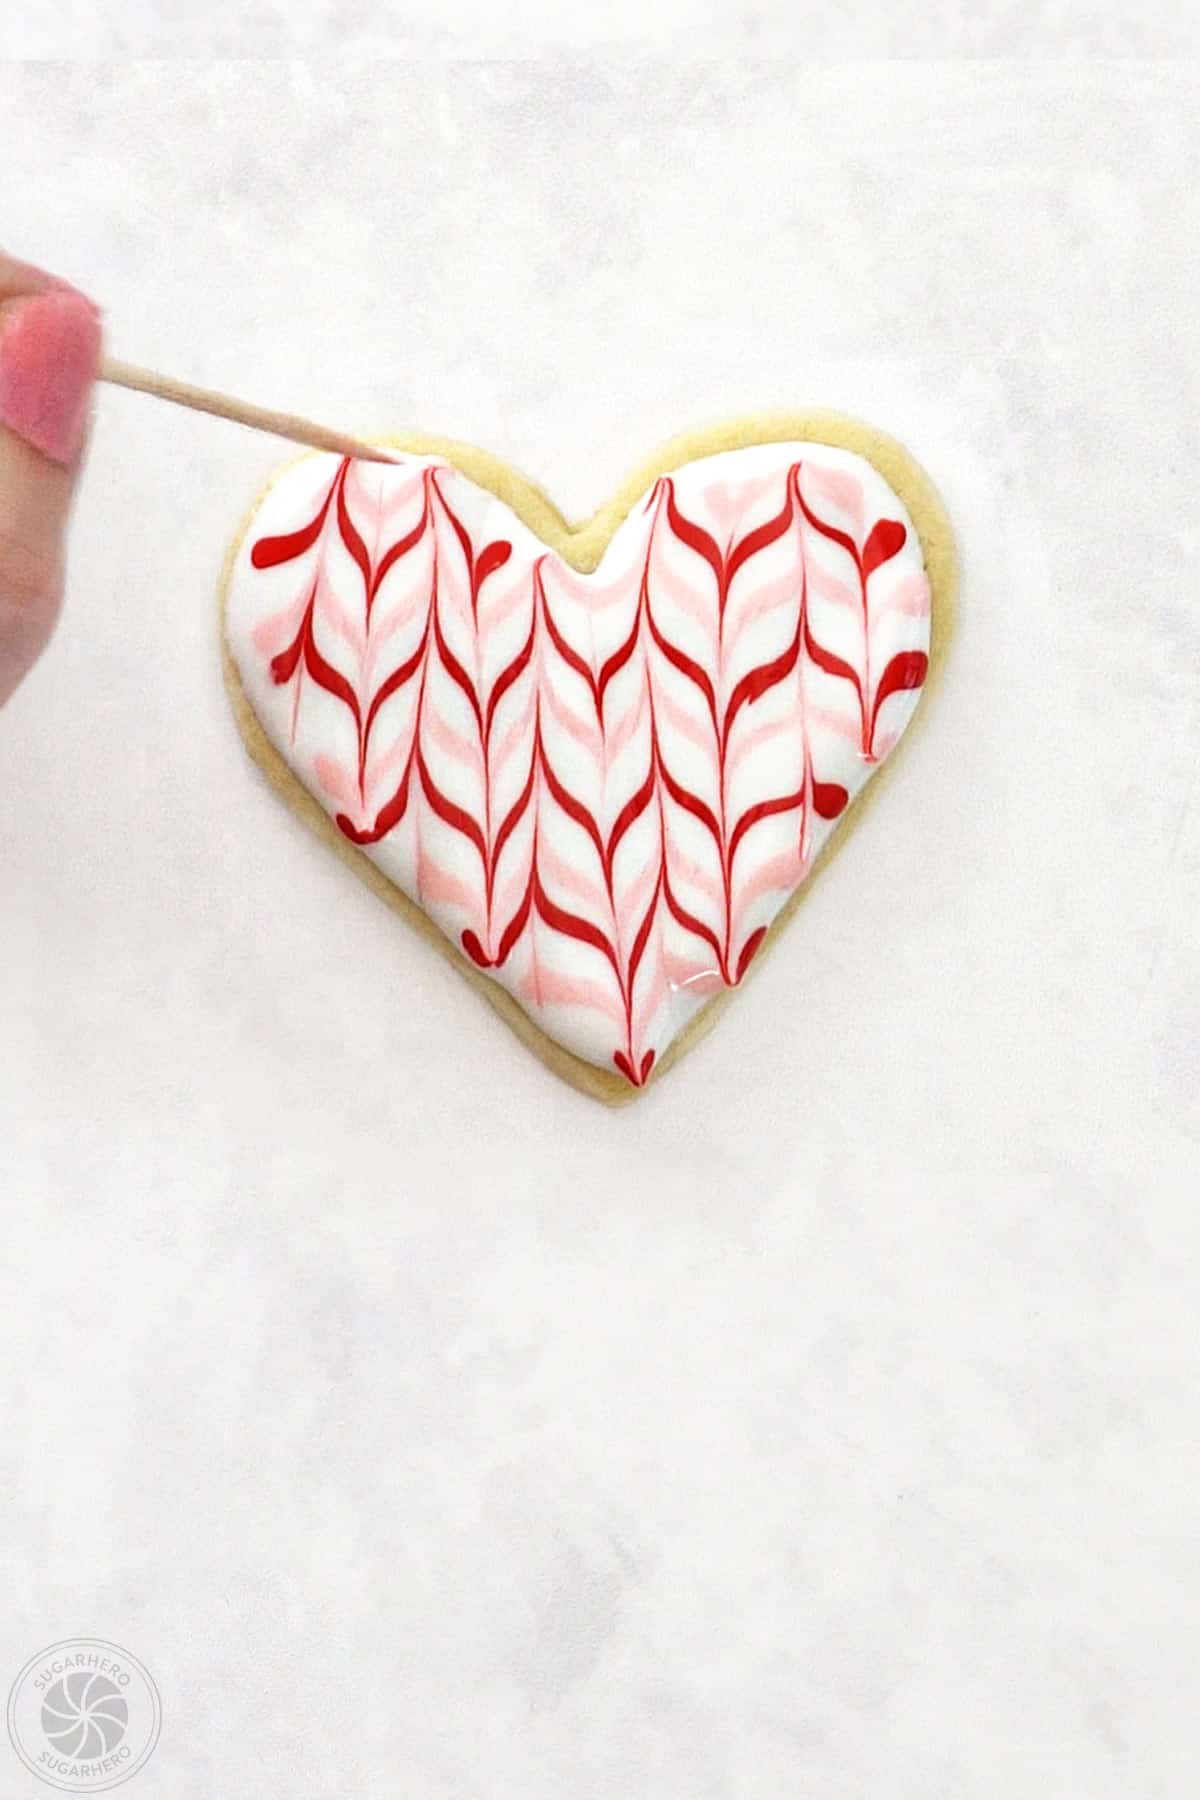
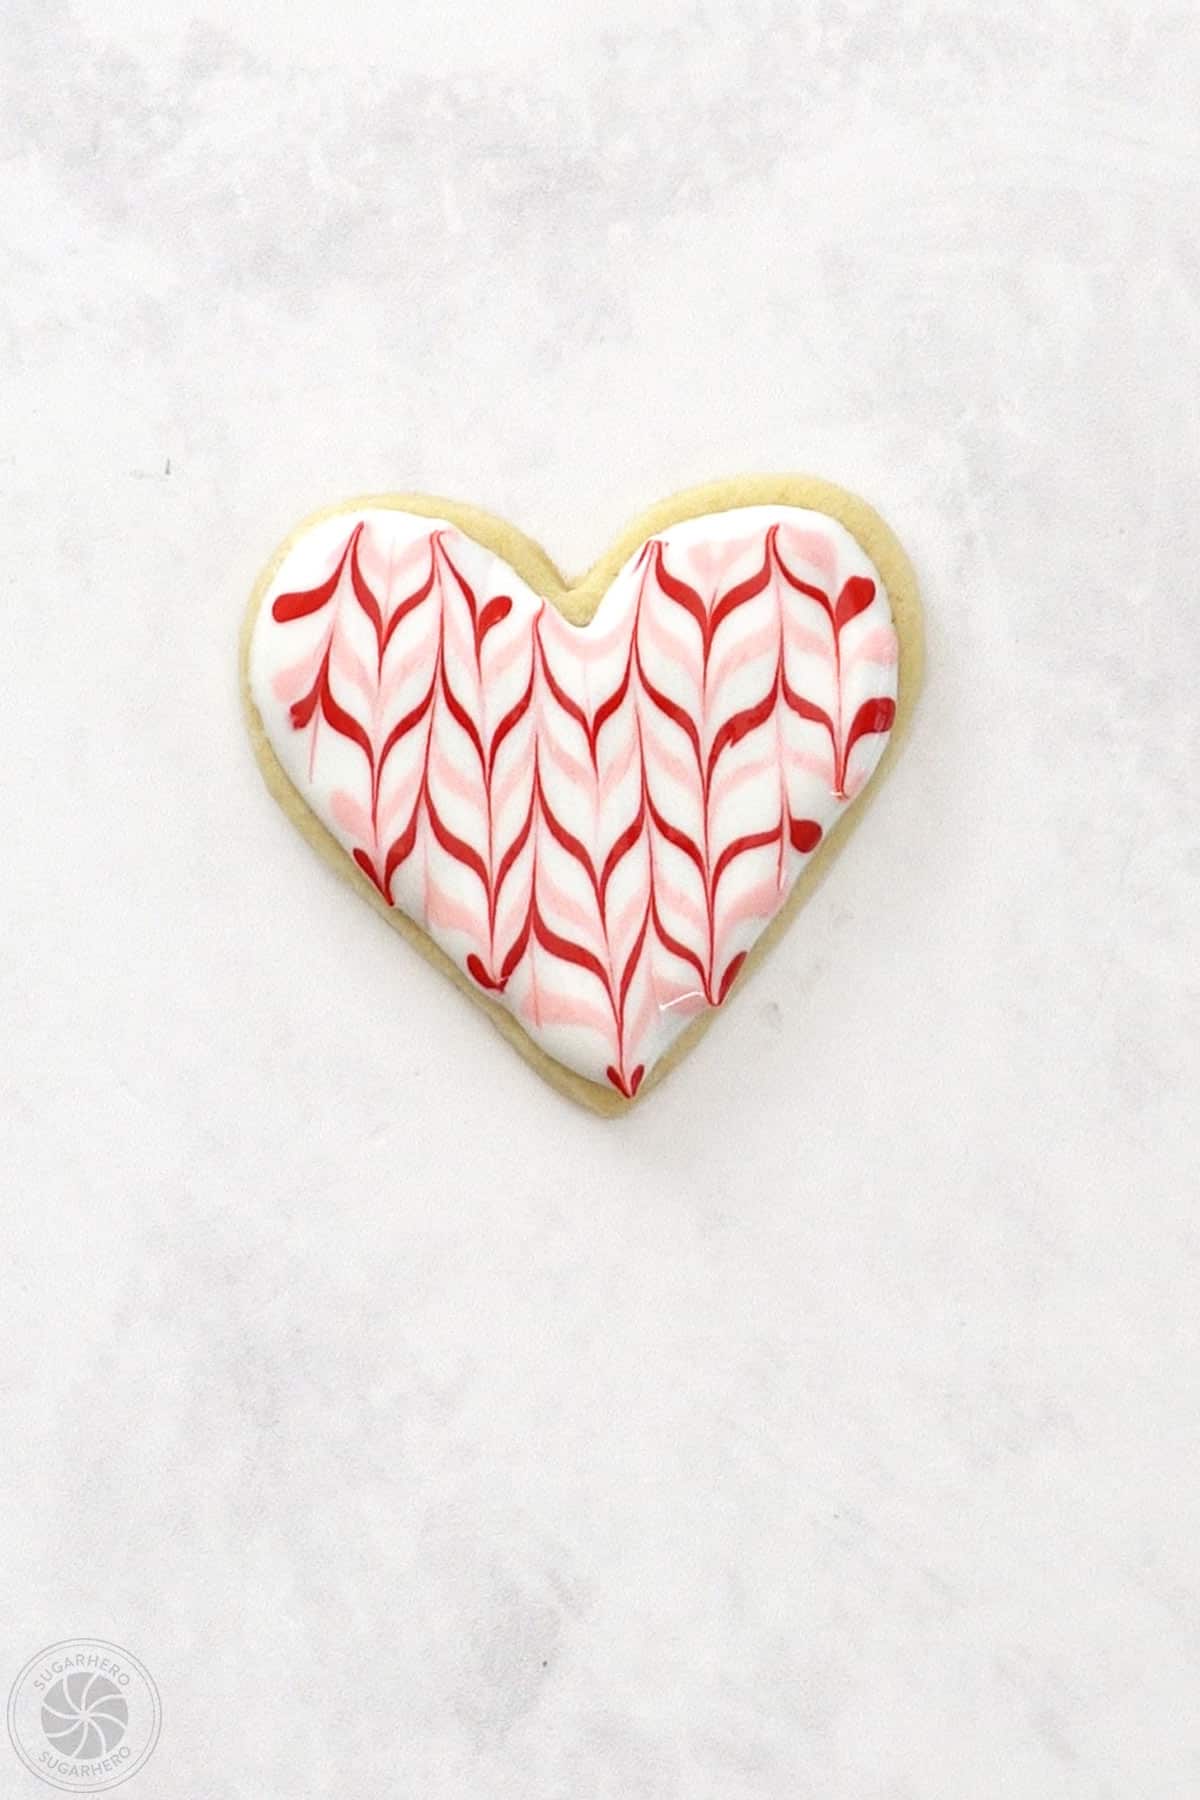
Elegant Rose Cookies
This elegant rose technique is one of my favorites! It’s a design I first saw on SweetAmbs, and she gets all the credit for introducing me to this cool and easy abstract flower design. The roses will have an impressionistic look, but once you add a few leaves around the edges, everyone will know what they are.
- Pick two shades of icing from the same color: These roses look best when made with two different shades of the same color, like pale pink and dark pink or light blue and dark blue.
- Pipe a few dots of the lighter icing: Start with the lighter color of icing and pipe several blobs on top of the cookie—refer to the picture tutorial to get a general idea of the shape.
- Pipe a line of the darker icing: Take the darker icing color and pipe a line across the center of the blob.
- Pipe a dot of white: Finally, add a dot of white in the center.


- Swirl the colors together: Now for the fun part! Take a toothpick and start swirling the colors together. It should only take a few swirls before they start to look like abstract roses.
- Make leaves: Add a few dots of green around the edges, and pull the dots of green out with a toothpick so they look like leaves.

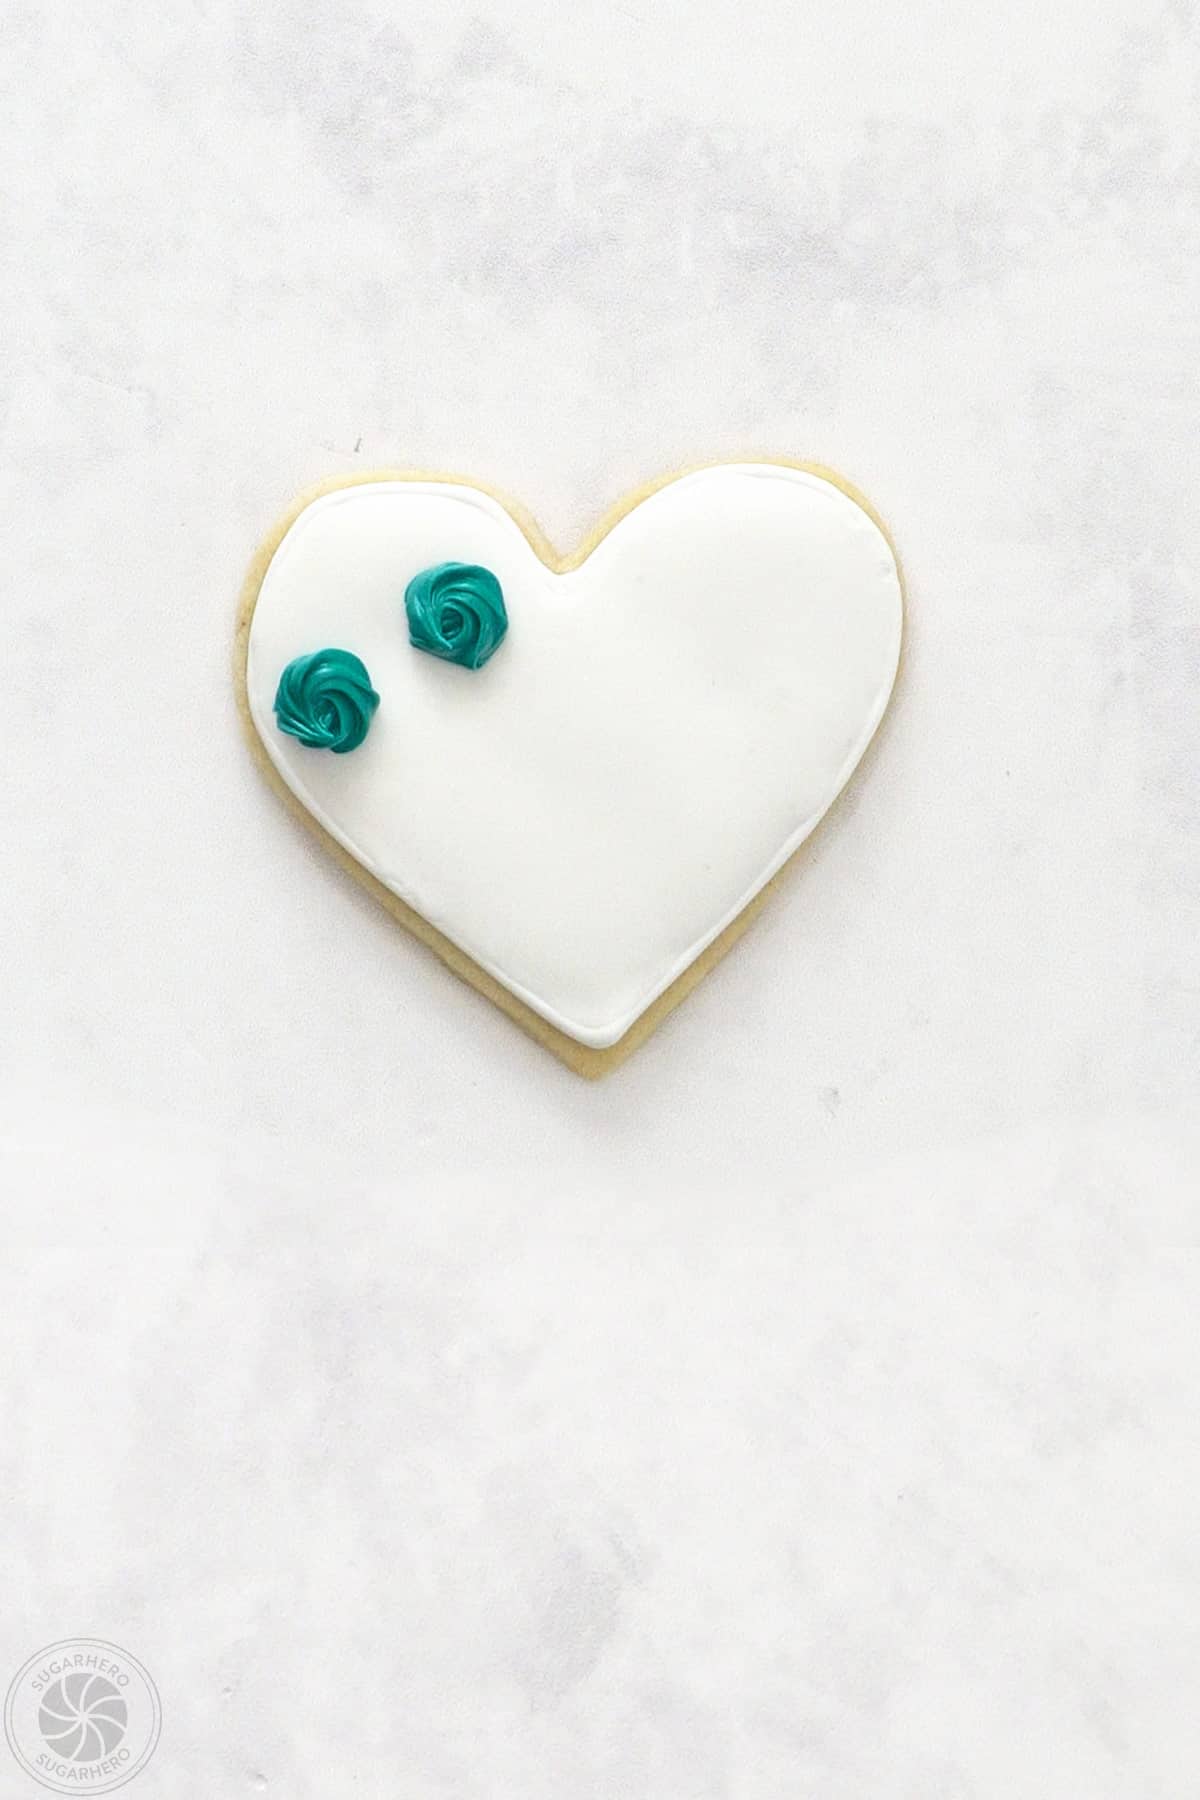
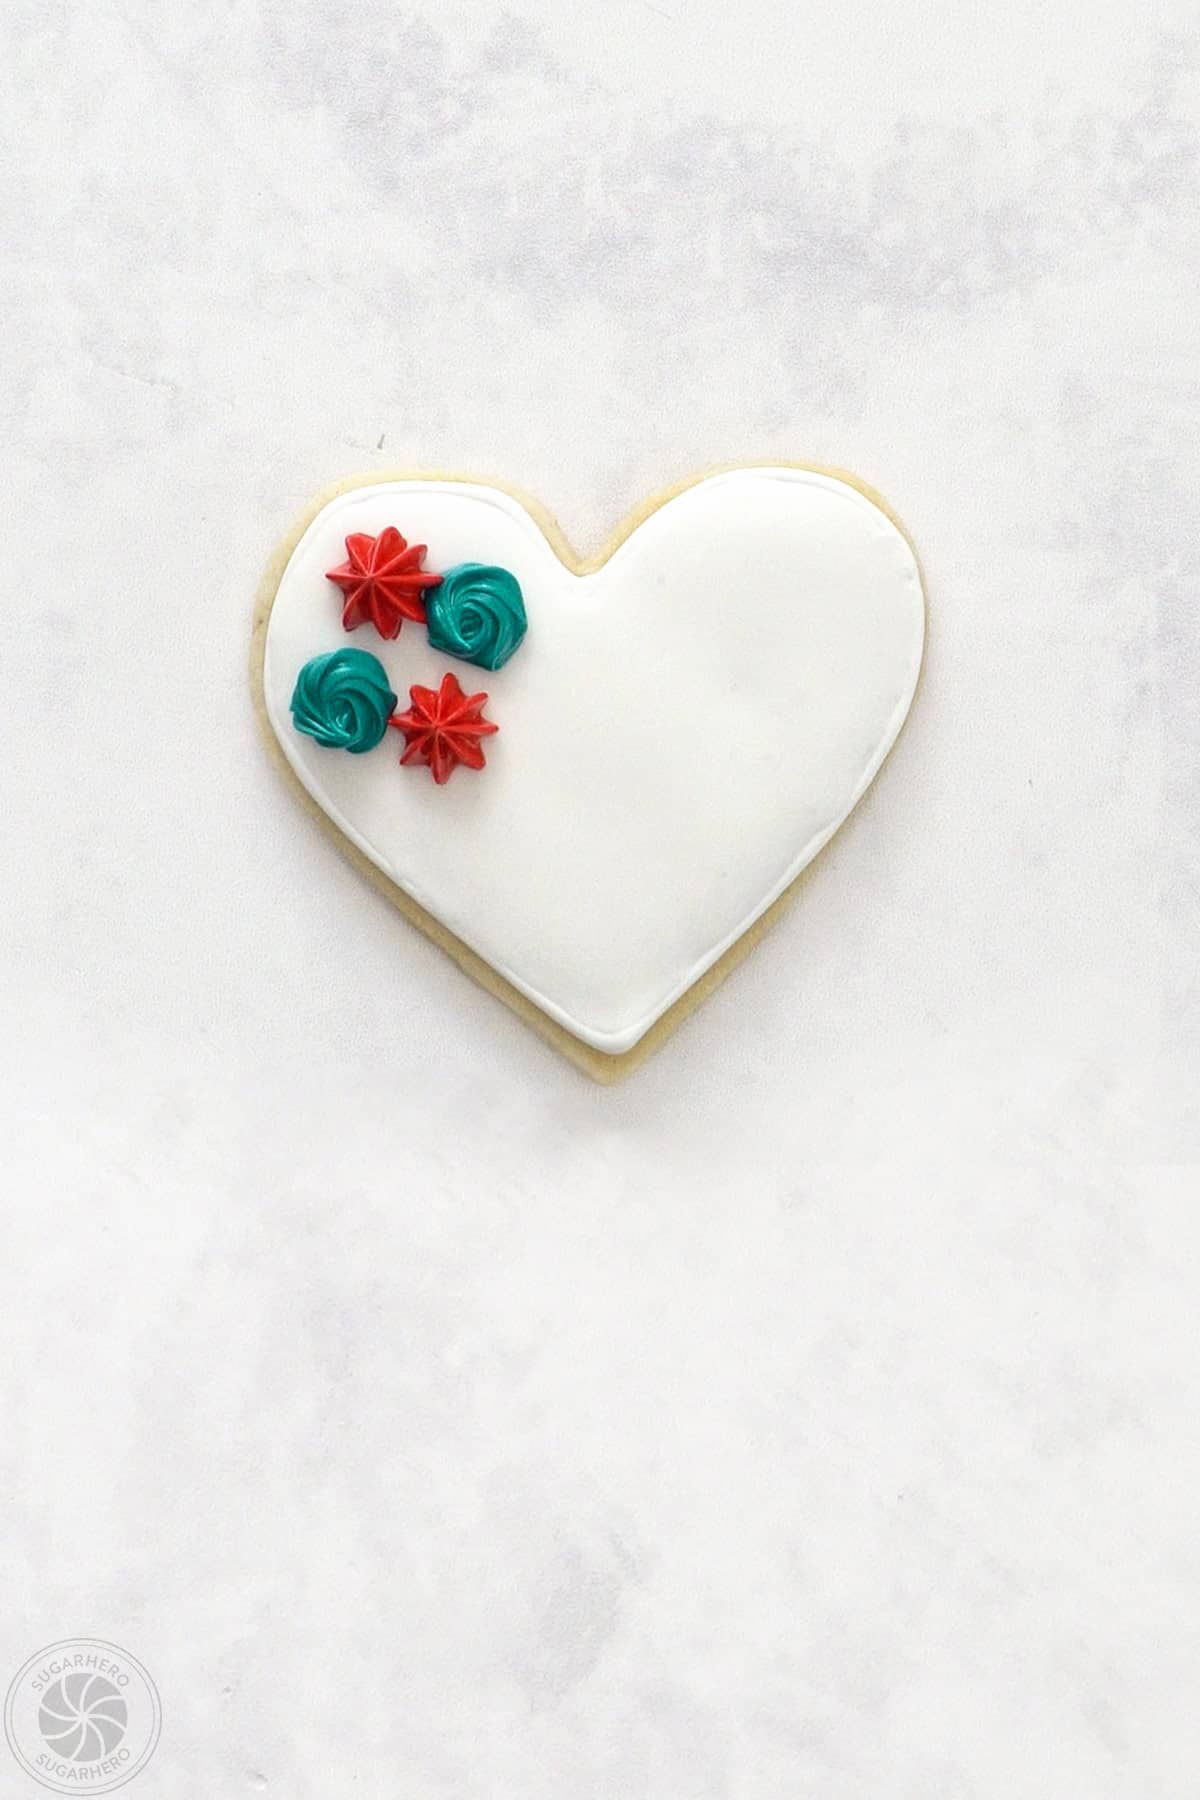
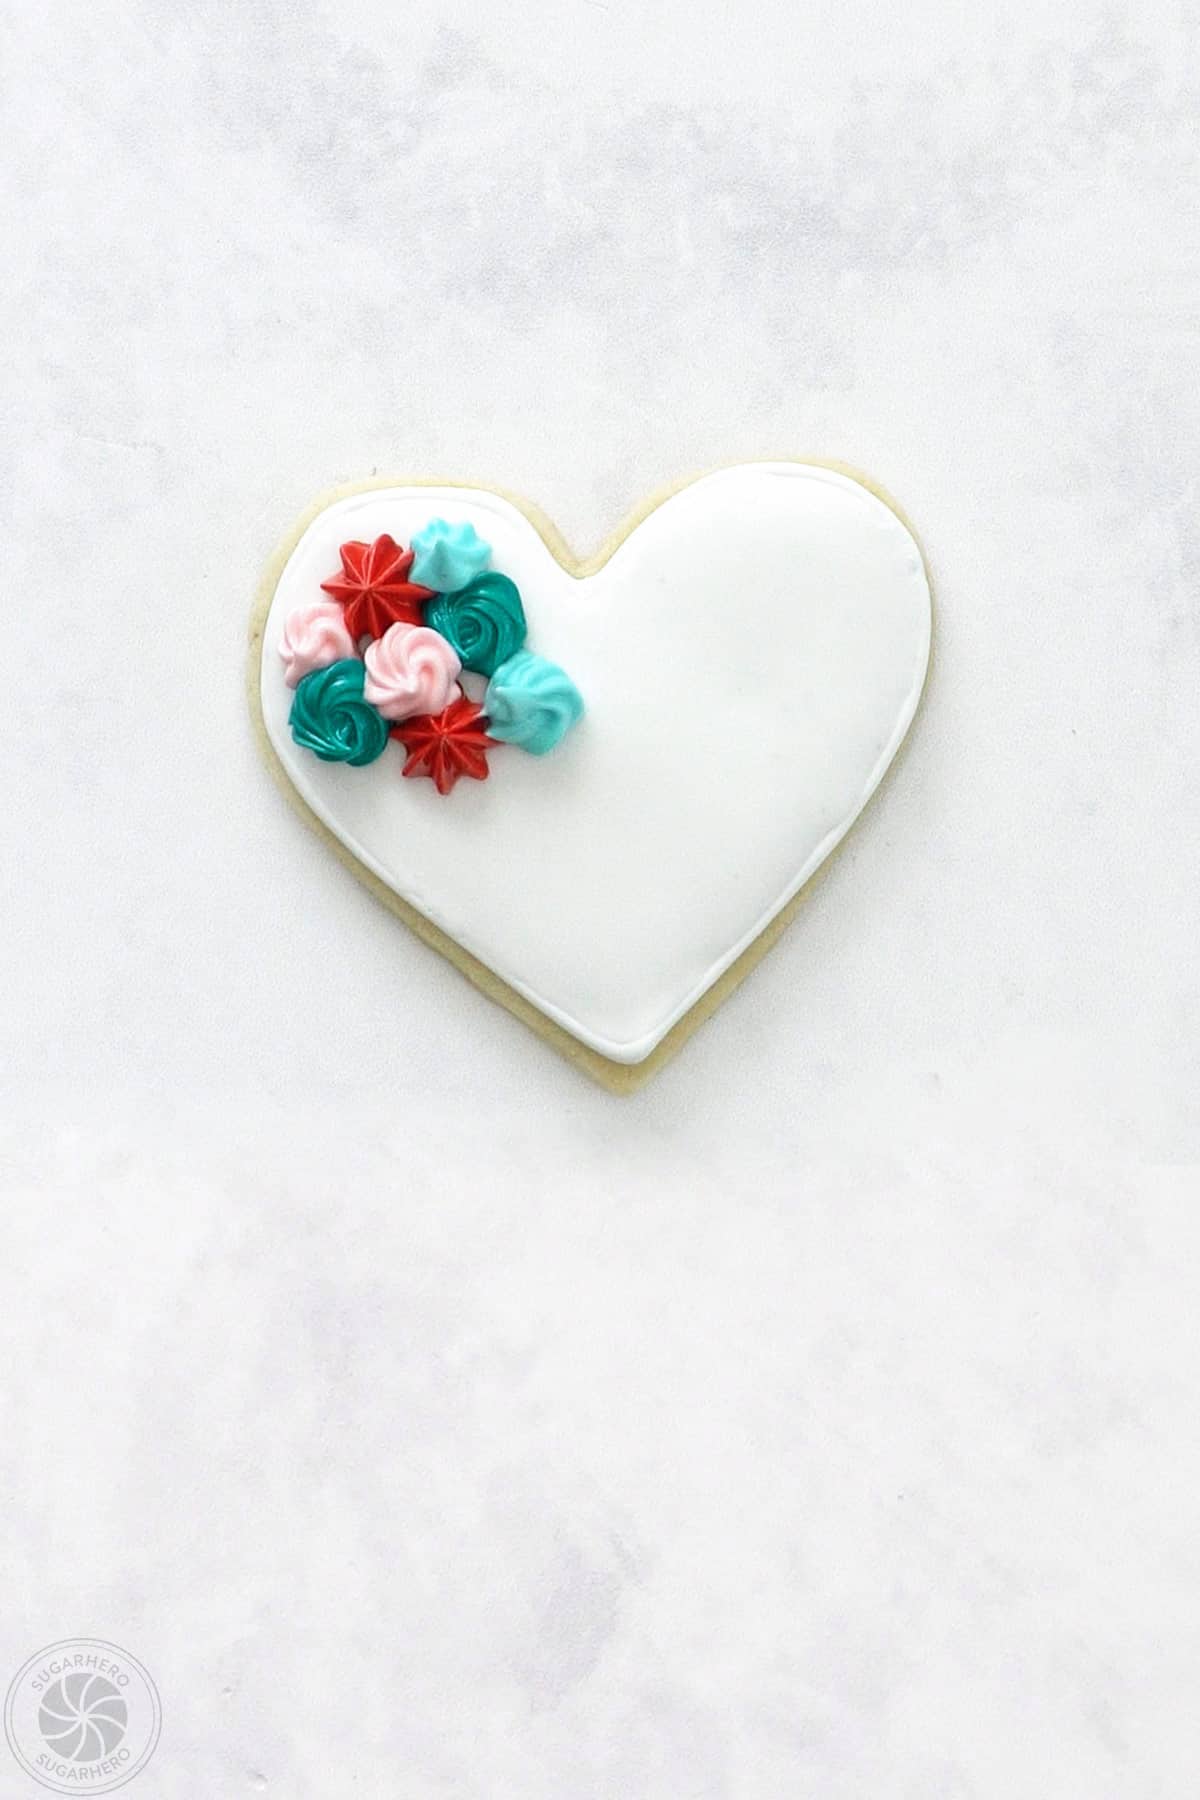
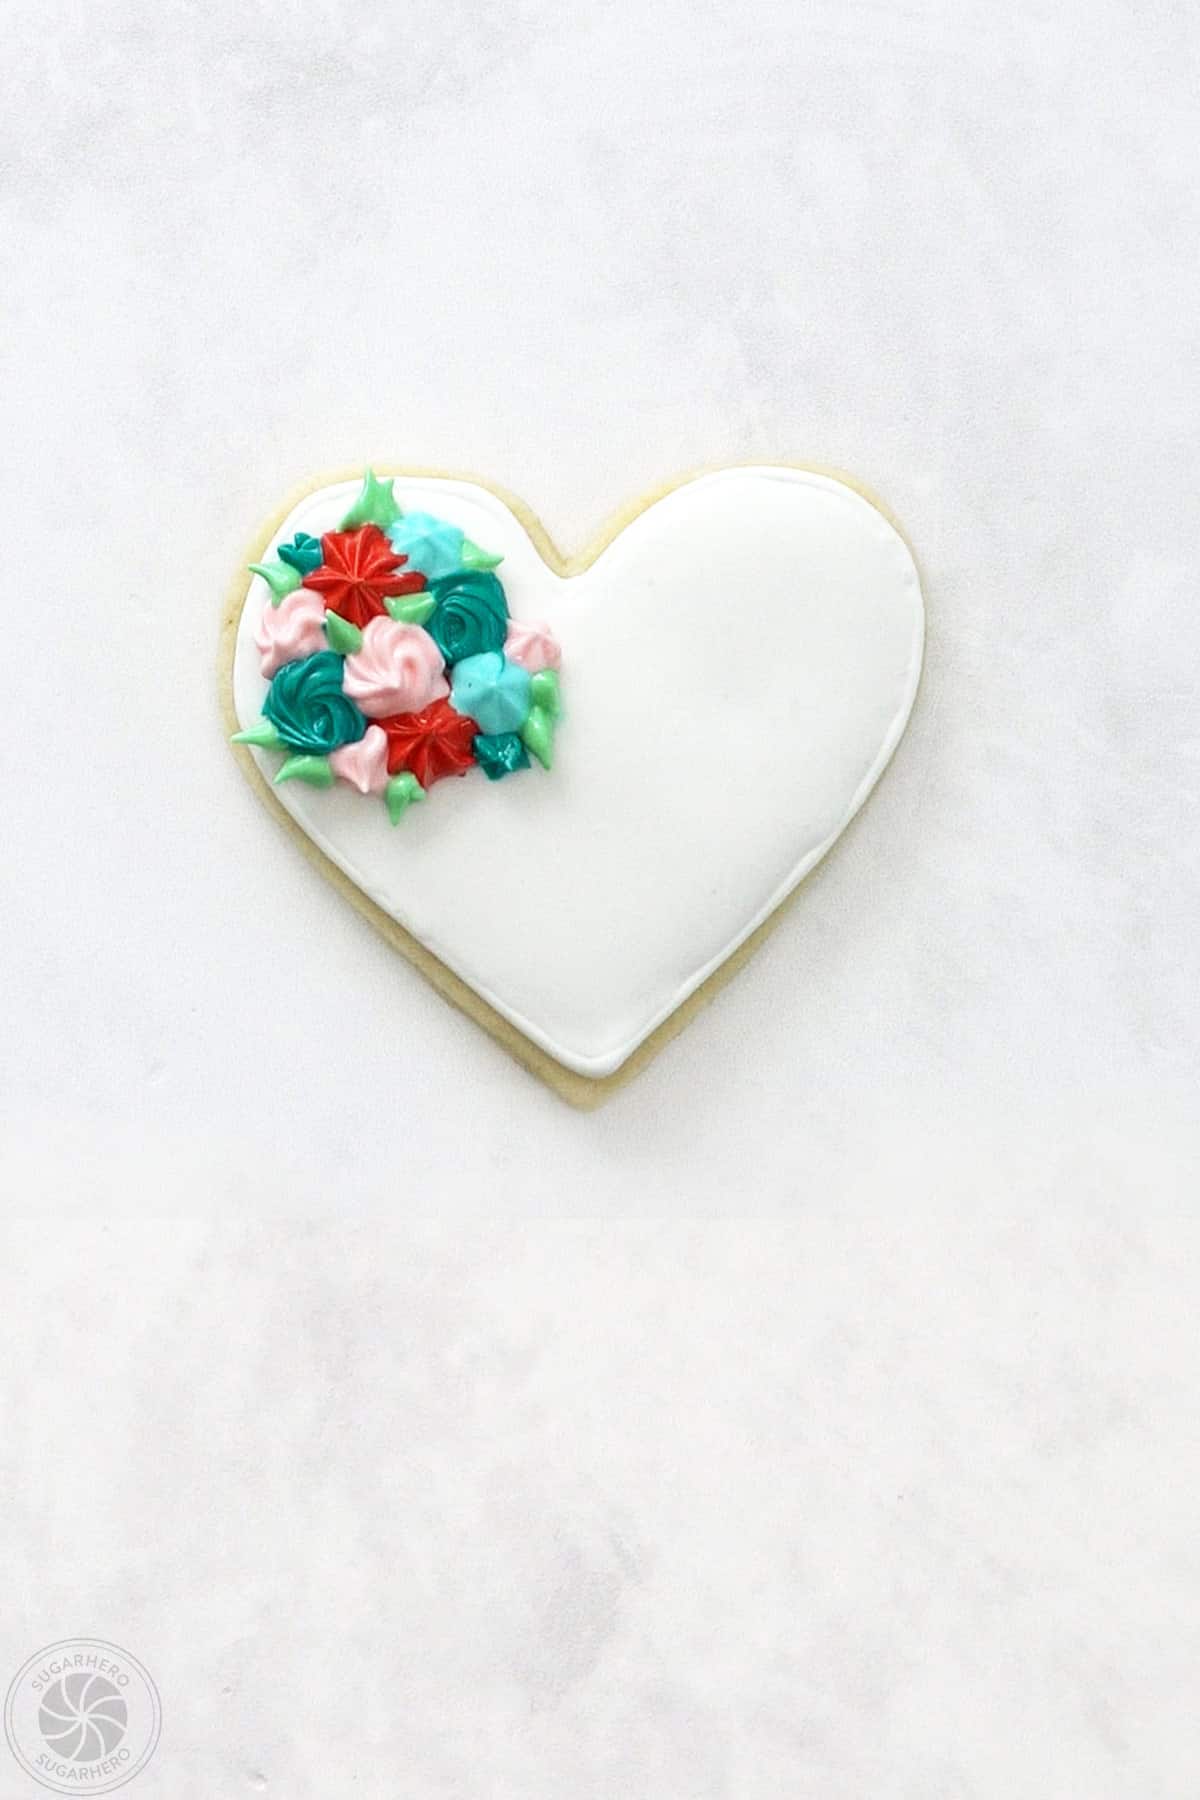
Small Rosettes
Finally, you can use a stiff-consistency icing to pipe easy rosettes and leaves on top of your (hardened) decorated cookies, to give them a more 3D look. I liked doing this on both plain white and cookies that have been decorated with dots, stripes, zig-zags, etc. Both versions turn out beautifully.
- Allow decorated cookies to set: Let the base cookies sit and dry for at least an hour before adding the stiff rosettes on top.
- Use stiff consistency icing: Place stiff consistency frosting in a piping bag fitted with a small star tip.
- Make a rosette swirl: Start a swirl of icing moving from the center outward to make a rosette shape. You can do just 1 flower or several bunched together.
- Add stars and leaves: Intersperse small stars piped between the rosettes. Finish by adding small leaves around the edges of the flower cluster.
🍪 Storing Royal Icing Sugar Cookies
You can enjoy the cookies the same day they’re made – just let the royal icing set for at least 2 hours, then serve and enjoy!
How long does royal icing take to harden?
If you won’t be eating the cookies right away, you’ll want to store them without damaging the decorations. To stack or package the cookies, the royal icing needs to be completely dry and hard throughout, otherwise the icing will get smeared or smashed.
Let the cookies sit in a single layer, at room temperature, for at least 12 hours to be sure the royal icing is fully dry. If you are in a humid climate, you may need to give them up to 24 hours to fully harden. I find having an oscillating fan pointing at the cookies can speed up the drying process and help them dry more evenly.
Storing Sugar Cookies at Room Temperature
Once set, the cookies can be stacked and stored in an airtight container between sheets of waxed paper or parchment. Store the cookies at room temperature for up to two weeks – do not refrigerate them, as the humidity can cause the icing to soften and dissolve.
Freezing Sugar Cookies with Royal Icing
Decorated cookies can also be frozen for up to 6 months. The defrosting process can make the icing bleed or become sticky, so for the best results, I recommend packaging the cookies individually (for instance, in sealed plastic bags) and then placing them in a plastic container in the freezer.
Let them defrost at room temperature while still in the plastic container – this can help cut down on colors bleeding or other moisture issues. You may still see some changes in the icing, so if you are planning on freezing cookies for an important event, do a test run first to see how they hold up for you.

💡 Sugar Cookie and Royal Icing FAQs
Whether you are an old pro or just getting started with royal icing, take a look at these helpful tips to avoid common mistakes.
The most common reason royal icing becomes textured is because of over-mixing. Be careful not to mix on the highest speed, and do not mix for more than 5 minutes. Doing either of these things will incorporate too many air bubbles into the icing and make it difficult to create a smooth look.
Royal icing hardens very quickly. Any time you aren’t using it, press a piece of cling wrap on top right away so that it doesn’t form a crust. Plastic wrap will be your lifesaver!
It really depends on what you are trying to create with the icing. The frosting consistency right out of the mixer is fairly stiff, but for most designs, you’ll want a thinner consistency. You can thin the frosting out by adding a small spoonful of water at a time, and stirring slowly until it’s incorporated. You’ll know the consistency is right when you lift up a spoonful of icing, let it drip back into the bowl, and it takes about 15 seconds for the trail of icing to fully disappear in the bowl. If you have multiple bowls of colored icing, add water a little bit at a time to each color until you achieve this consistency.
The only design that will require a thicker consistency is piping stiff rosettes onto decorated cookies. If you want to make this design, separate out a portion of stiff frosting in the color(s) of your choice. You won’t need to add water to this icing.
Tips for Cookie Success
- Don’t over-mix the butter and sugar – mixing too much will beat too much air into the dough, and cause your cookies to spread.
- Roll your dough between two sheets of parchment or waxed paper, and roll out until it is 1/4-inch thick. The thickness of the dough really makes a big difference in how crispy or soft the cookies turn out after being baked. I like rolling between parchment paper because it reduces the need for added flour during the rolling process, which can make cookies dry and tough.
- Freeze cut-out cookies for 10 minutes before baking (longer is okay too) to help them hold their shape.
- Use light-colored, heavy baking sheets that are not insulated. Dark or thin cookie sheets can cause the cookies to burn on the bottom before they’re cooked all the way through, and insulated cookie sheets can cause your cookies to spread too much.
- It’s always a good idea to do a test bake with 1 or 2 cookies on a baking sheet before baking a full batch. Ovens and baking sheets can produce drastically different results, and your baking time might vary from what the recipe says. Doing a test bake to figure out your personal timing will ensure all of your cookies turn out well!


I consider myself an expert cookie decorator and I found this to be a wonderful tutorial. Very informative with clear and consise direction not to mention the beautiful photos. Well done! So happy to have stumbled upon your post on Pinterest. Looking forward to more from you soon. Thanks!
Hey Janis, I am happy you came across it as well, I appreciate that! Thanks for following along!
Could I prep the dough and keep in fridge for a couple days?
Hey Crystal, absolutely! It should work great. I would love to hear how it goes and see pictures!
This looks great! I am making these for a baby shower and I am wondering how far in advance I can make these. I will be packaging them individually in baking bags with ribbon for guests to take home. Can you tell me the best way to store these?
Vicki, you have a few options for storage; if making the cookies well in advance, you can bake the cookies and store them in an airtight container in the freezer for up to 3 months. Once the royal icing is added, they shouldn’t be frozen. I’d suggest keeping them in an airtight container (individually wrapped or not) and storing in a cool temperature room with low humidity (no fridge or freezer at this point).