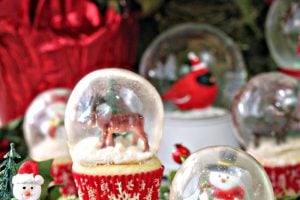


These gorgeous Snow Globe Cupcakes are topped with edible gelatin bubbles. That’s right–you can eat both the cupcakes AND the globe! They look so amazing and impressive, and are perfect for the holidays!

Hello, and welcome! If you’re looking for the famous Snow Globe Cupcake recipe, you’ve come to the right place! I’m thrilled that this recipe has become so popular. I want everyone to succeed at making these, so I’ve included both a photo tutorial AND a video tutorial for you! Once you make your Snow Globe Cupcakes, please feel free to share pictures on my facebook page or tag me on Instagram–I love to see how people make this recipe their own!
When I first thought of these, it took several months of dreaming and scheming to make them a reality. It took a lot of experimenting, several last-minute gelatin purchases, some late-night disasters, and a few choice words mumbled under my breath, but at last, this Christmas dessert finally lives up to the idea in my head!
The cupcakes themselves aren’t anything special—you can use your favorite cupcake and frosting recipe, or even a box mix and canned frosting, if that’s what this crazy holiday season requires. No, the real stars of the show, and the reason I’m still finding gelatin drips in the corners of my kitchen, are the beautiful gelatin bubbles perched on top of each cupcake.

My inspiration:

The bubbles are made of gelatin and water, so although they’re technically edible, they’re probably nothing you are going to want to eat. In that way, they’re like royal icing or gum paste decorations on cakes—they won’t hurt you if you eat them, but there are lots of things that are way more tasty. You’ll probably want to focus your attention on the cupcake underneath, anyhow.

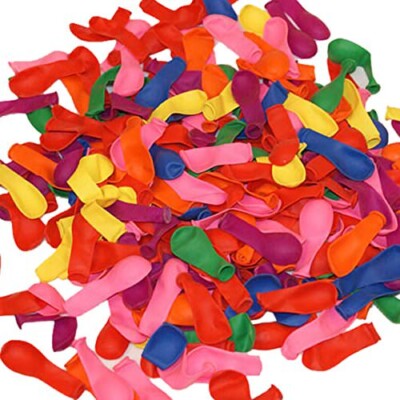
I used regular vanilla cupcakes and topped them with a thin layer of vanilla buttercream, then I rolled the tops in shredded coconut. If you’re using standard water balloons like I was, you’ll probably want to make sure to leave a margin along the edges of the cupcake, because the gelatin balloon will be a little smaller than the cake and you want to keep the coconut “snow” inside the balloon’s walls.
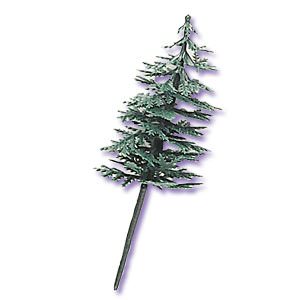
To fill the snow globes, I used some trinkets I found at the local craft store and cake supply store: cute little snowmen, reindeer, evergreen trees…and maybe a dinosaur or two I stole from my son’s collection. How funny would it be to serve your guests snow globe dinosaur cupcakes? We wish you a merry rex-mas…

I first read about gelatin bubbles when I pinned this gorgeous pearl cake from Cake Central, and I first saw them on cupcakes when Heather made these Bubble Gum Frosting Cupcakes. The actual method isn’t too hard, and if you prepare them like those tutorials suggest, you probably have the ingredients (powdered gelatin and water) in your house already.
However, all of the tutorials I saw for gelatin bubbles assumed that I’d want to add food coloring or luster dust or some sort of coloring agent to the gelatin. When I made my first batch of bubbles, I was disappointed to see that they were a cloudy, dingy beige color, with lots of air bubbles and a murky appearance. This might not be a problem if I was going to add color to them, but I wanted them to look transparent, like glass. Instead, they looked like the bubbles on the right:

Left: bubbles from gelatin sheets Right: bubbles from powdered gelatin
The bubbles had the right shape, but I couldn’t get over how sad and dirty they appeared. Maybe they would work for a “vintage” snow globe look, but I didn’t want to make gelatin snow globes like you’d find in your grandma’s attic—I wanted pristine, clear snow globes! And so the quest began…

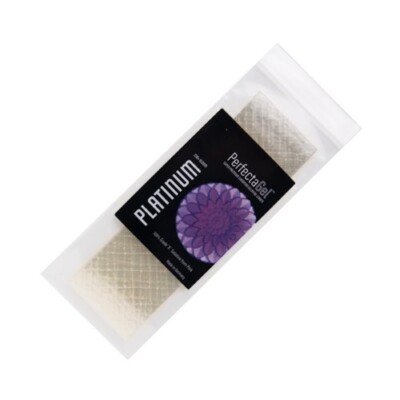
Eventually, my experiments led me to these platinum gelatin sheets. Gelatin sheets, also known as leaf gelatin or gelatine, are what I’ve always used in professional kitchens. Although I believe they’re much more common in other parts of the world, in the US they’re rarely found in regular grocery stores, and instead, we have easy access to powdered gelatin, like Knox brand. The powdered gelatin works well for most applications, but if given a choice, I’d choose gelatin sheets every time. They’re easy to work with, and they have a cleaner texture, clearer color, and less of a strong “gelatin” taste. There is much more to be said about the differences between types of gelatin, but why would I go on about it when David Lebovitz has already written a great post all about gelatin?
Gelatin sheets come in different strengths (bronze, silver, gold, and platinum), and I chose the highest grade, platinum, because it is the strongest, purest, and clearest available. (If you only have access to a different grade of gelatin sheets, you can absolutely make these gelatin balloons work, but you might have to adjust the gelatin/water ratio to get the perfect texture.) All of my trials and experiments were worth it, however, when I finally nailed my method and recipe. The gelatin balloons made with platinum gelatin sheets were strong and beautifully, gloriously clear. They are very difficult to photograph because of the glare, but you’ll have to believe me that they look amazing in person.

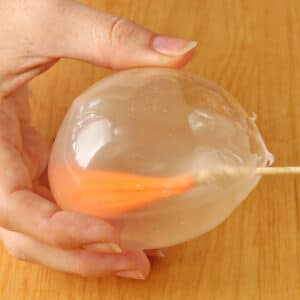
Here’s a quick and dirty photo tutorial showing how it’s done! Bloom the gelatin, dissolve it with a bit of water, attach water balloons to skewers, then dunk the balloons. I liked the look of a single dunk the best—just one coating of gelatin produced balloons that were crystal-clear– but the gelatin balloons weren’t quite strong enough when they were coated with just one layer. The single-dipped balloons would crinkle as they were being released, and although they could be popped back into shape, the crinkling left wrinkles in the balloons that made them look less than perfect. I settled for dipping my balloons twice, which produced gelatin bubbles that were mostly clear, but were a bit less transparent and had more surface bubbles as well.
One step that’s not show in the tutorial is the very important step of greasing the balloons ever so slightly. This is a science second only to safe-cracking in its difficulty and reliance on detail! Too much grease and the gelatin won’t stick to the balloon, but omit it and you’ll have a tough time removing the balloon at all. The method that worked the best for me was to spray my hands with nonstick cooking spray, rub them together to get it to absorb, then to rub my hands on the balloons to transfer some of the oil. Just the lightest coating possible is all you need for happy balloons that release easily and cleanly.

The other thing to know about these gelatin balloons is that they take a long time to set—I gave each of my batches a solid 24 hours at room temperature to harden. Yours might be done before this time, and the process is faster if you keep them in front of a fan the whole time, but to be safe, leave yourself at least a day to assemble them.

And THAT is how you write a novel about gelatin bubbles! Sorry/not sorry for the technical minutia. Even if you have no interest in making them yourself, I hope that at least part of it was interesting, or that you enjoyed laughing at my pathetic early attempts! And if nothing else, you can raise an eyebrow at my clashing stripes in one of the tutorial pictures. I aim to entertain, in any possible way. Now go out there and make some edible snow globes!
A NOTE ABOUT THE GELATIN: It can sometimes be hard to source the platinum gelatin sheets–they tend to be sold out occasionally. I’ve personally tried this recipe with gold-level sheets and it works just fine, so if you can’t find platinum sheets, these gold sheets work as well. If you only have access to powdered gelatin, please read the note at the bottom of the recipe–it will tell you how to use powdered instead.
More Holiday Recipes 🎄
- Pecan Snowball Cookies
- Gingerbread Cookie Mug Toppers
- Vintage Christmas Card Cakes
- Peppermint Hot Chocolate
- Oreo Cookie Christmas Ornaments
- Gingerbread Christmas Cookie Tree
- Peppermint Affogato
Christmas Pinwheel Cookies
Edible Christmas Cookie Boxes Recipe
Gelatin Bubbles
Ingredients
- 12 sheets of platinum gelatin
- Ice water
- 8 water balloons
- Wooden skewers, tape, and styrofoam
- Nonstick cooking spray
Instructions
- Fill a bowl with ice water. Add the gelatin sheets one at a time, making sure that they are separated and not in a big clump, and submerge them in the cold water. Let them sit and soften for 10 minutes.
- Once they are soft, remove the sheets from the water and gently squeeze out all the excess water back into the bowl. Place the wrung-out gelatin sheets and 3 tbsp of water from the bowl into a small saucepan.
- Heat the gelatin over LOW heat, swirling the pan occasionally, until the gelatin is melted. You are not trying to get it hot, so watch it carefully and remove the pan once the gelatin is mostly melted! If it is warm, let it cool until it is no longer warm to the touch, but is still fluid. If it starts to set at any time during this process, return it to low heat briefly just until it becomes liquid again.
- Blow up 8 water balloons to your desired size. Securely tape them to long wooden skewers. Spray nonstick cooking spray on your hands, and rub your hands together until most of the oil is absorbed. Gently rub your hands on the balloons, transferring just a little oil to them—they should not be shiny or greasy at all, or the gelatin won’t stick. You should be able to do several balloons before spraying your hands again.
- Transfer the gelatin to a small cup or bowl, narrow enough so that it will be fairly deep when you dip the balloons. Dip one in the gelatin entirely, turning it until it is nearly covered—it’s okay to leave the part near the knot/skewer uncovered. Let the excess gelatin drip back into the bowl, and once it has stopped dripping, stick the skewer in the Styrofoam board. Repeat until all of the balloons have an initial gelatin layer.
- Let the balloons set for about 10 minutes, until they are no longer tacky to the touch. If necessary, re-warm the gelatin just until it is fluid, but do not make it warm again—if it feels warm, let it cool to room temperature. Re-dip the balloons a second time, then place them back on the Styrofoam board. Let the gelatin balloons sit at room temperature for about 24 hours. If you want to speed up the process, you can place them in front of a low fan, which might cut your time in half or even a quarter.
- The balloons are done when they feel hard, like plastic or egg shells, when you tap them with a fingernail. They should not feel soft at all. To release them, cut a hole in the balloon near the stem. Ideally, the balloon will shrivel up and release easily, pulling itself away from the sides of the gelatin. If it doesn’t pull away right away, don’t fret and don’t pull on it yourself. Set the balloon aside and work on the others. The balloon will naturally shrink on its own and gradually pull away from the sides. It might take 5 minutes or it might take 45, but eventually the balloon will pull away from the gelatin.
- Gelatin balloons can be stored indefinitely in an airtight container at room temperature.
Recipe Notes
Measuring Tips
Our recipes are developed using weight measurements, and we highly recommend using a kitchen scale for baking whenever possible. However, if you prefer to use cups, volume measurements are provided as well. PLEASE NOTE: the adage “8 oz = 1 cup” is NOT true when speaking about weight, so don’t be concerned if the measurements don’t fit this formula.
Want to learn more about baking measurements and conversion?
Nutrition
Snow Globe Cupcakes
Ingredients
- 8 cupcakes, baked and cooled
- 8 oz frosting of your choice, (1 cup)
- Flaked coconut
- Snow globe-appropriate cupcake toppers like snowmen, Santas, reindeer, trees, etc
- 8 gelatin bubbles
Instructions
- Transfer the frosting to a piping bag fitted with a round tip, or a plastic bag with a hole cut in the corner. Pipe a thin ring of frosting on top of the cupcakes, leaving a margin around the edges so that the gelatin bubble can enclose the frosting entirely.
- Roll the top of the cupcakes in the flaked coconut. Add a cupcake topper or two to each cupcake—if it helps, you can glue a toothpick onto the back and use that the secure the toppers to the cupcakes.
- Trim off the bottom of the gelatin bubbles, making a hole big enough to fit on top of the cupcake around the frosting. Carefully place a bubble on top of each cupcake. The bubbles will last indefinitely, but if they’re exposed to a lot of moisture in the refrigerator or the frosting, they might eventually start to soften and lose their shape.
Video
Measuring Tips
Our recipes are developed using weight measurements, and we highly recommend using a kitchen scale for baking whenever possible. However, if you prefer to use cups, volume measurements are provided as well. PLEASE NOTE: the adage “8 oz = 1 cup” is NOT true when speaking about weight, so don’t be concerned if the measurements don’t fit this formula.
Want to learn more about baking measurements and conversion?
Nutrition


Hi!
How big do you think this will work? Do you think going bigger will cause stability issues?
Thanks!
I made them to fit over the whole top of the cupcake and there wasn’t any problem with stability. The problem was trying to get most of the balloon covered. With the size Elizabeth made, to cover only about 2/3 of the cupcake top, it is possible to dip the balloon. If you’re going much bigger, only the bottom half of the balloon gets dipped, and you have to maneuver it in the liquid, trying to get it covered. I was able to get 15 really good ones, but nine more had pretty ragged bottoms that had to be “glued” onto the cupcake with a lot of frosting. Also, because the gelatin is clear, it is very difficult to see how much is on the balloon.
I think it is possible to make larger balloons, but you’ll need a lot more gelatin to give you enough liquid to easily cover a large balloon! You’ll probably also want to do more than 2 coats, to give it more stability, so you’ll lose some of the transparent look–the more gelatin, the cloudier it gets.
thank you i’m so ready to try this
Thank you so much for sharing your beautiful creation, I am trying the first step today in practice for sharing a play afternoon with some budding chefs of 7 and 11 years. I have also forwarded on your link to great nieces to have a play with. Kind regards from New Zealand.
Oh, fun! I’ll bet the kids will love playing with the gelatin balloons. Please let me know how it works out for you!
Thank you again Elizabeth for our creative genius. I will try and put a photo up on your facebook or I’ll email them to you. I certainly had fun doing them, I tried two different methods, the first exactly as your recipe was and the second I substituted a quarter of the liquid for orange blossom water and added five drops of liquid stevia. Apart from a few blemishes on the first ones, I went with them. The second lot, within six hours of making them, the balloons started to shrivel and pop though they shrank away beautifully, they never became as hard as the first ones, even after twenty four hours drying. I used NZ produced Davis powdered gelatin and followed your guidance on quantities.
Thank you, but what about uf I can only use Knox…
Hi Grace, I talk about powdered gelatin in the blog post, and the Note at the bottom of the recipe talks about how to use powdered gelatin instead.
This is SUCH a cool idea, thank you for sharing! If you wanted to use edible decorations, you might try these gummy Santas, snowmen and penguins. I found them at Walmart last year and they actually taste REALLY good.
http://www.amazon.com/Treat-Street-Decorations-Flavored-Cupcakes/dp/B00QSXNOAQ
These are so cute, thanks for sharing!
woooooooow
So ridiculously awesome and creative! I want to try those out but I have never worked with gelatin before. If I try them I will definitely let you know how they turn out! Great job!
Yes, please do! Thanks Kristen!
These are absolutely beautiful. Has anyone tried to make this with agar agar or any other gelatin substitute? I would love to make this for a vegetarian friend. Thank you very much
Not that I know of! Agar-agar has such different properties from gelatin, I’m not sure it would work well. But if you give it a try I’d love to hear how it goes.
I didn’t realize until I was nearly finished with this project that you used mini-cupcakes. I noticed that you held your bubble with two fingers and your thumb. I did full-sized cupcakes, which proportionally large bubbles and they were torture! I did get the project (24 of them!) finished, though, and everyone at the party was amazed. Please specify the size in your instructions, so other people can have it esaier than I did.
I still applaud your genius.
Bruce
We’ve already emailed about this, but I just wanted to quickly respond for future readers: these are full-sized cupcakes, but I didn’t cover the whole top of the cupcake with frosting (you can see a bit of a border around the edges) so I didn’t have to worry about making the globes to fit over the whole top–consequently, my globes were smaller (and easier to make!) than yours. Thanks for the feedback!
Hi,
Thank you for this Great Inspiration! But I habe a Problem.. Want to so them for x mal, but They don’t ship this sort of Gelatine to Germany.. What Else Clan i use? Can i just use every sort of sheets of gelatine? Thx for your help!!
Hi Sophie, I can’t say for sure what type of gelatin will work. I recommended the one I did because that’s the one I had success with. If you want to experiment with gold or silver leaf gelatin, you might consider adding a few more sheets than the recipes calls for, to give the bubbles more stability.