
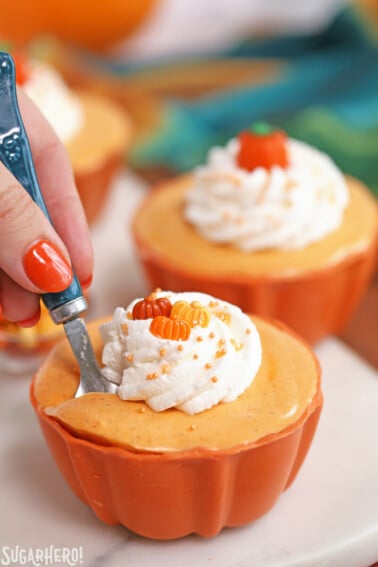
This Layered Coffee Panna Cotta is an easy and gorgeous coffee dessert with lots of layers of vanilla and mocha flavors!

Light and Creamy Panna Cotta
Earlier this week, we had a brief taste of fall. The normally 90 F temperatures dipped to the low 80s for a few days, and on our nightly after-dinner walks, I got chilly enough to want a light sweater. (This is actually a sign of how wimpy I am, not how cold it was, but still! A sweater! in August! What the what!)
I felt so conflicted. On the one hand, I looooooove fall and am not so much a fan of summer’s super-hot temps. On the other, now that I live in Utah, I know that fall leads to winter which equals snow, and I’m not quite ready to get that chain of events started. What’s a weather weeny to do?

The internal debate was moot, though, because we’re back to hot summer weather for the foreseeable future, and I’m ready to make the most of the end of summer. I’ll keep rocking shorts and tees, sneak in a few more visits to the water park before it closes, enjoy my coffee iced instead of hot, and gorge myself on all the summer produce I can get my greedy paws on.

I turned to panna cotta—that quintessential lazy person’s dessert. It’s basically milk/cream (or in this case, iced coffee) set with a bit of gelatin, so it’s soft but spoonable, creamy but not as rich as a mousse or custard. At heart, it’s a 10-minute dessert with a name fancy enough to make people think you’re a culinary whiz kid. It’s a lie in a cup and I love it.

How to Make the Layered Look
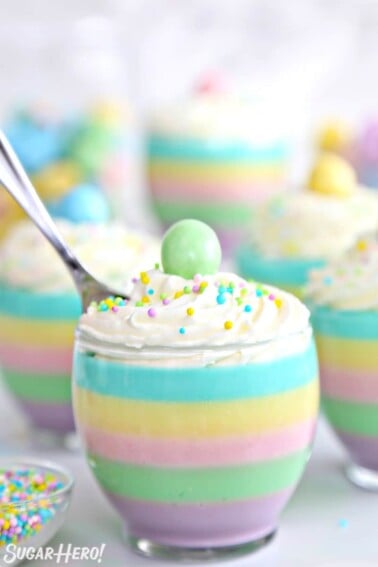
Because I cannot leave well enough alone, however, I decided to do 2 flavors of panna cotta—vanilla coffee and mocha—and create these elegant 4-layered cups. Creating the separate layers does mean that there’s a lot of chilling time in between, and sort of negates the “breezy” description from above. However, if you’re cooking in the kitchen already, periodically stopping and adding another layer to your panna cottas takes about 1 minute out of your life, so it’s not a huge ask.
And if it DOES seem like too much effort for a summer dessert, just keep the cups single flavor, no layering required! They’ll still taste great and you’ll have time to sneak in that afternoon nap we both know you’re dying to have.

To make these, I used two flavors of International Delight Iced Coffee—vanilla and mocha. I also added some cream to each flavor, so to compensate for diluting the coffee, I kicked in some espresso powder and melted chocolate. The result is a cool and creamy dessert with a coffee/chocolate flavor that’s present but not overpowering. I’ve also included instructions in the recipe for using milk, if you’re not able to find the iced coffee.

I finished my Layered Coffee Panna Cottas with a cloud of softly whipped cream and milk chocolate curls. These would also be great with a simple sprinkling of cocoa powder, or a cute chocolate-covered espresso bean on top. Happy weekend, friends, and happy end of summer!
☕More Delicious Desserts to Try
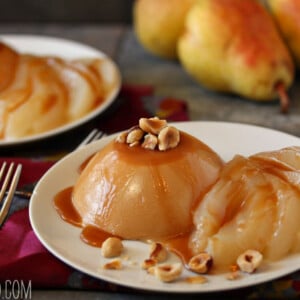
Caramel Panna Cotta with Poached Pears
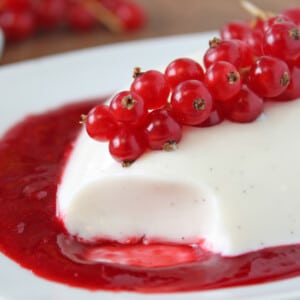
Vanilla Bean Panna Cotta
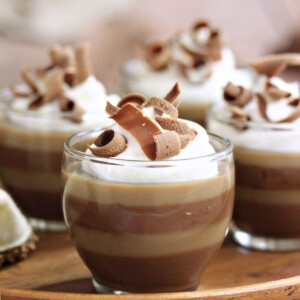
Layered Coffee Panna Cotta
Ingredients
- 1 ¾ cups Vanilla Iced Coffee
- 1 ¾ cups Mocha Iced Coffee
- ½ cup heavy cream, divided use
- 4 tsp instant espresso powder, divided use
- .5 oz unflavored powdered gelatin, 2 envelopes (1/4-oz each), divided use
- 3 oz semi-sweet chocolate, (1/2 cup), chopped
- Whipped cream , for garnish (optional)
- Chocolate Curls, for garnish (optional)
Instructions
- Put 8 ½-cup ramekins or cups on a baking sheet and place them in the freezer.
- Pour the Iced Coffee Vanilla into one medium saucepan, and pour the Iced Coffee Mocha into a second medium saucepan. Add ¼ cup of heavy cream and 2 tsp instant espresso powder to each saucepan, and whisk well.
- Add 1 packet of gelatin to each saucepan, and whisk until the gelatin dissolves. Let everything sit for 5-10 minutes while the gelatin blooms and hydrates.
- While you wait, place the chopped chocolate in a microwave-safe bowl and microwave in 30-second intervals, stirring after every 30 seconds, until melted and smooth. Set aside for now.
- Place both saucepans over medium heat and stir, whisking occasionally, until the gelatin is melted and they’re hot but not boiling. Remove the pans from the heat, and add the melted chocolate to the Mocha pan. Whisk well until the chocolate combines with the hot Mocha mixture and everything is smooth.
- Pour the contents of the two pans into two large measuring cups with spouts. Press a layer of cling wrap on top of each, and refrigerate for 20-30 minutes, until the mixture is cool but still fluid. You don’t want it to start setting, but it should be room temperature or cooler, not warm at all.
- Take the tray of cups out of the freezer, and divide half of the mocha mixture between the 8 cups. (You’ll want to use about 1 cup of the mixture for the first layer, so about 2 TBSP per cup. It doesn’t have to be exact, though!) Return the cups to the freezer for 10-20 minutes, just until they’re set. Do not let them freeze! The exact time required will depend on how cold your freezer gets.
- Once the first layer is just set, pour a thin layer of vanilla mixture on top of the mocha, and freeze again. Continue to layer the panna cottas until you have 4 layers per cup. Once you’ve added the last layer, transfer the cups to the refrigerator and chill until set, at least 90 minutes.
- Garnish with whipped cream and chocolate curls, and serve!
Recipe Notes
Measuring Tips
Our recipes are developed using weight measurements, and we highly recommend using a kitchen scale for baking whenever possible. However, if you prefer to use cups, volume measurements are provided as well. PLEASE NOTE: the adage “8 oz = 1 cup” is NOT true when speaking about weight, so don’t be concerned if the measurements don’t fit this formula.
Want to learn more about baking measurements and conversion?


Great recipe.
Can you tell me will the mixture in the fridge stay ‘unset’ enough while your waiting for the previous layers to set?
I would recommend setting a timer for 20 minutes after every layer, otherwise, it will definitely set hard, and you’ll have to gently heat it again to make it pourable (I know from experience!).
wanna try to make this, I’m a coffee lover and it looks so fabulously delicious.
Can I make this into a mousse ?
Hey Jennifer, This cant easily be made into a mousse however I have a recipe that can be adapted. https://www.sugarhero.com/peppermint-mocha-mousse-cake/ there is a layer that is for the peppermint mocha. Let me know if you have more questions. Thanks so much!
Recommended, but I’d do a few things differently…
1. I don’t normally keep iced coffee on hand, so I made my own with black coffee and a bunch of milk/half and half and some sugar (added caramel to the pot that didn’t have chocolate added so that one layer would be caramel-y). WOW, the coffee flavor was strong in the finished product (and I’m a coffee lover!). If I made this again, assuming I DIY’d the iced coffee, I wouldn’t add the espresso powder.
2. Maybe this would screw up the layering, since it would change the consistency a bit, but I’d cut the gelatin in half next time. I didn’t love how firm it set (but also, I’d never had panna cotta before, so maybe that’s how it’s supposed to be?). Try this at your own risk, lol!
3. I used Walmart’s Way to Celebrate! clear plastic party cups instead of glass. They worked great but didn’t appear very full, so I baked up a Ghirardelli Ultimate Chocolate brownie mix, cubed the brownies once they were cool, then sprinkled on top of the panna cotta and added caramel syrup on top. Made for lovely presentation!
Wow! You really had fun with the recipe and it sounds like you had great success. I bet it was really pretty with the brownies and caramel on top. Thanks for your tips and ideas. So useful for other DIYers!