


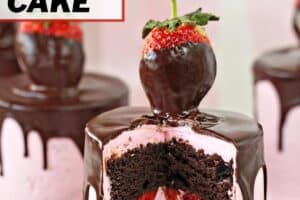
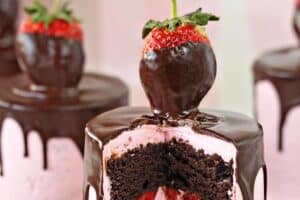


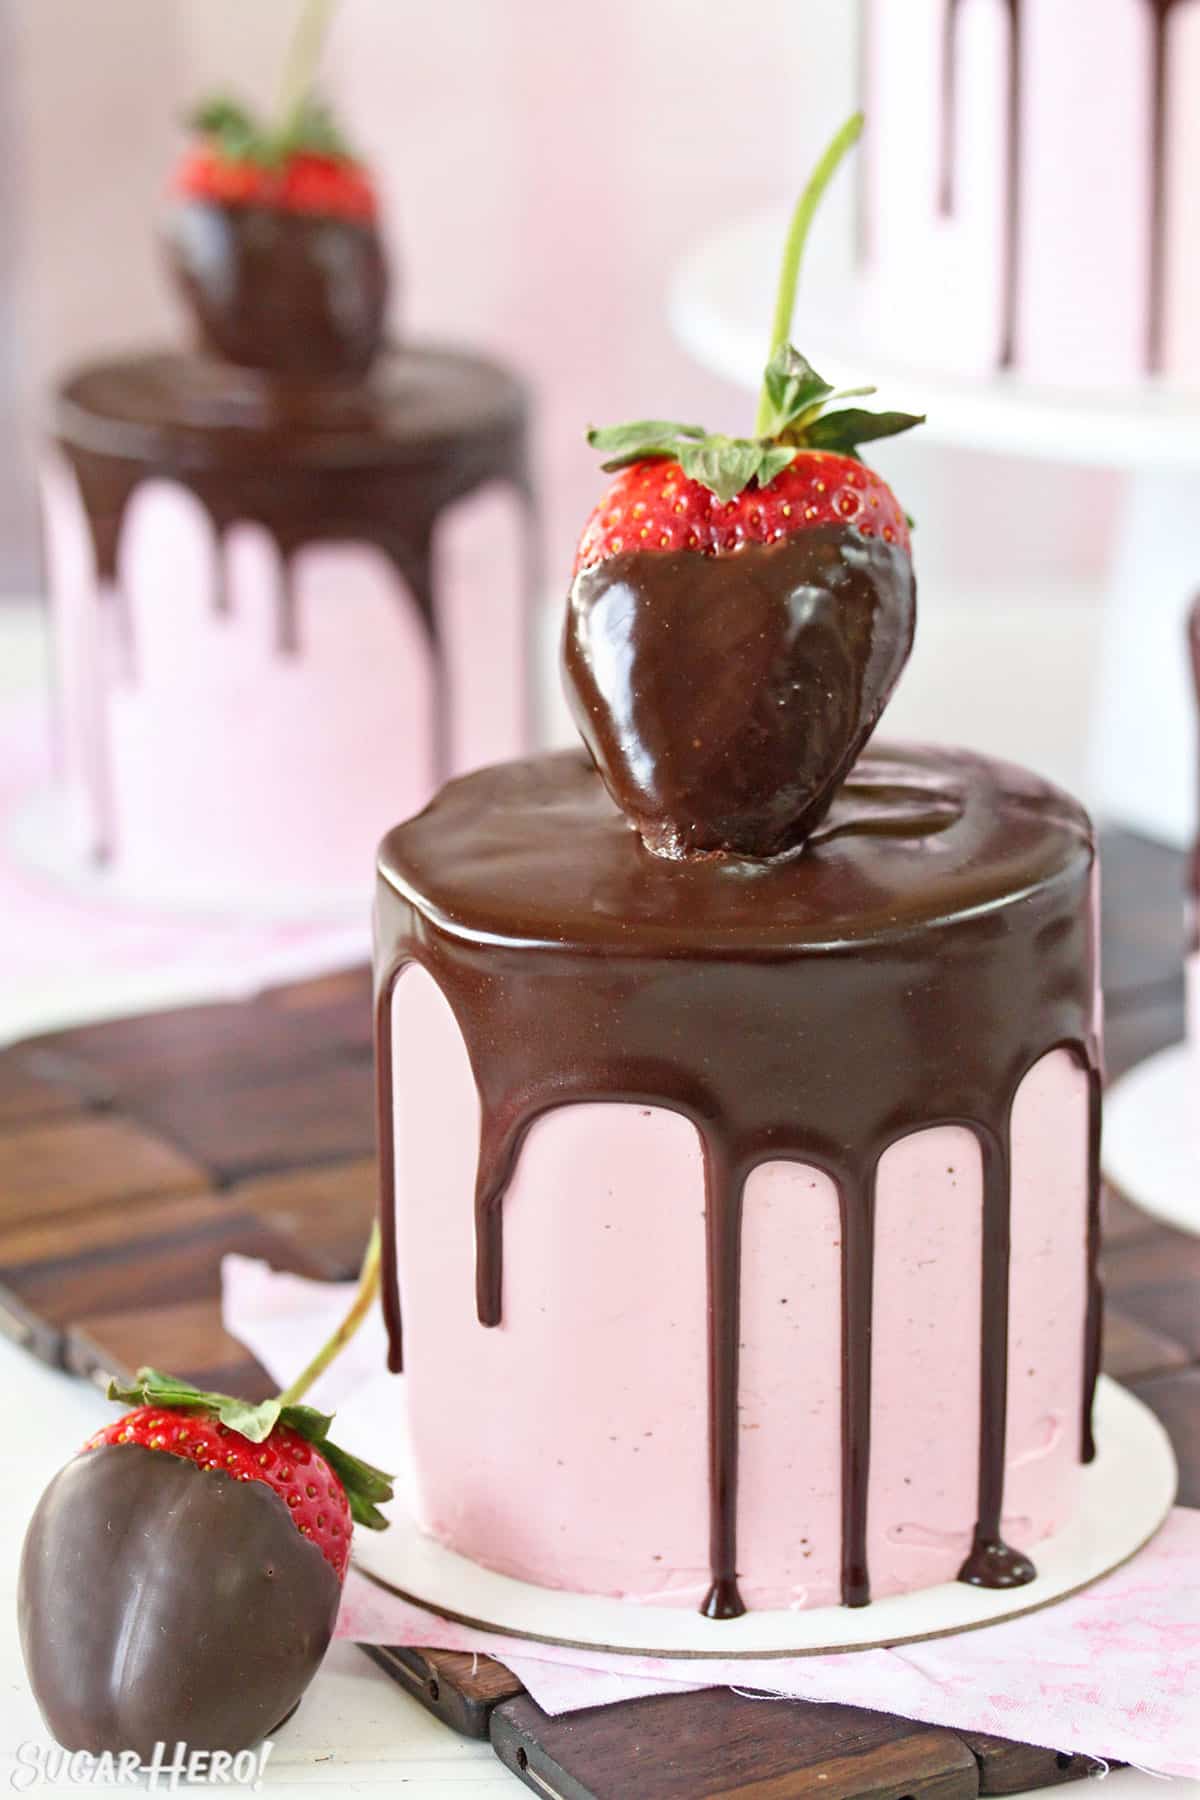
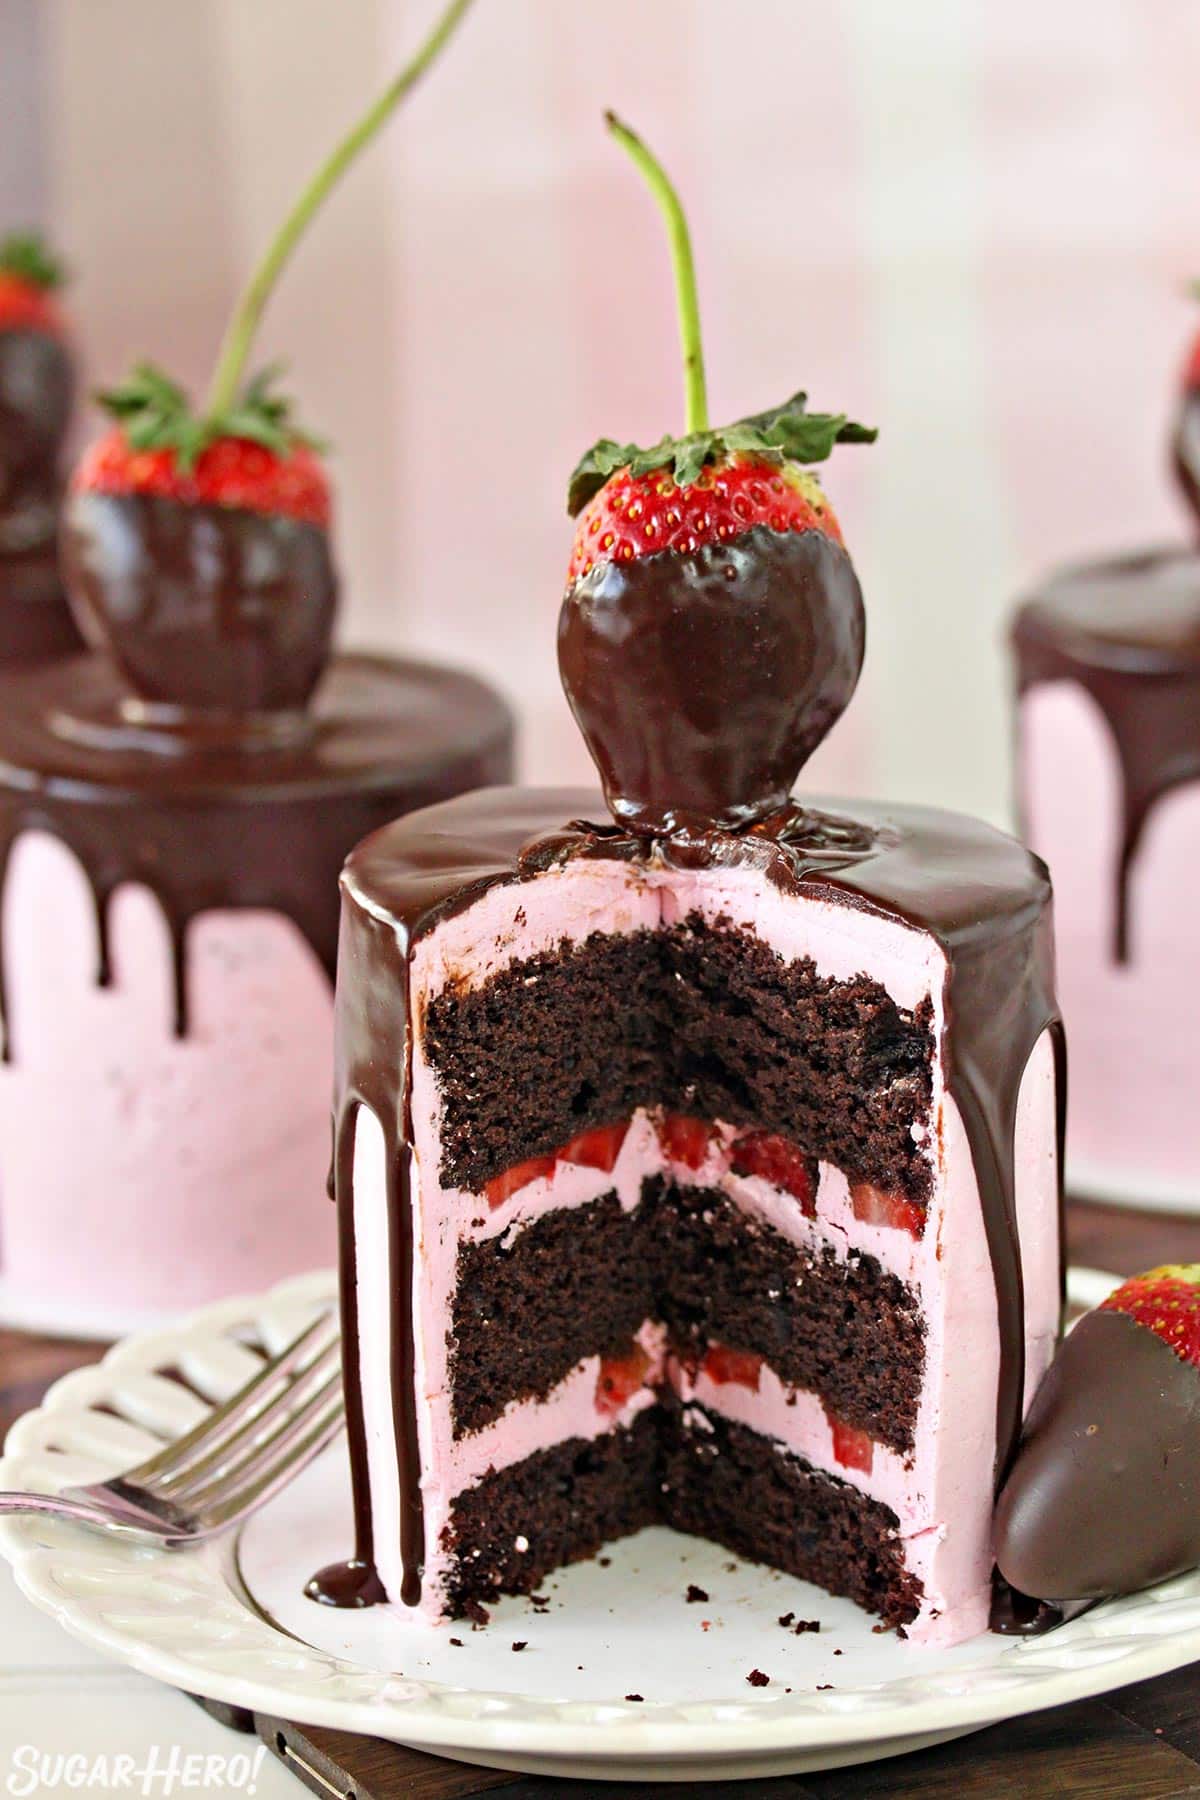
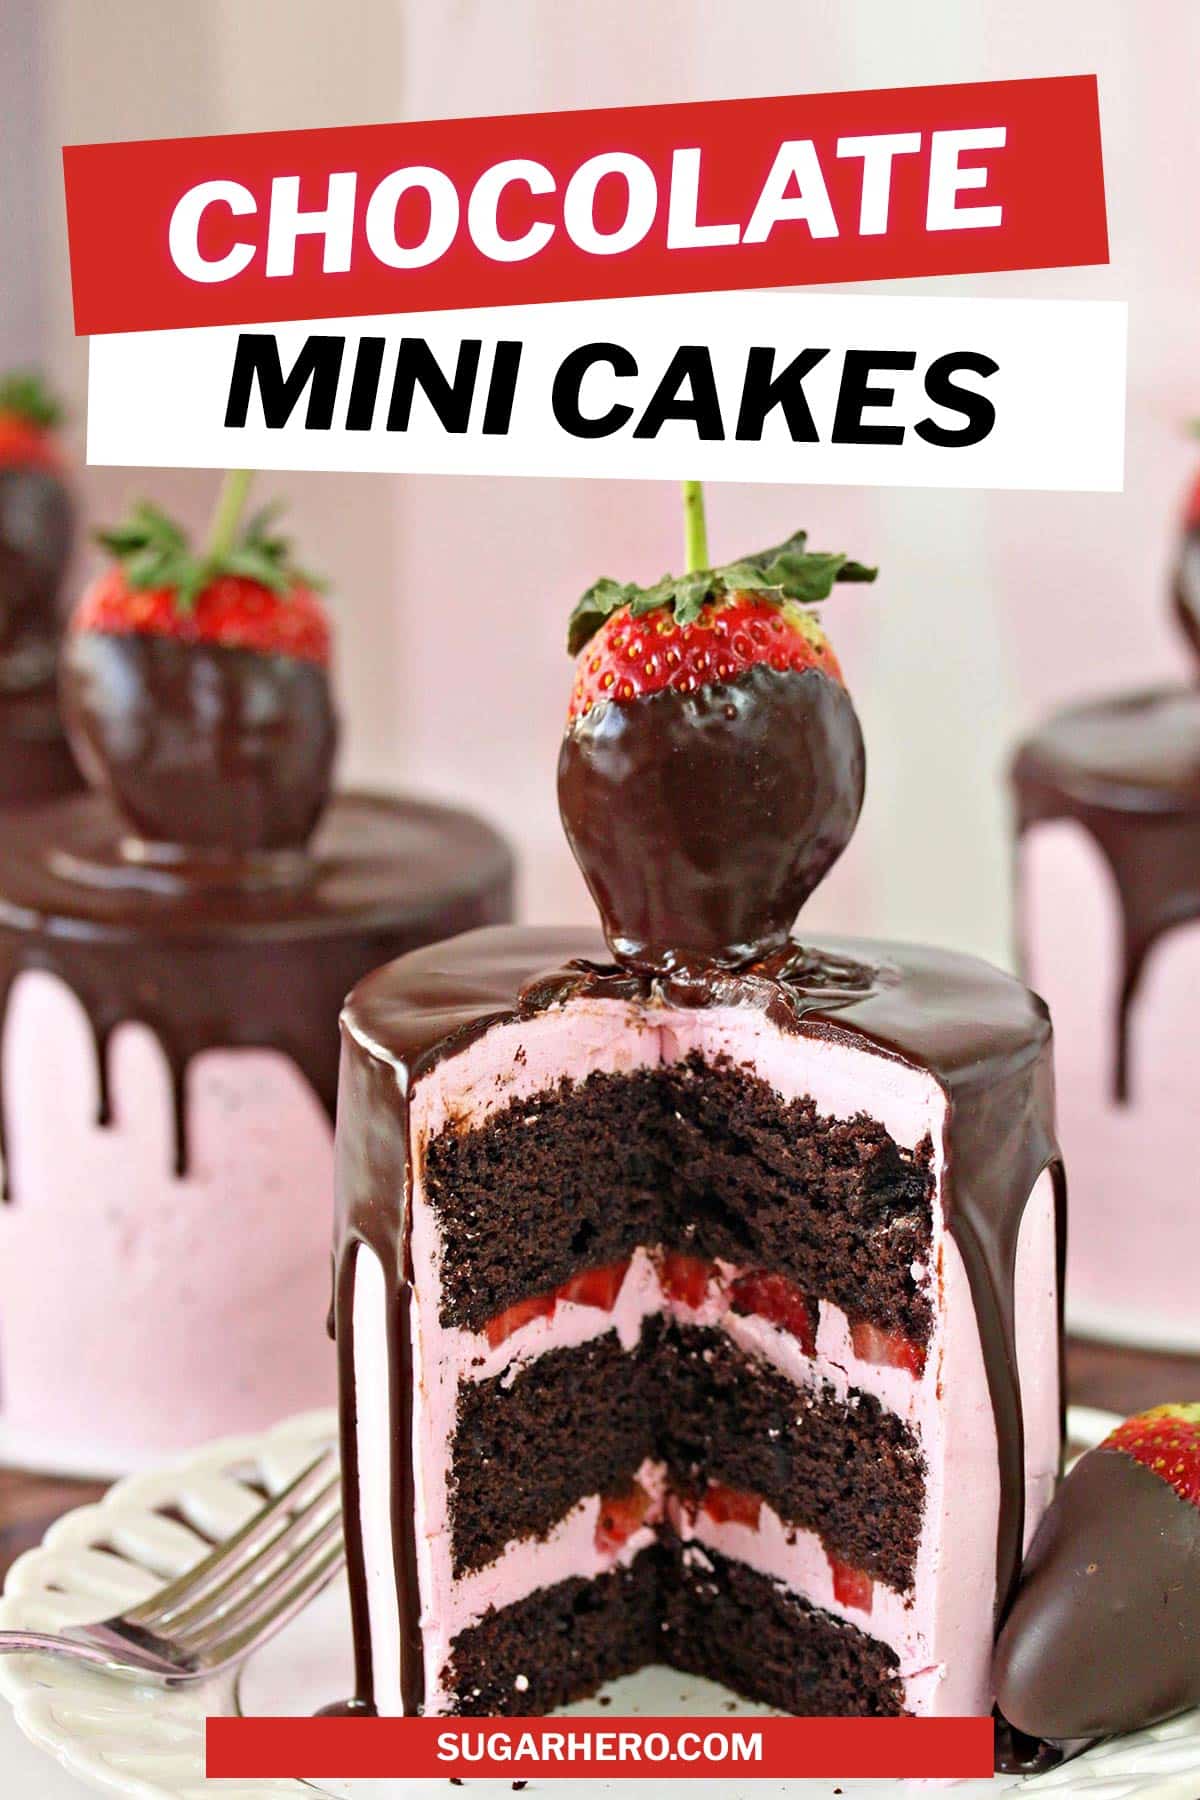
These Chocolate-Covered Strawberry Mini Cakes are made with rich chocolate cake, strawberry buttercream, glossy chocolate ganache, and fresh chocolate-dipped strawberries on top. They’re beautiful, romantic, and perfect for any special occasion.
🍫 Fall in love with Chocolate-Dipped Strawberry Cakes
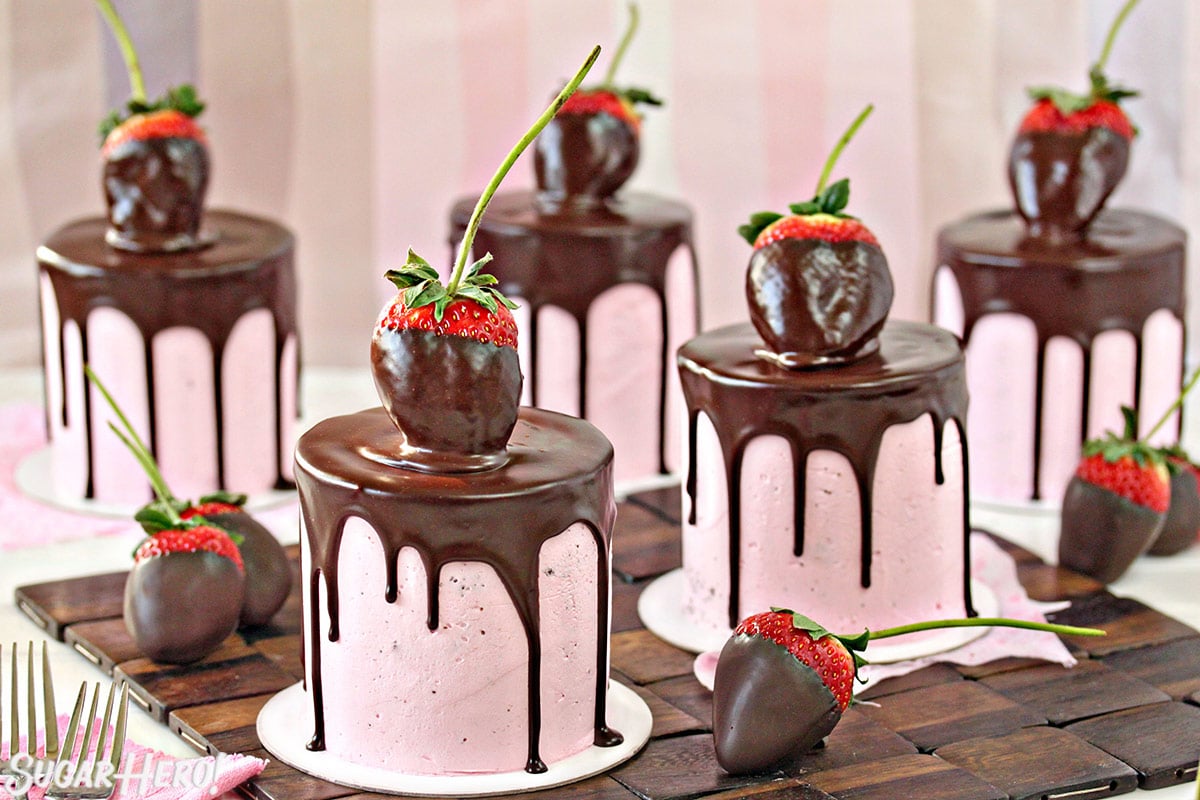
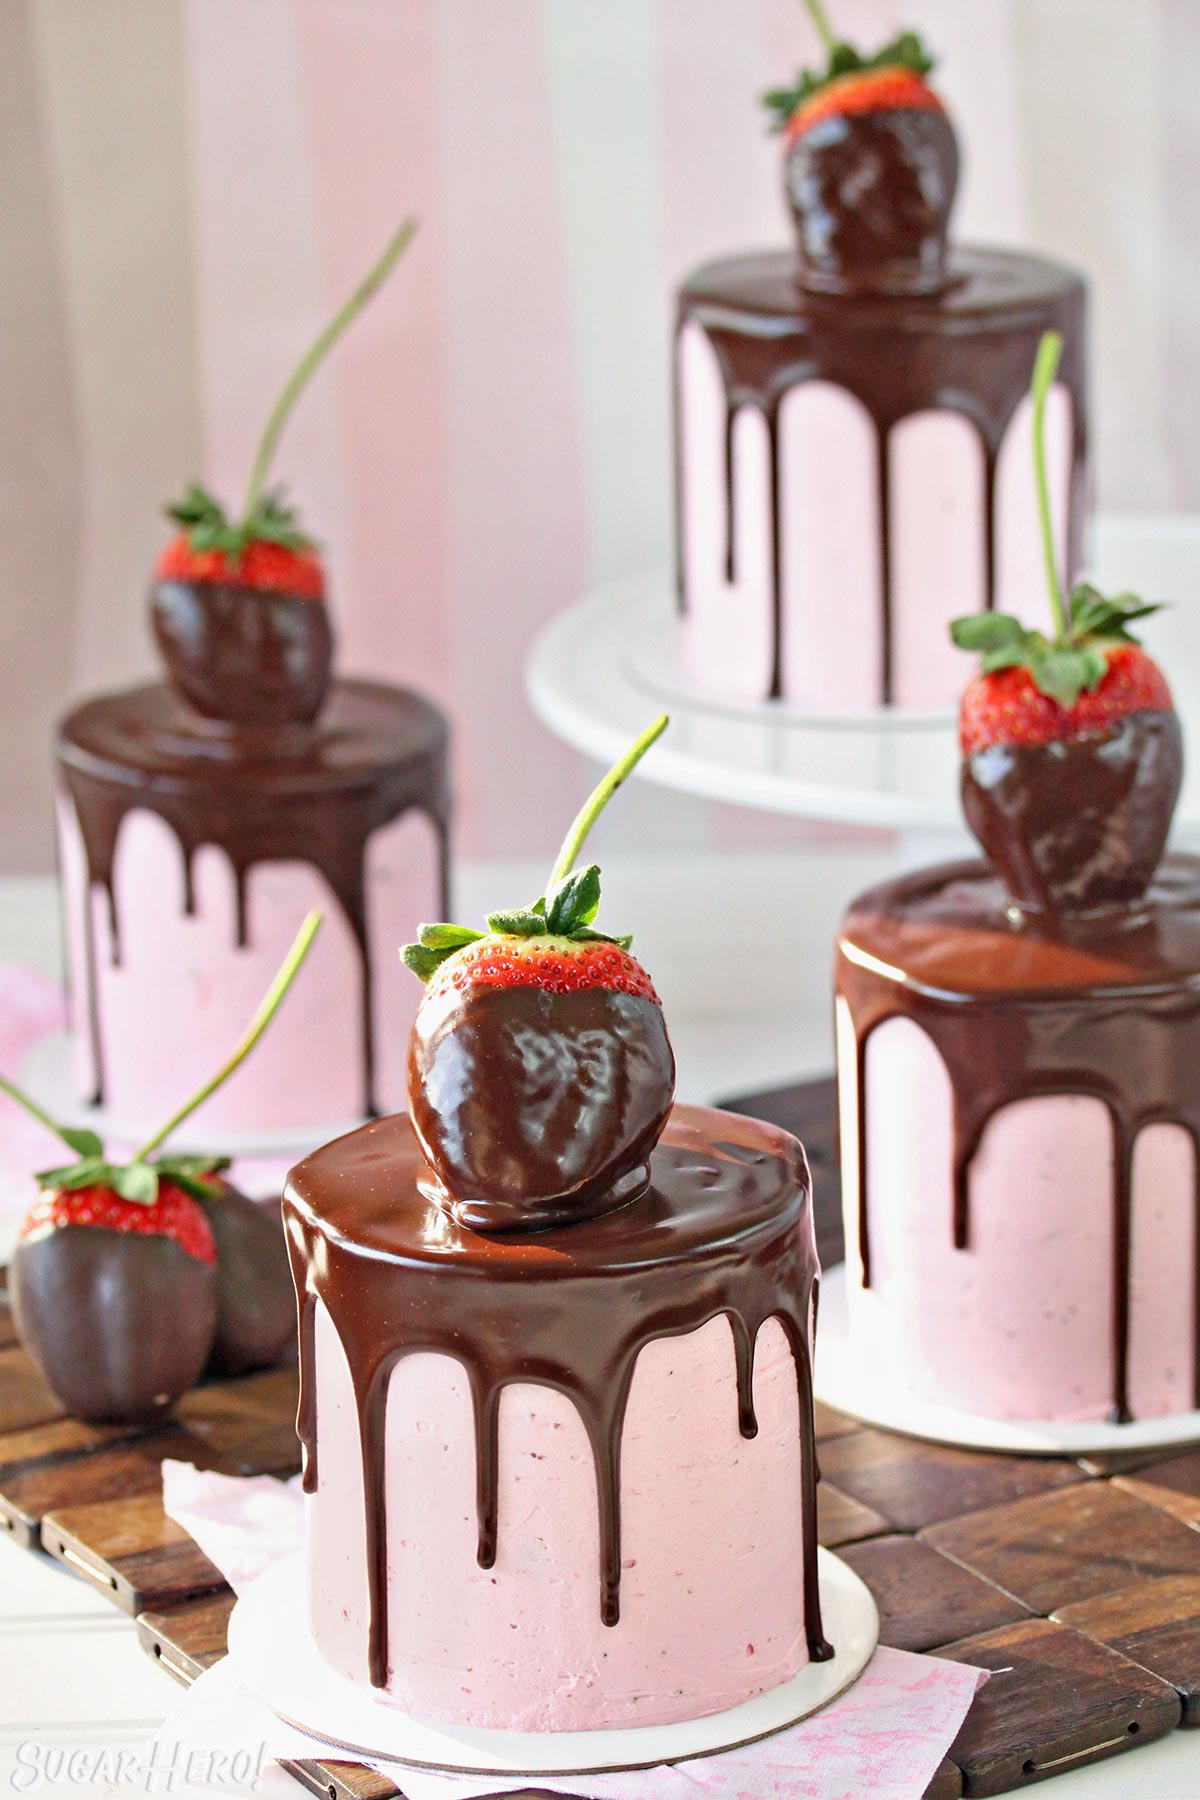
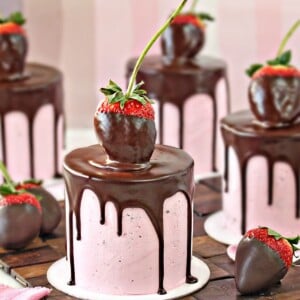
These sweet little mini cakes are like enjoying a chocolate-dipped strawberry in cake form! They start with moist chocolate cake, layered with a bright and vibrant strawberry buttercream. Then the cakes are coated with a dripping layer of glossy chocolate ganache, and finished with a juicy chocolate-dipped strawberry on top.
Aside from looking adorable, these petite cakes are the perfect size to serve 2 people generously—how’s that for romantic?! Unless you hate to share, in which case I recommend you and your partner(s) in cake each eat a whole cake, and then high-five each other in the name of deliciousness.
The recipe makes five 3-layer cakes that are only about 4 inches wide, so it’s not an overwhelming amount of dessert, and their small, portable size makes them perfect for sharing and gifting. It’s also easy to convert this recipe to cupcakes or one large layer cake — check the FAQ section for more information about this.
If you are looking for more romantic cake inspiration, check out our collection of Valentine’s Day dessert recipes, including Sky-High Pink and Red Velvet Cake, Heart-Topped Valentine’s Day Cake, Truffle-Topped Heart Cake, and Chocolate Raspberry Mini Crepe Cakes.
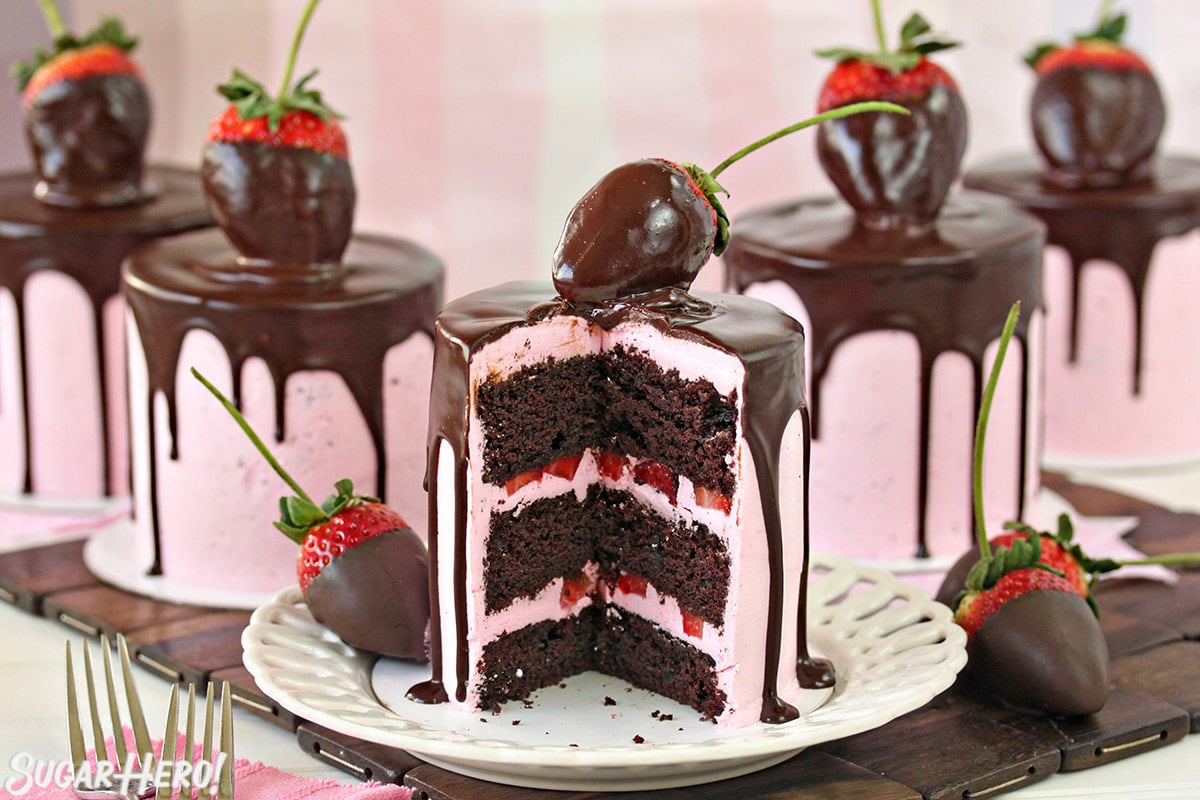
Table of Contents
🧾 What You’ll Need
Ingredients & Substitutions
You can find the full list of ingredients down in the recipe card, but here are a few notes to help as you gather ingredients: (Links are affiliate links and I earn a small commission from qualifying purchases.)
- Butter: Your butter should be at room temperature to make the cake and frosting. This means it’s pliable but cool–you don’t want it to be greasy and melty.
- Buttermilk: Buttermilk, along with sour cream, adds moisture and flavor. If you don’t have any, you can substitute more sour cream in a 1:1 ratio, or make your own buttermilk: combine 1.5 TBSP of fresh lemon juice or white vinegar with 1.5 cups of 2% or whole milk. Stir well, and let the milk sit for 10 minutes, until it’s thickened slightly, then it’s ready to use.
- Sour cream: I recommend using full-fat sour cream at room temperature. If you don’t have any, you can substitute buttermilk in a 1:1 ratio, or full-fat Greek yogurt.
- Cocoa powder: Make sure you use a high-quality cocoa powder. Cheap cocoa powders can be nearly flavorless, or worse, impart a bitter, dusty, or stale flavor. My personal favorite is Cacao Barry Extra Brute – it hits that sweet spot between very high quality but also pretty affordable since it is sold in bulk. Whatever you use, look for cocoa that is dutch-processed (also known as alkalized), because it has a deeper, richer flavor and color.
- Freeze-dried strawberries: we use freeze-dried strawberries to give the frosting a bold, vibrant, realistic strawberry flavor without changing the texture. If you want to use fresh strawberries instead, check the FAQ section for instructions on making that swap.
- Eggs & egg whites: You’ll need a lot of eggs – 3 for the cake, and 9 (whites) for the frosting! Use large eggs, and for the best results, have them at room temperature before beginning. If you are unsure about how to separate egg whites, check out my tutorial! Do not use pasteurized egg whites in a carton for this recipe. They will not whip properly.
- Chocolate: For the chocolate ganache, I recommend using a dark chocolate bar that’s not too bitter and not too sweet – something like these Lindt 70% bars are a great flavor balance, and make a silky-smooth ganache. Avoid chocolate chips – they don’t melt as smoothly or fluidly.
Equipment
- Rimmed baking sheet: The cake is baked in a half-sheet (18″ x 13″) rimmed baking sheet, then cut out with round cutters. This produces some waste (or scraps, as an optimist would say), but it’s the easiest method since most people have baking sheets available. The other option is to bake individual cakes in 4″ round cake pans, if you have this size.
- Round cutter: You’ll need a 3.5″ round cutter to make the cake rounds. I have and recommend this versatile set of round cutters.
- Cake turntable:A revolving cake stand isn’t a necessity, but it does make cake assembly and decorating much easier.
- Offset spatula: A small offset spatula is is perfect for smoothing frosting on the sides and top of the cakes.
- Squeeze bottle: A squeeze bottle is a big help for getting those perfect ganache drips!
- Mixer: You will need some kind of mixer to make the cake and frosting. Either a stand mixer or hand mixer will work fine.

🍰 Assembling the cakes
These cakes have quite a few stages, so here’s a quick overview of the whole process and how everything comes together:
- Make the cake batter, bake it in a rimmed baking sheet, and let it cool completely. (this can be done in advance)
- Make the strawberry frosting and chocolate ganache. (this can be done in advance)
- Cut 15 cake circles out of the sheet cake, and feel free to nibble some scraps while you assemble the cakes. You deserve it!
- Assemble five mini cakes. Each one is composed of three layers of cake, with strawberry buttercream and chopped fresh strawberries in the middle. Spread a thin layer of frosting on the top and sides to lock in the crumbs, then refrigerate for at least an hour, until firm.
- Spread a second layer of buttercream on the chilled cakes, smoothing out the top and sides as much as possible. Guess what? We’re gonna chill those bad boys again, so stick them in the fridge for another hour.
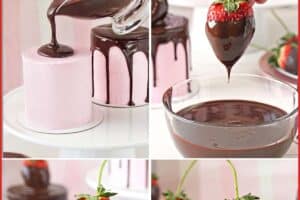
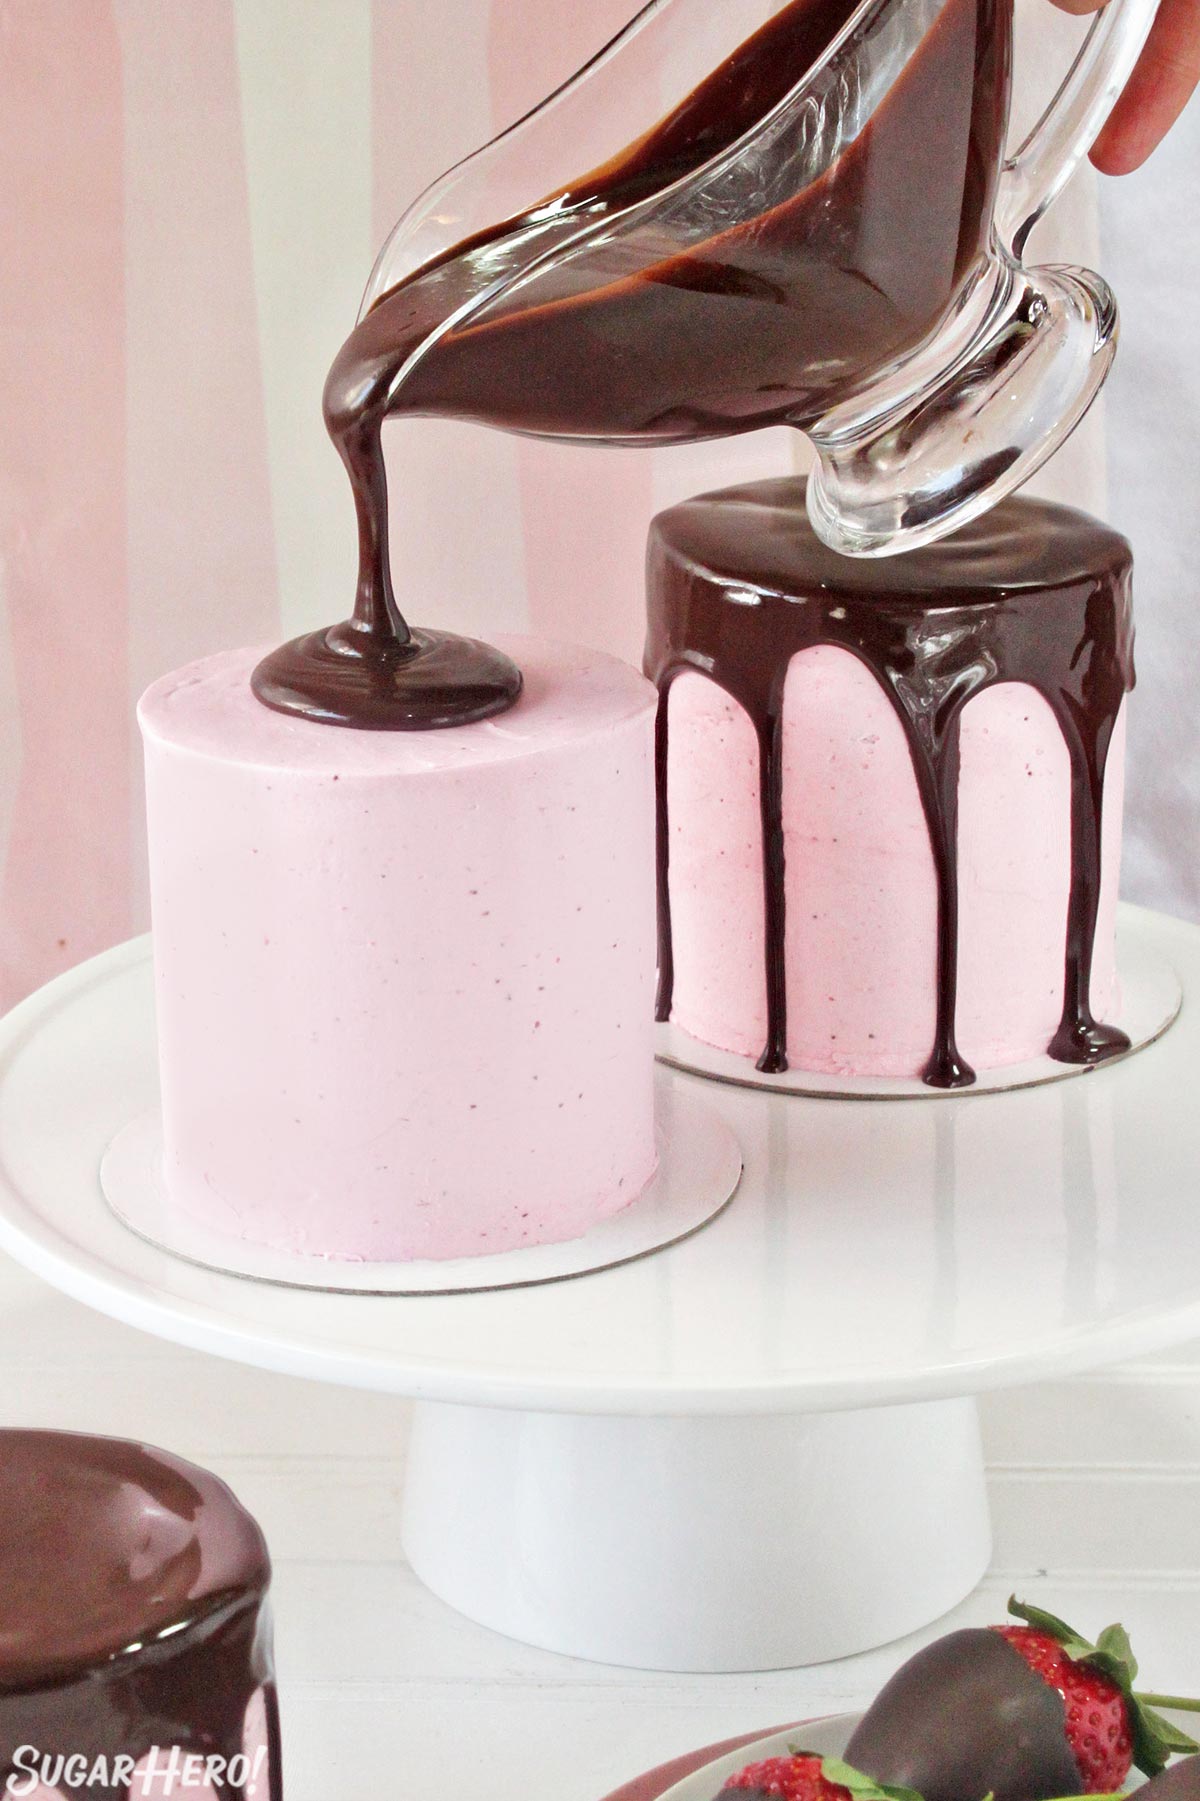
- Warm up the ganache until it’s smooth and fluid. Use a squeeze bottle or spouted measuring cup to pour ganache over the chilled cakes to make the drips.
- Dip large fresh strawberries in leftover ganache, and add one on top of each cake.
🎂 Tips for cake success
- It’s always a good idea to give yourself plenty of time to make the components and assemble a layer cake. I often like to do it over the course of several days so I’m not rushed or stressed. Fortunately, all the parts of this cake can be made in advance!
- Having all of the ingredients at room temperature is extremely important to making sure the cake batter and buttercream come together.
- This cake recipe is pretty straight-forward and forgiving. Even if it’s slightly overbaked, it still turns out moist and delicious! Don’t forget to prep your pan with parchment paper, and a generous layer of pan release or nonstick spray.
- Low on time? You can simplify some of the steps, like using a cake mix instead of making a homemade cake. If you want a shortcut version of the frosting, try my Easy Strawberry Buttercream instead.
- Don’t skimp on the chilling steps during cake assembly! I promise, it is MUCH easier to work with a cold, firm cake than a room temp cake that’s sliding around when you’re trying to frost it.
💭 Variations
- Try a raspberry version: use freeze-dried raspberry powder in the buttercream, and fresh raspberries in the frosting layers. Top the cakes with fresh berries and chocolate curls, like in this No-Bake Chocolate Raspberry Cake. (This would be fun to serve with my Love Potion Valentine’s Day Drink!)
- Try other cake recipes – a strawberry cake would be especially delicious! You could even use chocolate buttercream as a filling to complete the flavor swap.
- Instead of dipping the strawberries in ganache, dip them in real chocolate and use one of these fun strawberry decorating ideas to really customize the cakes!
💡 FAQs
You can use 1/2 cup strawberry puree in the frosting. Start with 8 oz of fresh or frozen strawberries. (If using frozen, defrost first.) Warm them over medium heat in a saucepan, mashing slightly to let them release their juice. Once warm, blend them in a blender or food processor until liquid, then pour through a fine mesh strainer to remove the seeds. Measure out 1/2 cup of puree for this recipe, and reserve any extra puree for another use. Mix the puree into the buttercream at the end of the recipe.
Line three 8-inch cake pans with parchment. Divide the batter between the pans, giving each pan about 13 oz batter, and smooth it into an even layer. Bake the cakes at 350 F for 22-25 minutes, until a toothpick inserted into the center comes out with just a few moist crumbs attached. Cool the cakes completely before using.
Line cupcake pans with 36 paper wrappers. Scoop batter into pans and bake at 350 F for 20-22 minutes, until the tops spring back when lightly pressed. Cool completely before decorating.
The cake can be baked and then wrapped well in plastic wrap. Store it in the freezer until you’re ready to assemble–the freezer does a better job of keeping cakes moist than the refrigerator. Cake can be stored for up to 3 months in the freezer.
The frosting can be made and stored in an airtight container in the refrigerator for up to 2 weeks. Let it come completely to room temperature, then whip well to restore the smooth texture.
The ganache can be made and stored in an airtight container in the refrigerator for up to a week. Warm it up very gently in the microwave in short bursts, stirring frequently, just until it’s fluid.
Leftovers can be refrigerated for up to a week, but the cakes will become more dry due to refrigeration after about 3-4 days. For the best taste and texture, bring them to room temperature before serving.
🍓 More Strawberry Desserts

Chocolate Covered Strawberries

Chocolate Rasperry Mini Crepe Cakes
Leave a Review!
If you make this recipe, let us know! Leave a ⭐️⭐️⭐️⭐️⭐️ rating on the recipe below, and leave a comment, take a photo and tag me on Instagram @elabau, or use #sugarhero on IG!
Chocolate-Covered Strawberry Mini Cakes
Ingredients
For the chocolate cake:
- 9 oz unsalted butter, (1 cup + 2 TBSP), at room temperature
- 7 oz granulated sugar, (1 cup)
- 7.5 oz brown sugar, (1 cup packed)
- 3 large eggs, at room temperature
- 1 TBSP vanilla extract
- 12 oz buttermilk, (1 1/2 cups), at room temperature
- 6 oz sour cream, (3/4 cup), at room temperature
- 3 TBSP water, can substitute coffee
- 11.75 oz all-purpose flour, (2 2/3 cups)
- 4.5 oz unsweetened cocoa powder, (1 1/2 cups)
- 2.25 tsp baking soda
- 0.75 tsp salt
For the strawberry buttercream:
- 9 large egg whites
- 14 oz granulated sugar, (2 cups)
- 1 lb unsalted butter, (2 cups), soft but still cool
- 1 TBSP vanilla extract
- 1/4 tsp salt
- 2 oz freeze-dried strawberries
- pink gel food coloring, I use Americolor Soft Pink
For the ganache:
- 8 oz semi-sweet chocolate, (1 ⅓ cups), finely chopped
- 8 oz heavy cream, (1 cup)
To assemble:
- 2 cups fresh strawberries, washed and chopped
- 5 large, beautiful strawberries, preferably long-stem variety
Instructions
To make the chocolate cake:
- Preheat the oven to 350 F. Line a half-sheet rimmed baking sheet (18 x 13 inches) with parchment, and spray the parchment with nonstick cooking spray.
- Add the butter and both sugars to the bowl of a large stand mixer fitted with a paddle attachment. Beat them together on medium-high speed, until light and fluffy, about 5 minutes.
- Add the eggs one at a time, beating well after each addition. Add the vanilla extract and mix it in.
- In a separate bowl, whisk together the buttermilk, sour cream, and water (or coffee, if using).
- In a different bowl, sift together the flour, cocoa powder, baking soda, and salt.
- With the mixer running on low, add a quarter of the sifted flour mixture. When the flour streaks have almost all disappeared, add a third of the liquid to the mixing bowl. When that’s incorporated, continue to add the drys and wets in an alternating pattern, ending with the dry ingredients.
- When the dry ingredients are nearly incorporated, stop the mixer. Scrape down the bottom and sides of the bowl with a rubber spatula, and finish mixing the cake by hand.
- Scrape the batter into the prepared baking sheet and smooth it into an even layer.
- Bake the cake for 20-25 minutes, until a toothpick inserted into the center comes out with just a few moist crumbs attached. Cool the cake completely before using.
- The cake can be made several days in advance and kept, well-wrapped and refrigerated or frozen, until ready to use. If you freeze it, make sure it’s partially defrosted before you use it so you can cut it easily.
To make the strawberry buttercream:
- Combine the egg whites and the granulated sugar in the bowl of a large stand mixer, and whisk them together. Choose a small saucepan that lets you fit the base of the stand mixer snugly into the top of the saucepan—this is your makeshift hot water bath. (Alternately, you can use a different bowl or an actual bain marie and then transfer the mixture to a mixing bowl once it’s heated.)
- Add an inch of water to the bottom of the saucepan, and bring the water to a simmer.
- Place the mixing bowl on top of the saucepan, making sure that the bottom isn’t in contact with the water, and heat the egg white mixture. Whisk frequently so that the egg whites don’t cook. Continue to heat the whites until they are hot to the touch, and when you rub a bit between your fingers, you don’t feel any grittiness from the sugar. Once the whites are hot, transfer the mixing bowl to your mixer and fit it with a whisk attachment.
- Beat the whites on medium-high speed until they are a shiny, stiff, voluminous meringue, and are no longer warm to the touch—feel the outside of the bowl, and make sure that it is around room temperature. Depending on your mixer and the temperature of your environment, this may take 15-20 minutes, or more.
- Reduce the speed to medium-low and add the softened but cool butter in small chunks, a tablespoon at a time, making sure to wait in between additions. It may separate or look a little gloopy at this point—fear not. Once all of the butter is added, increase the speed again and whip until it comes together and is light and fluffy. If, after 5 minutes, it hasn’t come together, refrigerate the mixing bowl for 5-7 minutes, to cool the mixture down, and whip it again until it has thickened and is smooth and silky. Add the vanilla extract and salt and beat until it is mixed in.
- Place the freeze-dried strawberries in a food processor and process in long pulses until the strawberries are a very fine powder.
- Add the strawberry powder to the prepared frosting. Mix on low speed until the powder is well-mixed into the frosting. Add a few drops of pink food coloring, if desired, to boost the pink color.
- The buttercream can be made in advance and kept at room temperature if you’re going to use it the same day, or refrigerated. If it has been chilled, let it sit at room temperature until completely soft, then re-whip it to get the smooth texture back before you use it.
To make the chocolate ganache:
- Place the chopped semi-sweet chocolate in a medium bowl and set aside. Pour the heavy cream into a small saucepan and place it over medium heat. Bring it to a simmer so that bubbles appear along the sides of the pan, but don’t let it boil.
- Pour the hot cream over the chopped chocolate and let it sit for one minute to soften and melt the chocolate. After a minute, gently whisk the cream and chocolate together until it is shiny and smooth.
- If you won’t be using it soon after making it, press a layer of cling wrap on top of the chocolate and refrigerate it for up to a week. To use it, gently re-warm it in short intervals in the microwave, whisking frequently, until it is fluid again.
To Assemble:
- Use a 3 1/2-inch round cutter to cut 15 circles from the half-sheet cake. Space them as close together as you can, and don’t worry if an edge or two is not exactly round—that can all be smoothed over with frosting later.
- Cut out five cardboard rounds the same size as your cake circles, and place a cake layer on each round. Spread a layer of frosting on top of one of the cake layers on a cardboard circle, and use a small offset spatula to spread it out to the edge. Sprinkle some of the chopped strawberries on top, and press them down gently to embed them in the frosting. Top it with a second cake slice, then add a layer of frosting on top of that. Finally, finish it off with a third cake slice.
- Spread a very thin layer of frosting on the top and sides of the cake. It will look rough and imperfect, and that’s okay – this is the “crumb coat” and it is used to lock in any stray crumbs. Repeat this process until you have assembled 5 mini cakes. Place the cakes on a baking sheet and refrigerate them for at least an hour, until the frosting on the outside is very firm.
- Mix the strawberry frosting again if necessary, so that it is very smooth and not spongy. Add a thicker layer of frosting to the top and sides of each cake, covering the crumb coat, making sure the frosting is as smooth as possible. To get the sides extra-smooth, run a metal offset spatula under very hot water, then wipe it dry and run it along the sides of the cake—the heat from the spatula helps smooth out the frosting. Repeat until all of the mini cakes have a final layer of frosting on them, then refrigerate them again for at least 1 hour to set the frosting. It is important the frosting is very set before adding the ganache drip.
- Re-warm the ganache so that it is fluid and flows easily. Transfer it to a measuring cup with a spout, and pour some on top of a cake, until it goes almost out to the edge. Use an offset spatula to nudge it around the sides of the cake, encouraging drips to go down the sides, until you’ve gone around the whole cake. Repeat until all of the cakes have a coating of drippy ganache.
- If you want your chocolate-dipped strawberries to stand upright on top of the cakes, insert a wooden skewer going all the way to the bottom of the cake and extending about 3/4-inch up above the surface.
- Make sure your strawberries are washed and completely dry. Dip a strawberry in the ganache until it is nearly covered, then remove it and let excess drip back into the pan. Prop it up on top of the cake, resting the back on the wooden skewer so that it balances upright. Repeat until all of the cakes are topped with chocolate-dipped strawberries.
- Refrigerate the cakes briefly just until the ganache is set, for about 20 minutes. For the best taste and texture, serve these mini cakes close to room temperature.
- Leftovers can be stored in the refrigerator for about 5 days. Because of the fresh fruit between the layers, this cake should not be stored at room temperature overnight.
Recipe Notes
Measuring Tips
Our recipes are developed using weight measurements, and we highly recommend using a kitchen scale for baking whenever possible. However, if you prefer to use cups, volume measurements are provided as well. PLEASE NOTE: the adage “8 oz = 1 cup” is NOT true when speaking about weight, so don’t be concerned if the measurements don’t fit this formula.
Want to learn more about baking measurements and conversion?
Nutrition
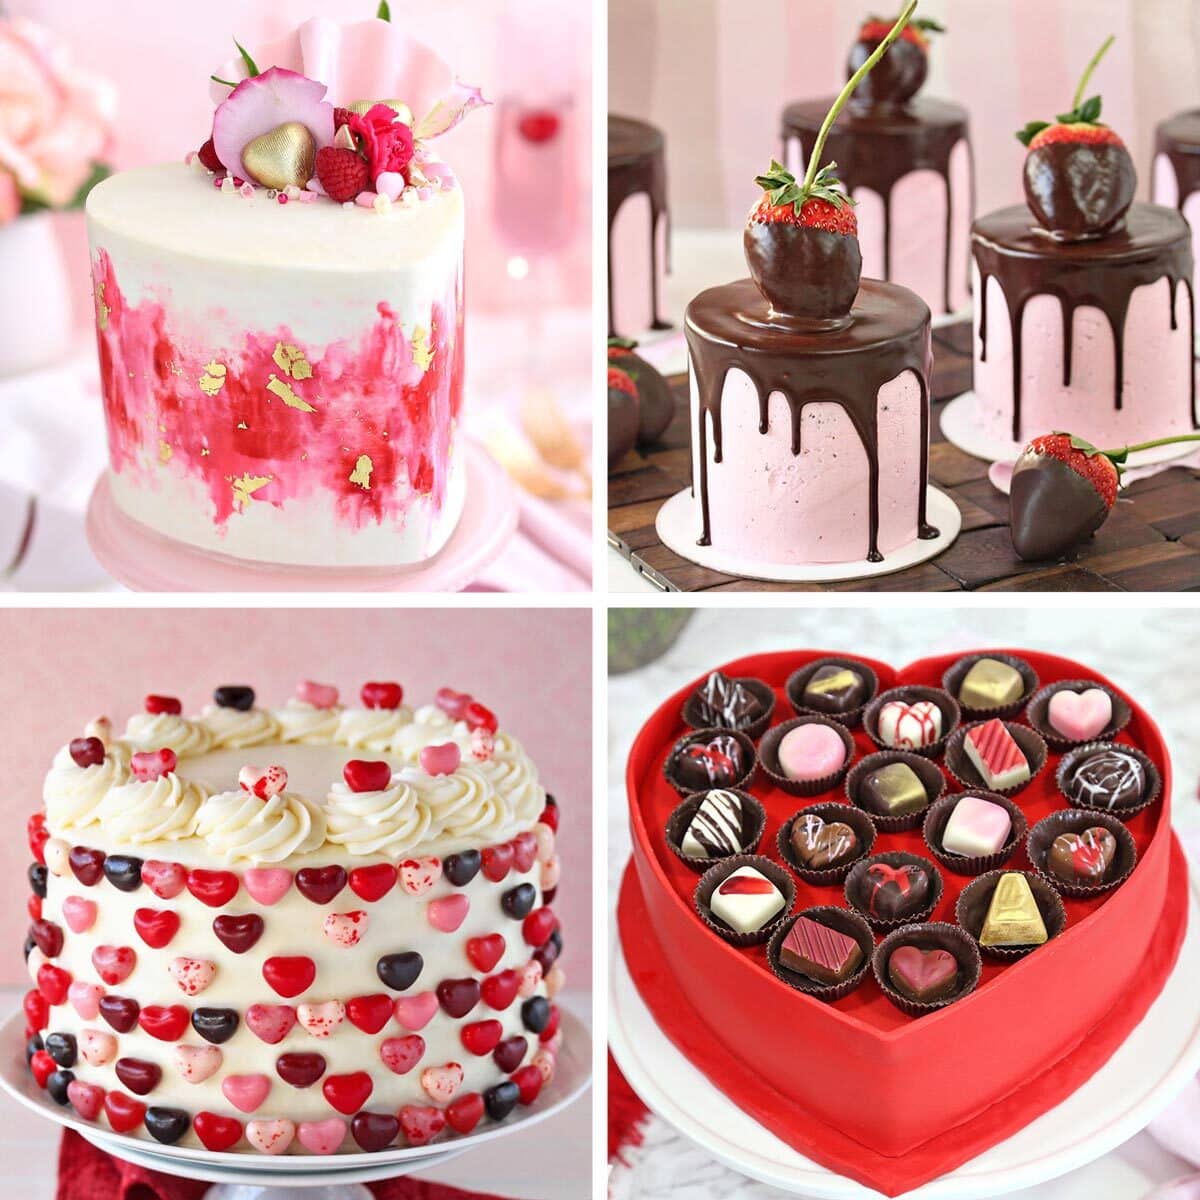
THE BEST VALENTINE’S DAY CAKES
Check out our collection of the 27 best Valentine’s Day cake ideas — click here to get all the recipes!


I made this months ago for my nieces and kids (with the pandemic we did mass birthdays the few times we saw eachother to celebrate all of them at once since it was hard to travel). The cakes were perfect. I did a strawberry Swiss meringue buttercream but otherwise used the recipe here.
That Strawberry Swiss Meringue Buttercream sounds delicious! Glad the cakes were a hit with the kids 🙂
I’m going to make these for a larger group I was thinking of doing two layers instead of the three to make more how many more do you think I would get out of the recipe if I only do the two layers?
Hi Cindy. This recipe makes 5 mini cakes with 3-layers that are 3.5 inches in diameter. If you keep the diameter the same, you can make 7 2-layer mini cakes. If you want to get a lot more cakes I’d recommend using a smaller round cutter. If you use a 3 inch cutter, you’d have 24 circles and could make 12 2-layer mini cakes. Or, if you use a 2.5 inch cutter you’d be able to cut 35 circles and could make 17 2-layer mini cakes. Also, keep in mind that you might need to make extra frosting and ganache since you’ll be covering a greater overall surface area. You’ll also need more strawberries to match the number of cakes you’ll be making. I’d suggest doubling the buttercream and ganache just to play it safe. I hope that helps. Let me know if you have any other questions.