
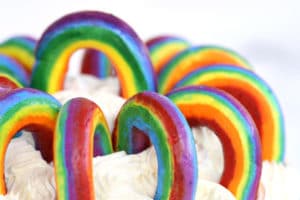
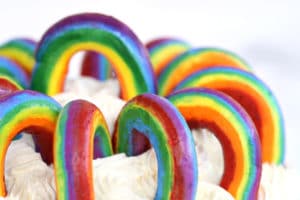
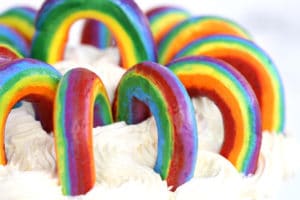
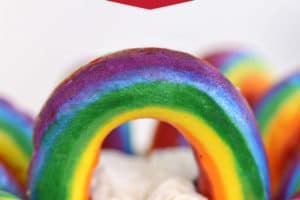
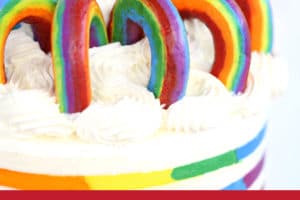


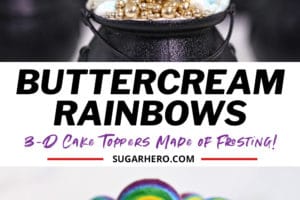
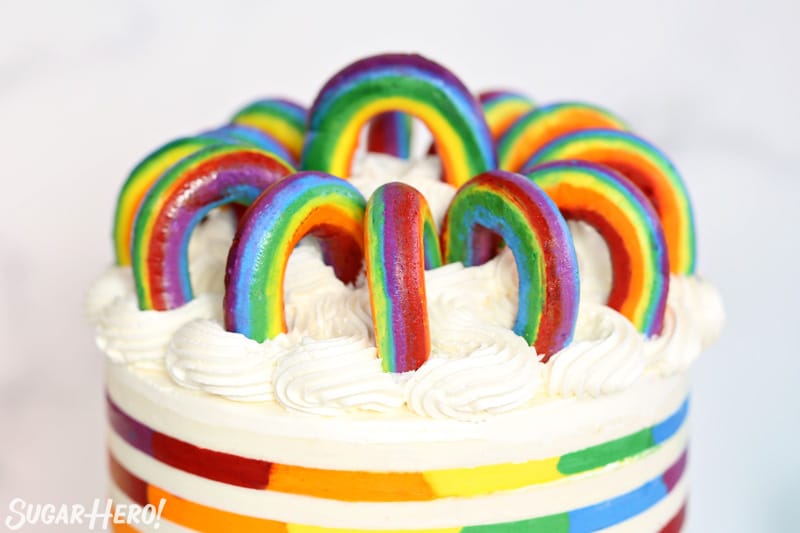
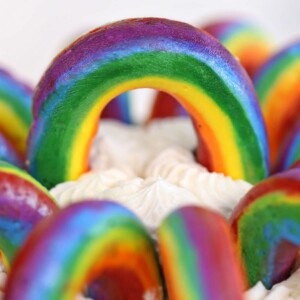
Give your desserts a splash of color with these 3-D Buttercream Rainbows! These fun frosting rainbow toppers are surprisingly easy to make, and they look SO fun on top of cakes and cupcakes!
🌈 3-D Rainbows Made of Frosting
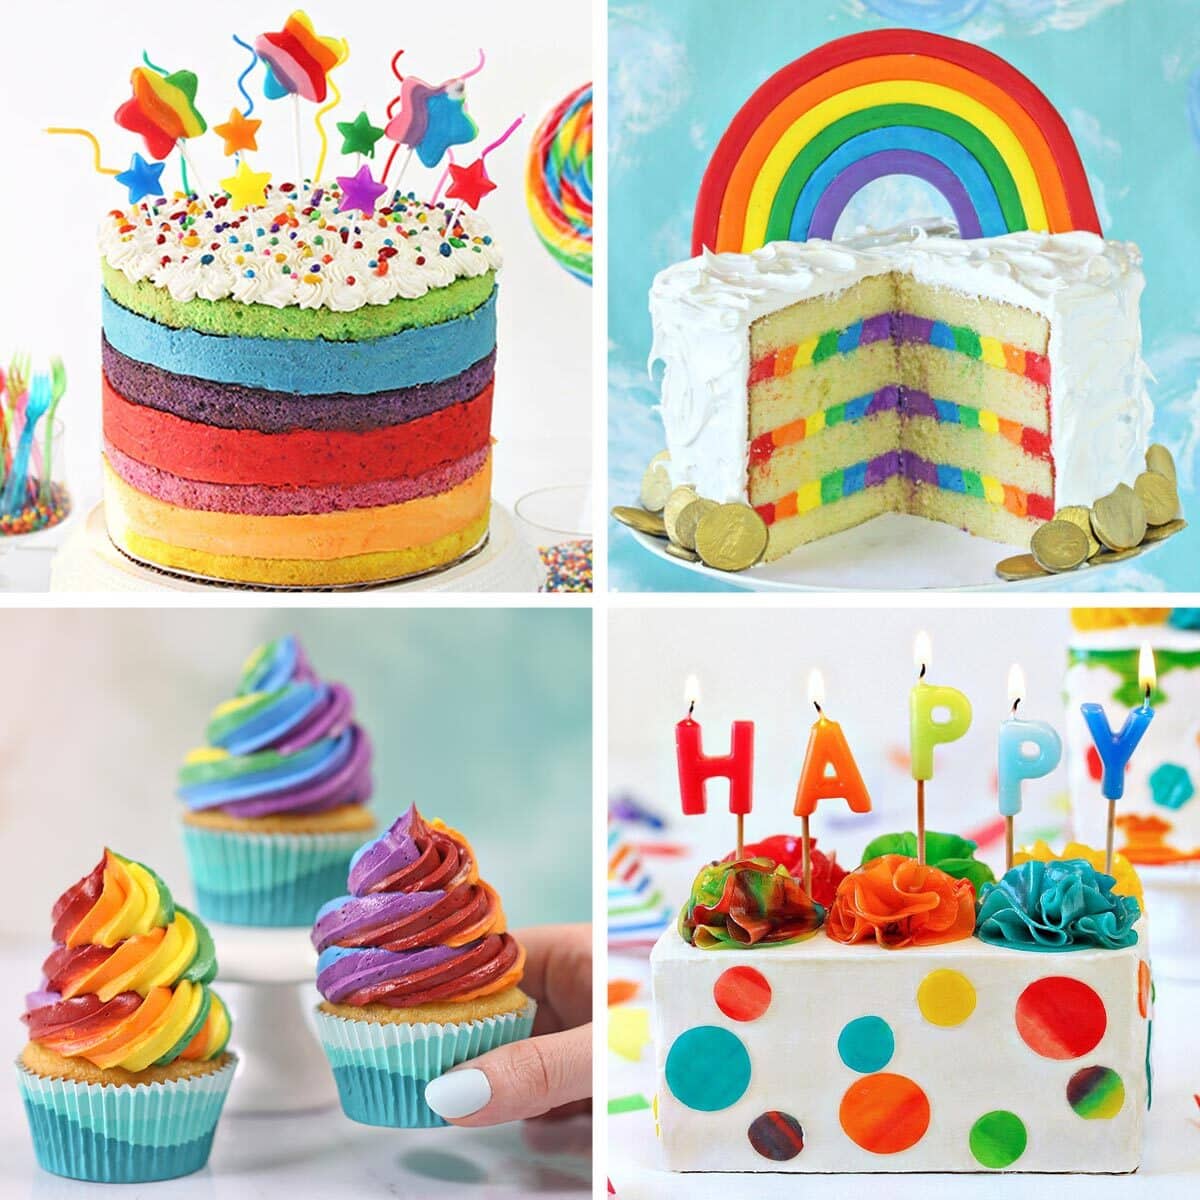
Rainbow frosting is one of my favorite ways to add color and cheer to cakes and cupcakes. These Rainbow Swirl Cupcakes are a party on a plate, my Gold-Topped Rainbow Cake a party in a cake, and this stunning cake with a hidden rainbow inside never fails to make me smile. So this year, when I was thinking about new rainbow desserts, I wanted to keep with the rainbow buttercream trend, but with a twist.
After a little experimentation–and a lot of eating frosting straight out of the bag–these 3-D Buttercream Rainbows were born!
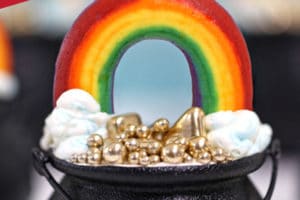
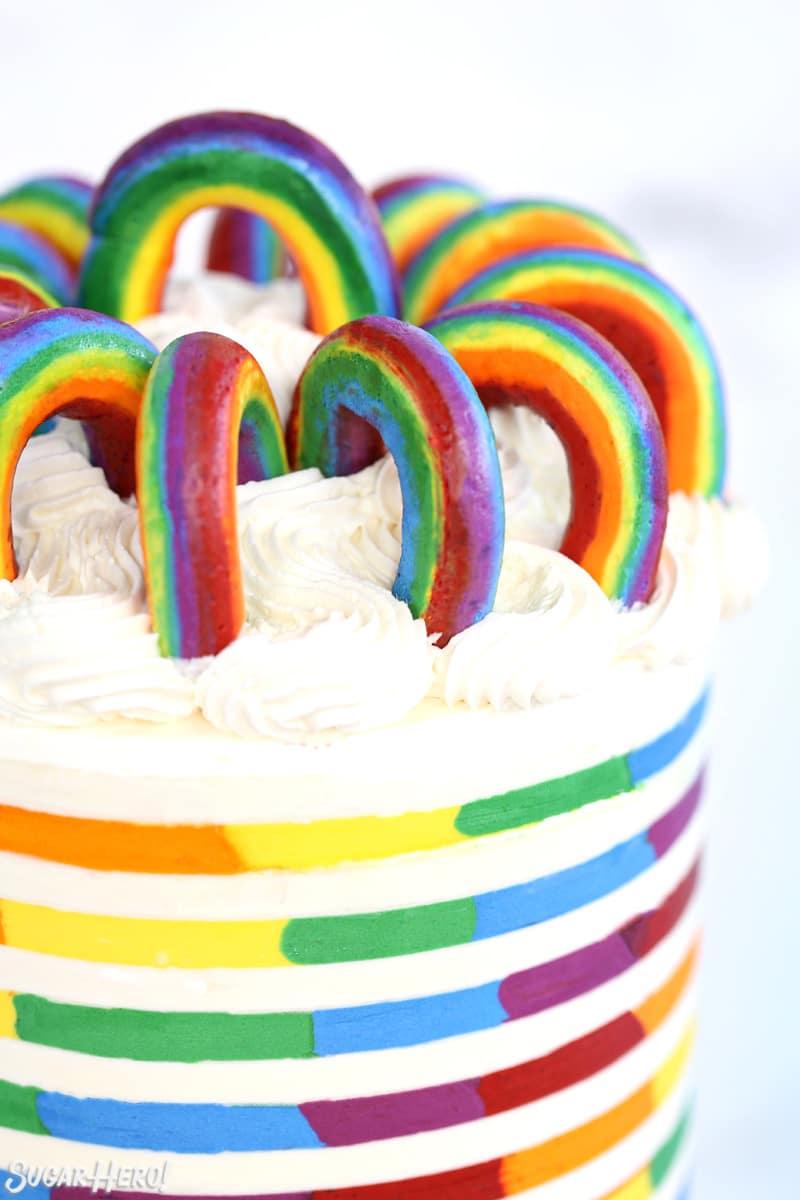
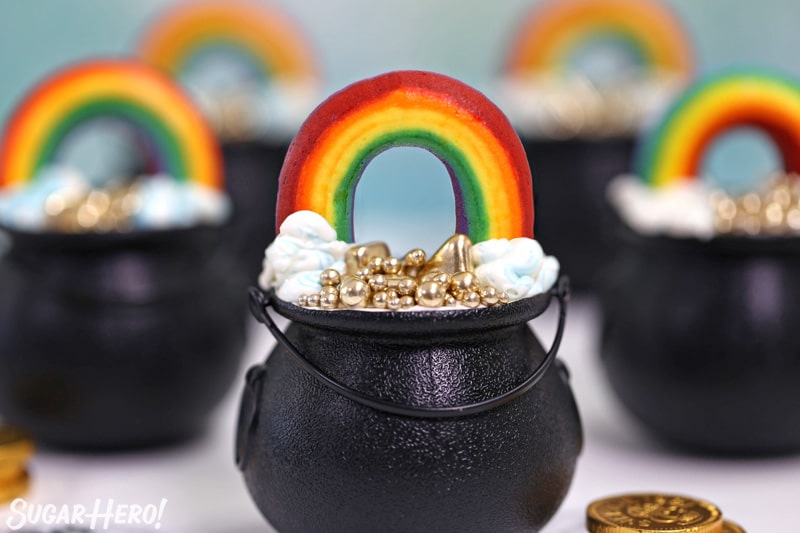
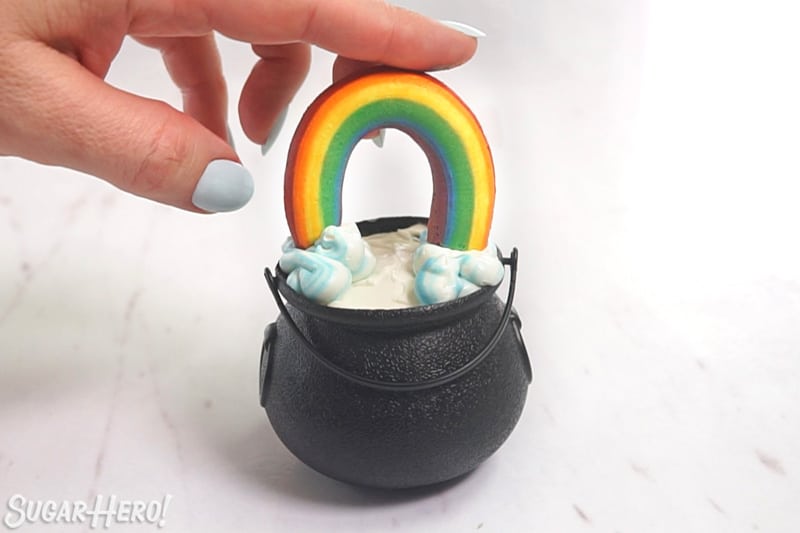
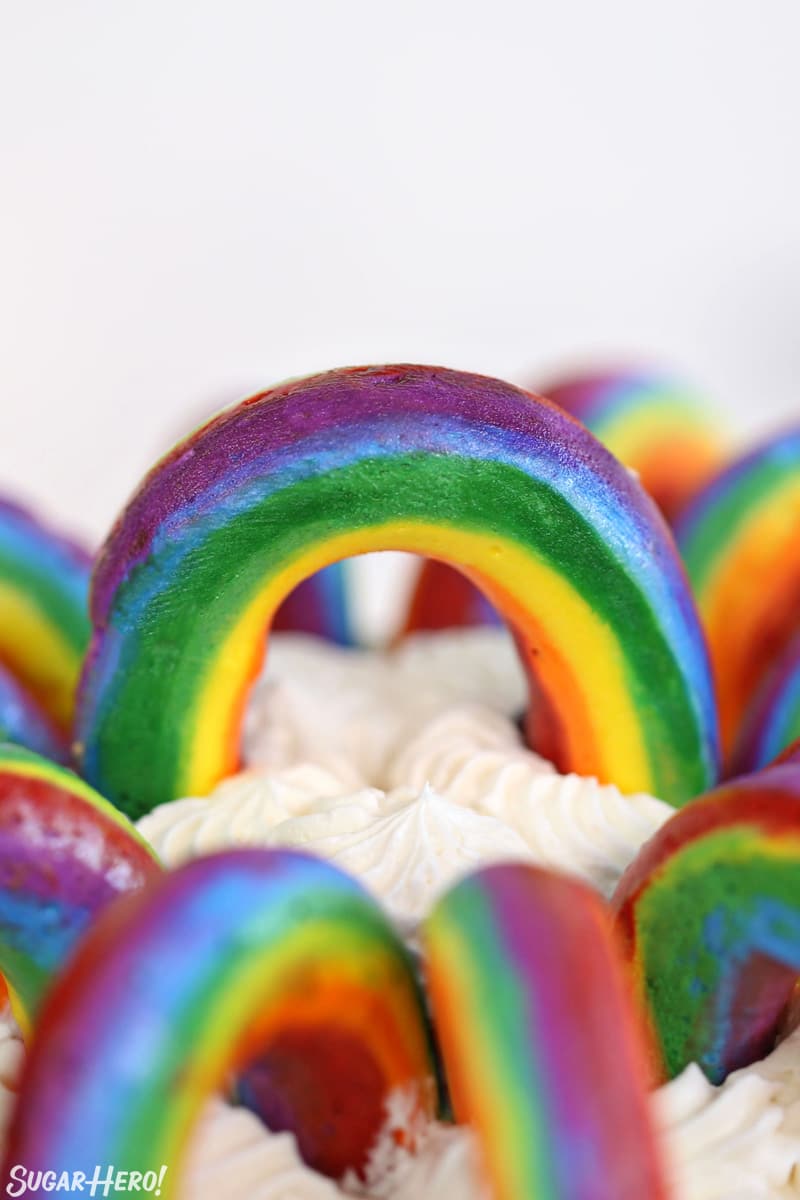
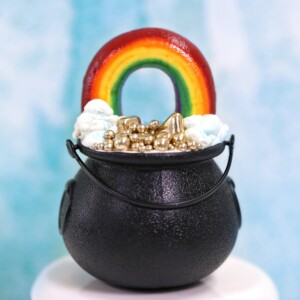
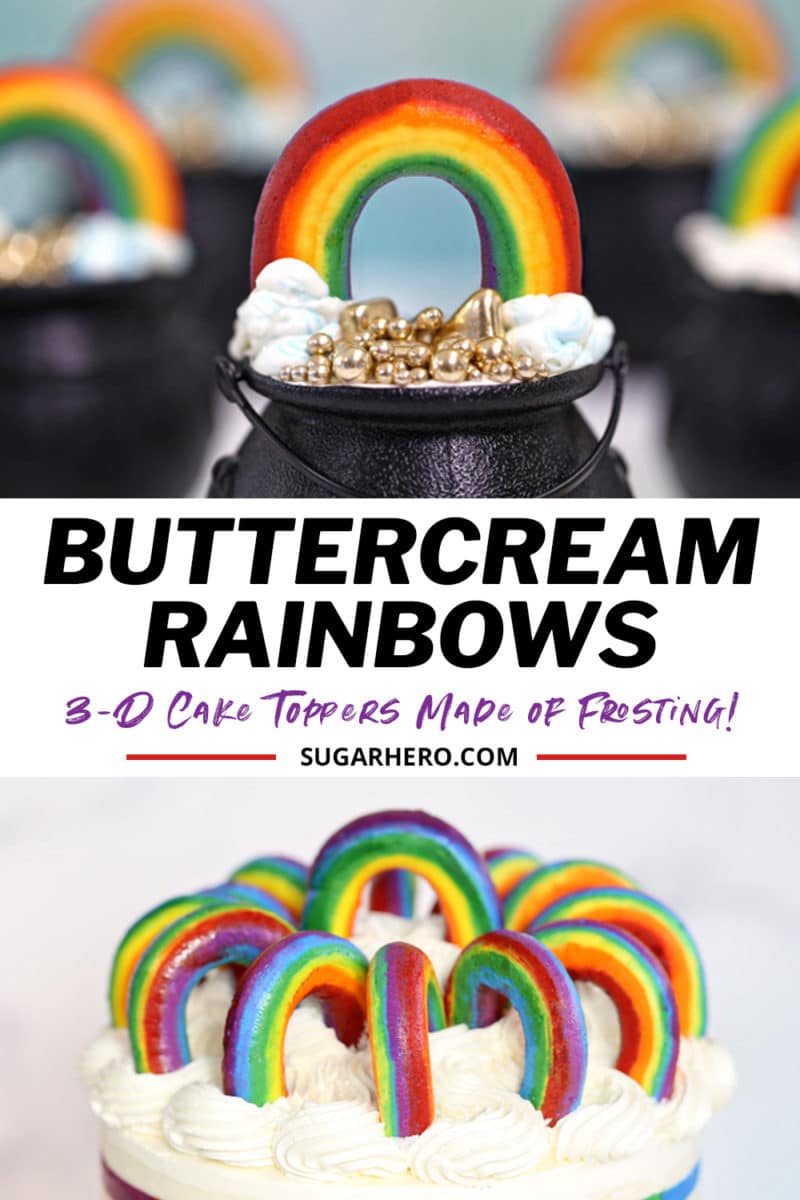
These adorable mini rainbows are the perfect edible cake or cupcake topper. They have the bright colorful stripes and semicircular shape you’d expect from any rainbow, and the fondant haters in your life will appreciate that they’re made entirely of delicious buttercream. See them in action on these adorable Pot of Gold Cupcakes I made for St. Patrick’s Day. (If you’re Team Fondant, you should also check out my Fondant Rainbow Cake Topper for another fun rainbow option!)
As with any buttercream decoration, it may take a few tries to nail the design, but once you get comfortable with the piping process, you can crank out dozens of these babies in a short time. Read on to learn what tools you’ll need, the best buttercream and food coloring for the job, and step-by-step instructions of how to make them!
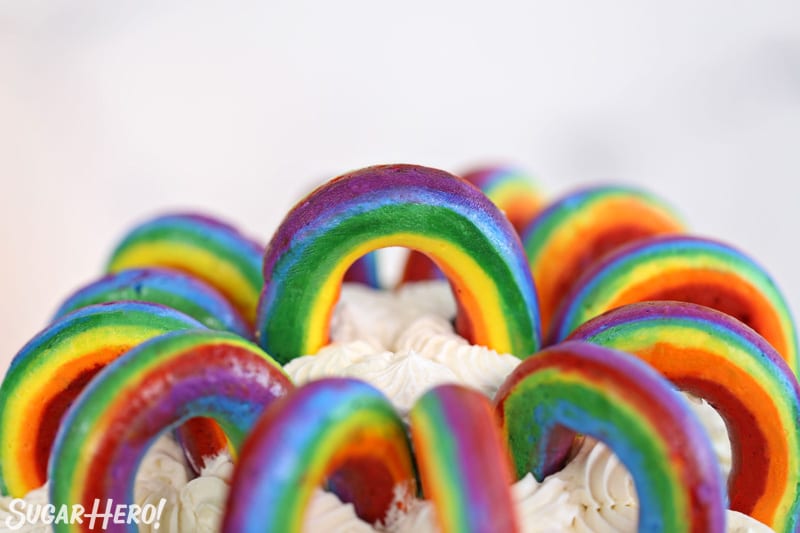
Table of Contents
🧾 What You’ll Need
Here’s a list of everything you’ll need to make these cute buttercream rainbows. (Links are affiliate links and I earn a small commission from qualifying purchases.)
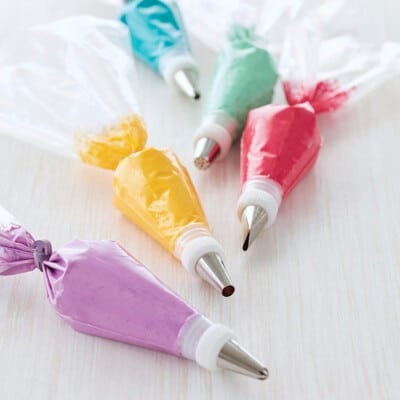
- Buttercream: Plan on getting about 10 rainbows from 1 cup of frosting, because the process of coloring, transferring, and piping the different frosting colors leaves some frosting behind during each step. More information about what buttercream to use can be found below.
- Gel food colors: You’ll want 5-7 gel food colors in bright rainbow colors. More info about choosing food coloring down here.
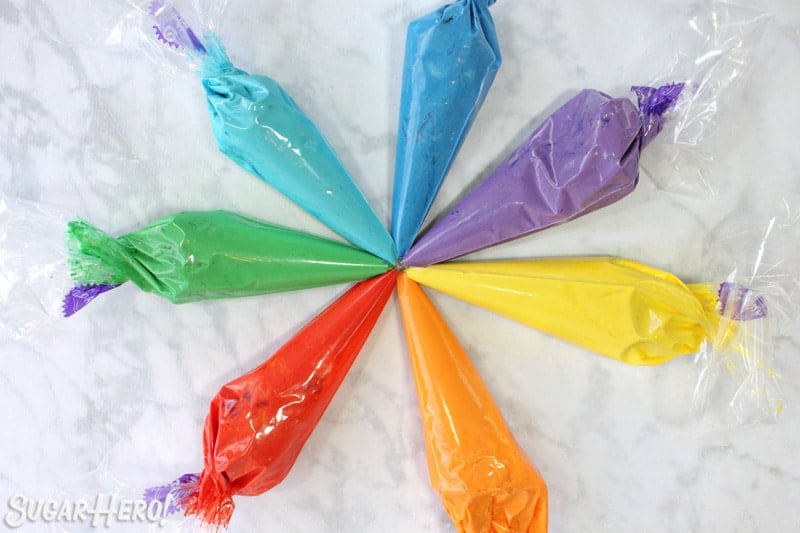
- Piping bags: One piping bag to hold each color, plus a bag for the striped rainbow frosting.
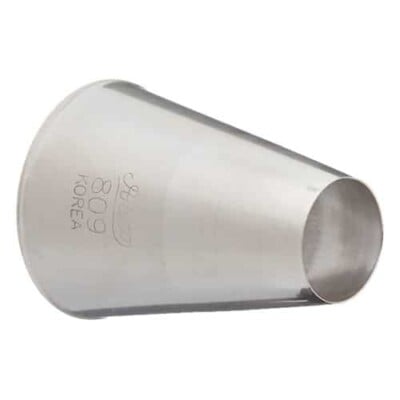
- Large round piping tip: I recommend Ateco #809
- Large flower nail: this is a MUST! And the larger the flower nail, the easier this process will be.
- Parchment paper: cut the parchment paper into 2-inch squares
- Plastic wrap
The perfect buttercream for rainbows
These buttercream rainbows work best with a moderately stiff frosting recipe. I recommend American buttercream, because it forms an outer crust as it dries and this makes the rainbow shapes more sturdy.
Non-crusting frosting recipes, like Italian meringue or Swiss meringue, can also be used, but be aware that the rainbows might droop as they sit at room temperature. If you want to use a meringue recipe, I recommend keeping the rainbows in the refrigerator until shortly before serving so they don’t collapse.
I’m sharing a delicious American buttercream frosting recipe in the recipe card down below, but you can swap in your own favorite stiff buttercream if you prefer. You’ll want at least 2.5 cups for 24 rainbows.
Avoid this mistake:
Don’t use canned frosting purchased at the store, because it is too soft to pipe well.
Food coloring for bright colors
I strongly recommend using gel food coloring over the liquid food coloring you can buy in a grocery store. Gel colors are more concentrated, so you won’t have to use as much coloring to get a bright, vibrant color. (Bonus: you can hopefully avoid the “food coloring aftertaste” if you use good-quality gel colors!)
I recommend Americolor brand food coloring, or the Wilton ColorRight system. Here are the colors I used in these photos (these are affiliate links):
- Red gel food coloring
- Orange gel food coloring
- Yellow gel food coloring
- Green gel food coloring
- Blue gel food coloring
- Purple gel food coloring
Tip for red food coloring:
It is notoriously hard to get a bright red buttercream color! My best tips are to use a good-quality gel brand, and warm up a small amount (~2-3 TBSP) of buttercream in the microwave until warm but not hot. Mix a generous spoonful of red gel in with the warm buttercream, then mix THAT into the whole bowl. Starting with this small concentrated red portion helps the color disperse better throughout the batch. The color will also deepen as it sits, so if possible, mix up your red color the day before you need it so it has time to deepen.
📋 Step-by-Step Instructions
Here are the step-by-step instructions showing how to make buttercream rainbows! There is also a video below in the recipe card if you find videos more helpful.
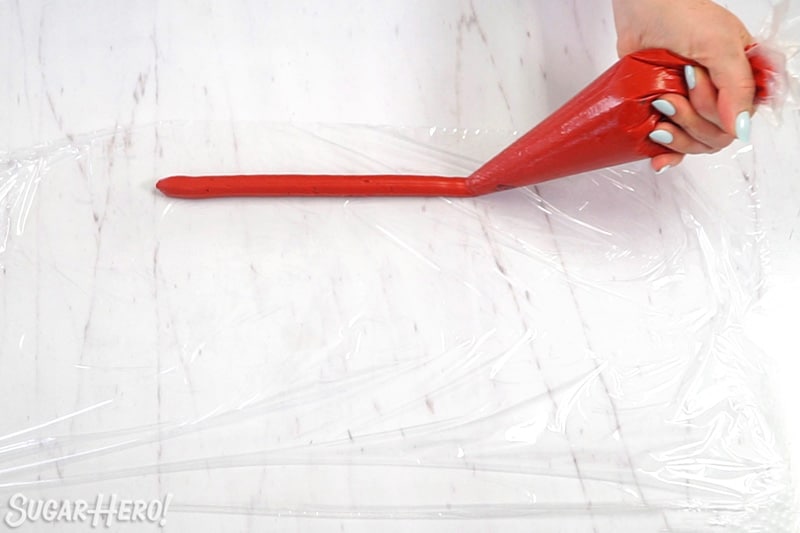
Step 1: Pipe on plastic wrap
Lay out a piece of plastic wrap on your counter. Start by piping a long line of red food coloring on the plastic wrap. Leave a margin of a few inches from the sides and top of the wrap. Next, pipe the orange frosting right next to the red.
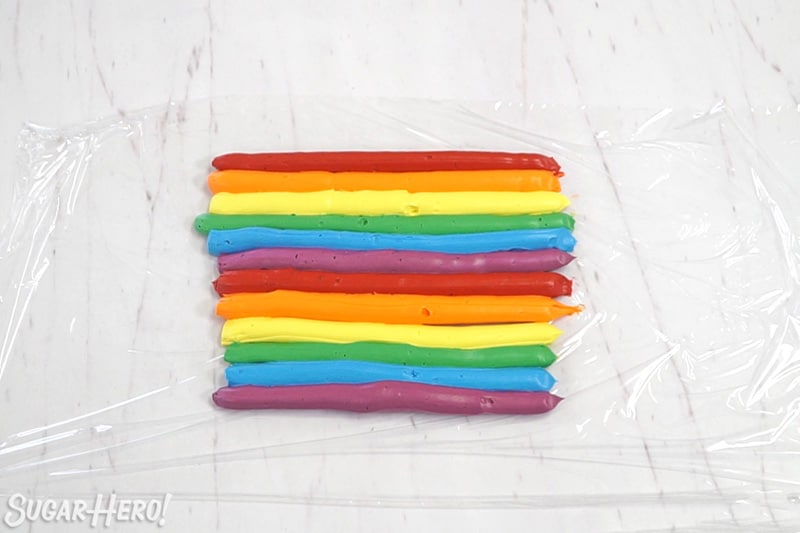
Step 2: Continue piping the colors
Continue to pipe the colors in a row on the plastic wrap. Repeat a second time so each color appears twice and you have 12 lines total. (If you have extra colors left over, you can do this a second time to make another rainbow piping bag.) Make sure you leave a margin and don’t go all the way to the edge of the plastic wrap.
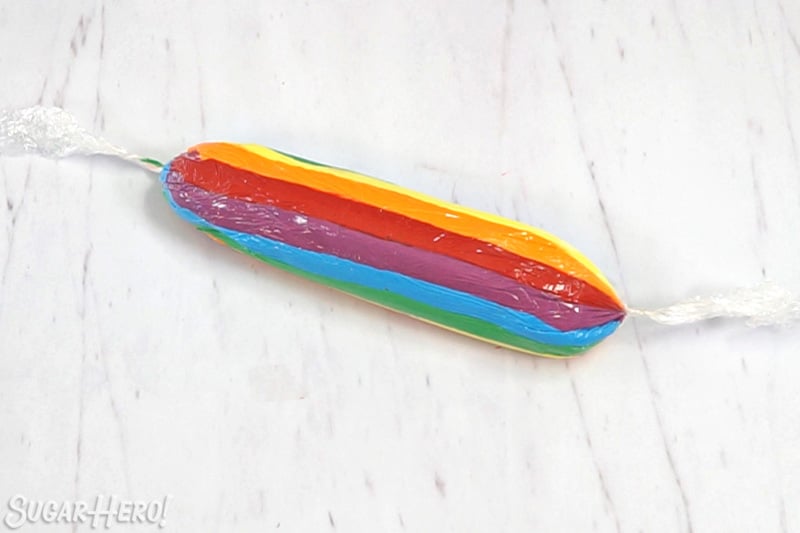
Step 3: Roll up the plastic wrap
Fold the plastic wrap over lengthwise and roll the frosting into a cylinder. Grasp the ends of the plastic wrap in each hand, and twirl it quickly so the frosting is burrito-shaped and the ends of the plastic are tightly twisted.
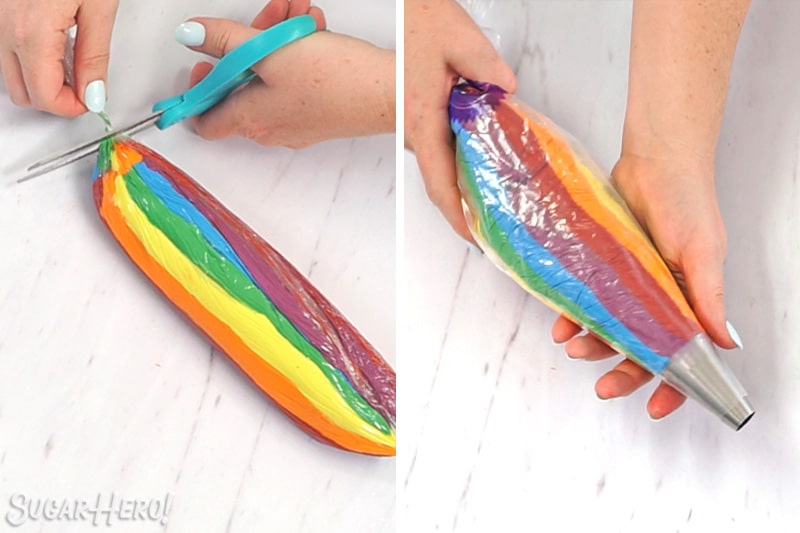
Step 4: Place the rainbow frosting in a piping bag
Fit a piping bag with a large round tip – I like the size of Ateco #809. Snip off one of the plastic wrap “tails,” and insert the frosting cylinder into the piping bag, snipped-side down.
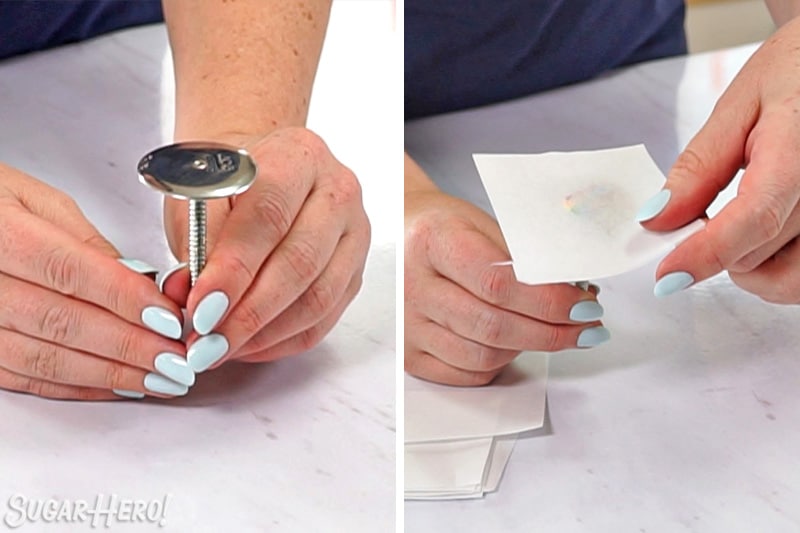
Step 5: Cover a flower nail with parchment
Take a flower nail and add a dab of buttercream on top. Place a 2×2-inch square of parchment on top of the nail and press down gently, so the parchment sticks.
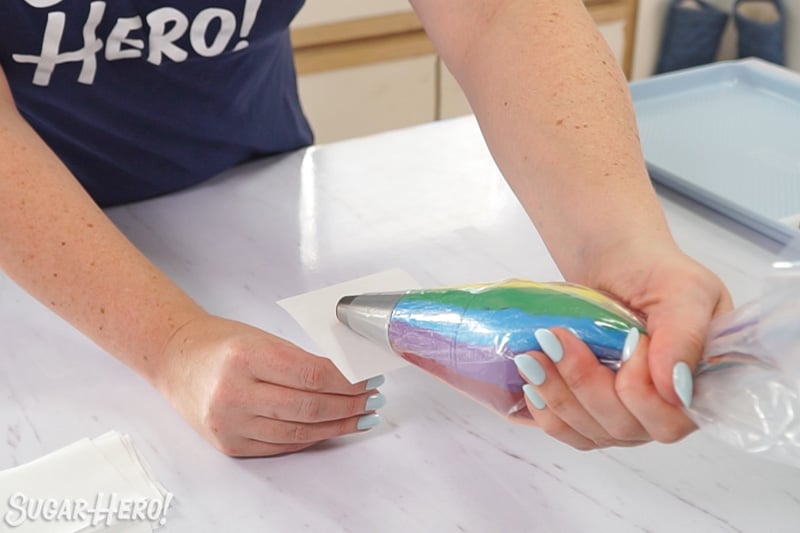
Step 6: Start piping the rainbow
Hold the piping bag in your dominant hand, and the flower nail upright in the other. Curl the hand holding the piping bag around, palm up, so that the tip of the bag is pointing back towards you. Start squeezing the piping bag so that a thick frosting rope is piped onto the parchment square.

Step 7: Finish piping the rainbow
As you squeeze the buttercream out, slowly turn the flower nail so that the rope is curved into a rainbow shape. All of the movement comes from the flower nail, the bag should stay stationary. When you’ve made a rainbow shape, stop squeezing the bag and flick it downwards to cut off the frosting edge. It’s fine if the bottom of the rainbow is not completely neat, because it will be covered when you put it on a cake.
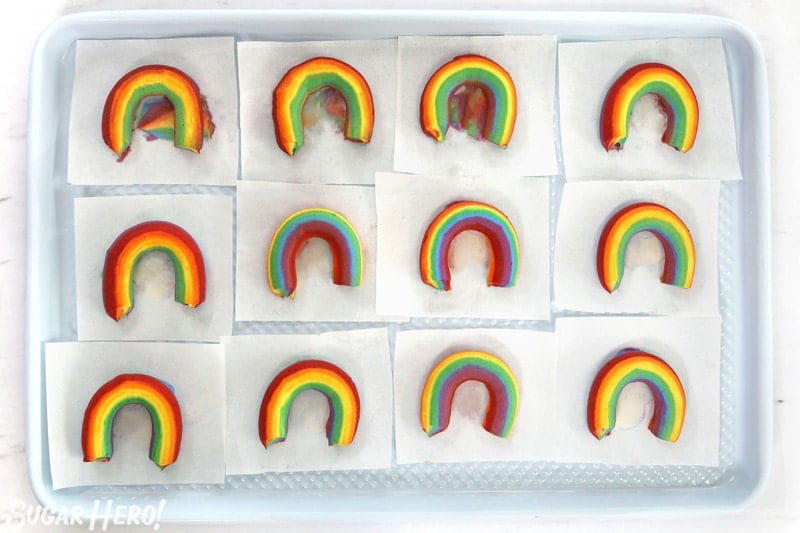
Step 8: Freeze the rainbows
Carefully pull the frosting square off of the flower nail and place it on a baking sheet. Continue piping rainbows until the baking sheet is filled.
Freeze the rainbows until completely firm, at least 20-30 minutes. At this point, you can use the rainbows to decorate, or transfer them to an airtight container for later use. Make sure you put layers of waxed paper or parchment paper between the layers of rainbows. Store in the refrigerator or freezer until ready to use.
Step 9: Decorate with them!
When you are ready to decorate, slide an offset spatula between the rainbow and parchment to release the parchment. Gently press the rainbow into frosting on top of your cake or cupcakes. How! cute! are! they?!?
💡 Tips and FAQs
A weather warning:
These rainbows should hold up well at cool room temperature. At hot temperatures, or in direct sunlight, the frosting might soften and the rainbows could droop or collapse, so these decorations are best suited for cool room temperatures, or applied shortly before serving.
Using a fairly stiff American buttercream helps make them more sturdy, and if you need a little insurance, you can swap in half shortening for half of the butter in the frosting, and adjust the milk/powdered sugar until you’re happy with the texture.
🌈 More Rainbow Desserts You’ll Love
- Rainbow Frosting for Cupcakes
- Rainbow Cake with Rainbow Frosting
- Pot of Gold Rainbow Cake
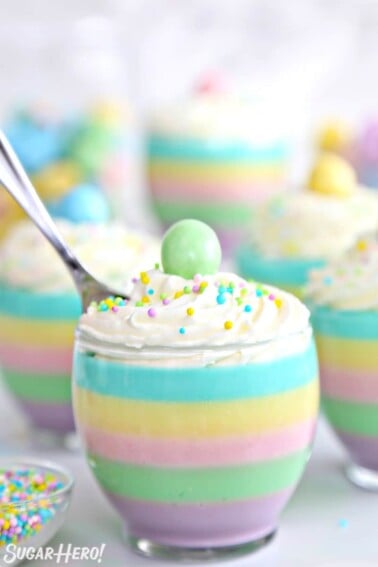
- Pastel Rainbow Gelatin Cups
- Rainbow Cake Push-Up Pops
- Rainbow Mousse Cake
Don’t miss the step-by-step tutorial showing how to make Buttercream Rainbows – check out the web story here!
Pot of Gold St. Patrick’s Day Cake Cups
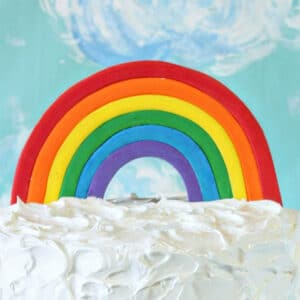
How to Make Fondant Rainbows
Leave a Review!
If you make this recipe, let us know! Leave a ⭐️⭐️⭐️⭐️⭐️ rating on the recipe below, and leave a comment, take a photo and tag me on Instagram @elabau, or use #sugarhero on IG!
Buttercream Rainbows
Ingredients
- 1 TBSP milk, at room temperature
- 1 tsp vanilla extract, or other flavoring
- 1/4 tsp salt
- 6 oz unsalted butter, (1.5 sticks), at room temperature
- 10 oz powdered sugar, (2.5 cups), sifted
- Gel food coloring in six rainbow colors, I recommend Americolor
Instructions
- Combine the milk, vanilla extract, and salt in a small bowl, and stir them together to dissolve the salt and set aside.
- Place the butter in a stand mixer fitted with a paddle attachment. Mix for 2 minutes on medium speed, until the butter is lighter in color and creamy. Scrape the bottom and sides of the bowl.
- Add the milk mixture. Run the mixer on low until the liquid starts to incorporate, then turn it to medium until everything is well-mixed and smooth (20-30 seconds). Scrape down the bowl again.
- Turn the mixer to low, and add the sugar to the bowl in a steady stream. Once all of the sugar is incorporated, scrape down the bottom and sides of the bowl, and turn the mixer to medium-low for 30 seconds to mix the frosting well.
- Check the texture: if the frosting is too stiff, add up to another 1 TBSP of milk to thin it out. If it is too soft, add additional powdered sugar to make it stiffer. Adjust until you have a frosting that holds its shape well but is not dry or hard to stir.
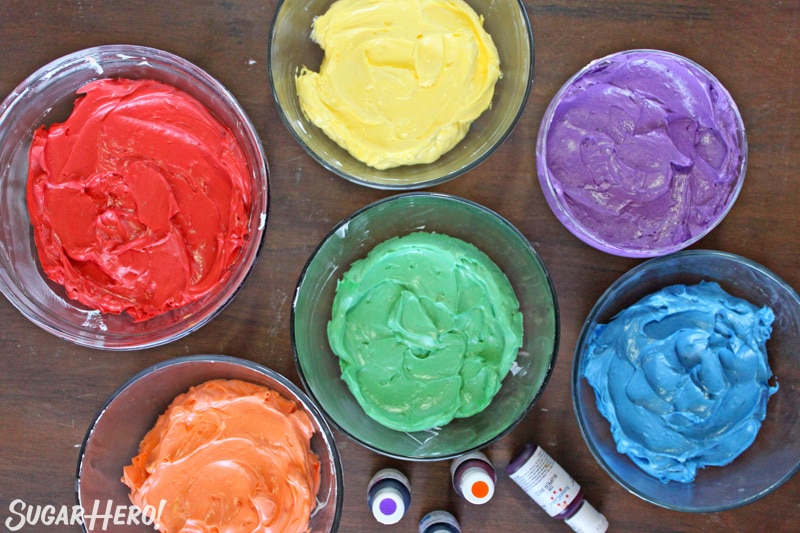
- Divide the frosting equally between 6 bowls. Add a different color of gel food coloring to each bowl and stir well, adding more if necessary until you get a vibrant color. Place each color of frosting into its own piping bag, and snip a 1/2-inch opening in the end of each bag.
- Lay out a piece of plastic wrap about 16 inches long. Start by piping a long line of red food coloring on the plastic wrap. Leave a margin of a few inches from the sides and bottom of the wrap.
- Next, pipe the orange frosting right next to the red, and continue to pipe each color in a line. Repeat a second time so each color appears twice and you have 12 lines. (If you have extra colors left over, you can do this a second time to make another rainbow piping bag.)
- Now, fold the plastic wrap over lengthwise and roll the frosting into a cylinder. Grasp the ends of the plastic wrap in each hand, and twirl it quickly so the frosting is burrito-shaped and the ends of the plastic are tightly twisted.
- Fit a piping bag with a large round tip (Ateco #809).
- Snip off one of the plastic wrap “tails," and insert the frosting cylinder into the piping bag, snipped-side down. Squeeze the bag for a moment until all of the colors come out together, then your rainbow piping bag is ready!
- Place a dot of frosting on top of a large flower nail, and press a square of parchment onto the top so it adheres.
- Hold the piping bag in your dominant hand, and the flower nail upright in the other. Curl the hand holding the piping bag around, palm up, so that the tip of the bag is pointing towards you.
- Start squeezing the piping bag so that a thick frosting rope is piped onto the parchment square. As you squeeze, slowly turn the flower nail so that the rope is curved into a rainbow shape. All of the movement comes from the flower nail, the bag should stay stationary.
- When you've made a rainbow shape, stop squeezing the bag and flick it downwards to cut off the frosting edge. It's fine if the bottom of the rainbow is not completely neat, because it will be covered when you put it on a cake.
- Carefully pull the frosting square off of the flower nail and place it on a baking sheet. Continue piping rainbows until the baking sheet is filled.
- Freeze the rainbows until completely firm, at least 20-30 minutes. At this point, you can use the rainbows to decorate, or transfer them to an airtight container for later use. Make sure you put layers of waxed paper or parchment paper between the layers of rainbows. Store in the refrigerator or freezer until ready to use.
- When you are ready to decorate, slide an offset spatula between the rainbow and parchment to release the parchment. Gently press the rainbow into frosting on top of your cake or cupcakes.
- These rainbows should hold up well at cool room temperature. At hot temperatures or in direct sunlight the frosting might soften and the rainbows could droop or collapse, so these decorations are best suited for cool temperatures or applied shortly before serving.
Video

Measuring Tips
Our recipes are developed using weight measurements, and we highly recommend using a kitchen scale for baking whenever possible. However, if you prefer to use cups, volume measurements are provided as well. PLEASE NOTE: the adage “8 oz = 1 cup” is NOT true when speaking about weight, so don’t be concerned if the measurements don’t fit this formula.
Want to learn more about baking measurements and conversion?
Nutrition
🌈 COLORFUL RAINBOW DESSERTS 🌈
We’ve rounded up 23 of our FAVORITE rainbow dessert recipes & ideas that are sure to make you smile — click here to get all the recipes!


These look so fun to make! My teens are going to love making these with me! So excited!
Family cake decorating–sounds perfect! Thanks Beth!
This is such a cool idea!!! So looking forward to trying these buttercream rainbows out! Adorable!
Yay! Definitely come back and let me know how they work out for you!
This is a gamechanger! I imagine making different 3D buttercream cake toppers from this recipe!
For sure–it works with any colors, so you could make some really cool themed rainbows!
I love everything about this cake. It would ve such a fun cake to make with the kids
Definitely–my 8 year old loves playing around with my cake decorating supplies. 😀 Thanks Mirlene!
What a beautiful cake. Looks delicious and so fun to make. I’m saving this recipe and will make this for my family. I bet my kids will flip. Yum!
Thanks Natalie! I do hope your kids will flip. 😀 Let me know how it goes!
I was very happy to find this website. I need to to thank you for ones time just for this fantastic read!! I definitely enjoyed every bit of it and I have you saved as a favorite to check out new things in your site.
So glad you enjoyed it Nakesha! All the best!