


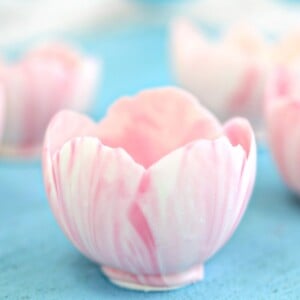
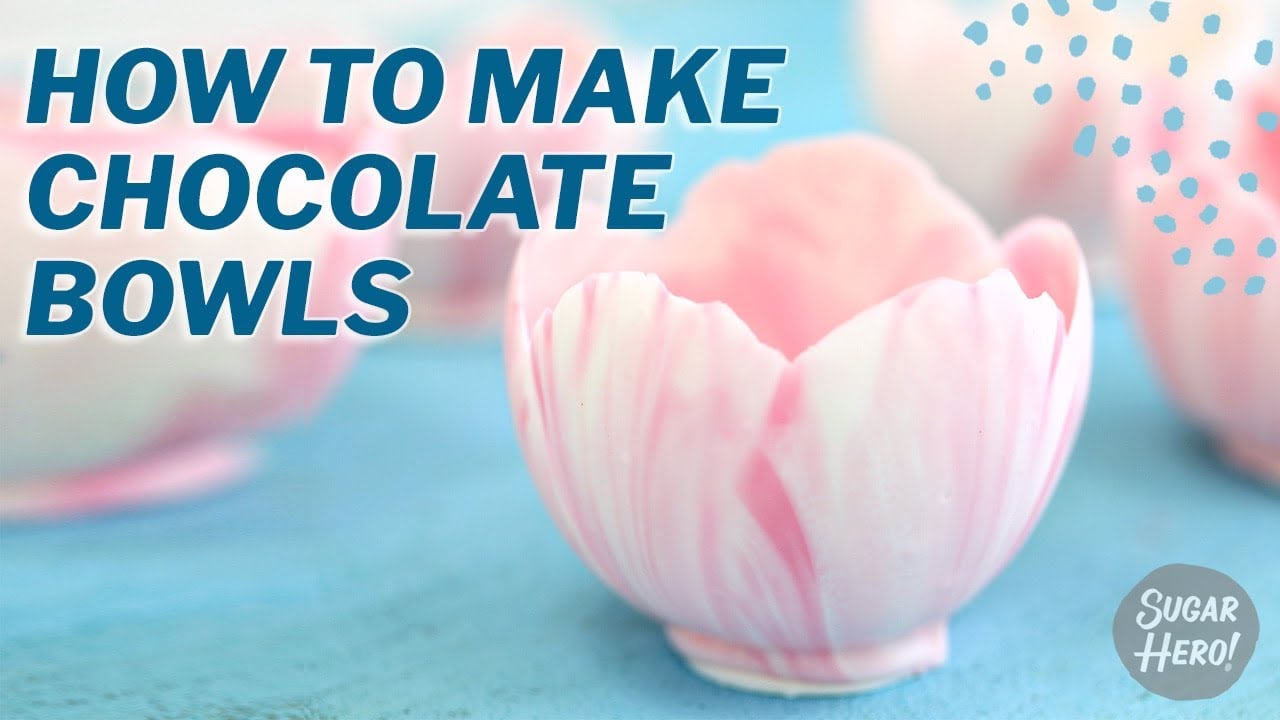
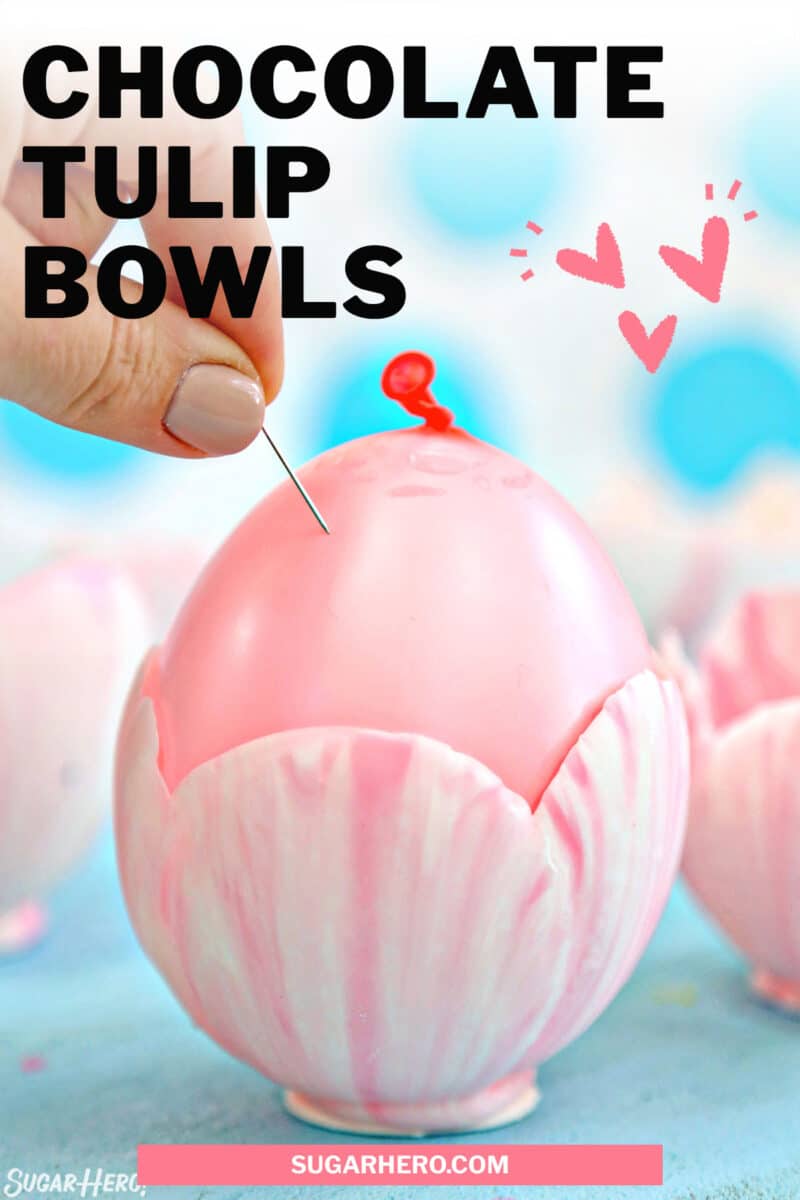
Chocolate Tulip Bowls add a gorgeous touch to any dessert, and they’re surprisingly easy to make! All you need are water balloons and candy melts (or tempered chocolate) to make these beautiful dessert cups.
🍫 Chocolate Dessert Cups
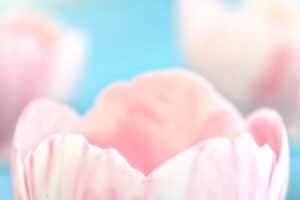
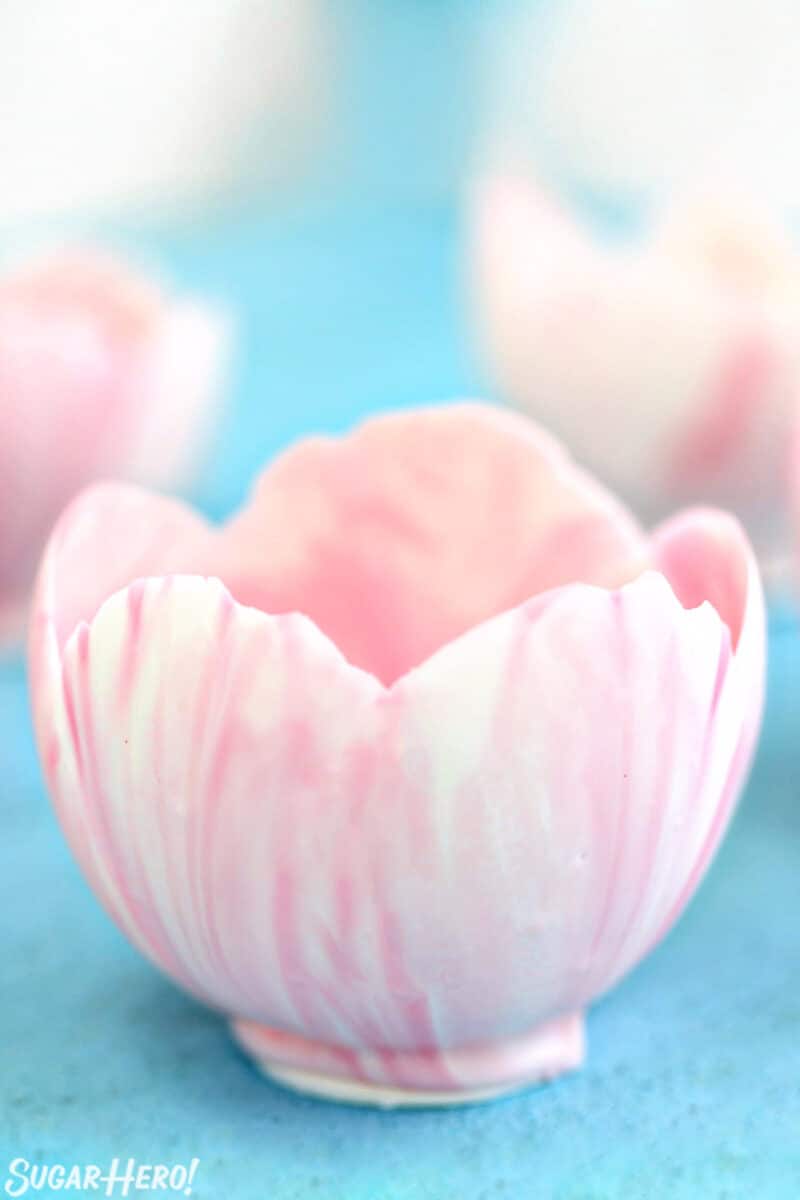
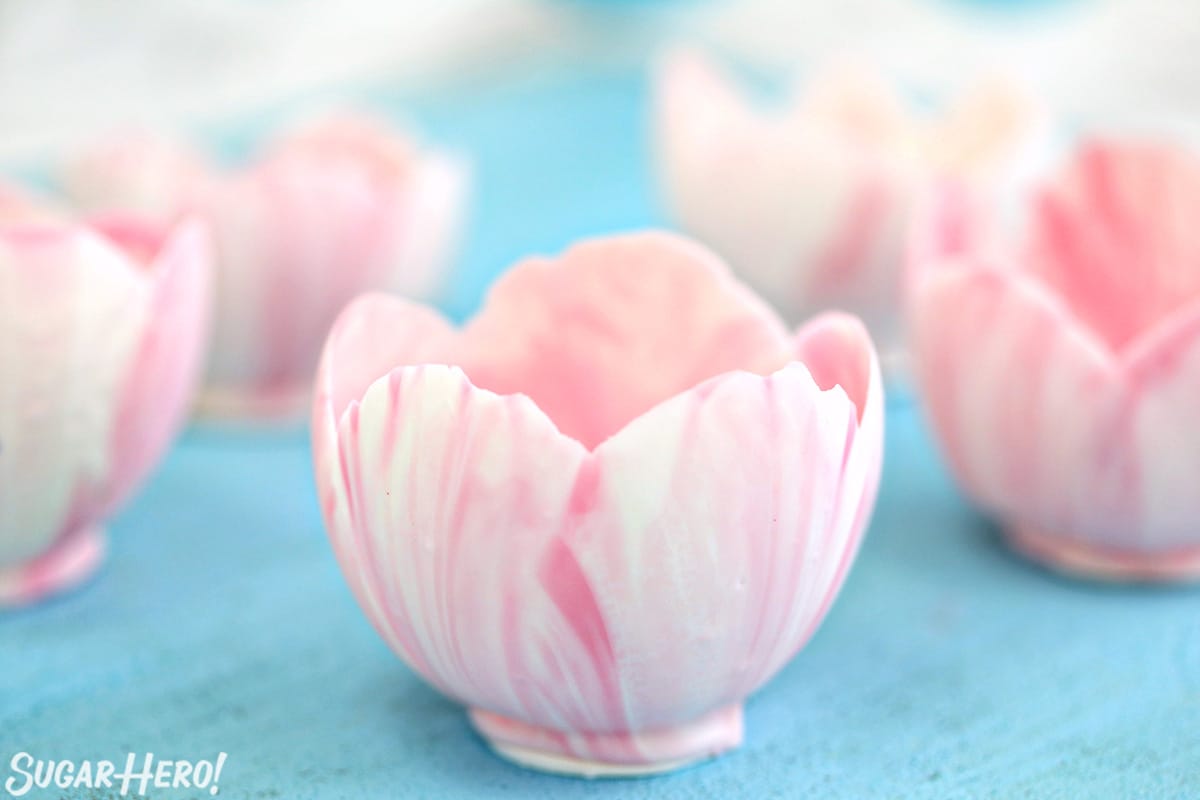
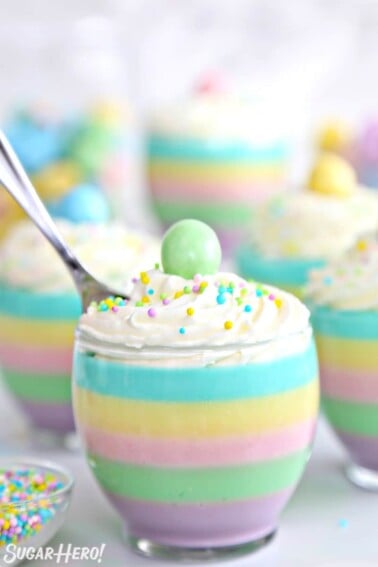
Desserts get a MAJOR upgrade when they’re served in these gorgeous edible “tulip” bowls! These dessert cups get their name from the delicate leaf shape of the edges, but don’t be fooled by their fancy appearance — they’re surprisingly simple to make. In fact, they’re made with water balloons, which is the exact opposite of fancy, so you know they can’t be too hoity-toity.
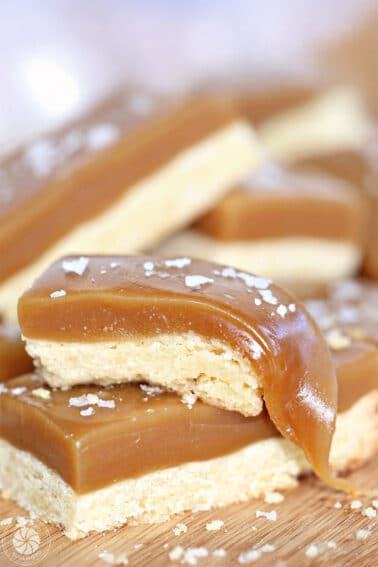
What can you do with chocolate bowls? Traditionally, they’re filled with soft desserts like ice cream, mousse, whipped cream, pastry cream, or pudding, but that’s just the beginning! How about making individual no-bake cakes in the bowls? Or filling them with luscious salted caramel? Heck, just toss some M&Ms in there for an instant party! They’re endlessly versatile and lots of fun to make.
More Edible Bowls
I love a good edible bowl! Don’t forget to try my Chocolate Cookie Ice Cream Cups and Layered Cookie Boxes (Recipe & Tutorial). Or, try these other variations of chocolate bowls: Mini Bundt-Shaped Cups and Mini Chocolate Cups.
Table of Contents
🧾 What You’ll Need
Ingredients & Equipment
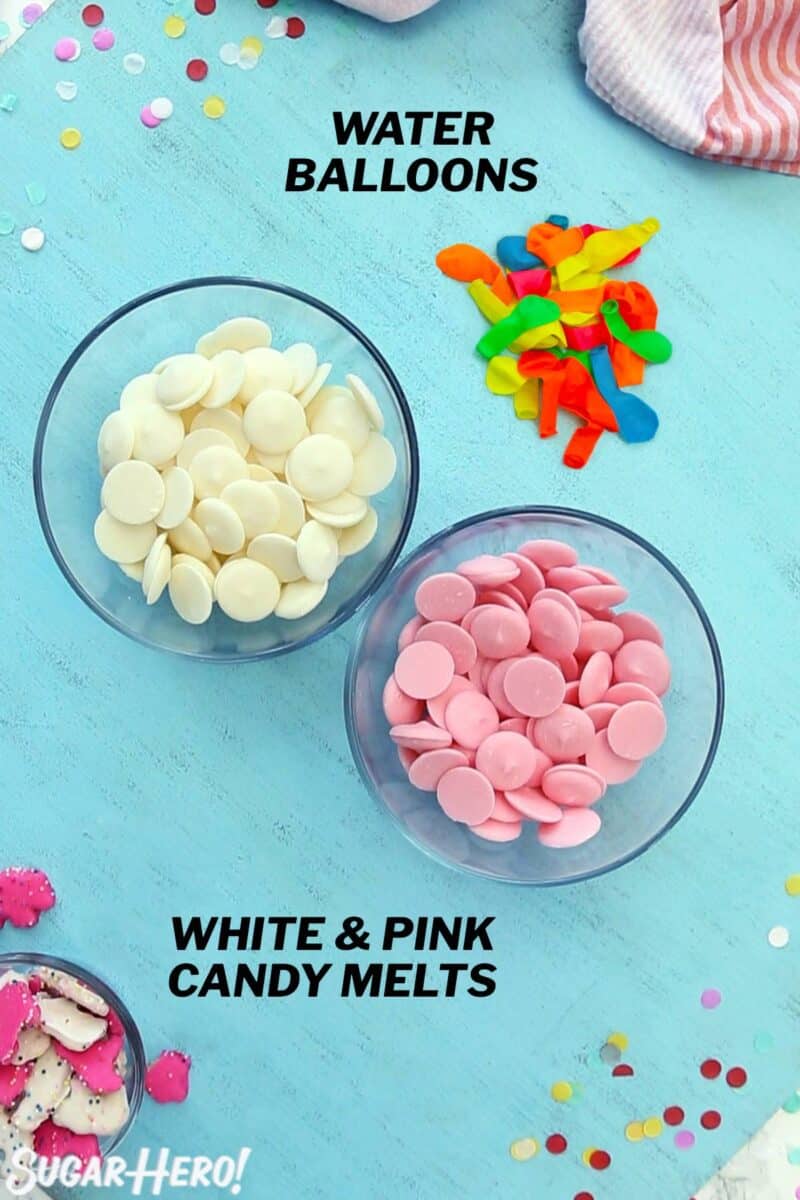
First step, gather your supplies! (Links are affiliate links and I earn a small commission from qualifying purchases.)
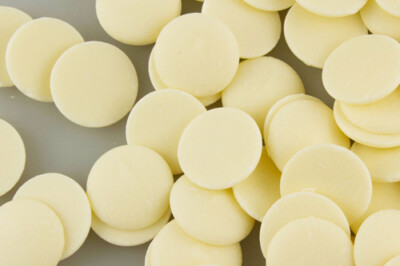
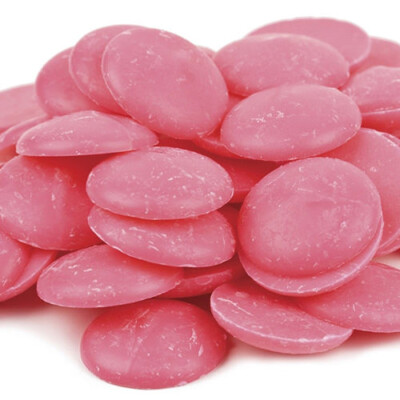
- Candy melts: These can be made with either candy coating or real tempered chocolate. To keep things simple this tutorial uses white candy melts and pink candy melts, but you can read more about using real chocolate in the Tips section below. You can make the bowls with one solid color of candy coating, or multiple colors if you want to create the swirled effect in the pictures.
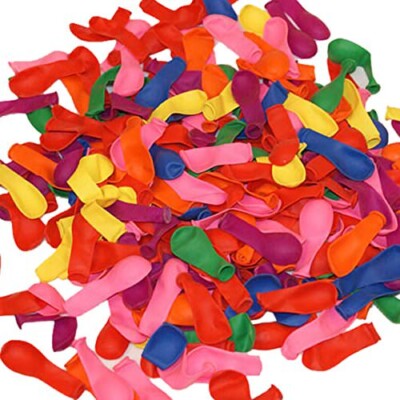
- Water balloons: Water balloons are the secret to making the bowl shape! Be sure that you use water balloons and not regular balloons — the small size is exactly the right shape, and simply half-inflating a regular balloon doesn’t work nearly as well.
- Cookie sheet and parchment paper: You’ll build the base of the bowls on a baking tray lined with parchment paper. Make sure that the tray you use can fit into your refrigerator.
❤️ What to Serve in a Chocolate Bowl
The sky’s the limit when it comes to deciding what to serve in your chocolate bowls, but if you need some recipe inspo, here are a few of our favorites:

Leave a Review!
If you make this recipe, let us know! Leave a ⭐️⭐️⭐️⭐️⭐️ rating on the recipe below, and leave a comment, take a photo and tag me on Instagram @elabau, or use #sugarhero on IG!
Chocolate Bowls
Ingredients
- 12 oz white candy coating melts
- 4 oz pink candy coating melts
- 10 water balloons
Instructions
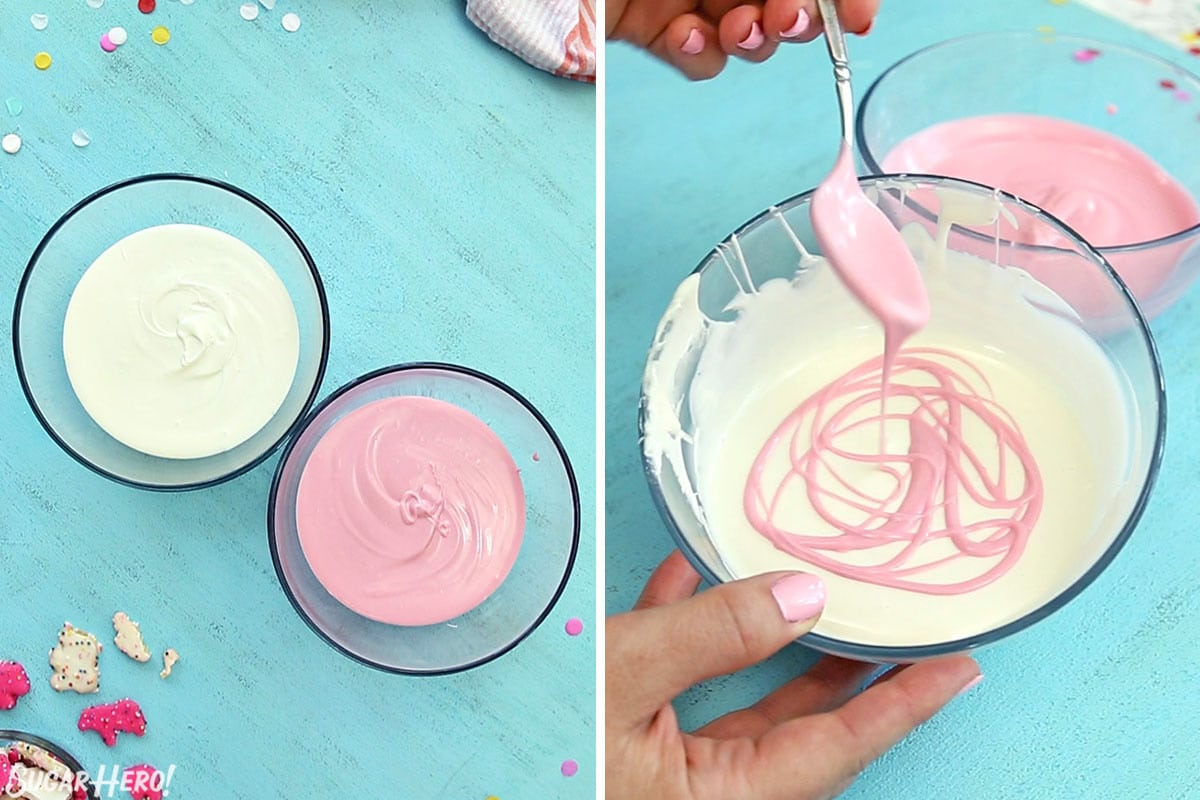
- Melt candy coating: Melt the white candy coating and the pink candy coating in separate bowls. Set them aside to cool to room temperature—they should still be melted and fluid, but not at all warm to the touch. (If the chocolate is too warm, the balloons will pop when you dip them! It's best to err on the side of being too cold than too hot.)
- Make circular candy bases: Line a baking sheet with parchment or waxed paper. Drop ten 1-inch circles of white coating on the paper, spaced several inches apart. Tap the baking sheet against the counter a few times so the circles level of with a flat top. These will be the bases for your chocolate bowls.
- Prep balloons: Blow up the water balloons and tie them off.
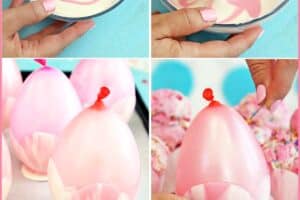
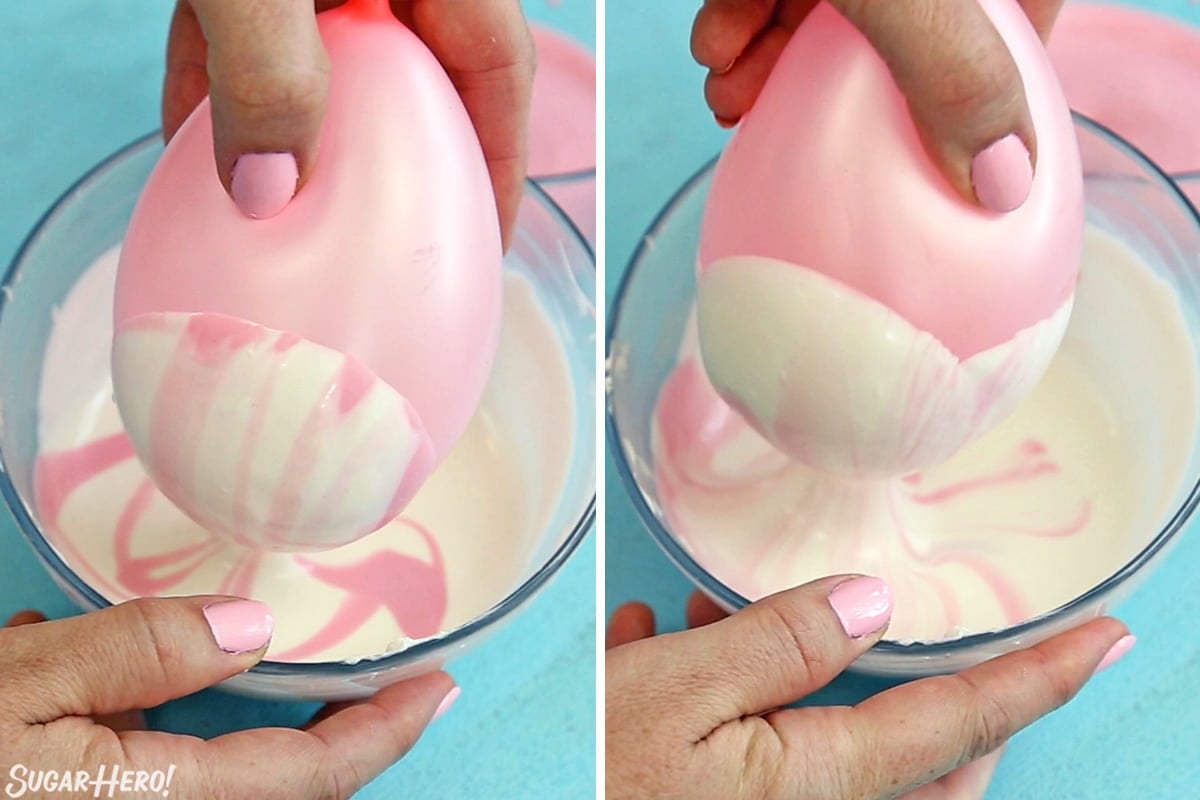
- Get ready to dip: Drizzle a spoonful of pink coating on top of the melted white coating in a random pattern. Hold a balloon by the top near the knot in one hand, and hold the bowl of coating in the other hand, tilted at an angle toward you.
- Dip balloon to make tulip shape: To get visible swirls, gently press the side of the balloon into the chocolate so that the chocolate comes about half-way up the side of the balloon in a semi-circle shape. Carefully pull the balloon out of the chocolate, then rotate it a bit to press another side into the chocolate, slightly overlapping the first, and creating a scalloped edge on top. Repeat, rotating the balloon, until all of the sides are covered with chocolate. I typically did 5 dips per balloon. Let any excess chocolate drip back into the bowl, then gently set the balloon down on one of the white chocolate circles you made.
- Repeat with remaining balloons: Before dipping each of the remaining balloons, drizzle another big spoonful of pink coating into the bowl. Repeat the dipping pattern as described above until each balloon has a tulip shape and is setting on a chocolate base. Note: If the coating gets too cool to work with, heat it up briefly, in 5-second spurts, just until it is workable again.
- Chill bowls: Once all of the balloons are dipped, refrigerate the tray to set the white chocolate bowls completely. The bowls should be very cold before attempting to remove the balloons.
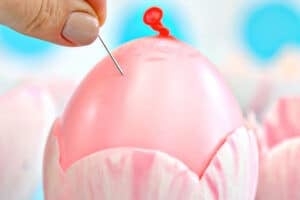
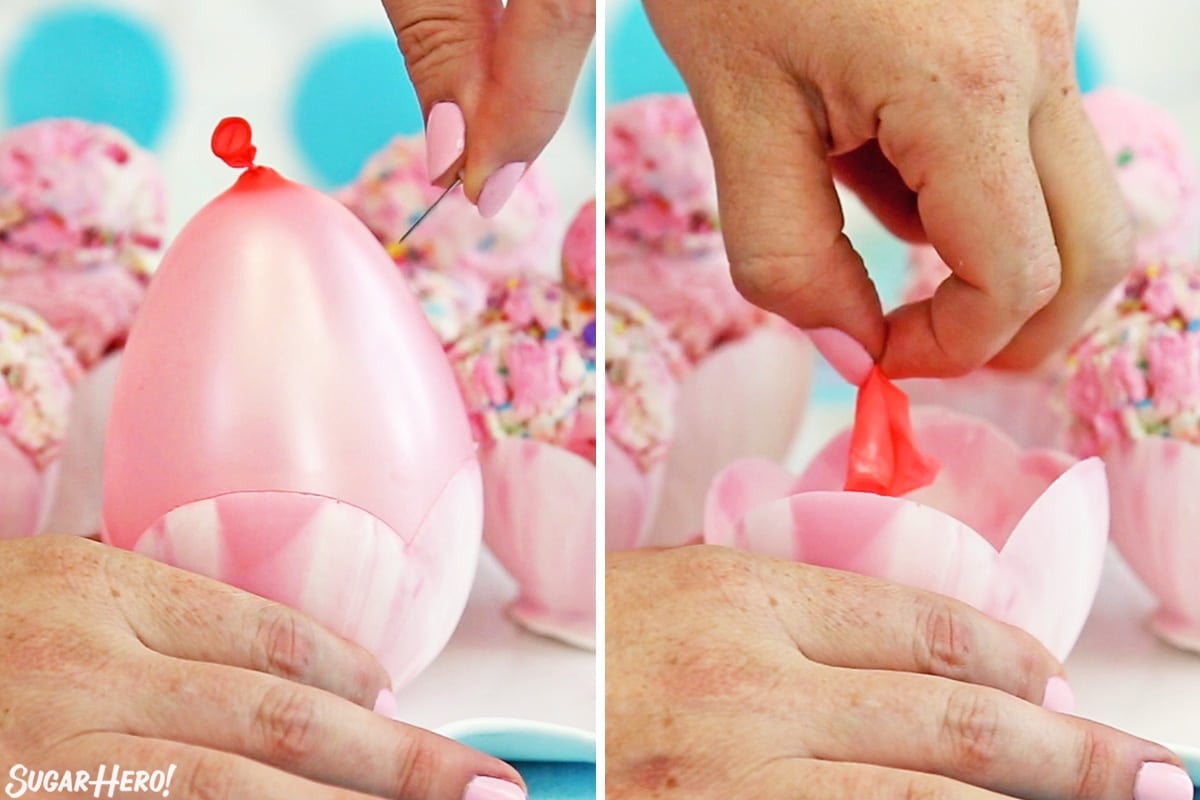
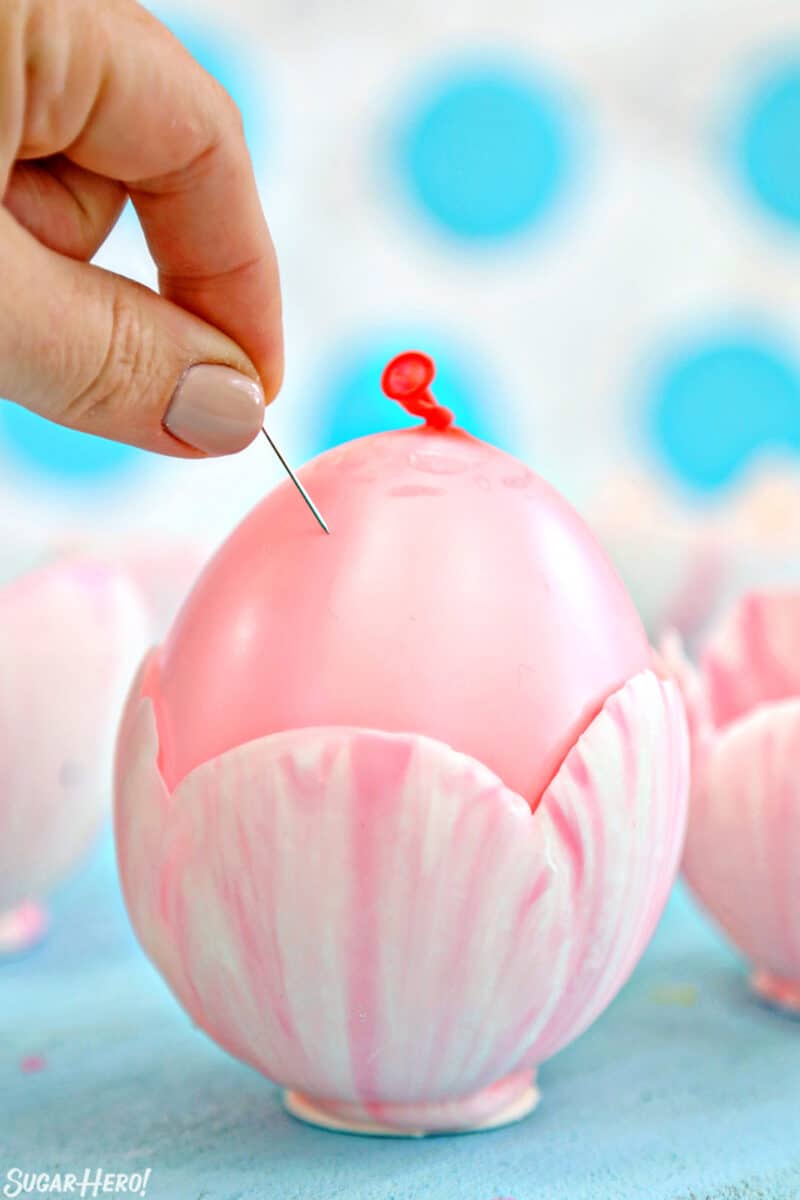
- Press and pop balloons: Press against the sides of the balloons, gently, to loosen them from the chocolate bowls, then pop the balloons with a sharp pin and pull out any balloons that cling to the white chocolate inside.Note: Removing the balloons is the hardest part of this recipe. If the balloons stick when you attempt to remove them, try chilling them for a longer amount of time to ensure they are cold all the way through. For extra stubborn balloons, don't forcefully remove stuck pieces. Let the bowl sit as it is at room temperature for 20-30 minutes. As time passes, the balloons often shrink away from the chocolate and actually peel themselves off. As the chocolate warms, you can also try to peel away any remaining pieces.
- Serve and enjoy: Fill them with ice cream, mousse, whipped cream, candies, or anything else you can dream up!
- Make-ahead: These bowls can be made several days, or even weeks, in advance. Just keep in mind that the longer they are stored, the more likely they are to get bumped, broken, or lose their shine.
- Storage: Store extra chocolate bowls in an airtight container in a dark, cool (not cold) place, so they don't get exposed to light or heat. You can also stack the bowls one on top of each other using muffin liners or coffee filters as separators to keep them from getting scuffed up. (Do not store them in the refrigerator; condensation will form and ruin the cups.)
Video
Measuring Tips
Our recipes are developed using weight measurements, and we highly recommend using a kitchen scale for baking whenever possible. However, if you prefer to use cups, volume measurements are provided as well. PLEASE NOTE: the adage “8 oz = 1 cup” is NOT true when speaking about weight, so don’t be concerned if the measurements don’t fit this formula.
Want to learn more about baking measurements and conversion?
Nutrition
📸Photo Tutorial: How to Make Chocolate Tulip Bowls
Ready to get started? Follow along to get familiar with all the steps. Full instructions are included in the recipe card above.
Melt the candy coating
- Melt candy coating in separate bowls: Melt the white candy coating and the pink candy coating in separate bowls.
- Cool: Set them aside to cool to room temperature—they should still be melted and fluid, but not at all warm to the touch.
- Drizzle a little pink on the white: When they’re at the right temperature, drizzle some pink coating on top of the bowl of white. Do not stir it in.
Dip the balloons
- Press one side of the balloon into the candy: Hold a water balloon at the top, and gently press the side of the balloon in chocolate, so that the chocolate comes about half-way up the side of the balloon in a semi-circle shape.
- Pull up, rotate, dip again: Pull the balloon out of the chocolate, then rotate it a bit to do a second dip, slightly overlapping the first.
- Repeat until balloon bottom is coated: Repeat, rotating the balloon, until all of the sides are covered with chocolate. My balloons were dipped 5 times, resulting in a bowl with 5 chocolate petals.
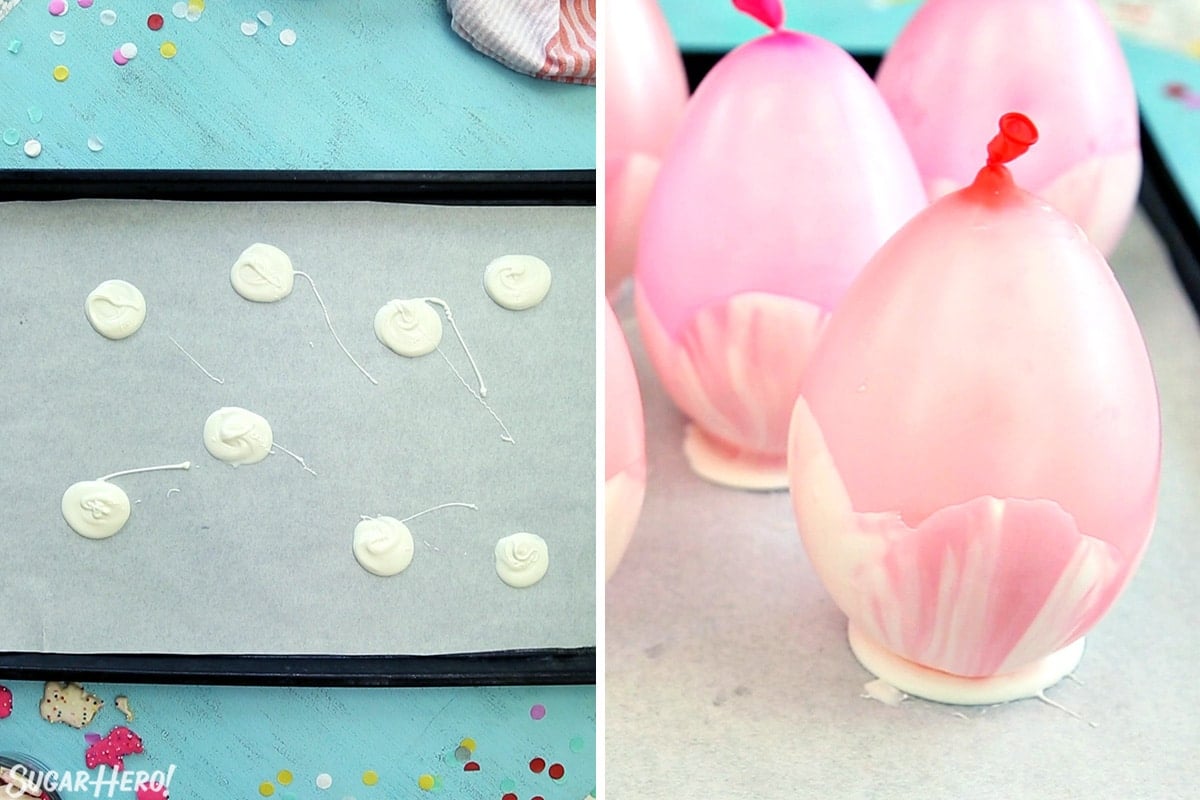
- Make candy bowl bases: Dollop small spoonfuls of candy coating on a parchment-covered baking sheet, and set the dipped balloon down on one of the circles — this base helps with the bowl’s stability.
- Finish dipping remaining balloons: Before dipping each remaining balloon, drizzle another big spoonful of pink coating into the bowl, then follow the dipping process above until each bowl has 5 petals. Place dipped bowls on candy bases, and place the tray into the refrigerator. The bowls will be fully set when they are very cold to the touch.
Remove the balloons
- Press and pop balloons: Gently press against the sides of the balloons, carefully loosening them from the chocolate bowls. Then pop the balloons with a sharp pin.
- Remove remaining balloon pieces: Carefully pull out any balloons that cling to the white chocolate inside. See Tip section for more help with stubborn balloons.
💡Tips and FAQs for Success
- Check the temperature: It’s a balancing act to keep the candy melts at the right temperature. Too cool and it’s hard to work with, too warm and it will pop your balloons! I recommend erring on the side of too cool, and if it does become hard to work with, warm it up in short spurts at half power in the microwave just until it is fluid again.
- Using real chocolate: YES you can use real chocolate instead of candy melts! However, your chocolate should be tempered and not just melted. Tempered chocolate hardens at room temperature and has a beautiful shine and snap. Untempered chocolate is dull, streaky, and soft at room temperature — not ideal for chocolate bowls!
- Use water balloons: I cannot stress this enough. Using regular (large) balloons does not work well and will be frustrating and difficult. See the FAQs below for more information about choosing the right balloons.
- Add flavoring: If you want to flavor your chocolate cups, use an oil-based flavoring (not extracts, which are water-based) so the chocolate or candy coating doesn’t seize.
- Avoid water: Water and chocolate do NOT mix! Make sure that the bowl you use to melt the chocolate or coating is completely dry, and do not get any stray drops or splashes in the chocolate. If you do, it might seize and become an unworkable clump.
Water balloons become weaker and more brittle the older they get. Make sure to buy fresh, new balloons when attempting this project. I also recommend buying higher quality balloons. Really cheap brands tend to be weaker and thinner than more expensive brands. That being said, you can check all those things and still not know how long the balloons have been sitting on the shelf at the retailer. If you’re struggling with the water balloons, try another brand or try purchasing from a different retailer to see if that makes a difference.
For those who have a latex allergy, or just want to avoid using water balloons, you have a few options. The easiest/cheapest would be to use foil muffin cups. Paint the inside of the cups with melted chocolate (using this tutorial) and once it’s hardened, peel the liners away to reveal chocolate cups.
Other options would be using a silicone bowl mold, or using a half-sphere cocoa bomb mold to form the bowls.
Removing the balloons is definitely the hardest part of this recipe. They occasionally stick when you attempt to remove them and there are a couple things I’ve found that help this process: make sure the chocolate is very chilled when removing the balloons. For stubborn balloons, try leaving them as they are for 20-30 minutes. Often, I find that as time goes on the balloons shrink from the chocolate and actually peel themselves off.
You can look to the candy melts or chocolate you used for a specific best-by date, but as a general rule, candy melts and chocolate will be good for at least a year from purchase. The trickier aspect is keeping the chocolate bowls in good aesthetic condition, since they are prone to scuffing, losing their luster, or changing due to temperature fluctuations if stored for an extended period of time.
Cool and dark is the name of the game when it comes to chocolate! Store extra chocolate bowls in an airtight container in a cool (but not cold!) and dark place, so they don’t get exposed to light/heat. Avoid refrigerators, which are usually humid and will cause condensation to develop. You can stack them on top of each other using muffin liners or coffee filters as separators to keep them from scuffing each other. If you are just making them a few days in advance you don’t have to take as many precautions, just avoid refrigeration and hot temperatures.


Don’t miss the step-by-step tutorial showing how to make Chocolate Bowls – check out the web story here!


These are fabulous! Very easy to make but everyone will think it took hours.
Yes! These are an easy showstopper . . . all the glory without breaking a sweat. Thanks for commenting Andrea.
These are gorgeous, colorful, and so tasty! The adults loved them just as much as the kids, haha.
I know, right? Thanks Dana!
I never knew how to make these adorable cups. How easy!! Thank you.
Hi Luci! Thanks for commenting. They really are super simple to make. Hope you enjoy!
What a fun idea! I’m definitely going to make these for a bridal shower I’m hosting in a few months! I’m sure these are going to go great on the ice cream bar!
Hello Kerri! An ice cream bar sounds so fun. What a great idea for a bridal shower. Thanks for commenting!
Wow so pretty looking. We made these to hold chocolates at a baby shower and everyone was impressed
Way to go Nancy! What a fun way to use the chocolate bowls. Glad this worked out so well for you.
I don’t consider balloons to be sanitary and wouldn’t mold anything to be eaten on them.
Fair enough, it’s definitely up to personal preference. I give a few suggestions for balloon alternatives in the FAQ section that you might find helpful!
Big fail! Water balloon adheres to the chocolate and won’t peel off after popping when chocolate set.
Hi Angeline, I’m sorry to hear the recipe gave you trouble. This does happen occasionally and there are a couple things I’ve found that help: make sure the chocolate is very chilled when removing the balloons. And for stubborn balloons, try leaving them as they are for 20-30 minutes. I find that often, as time goes on, the balloons shrink from the chocolate and kind of peel themselves off. I will update the post to add these tips as I imagine there are others who might have had the same experience. Please let us know how it goes if you end up giving it another try in the future.
These tulip cups do not work. The balloons break EVERY time! I’m an experienced cook and thought this would be easy. Chocolate melts everywhere from burst balloons. Even got as far as sitting one on the tray, turned around and it popped. No the chocolate wasn’t too hot. Looks good but doesn’t work. Yes, I used water balloons.
Hi Wendy. I’m so sorry that you had trouble with the recipe. I know how frustrating that can be. It looks like you did some troubleshooting with the temperature of your chocolate and the size of the balloons. There are tips for success and some FAQs on the blog post that might give you some more ideas of where the problem is. Really sorry for your troubles and wish you the best.
I’m planning on using these for chocolate mousse. Can I add the mousse the night before serving (keeping them in the refrigerator until serving)?
Yes, that should be fine! The bowls might develop a bit of condensation on the outside as they sit at room temperature, but that’s just a small cosmetic matter. Filling these with mousse sounds delicious! Please come back and let us know how they turn out.