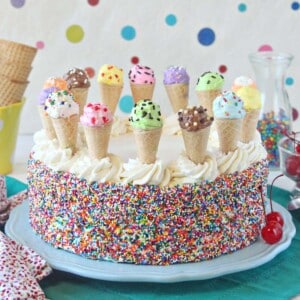
This Ice Cream Sundae Cake is so sweet and charming! Layers of brownies and ice cream filled with cherries, peanuts and waffle cone pieces are topped by tiny ice cream cones; it’s the perfect treat for birthdays or special celebrations.

Quick! Name the summeriest thing you can think of. Sand-crusted weekends at the beach? Long, sticky days at the pool working on your skin cancer tan? Frosty drinks beneath a palm tree? Hearing that horrible Iggy Azalea song one too many times and throwing your radio across the room in disgust? All good answers, but ***EEEEHHHHNNNN!*** (That was me making an obnoxious buzzer noise.) The correct answer is actually this:
This sundae-flavored ice cream cake, topped with miniature ice cream cones, is in fact the is the summeriest summer thing that ever summered. Ice cream! Filled with cherries and peanuts and waffle cone pieces! Topped with sprinkles and whipped cream and wee little ice cream cones! Take THAT, Iggy Azalea. Who’s fancy now?

This cake is a love letter to six-year-old me, who would have gone out of her MIND at the sight of this.

I mean, the ice cream center is one thing. A rich, creamy vanilla ice cream, studded with cherry pieces, peanuts (I used honey-roasted), and bits of waffle cone, is exciting enough. But when you combine that with a fudgy brownie, plenty of vanilla whipped cream, and a boatload of sprinkles? Pretty sure Young Liz would have passed out with excitement.

Oh, and the Lilliputian-sized ice cream cone decorations? That’s for Adult Liz, who never met a cake she didn’t want to garnish with other teensy desserts. I first found these tiny cones at a cake supply store, and my hands, independent of my mind, shoved them in my cart faster than I could think about it. I didn’t know what I was going to do with them, but I knew they needed to be mine. My heart beats fast for miniature desserts—if it’s a sickness, I don’t want to know the cure.

The cones are actually filled with colored buttercream. I may be crazy, but I’m not crazy enough to buy eight different types of ice cream to use a few tablespoons of each! I colored the frosting different colors and used a small candy scoop to plop scoops of it on top of the cones. A quick pinch of various sprinkles, a chill in the fridge, and they were ready to garnish my ice cream cake. I didn’t go so far as to flavor them to match their colors (see above re: low-level crazy pants) but you totally could if you want to go the extra mile!

One word of caution: although I made this with two layers of brownies, I would recommend actually only using one, on the bottom. The top brownie made it very hard to cut neat slices when the cake was completely frozen, and letting it defrost slightly led to messy slices and crying food bloggers. (Exaggerating…only slightly.) Plus, it’s just too much brownie and not enough ice cream! So do as I say, not as I do, and content yourself with one lovely brownie on the bottom, and lots of ice cream and whipped cream on top. You (and your biceps) will thank me. Happy summering!

🍦More Frozen Dessert Recipes

Birthday Present Mini Cakes

Striped Buttercream Balloon Cake
Ice Cream Sundae Cake
Ingredients
For the Brownie Layer:
- 5 oz unsalted butter
- 10.5 oz granulated sugar, (1 1/2 cups)
- 3 oz unsweetened cocoa powder, (1 cup)
- 2 large eggs, cold
- 1 tsp vanilla extract
- 1/2 tsp salt
- 2.25 oz all-purpose flour, (1/2 cup)
For the Ice Cream Layer:
- 16 oz heavy cream, (2 cups)
- 8 oz milk, (1 cup)
- 7 oz granulated sugar, (1 cup)
- Pinch of salt
- 5 large egg yolks
- 2 tsp vanilla paste, or 1 tbsp vanilla extract
- 2 oz maraschino cherries, (1/3 cup), patted dry
- 2 large waffle cones, coarsely chopped
- 2.5 oz peanuts, (1/2 cup), coarsely chopped
To Decorate:
- Miniature ice cream cones
- 2-3 cups buttercream frosting, homemade or store-bought
- Assorted gel food coloring
- 20 oz heavy cream, (2 1/2 cups)
- 3.5 oz powdered sugar, (1/2 cup)
- sprinkles
Instructions
To Make the Brownie Layer:
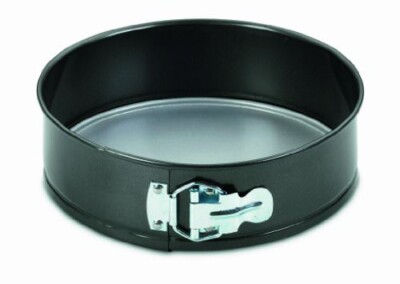
- Preheat the oven to 325 F, line a 9-inch springform pan with parchment, and spray it with nonstick cooking spray.
- Combine the butter, sugar, and cocoa powder in a large microwave-safe bowl, and microwave in 45-second increments, two or three times, until the butter is melted and the mixture is hot. When you stir it, it should be shiny but still grainy. Let it cool until it is warm but not hot.
- Add the eggs one at a time, mixing them in with a spatula, stirring well, then add the vanilla extract. Finally, add the salt and flour and stir them in until no flour streaks remain. Scrape the batter into the prepared pan and smooth into an even layer. Bake at 325 for 30-35 minutes, until a toothpick inserted into the center comes out with just a few moist crumbs attached. Cool completely before assembling the cake.
To Make the Ice Cream Layer:
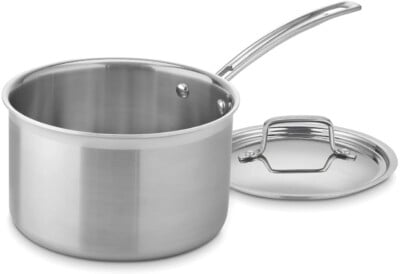
- Combine the cream, milk, sugars, and salt in a medium saucepan over medium heat. Put the egg yolks in a medium bowl nearby and whisk them gently. Bring the milk/cream mixture to a simmer, then when it just starts to come to a boil, remove the pan from the heat. Whisk the egg yolks while you slowly pour in about a third of the hot cream mixture, whisking constantly so the eggs heat up but don’t cook during the process.
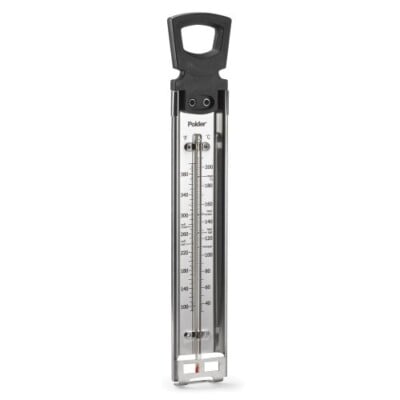
- Now return the saucepan to the heat and start whisking the cream while you pour in the hot egg mixture. Continue to whisk as the custard cooks, and cook it until it thickens slightly and coats the back of a spoon. If you want to use a candy thermometer, you’re shooting for 175 F (80C).
- Take the pan from the heat and strain the ice cream custard through a fine mesh strainer into a bowl. Whisk in the vanilla paste or extract, then continue to whisk occasionally as it cools. Once at room temperature, press a layer of cling wrap on top of the custard and refrigerate it until it’s completely chilled. (To speed up the process, you can place the bowl over an ice bath and whisk it as it cools down.)
- Once the custard is fully chilled, churn the ice cream according to your ice cream maker’s instructions. Once it reaches soft-serve consistency, stop the machine and stir in the cherries, waffle cone pieces, and peanuts.
- Remove the brownie from the pan and line the pan with cling wrap extending up and over the sides—this will make it much easier to remove the ice cream cake later. Place the brownie back in the bottom of the pan. Scrape the ice cream on top of the brownie and smooth it into an even layer. Freeze for at least 3-4 hours, or overnight, so that the ice cream is very firm before decorating.
To Decorate:
- To make the mini ice cream cones, take an empty cereal box or similar, lay it on its side, and cut evenly spaced Xs across the top—this will be used to hold your ice cream cones after they are decorated.
- Divide the buttercream up into small bowls, with a few scoops of frosting per bowl, and dye it different colors to represent different flavors of ice cream. (You can also add a few drops of flavoring extract if you’d like!) Use a small 1-inch candy scoop to scoop the frosting into balls and place it on the miniature ice cream cones. Add a pinch of sprinkles on top, if you’d like, and slide the cone into one of the X’s you cut in the box. Continue until you’ve made all the cones you need. These can be made several days in advance and kept in the refrigerator, if desired.
- When you’re ready to decorate the cake, combine the heavy cream and powdered sugar in the bowl of a large stand mixer fitted with a whisk attachment. Whip on medium-high speed until stiff peaks form. Note that ice cream cakes start to melt quickly, so during the decorating process, you may need to return the cake to the freezer periodically between steps. Don’t be shy about freezing it mid-decorating session–it’s better to err on the side of caution than to push it and end up with a melting cake that’s only partially decorated!
- Unclasp the sides of the springform pan, remove the cake from the pan and peel off the plastic wrap. Place the cake on a cardboard cake round. Spread a thick layer of whipped cream on top of the cake and around the sides. Pour your sprinkles into a shallow bowl or pie tin, and holding the cake in one hand above the bowl, use your other hand to grab a handful of sprinkles and press them into the sides of the cake. Place some whipped cream into a piping bag fitted with a large star tip, and pipe a ring of rosettes all around the top edge. Return the cake to the freezer to freeze the whipped cream before adding the mini ice cream cones.
- Once the whipped cream is solid, press the miniature ice cream cones into the tops of the whipped cream. (I didn’t have a problem with them standing upright, but if you do you can always rest them at an angle on the rosettes instead.)
- For the cleanest cuts, cut the cake when it is fresh from the freezer—it will be a little difficult to cut through the bottom brownie layer, but it’s neater than trying to cut a partially defrosting cake! I think the slices taste best after about 5 minutes out of the freezer, when the ice cream and brownies have had a chance to soften a bit. Wrap any leftovers with plastic wrap and store in the freezer.
Recipe Notes
Measuring Tips
Our recipes are developed using weight measurements, and we highly recommend using a kitchen scale for baking whenever possible. However, if you prefer to use cups, volume measurements are provided as well. PLEASE NOTE: the adage “8 oz = 1 cup” is NOT true when speaking about weight, so don’t be concerned if the measurements don’t fit this formula.
Want to learn more about baking measurements and conversion?
Nutrition
This post contains Amazon affiliate links. For more information, see my Affiliate and Advertising Policy.


i love it taste so good
I am making similar cake (no ice cream) How long will cones last in cake with buttercream before they soften & fall over?
Hi Michelle, it depends on a lot of things, including what frosting recipe you use–some can be quite soft/moist while others are very stiff and don’t give off as much liquid. One thing you could do is fill the inside of the cones with melted chocolate. This would give them a lot of stability and even if the cones themselves softened, they should still stay upright.
Can this be made without the cherries ?
Definitely! You can customize it however you’d like–the cherries are optional. 🙂
I wanted to make this in advance for my sons 3rd bday. Can I freeze it?
Hi Katie! Yes, you can freeze this cake if you are wanting to make it in advance! Happy baking 🙂