


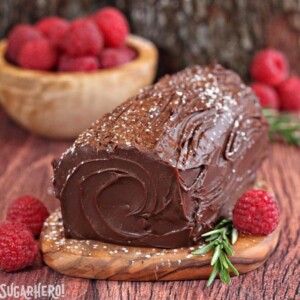
This rich Flourless Chocolate Bûche De Noël has the light and airy texture of a baked chocolate mousse wrapped around a filling of freshly whipped cream. It’s decorated with chocolate ganache and festive edible decorations for a beautiful presentation.

🪵 A Gorgeous Yule Log Cake
One dessert I look forward to baking every December is a yule log cake. Also known as a bûche de noël, this classic French delicacy traces back to the 19th century. For many families, including mine, this is a must-bake for Christmas.
Traditional yule log cakes are made from a genoise cake or springy sponge rolled around a filling, and then decorated to look like yule logs. Don’t get me wrong, I love traditional bûche de noël, but I also love experimenting! In past years I’ve played with different flavors, like this Peanut Butter Cup Yule Log, and different sizes, like these no-bake, Mini Bûche de Noël.
This recipe is also a bit different than a classic yule log–and dare I say, better!–because it uses a flourless chocolate cake that tastes more like a baked mousse in flavor and texture. It’s rolled around a sweetened vanilla whipped cream, and then covered with rich chocolate ganache and natural looking edible decorations like Meringue Mushrooms. Each bite is super light and airy; the cake practically melts in your mouth.
Table of Contents
🧾 What You’ll Need

Ingredients
You’ll likely have many of the ingredients needed for this cake on hand, but you’ll want to plan ahead for the decorations. Check out these helpful tips as you gather your ingredients. (Links are affiliate links and I earn a small commission from qualifying purchases.)
For the Chocolate Ganache
- Semi-sweet chocolate: For the best flavor, use a high-quality, flavorful semi-sweet chocolate.
- Heavy whipping cream: Gives the ganache its rich, creamy texture and flavor.
- Unsalted butter: Use room temperature butter so that it melts easily into the ganache.
For the Chocolate Cake
- Sugar: Use granulated sugar to sweeten the cake. Take note that it will be divided and used in two separate recipe steps.
- Large eggs: Make sure you use large eggs (not medium or extra large). You’ll need to separate the eggs into whites and yolks. Check out my egg separating tutorial if you need more help with this.
- Vanilla extract: A touch of vanilla extract adds depth to the chocolate flavor.
- Semi-sweet chocolate: Use a brand you enjoy to give the cake rich flavor. Make sure to chop the semi-sweet chocolate into small pieces so that it melts more easily.
- Cream of tartar: This is a crucial ingredient when making a flourless cake. Cream of tartar helps to stabilize the whipped egg whites so they form stiff peaks. When the whipped egg whites are added to the batter and baked, they give the sheet cake its soft, airy texture.
- Cocoa powder: Although not technically an ingredient for the cake, you will need cocoa powder to help prepare the pan for baking and the cake for cooling. In both cases the cocoa powder helps to prevent the cake from sticking. You can use either natural cocoa powder or alkalized cocoa powder — both will both work.
For the Whipped Cream Filling
- Heavy whipping cream: Keep your heavy whipping cream very cold until it’s time to whip it. This helps the cream to whip up faster and fluffier.
- Powdered sugar: Powdered sugar adds a bit of sweetness, and the cornstarch in the sugar helps to thicken the whipped cream.
- Vanilla extract: For flavor!
- Ground cinnamon: This is optional, but I like adding a touch of ground cinnamon in this recipe to make it a bit more warm and cozy.
To Decorate
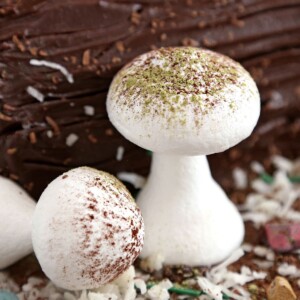
- Meringue mushrooms: Meringue Mushrooms are a very traditional yule log decoration. Head over to the my meringue mushroom recipe and tutorial to learn how to make them! They will require some advance preparation, so if you are short on time, you can use other decorations to complete your bûche de noël.
- Other natural looking decorations: Tap into your creativity to make natural looking decorations with ingredients you have available.
- Use cocoa powder to add texture to the log or non-melting powdered sugar for the appearance of snow.
- Line the serving plate with chocolate shavings or green coconut shreds to make it look like the forest floor.
- Make leaves and berries with piped frosting or a sprig of rosemary and fresh cranberries.
- To finish the look, sprinkle chocolate rocks or other edible nature decorations around the yule log as desired.

Equipment
It’s important to have the right tools on hand when making something as beautiful as a French yule log cake! (Links are affiliate links and I earn a small commission from qualifying purchases.)
- Small saucepan: You’ll need a small saucepan to heat the cream for the ganache. This can also be useful in the chocolate melting step if you don’t have a microwave. If that’s the case, you can melt the chocolate in a heatproof bowl over a saucepan of simmering water.
- Plastic wrap: To prevent the ganache from forming a thick film as it cools, you’ll need plastic wrap to press along its surface.
- Baking sheet: It’s really important to use the correct pan size when making this cake. You need a 17×12″ (43x30cm) baking pan, at least 1″ deep. This type of pan is also known as a half sheet baking pan and is commonly used for baking cookies.
- Foil or parchment paper: I recommend using non-stick foil to line your baking sheet, or you can also use parchment paper.
- Baking spray: Sheet cakes are notorious for sticking to the pan, so I suggest spraying the foil/parchment and the edge of the baking sheet with non-stick baking spray. If possible, use a baking spray with flour already in it.
- Mixer: Although you can use a hand mixer to make this cake, it will be easier and faster if you use a stand mixer with a whisk attachment. It’s also very helpful to have a silicone spatula on hand to scrape down the sides of the bowl.
- Tea towel: While the cake cools, you’ll want to take steps to prevent it from drying out. Placing a slightly damp cotton tea towel over the cake works perfectly.
- Wire rack: To encourage faster cooling, I set my hot cake on a wire rack so that air can circulate around the entire pan.

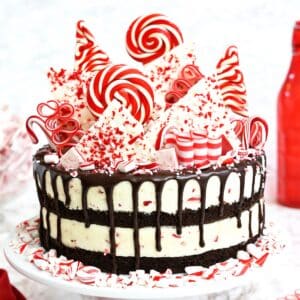
🎄 More Christmas Cakes


Leave a Review!
If you make this recipe, let us know! Leave a ⭐️⭐️⭐️⭐️⭐️ rating on the recipe below, and leave a comment, take a photo and tag me on Instagram @elabau, or use #sugarhero on IG!

Flourless Chocolate Bûche De Noël
Ingredients
For the Chocolate Ganache
- 10 oz semi-sweet chocolate, (1 ⅔ cups), good-quality, chopped in small pieces
- 12 fl oz heavy cream, (1 ½ cups)
- 2 tbsp unsalted butter, softened
For the Chocolate Cake
- 2.6 oz granulated sugar, (1/4 cup + 2 tablespoons, divided use)
- 6 large eggs, separated
- 1/2 tsp vanilla extract
- 4 oz semi-sweet chocolate, (⅔ cup), good-quality, chopped in small pieces
- 3/4 tsp cream of tartar
- Unsweetened cocoa powder, to sprinkle over greased baking sheet and cooling cake
For the Whipped Cream
- 8 fl oz heavy cream, (1 cup)
- 0.75 oz powdered sugar, (⅓ cup)
- 1 tsp vanilla extract
- 1/2 tsp ground cinnamon
To Decorate
- Meringue mushrooms
- Other edible nature decorations, Such as chocolate shavings, chocolate rocks, cocoa powder, powdered sugar, coconut, etc., optional
Instructions
Make the Chocolate Ganache
- Chop the chocolate into small pieces and place it in a large bowl. Place the softened butter on top. Set aside.
- Put the heavy cream in a saucepan over medium-high. Heat until it simmers and bubbles appear along the sides of the pan, but do not bring it to a boil.
- Pour the hot cream over the chopped chocolate and whisk it together until the chocolate melts and the mixture is shiny and smooth.
- Cover with cling wrap, pressing down until the plastic is touching the top of the ganche. Allow it to firm up to a spoonable consistency (like peanut butter) by setting it out for 1-2 hours at room temperature (overnight is even better).
- Or, to firm the ganache faster, place it in the refrigerator and whisk every 15 minutes until it has a spoonable consistency. Do not leave it in the fridge too long, or it will get hard! If it accidentally gets too hard, let it rest at room temperature (or microwave briefly), then stir until the consistency is spreadable again.
Make the Chocolate Cake
- Preheat oven to 350°F (180°C) and place the oven rack in the center of the oven. Use a non-stick baking spray or butter to grease a 17×12-inch (43x30cm) baking pan. Line the pan with foil or parchment paper, spray it well with baking spray, and then sprinkle liberally with cocoa powder to help prevent sticking.
- While the eggs are still cold, separate the eggs, placing the whites in one bowl and the yolks in another. Cover with a lid or plastic wrap, and bring to room temperature before using (about 30 minutes).
- Meanwhile, melt the chocolate in a microwave-safe bowl in 30 second increments, stirring well between each, until smooth. Remove from microwave and cool. (Alternately, melt the chocolate in a heatproof bowl placed over a saucepan of simmering water, stirring occasionally until smooth. Remove from heat and cool.)
- Place the egg yolks and 1/4 cup of sugar in the bowl of a stand mixer fitted with a whisk attachment (or use a hand mixer) and beat them on medium-high speed to reach the “ribbon stage" (about 5 minutes). See Note below.
- Mix in the vanilla extract and scrape down the sides of the bowl. Then add the cooled, melted chocolate and beat until just combined. Set aside.
- In a clean mixing bowl, with the whisk attachment, beat the egg whites until foamy. Add the cream of tartar and beat at medium-high speed until soft peaks form. Gradually beat in the remaining 2 tablespoons sugar until stiff peaks form. See Note below.
- Gently fold a small amount of egg white mixture (about ¼ cup) into the chocolate egg yolk mixture using a rubber spatula or whisk. Once incorporated, fold in the remaining whites just until combined. Don’t over mix or the batter will deflate.
- Spread the batter evenly into the prepared pan. Bake until the cake is puffed, has lost its shine, and springs back when gently pressed, about 15-17 minutes.
- Remove from the oven and sprinkle the top generously with cocoa powder. Then cover the cake with a clean, slightly damp tea towel to keep the cake moist. Place the covered cake on a wire rack to cool to room temperature (approximately 30-45 minutes).
Make the Whipped Cream
- In a clean mixing bowl fitted with a whisk attachment, beat together all the whipped cream ingredients until the cream starts to hold firm peaks. Be careful not to whip past firm peaks or the cream will curdle and look more buttery with a chunky texture.
- Cover the filling and refrigerate until you're ready to assemble the cake.
Assemble the Bûche De Noël
- Once the cake has fully cooled, remove the towel and gently spread the whipped filling over the surface of the cake.
- The cake can be rolled in the pan it was baked in or on a flat surface. (If you remove the cake from the pan, use the excess foil like handles to lift it from the pan in one piece.) Gently roll the cake, peeling off the foil or parchment paper as you roll. Don't worry if the cake cracks a little, it’ll be covered with ganache and other decorations.
- Trim one end of the cake at an angle and set it aside. Then place the cake, seam side down, on your serving platter. Take the reserved slice and place it on top of the cake to resemble a branch growing off the log.
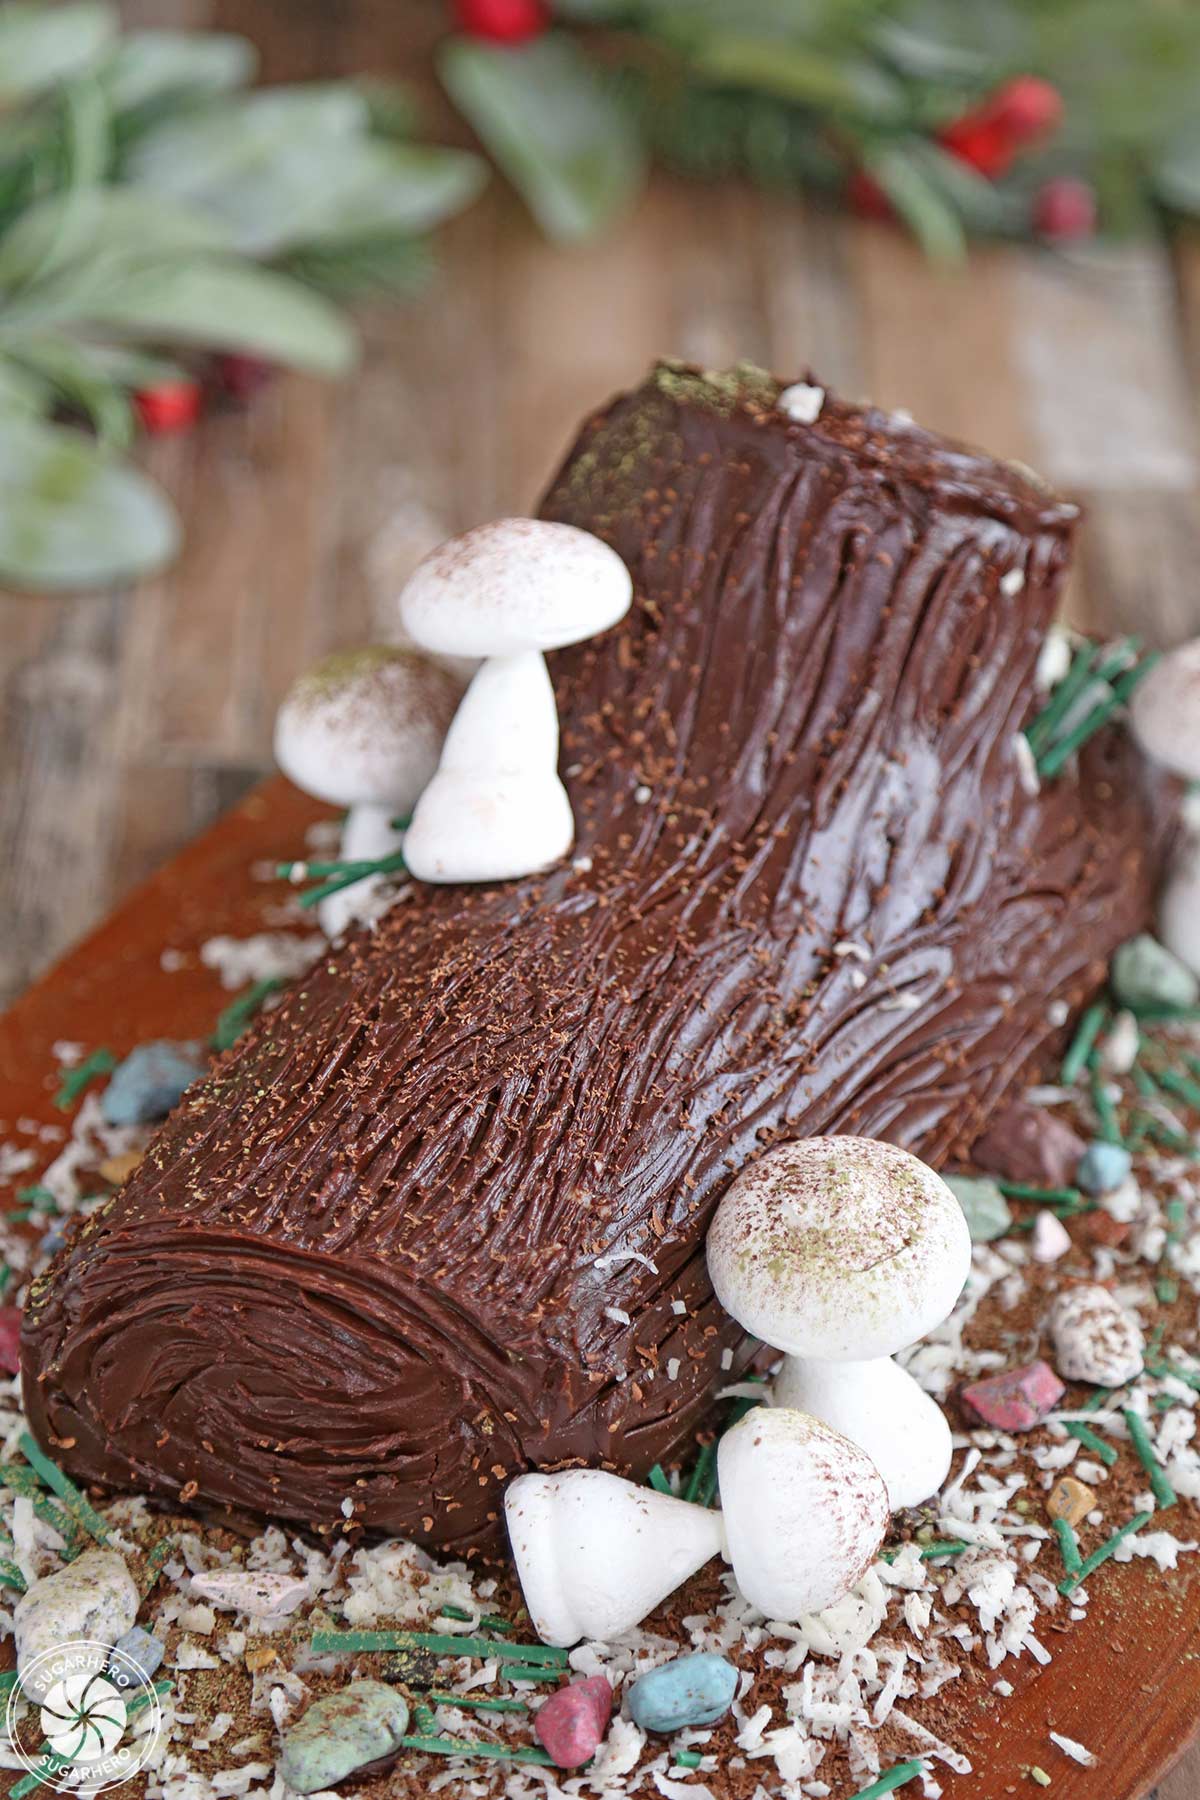
- Gently spread the ganache over the outside of the cake. Once it's completely covered, use a spatula or a fork to create waves and texture in the ganache to resemble tree bark.
- For the best results cutting the cake, refrigerate it for 30 minutes to firm up slightly. If you are short on time the cake can be decorated and cut immediately.
- Just before serving, finish the buche de noel with edible natural looking decorations like meringue mushrooms (see Note below), sprinkled cocoa powder or chocolate shavings, candy rocks, powdered sugar or coconut, or anything else you have on hand.
- To get the cleanest cuts, heat a sharp knife under hot water for a few seconds, wipe the blade clean and cut the cake in 1-inch slices, wiping the blade clean between cuts.
- If you have leftovers, remove the mushrooms and place them in an airtight container at room temperture before refrigerating the rest of the cake. Place the cake in an airtight container or wrap it with a light covering of plastic wrap. For best taste and texture, enjoy within 5 days.
Recipe Notes
“Ribbon stage” when beating egg yolks
When egg yolks and sugar are mixed together they go through a series of different stages. These stages help to identify when the mixture is ready to be used. For this cake, the mixture needs to come to the ribbon stage which means that when you raise the whisk (or beaters), the batter will fall back into the bowl in a slow ribbon that gradually reincorporates itself into the rest of the mixture. It should take about 5 minutes to reach this stage (a little longer if using a hand mixer).Soft peaks vs. stiff peaks
If you are new to making meringue, you might be unfamiliar with the term “peaks”. This is a method testing how firm the egg whites are as they are whipped. When you lift the whisk or beaters from the bowl, you’ll notice some of the whites rising upward from the bowl. Soft peaks will flop over a little on top of the whisks, while stiff peaks will point upward, holding their shape like a mountain peak. This term is also used when whipping cream.Meringue Mushrooms
If you want to decorate your cake the way I did, I recommend making the meringue mushrooms in advance. They are a great make-ahead decoration because, although they take almost 3 hours to make, they hold up really well at room temperature. Be aware that meringue mushrooms will begin to loose their dry, crisp texture as soon as they come in contact with the cake, so it’s extra important to wait to place them on the cake until right before serving. This recipe is adapted from the Chocolate Cloud Roll in The Cake Bible by Rose Levy Beranbaum.Measuring Tips
Our recipes are developed using weight measurements, and we highly recommend using a kitchen scale for baking whenever possible. However, if you prefer to use cups, volume measurements are provided as well. PLEASE NOTE: the adage “8 oz = 1 cup” is NOT true when speaking about weight, so don’t be concerned if the measurements don’t fit this formula.
Want to learn more about baking measurements and conversion?
Nutrition
📸 Photo Tutorial: How to Make A Chocolate Bûche De Noël
Let’s get rolling, friends! I’ll walk you through every step of this flourless yule log cake recipe with an easy to follow photo tutorial. Full instructions are included in the recipe card above.


Make the GAnache
- Prep chocolate and butter: Chop 10 oz of chocolate into small pieces. Place it in a large bowl with 2 TBSP softened butter on top. Set aside.
- Heat cream: Put 1 1/2 cups (12 fl oz) heavy cream in a small saucepan over medium-high. Heat until it simmers (you’ll notice little bubbles along the sides of the pan). Do not boil.
- Mix chocolate and hot cream: Pour the hot cream over the chocolate and butter. Whisk until the chocolate melts and the mixture is shiny and smooth.
- Cover: Cover the ganache with plastic wrap, pressing down until the plastic touches the top of the chocolate.
- Cool. Allow the ganache to firm up to a spoonable consistency for 1-2 hours at room temperature. Or, speed up the cooling process by placing it in the refrigerator and whisking every 15 minutes until it has a spoonable consistency. Do not chill for too long in the refrigerator – you want to be able to spread it.


Make the Flourless Chocolate Cake
- Prepare to bake: Preheat oven to 350°F (180°C) with the oven rack in the center. Line a 17×12-inch (43x30cm) baking pan with foil or parchment paper. Spray the lined pan well with baking spray, and sprinkle a thin layer of unsweetened cocoa powder on it (to prevent sticking).
- Separate cold eggs: Crack and separate 6 eggs into two large bowls, with the whites in one and the yolks in the other. Cover each bowl with plastic wrap, and bring to room temperature before using (about 30 minutes).
- Melt the chocolate: Meanwhile melt 2/3 cup (4 oz) chocolate in the microwave in 30 second increments, stirring well between each, until smooth. Remove from microwave and cool.
- Whip yolks and sugar to ribbon stage: Place the egg yolks and 1/4 cup of sugar in the bowl of a stand mixer fitted with a whisk attachment and beat on medium-high speed until the batter falls back into the bowl from the raised whisk in a slow ribbon (about 5 minutes).
- Add vanilla and cooled chocolate: Add 1 tsp vanilla extract and the cooled, melted chocolate, stirring by hand until just combined. Set aside.


- Whip egg whites: In a clean mixing bowl, use a whisk attachment to beat the egg whites until foamy. Add 3/4 tsp cream of tartar and beat at medium-high speed until soft peaks form. Gradually beat in the remaining 2 TBSP of sugar until stiff peaks form.
- Add a small amount of egg whites: Gently fold a small amount of egg whites (about 1/2 cup) into the chocolate-egg yolk mixture.

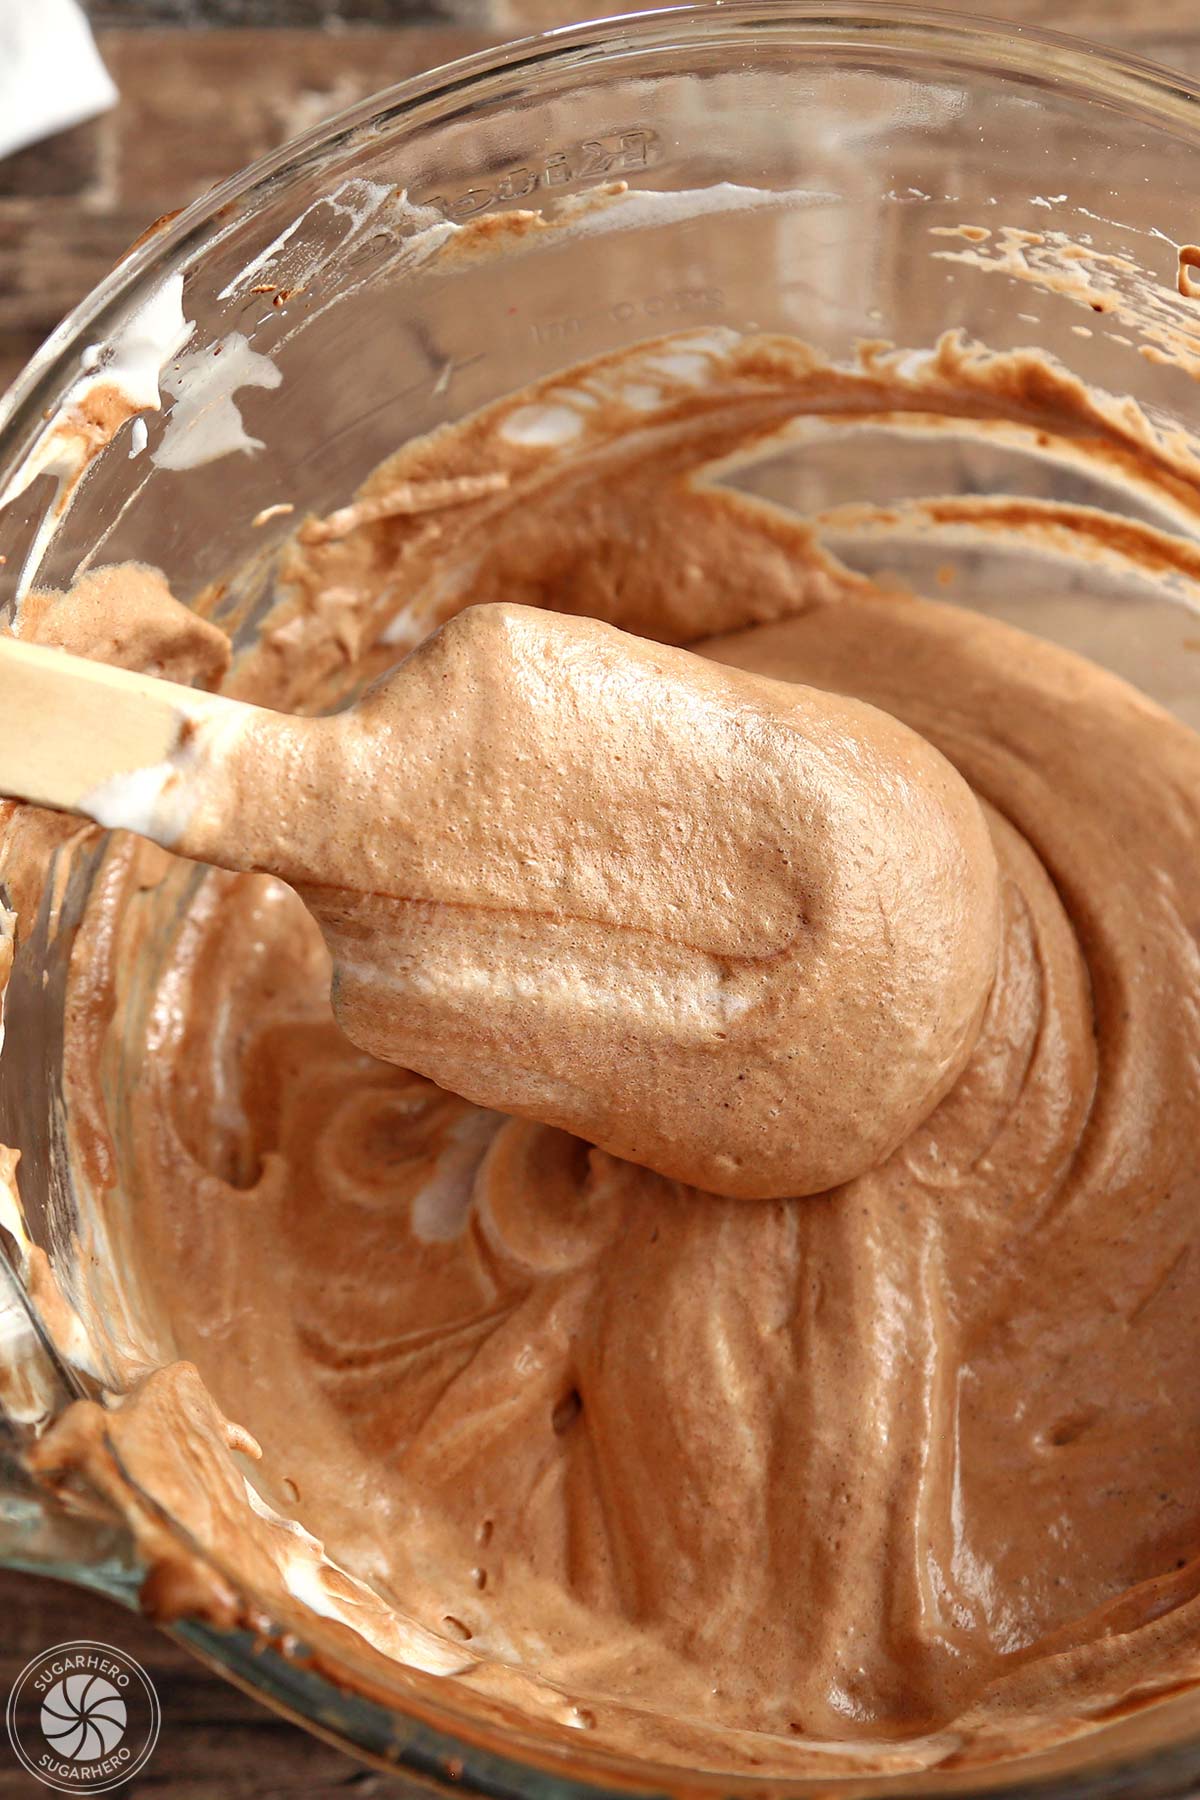
- Fold in remaining egg whites: Once the initial amount of egg whites is incorporated, gently fold in the remaining whites until just combined. Don’t over mix, or the batter will deflate.


- Bake: Spread the batter into the prepared pan and bake, about 15-17 minutes, until cooked through.
- Cool: Remove the cake from the oven and sprinkle the top generously with cocoa powder. Then cover the cake with a clean, slightly damp tea towel to keep the cake moist. Place the covered cake on a wire rack to cool to room temperature (approximately 30-45 minutes).
Make VAnilla Whipped Cream Filling
- Make filling: While the cake cools, beat together 1 cup (8 fl oz) heavy cream, 1/3 cup (.75 oz) powdered sugar, 1 tsp vanilla and 1/2 tsp ground cinnamon in a clean mixing bowl until the cream starts to hold firm peaks.
- Chill: Cover the filling and refrigerate until you’re ready to assemble the cake.


Assemble the Buche de Noel
- Spread the filling: Remove the towel from the cake and gently spread the whipped filling over the surface of the cake.
- Begin rolling: The cake can be rolled in the pan it was baked in or on a flat surface. (If you remove the cake from the pan, use the excess foil like handles to lift it from the pan in one piece.) Gently roll the cake, peeling off the foil or parchment as you roll. Don’t worry if the cake cracks a little, this is normal. Because this cake is so mousse-y and delicate, some cracking can be expected.
- Shape the log: Trim one end of the cake at an angle and set it aside. Then place the cake, seam side down, on your serving platter. Spread a dollop of ganache on top of the cake, then place the cut-off end on top of the cake to look like a branch.


- Cover with ganache: Gently spread the ganache over the outside of the cake. The ganache needs to be a soft, spreadable texture, or else it will tear the cake. If your ganache is too cold, microwave it in 5-second increments just until it’s soft, like peanut butter. Once it’s completely covered, use a for or toothpick to create waves and texture in the ganache to resemble tree bark.
- Refrigerate: If you’ve got time, refrigerate the cake for 30 minutes to firm it up slightly. If you’re in a rush, the cake can be decorated and served immediately, but it’ll be messier to cut and serve.


- Decorate the cake: Just before serving, finish the buche de noel with edible nature decorations like meringue mushrooms, cocoa powder or chocolate shavings, candy rocks, powdered sugar, coconut, frosting or anything else that catches your eye.
- Serve and enjoy!
💡 Tips and FAQs for Success
Avoid common mistakes and learn how to make this Bûche de Noël like a pro! Here’s everything you need to know to be successful.
If you are in a hurry and need to speed up the cooling process for the ganache, you can place it in the refrigerator and whisk every 15 minutes until it has a spoonable consistency. You need to be vigilant about stirring it and watching that the texture doesn’t start to get too hard. If you accidentally leave it in the fridge too long, let it rest at room temperature (or microwave briefly) to make it spreadable again.
To make the smoothest, creamiest ganache the cream needs to be hot enough to melt the chocolate and butter but cool enough it doesn’t overheat the chocolate. When chocolate is overheated it will seize (become lumpy and grainy). The temperature of boiling the cream is too hot for chocolate and will ruin the texture of the ganache. If you accidentally overheat the cream, let it cool slightly before pouring it over the chocolate and butter.
If you’ve never heard the term before, you’ve come to the right place! When egg yolks and sugar are mixed together they go through a series of different stages. These stages help to identify when the mixture is ready to be used. For this cake, the mixture needs to come to the ribbon stage which means that when you raise the whisk (or beaters), the batter will fall back into the bowl in a slow ribbon that gradually reincorporates itself into the rest of the mixture. It should take about 5 minutes to reach this stage (a little longer if using a hand mixer).
You’ll know your sheet cake is ready when it looks puffed, has lost its shine, and springs back when gently pressed. For the best taste and texture, don’t overbake the cake.
Learning to recognize the various stages cream goes through as it is whipped is important for any baker. In this recipe you’ll be watching for soft and stiff/firm peaks. You can test for both of these stages by raising the whisk or beaters out of the cream. As the attachment leaves the mixture the cream should extend upward like little mountain peaks. Soft peaks will flop over on top and slowly sink back into the mixture, whereas stiff peaks will be pointy and hold their shape well. Be careful not to whip past firm peaks or the cream will begin to curdle, look more buttery and take on a chunky texture. If you accidentally whip the cream too much, it will still taste fine but the texture won’t be as smooth as it should be. It also might be a little harder to smooth into an even layer over the cake.
If you want to remove the cake from the pan before rolling it, here’s an easy trick to try. When you prep the baking pan, leave a little excess foil to fold around the edges. You can unroll the excess foil and use it like handles to gently and quickly move the cake from the pan to a flat surface.
There are a few things you can do to make clean cut slices of cake. My first recommendation is to give yourself enough time to refrigerate the cake for 30 minutes before adding the decorations. This brief chilling period firms up the layers of the cake, making them easier to cut. The next thing you’ll want to do is use a sharp knife to cut the cake. Run the knife under hot water for a few seconds, wipe it dry and then begin cutting the cake in 1-inch slices, reheating the blade under hot water and cleaning the blade off between slices as needed. Viola!
If you have leftovers, remove the mushrooms and place them in an airtight container at room temperture before refrigerating the rest of the cake. Place the cake in an airtight container or wrap it with a light covering of plastic wrap. For best taste and texture, enjoy within 5 days.

💭 Variations
Want to change things up a little? Here’s some ideas to get you started.
- Flavoring: The filling is flavored with vanilla extract and a little ground cinnamon. Feel free to swap the vanilla for another flavor like almond, orange, or peppermint. Likewise, you can leave out the cinnamon.
- Chang the filling: Try using a different filling like peanut butter or raspberry. Or, add a 1/4 cup of cocoa powder to the filling to make it chocolatey!
- Toppings: In addition to the filling, you can add a layer of jam or preserves like Blueberry Sauce, Strawberry Sauce or Cranberry Orange Sauce. It would also be delicious to sprinkle the filling with a light layer of toasted chopped nuts or fresh berries.
- Decorations: If you are short on time or just don’t want to decorate, it’s totally fine to skip all the extra natural looking decorations.
Browse More:


I'd go with the awesomely early. They look great!
That's an extremely pretty buche de noel. Definitely one of the very nicest I've seen. And your meringue mushrooms look perfect, despite the challenge they presented what with the stormy weather! I like your t-shirt, too–very cute!
Now that is the prettiest buche-de-noel I have seen. I am too chicken to attempt.
Definitely early! I never got around to making fruit cake for Christmas, so I'm going to bake some in January instead 🙂 Love the log and the mushrooms. Happy New Year!
Awesome shirt.
That looks gorgeous! i think we're in the same time warp, because I did most of my Christmas baking after the big day, and still have more I want to do.
Oh my gosh, the shirt rocks! I think you/he should start mass producing them!
Love the buche!
What a great gift!! Super sweet, and totally awesome!
The yule log looks great, and the inside sounds really interesting. I've got to wait almost a year to try it 🙁