
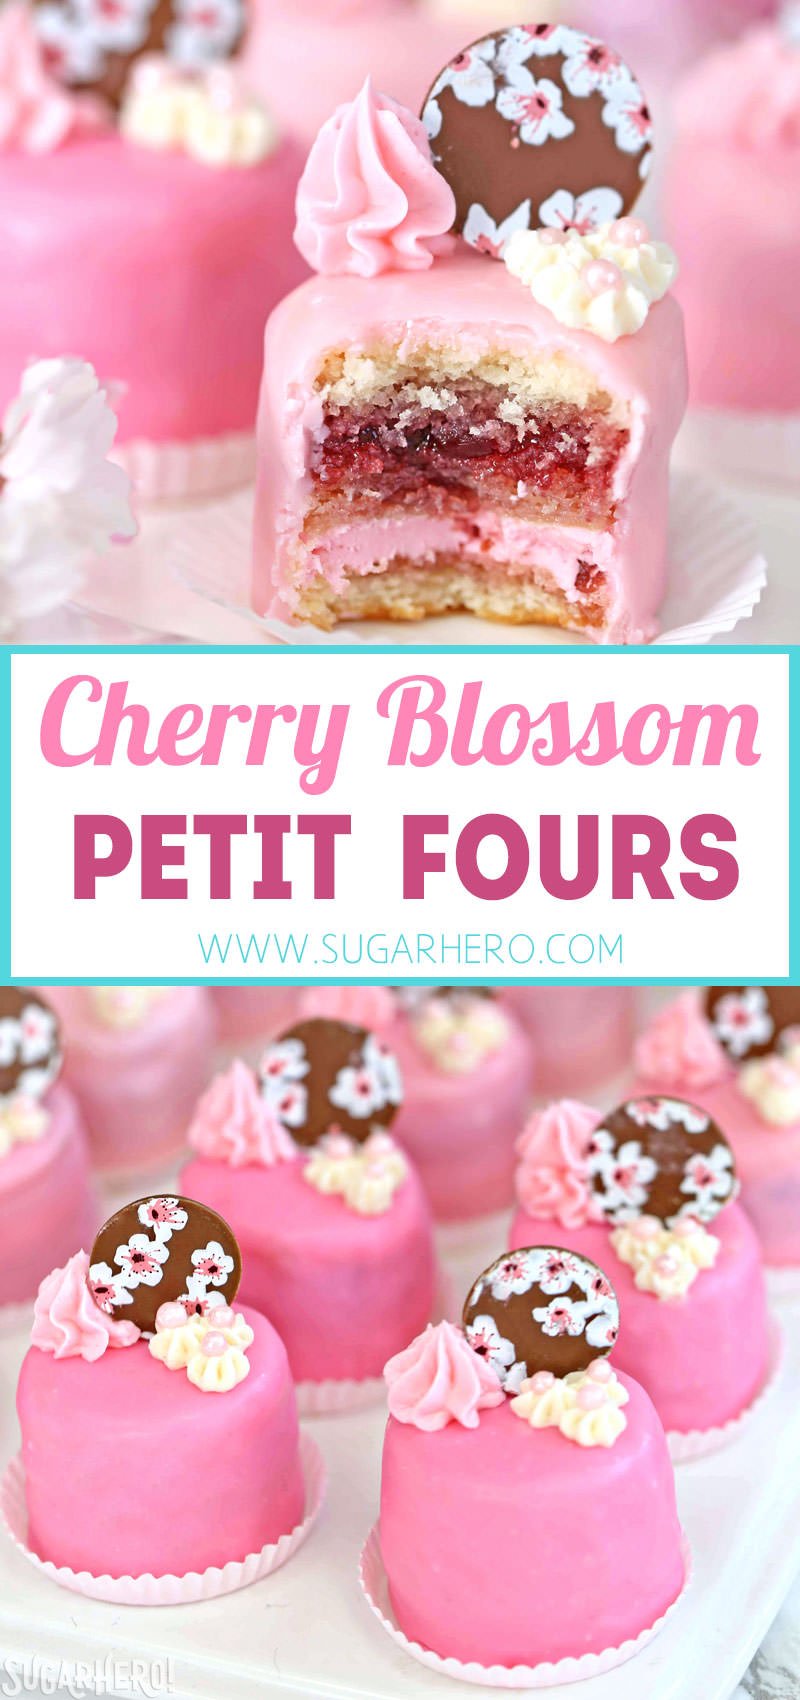
Cherry Blossom Petit Fours are pretty pink cake bites! Cherry lovers will adore these cherry jam-flavored mini cakes. Bonus–the petit four icing in this recipe is a cheater’s version, meaning it’s WAY easier and less messy than traditional petit four icing. Score!

Cherry Petit Fours Recipe
As much as I love mega-tall cakes and over-the-top desserts (I’m looking at you, Spring in Bloom Cake), my first true pastry passion was miniature sweets.
When I was a wee baking bebe fresh out of culinary school, I dreamed about opening up my own bakery one day, chock-full of precious miniature desserts like two-bite sandwich cookies, macarons, mini cupcakes, and other twee but darling things. It was a beautiful lush daydream, straight out of a romantic comedy. Picture me with flour smudged on my nose, wearing a colorful apron while The Shins play in the background.
Aaaaaand then I started working in bakeries, realized how difficult it is to make decent money if you sell full-sized items, much less TINY ones, and tossed that idea out the window. (And truly, I don’t think I would have liked owning a bakery. But it’s still a cute idea! Feel free to run with it and then invite me over for teensy treats and a 10% share of the profits.)

Flash-forward 10-mumble years later, and I don’t have a bakery, I DO often have flour on my nose, and I’m usually wearing yoga pants and maybe an apron if I’m really practicing some self-care. But you can still find me making tiny desserts whenever I get the chance!
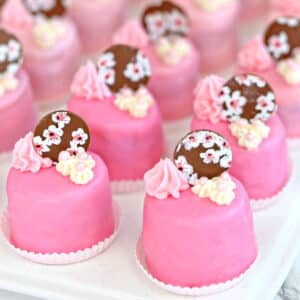
These petit fours were inspired by a beautiful chocolate transfer sheet I found. (That is the pattern I bought, but I purchased it at a local store.) When I saw the cherry blossoms on the transfer sheet, I knew I had to do some sort of spring-y cherry dessert, and pretty soon I was dreaming about two-bite cakes, layered with cherry jam and cherry buttercream, and decorated with chocolate rounds printed with cherry blossoms.

What Are Petit Fours?
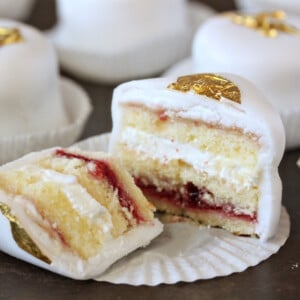
Petit Fours, in their most basic form, are just one- or two-bite dishes. In America, they are usually understood to be desserts, and typically refer to small bites of cake covered in icing. These cake bites are usually decorated beautifully, and have a fancy, elevated presentation.
Simple petit fours can be squares of cake, usually pound cake, covered in icing. More complicated petit fours would involve thin cake layers, filled with jam or frosting, then covered in icing and decorated.

How Do You Glaze Petit Fours?
The MOST annoying part of making petit fours, by far, is covering them! I would probably serve them far more often if there was an easy way to make petit fours! But the nature of the beast means that you’re going to spend significant time dipping small chunks of cold cake–unfortunately, that’s just the way they’re made.
- Traditionally, petit fours are iced with a poured fondant. This is basically a thickened sugar syrup that is opaque. You can see this type of poured fondant in my Easter Egg Petit Four Recipe. It can be made at home, but it’s typically purchased since it’s a bit fiddly to make.
- You can also ice petit fours with a gelatin-based glaze, like in my Nutella Pound Cake Petit Fours. This is a gorgeous, shiny glaze that’s easy to whip up, but it has a chewy texture that not everyone loves.
Fortunately, I have a petit four icing hack that’s easier, faster, and more accessible for most people. Drum roll please…

The Easiest Way to Ice Petit Fours
We’re throwing out traditional petit four icing and using CANDY COATING instead. Yep, you need just 2 ingredients to make this petit four glaze:
- candy coating
- heavy cream
All you do is combine the two together, heat in the microwave, and whisk until they’re smooth. Once smooth, let the glaze cool until it reaches a pourable texture. You want it thin enough to slide easily over the cakes, but thick enough to coat the sides and keep the dark jam layers from peeking through.
Is it traditional? No way. Would Julia Child roll over in her grave if she saw me do this? Probably? Or maybe not, because Meryl Streep’s portrayal made her seem like a pretty fun lady. I dunno. But it’s saved my bacon and my sanity in a pinch, and I’m all about the occasional bacon-saving shortcut.
What are the benefits of this petit four glaze?
It’s super smooth, reheats beautifully, dries firm enough that you can move and touch the petit fours, but remains soft enough so that it melts into the cake when you bite it. It also seems less sweet than poured fondant.

One more decorating note–I decided to have a little fun and create an ombre effect with the glaze—I started out by making a very pale pink glaze, and after dipping a portion of the cakes, I added a little more pink food coloring to the glaze, dipped a few more, etc. By the end, I ended up with dark pink petit fours, and a gorgeous array of different pink shades.
This is TOTALLY optional, but it’s easy enough to add coloring gradually to the glaze, and it looks really impressive when they’re all arranged together.

If you’re thinking of making these, but would like a little more instruction, I actually demonstrated how to make and dip petit fours on Facebook Live! You can check out the videos and see the glaze-making and dipping process in action: Petit Fours Part 1 and Part 2.
If you do give these a try, please come share a picture in our SugarHeroes Facebook group!
🌸More Spring Desserts You’ll Love:
Petit Fours

Nutella Pound Cake Petit Fours
Cherry Blossom Petit Fours
Ingredients
For the Pound Cake:
- 9 oz cake flour, (2¼ cups)
- ½ tsp salt
- 8 oz unsalted butter, at room temperature
- 8 oz cream cheese, at room temperature
- 15.75 oz granulated sugar, (2¼ cups)
- 5 large eggs, at room temperature
- 1 tsp vanilla extract
- 1 tsp almond extract
To Assemble:
- 16 oz buttercream frosting, (about 2 cups), tinted pink
- ½ tsp cherry extract
- 14 oz cherry jam, (about 1 1/2 cups)
- 18 oz candy coating melts
- 2/3 cup heavy cream
- Assorted sprinkles, or other decorations
Instructions
To Make the Pound Cake:
- Preheat the oven to 350 degrees F. Line a 18×12-inch rimmed baking sheet (half-sheet size) with parchment, and spray with nonstick cooking spray.
- Sift or whisk together the cake flour and salt in a small bowl.
- Combine the butter, cream cheese, and sugar in the bowl of a large stand mixer. Beat them together on medium-high speed until very light and fluffy, 3-4 minutes. Reduce the speed to medium and add the eggs one at a time, beating for 1 minute after each addition. Add the vanilla and almond extracts. Finally, turn the speed to low and add the cake flour, mixing until just a few streaks of flour remain.
- Stop the mixer and finish mixing by hand, scraping the bottom and sides of the bowl and stirring well. Scrape the batter into the prepared pan and smooth it into an even layer.
- Bake the cake for about 20 minutes, until it’s golden brown and it springs back when touched lightly with the fingertips. Let it cool completely at room temperature. The cake can be made several days ahead of time; wrap it well in cling-wrap if you’re making it in advance.
To Assemble:
- Stir together the pink-tinted buttercream and the cherry extract. Taste and add more extract, if desired, to get a cherry flavor you like.
- Flip the cake upside-down onto a cutting board and peel off the piece of parchment. Cut the cake into six rectangles by cutting the cake across the middle lengthwise, then cutting it into thirds widthwise. Use a long serrated knife to carefully cut each rectangle into two thin layers (like you would cut a cake into layers) so that you’re left with 12 thin rectangles.
- Take one of the rectangles and top it with a thin layer of frosting, about the same height as one of the cake layers. Top it with a second cake slice, and dollop on some of the cherry jam, and spread it in a thin layer over the cake. You want enough jam so that the flavor comes through, but not so much that the cake is unstable. Finally, add a third cake layer on top of the jam layer–you should now have a 3-tiered rectangle of cake. Set it aside and repeat this process with the remaining cake layers, until you have four rectangles of assembled cake.
- Refrigerate the tray to firm up the cakes, for about 45 minutes.
- Once firm, either cut the cakes into small 1-inch squares, or use a round cutter to cut small circles out of the cake, about 1 – 1½ inches across. (You will get many more squares than circles out of this recipe, so be aware that if you go the circle route, you will be left with lots of delicious cake scraps!)
- If the cake layers are taller than the cutter, try pressing the cutter down until it is flush with the top of the cake, then using a paring knife to trim around the bottom—this prevents the top of your petit fours from getting dented or smashed when you try to press the cutter to the bottom of the cake. Place the petit fours on a baking sheet and freeze them until firm, about 1-2 hours. The petit fours should be very hard before you dip them.
- To make the glaze, combine the candy melts and cream in a large bowl. Microwave in 30-second increments, whisking after every 30 seconds, until the glaze is smooth and shiny. Let it cool slightly—you want it warm and fluid, but not hot and thin like water. It may take a little experimenting with the first few petit fours before you find the perfect dipping temperature.
- Take the tray of petit fours from the freezer. Press a wooden barbeque skewer through the bottom of one of the pieces, until it is firmly in the middle but not poking through the top. Dip the top of the cake into the glaze at a 45-degree angle and swirl it around. Use a spoon to pour glaze on the sides of the cake as you twirl it. Let the excess drip back into the bowl, and use a spoon to touch up any areas that were missing glaze.
- Take a fork and put it under the piece of cake, twist the skewer to remove it so the cake is resting on the fork, then gently set the cake onto a wire cooling rack to set. Repeat until all of the pieces of cake are dipped. If the glaze gets too thick and gloopy, re-warm it in brief intervals in the microwave. After the cakes are dipped, finish decorating them with small candies, swirls of buttercream, a dusting of edible glitter, and/or fun sprinkles.
- Once the glaze is set, use a sharp knife to carefully loosen the petit fours from the wire rack. The glaze does help preserve them, and they stay fresh and moist for days when stored in an airtight container in the refrigerator. For the best taste and texture, serve these petit fours at room temperature.
Recipe Notes
Measuring Tips
Our recipes are developed using weight measurements, and we highly recommend using a kitchen scale for baking whenever possible. However, if you prefer to use cups, volume measurements are provided as well. PLEASE NOTE: the adage “8 oz = 1 cup” is NOT true when speaking about weight, so don’t be concerned if the measurements don’t fit this formula.
Want to learn more about baking measurements and conversion?
Nutrition


This looks great! Do they freeze well?
Thanks Sam! I have frozen the cakes before dipping, but I haven’t tried it after doing the dipping. My *guess* is that it would actually work okay. Since this is a coating-based ganache instead of a fondant-based glaze I’m guessing it might not have the same issues with getting sticky after defrosting that fondant does. However, I can’t say for sure. Please let me know if you give it a try!
These are so cute i bet a lot of people will be makeing these just love them. where do you get such cute ideas?
Beautiful.i.want to see more and learn
Thank you Karen! Make sure to check the blog for seasonal desserts and new recipes!