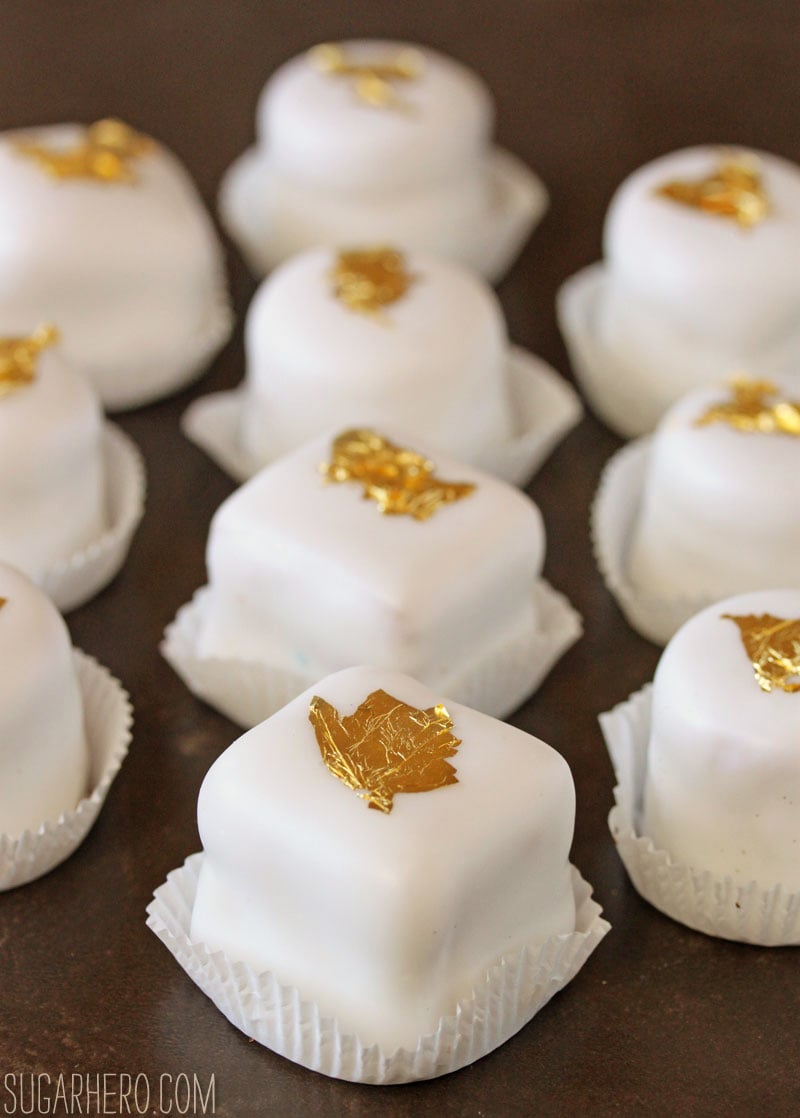
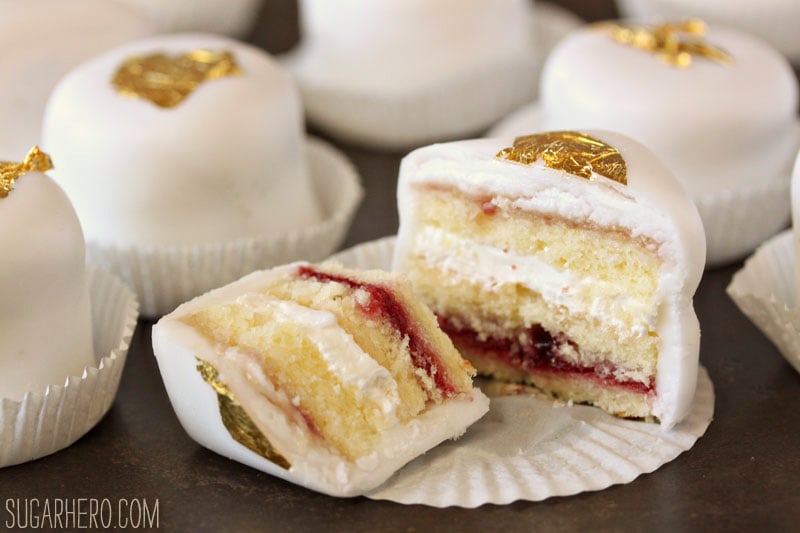
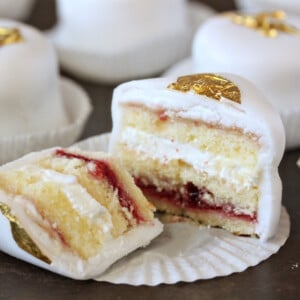
These glamorous Petit Fours add just the right amount of glitz to any dessert table. They are made with cream cheese pound cake, layers of raspberry jam and vanilla bean buttercream and topped with fondant and a bit of sparkle!
I used to roll my eyes at Mother’s Day and voice unoriginal complaints about how it’s a “Hallmark holiday,” but now that I’m a mom? I’ll take that Hallmark card and those flowers, thank you very much, and I wouldn’t say no to a box of chocolates, either. I had a fantastic Mother’s Day yesterday—the highlight was probably watching my two-year-old giggle as he helped carry the breakfast tray to me in bed, then having him cheer, “Eat, Mama! Happy Mother’s!” (He always forgets to add the “Day” at the end.) I hope all of the mothers out there had wonderful days as well!
Although Mother’s Day has passed (sniff), I’m still sharing recipes from our Mother’s Day tea party, like these Blueberry Pavolovas, because it’s my blog and I do what I want. And also because petit fours are welcome in my house any day of the year.
When I was a starry-eyed pastry pup, I dreamed about opening my own bakery that would sell only miniature desserts. That would be the cutest, right? I imagined the big glass display cases full of mini cupcakes, tarts, macarons, petit fours, and brownie bites, each adorably displayed and packaged. In retrospect, of course, this is kind of a terrible idea. With years of experience under my belt, and knowing what I now know about price points and labor costs and how many dang mini tarts I would have to sell to just break even, I think it’s a very good thing I never went through with this plan…but I do still sometimes think about how cute my imaginary mini bakery would have been.

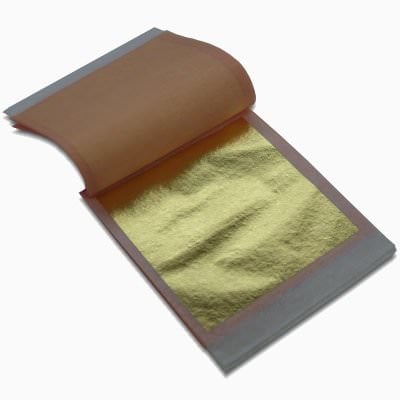
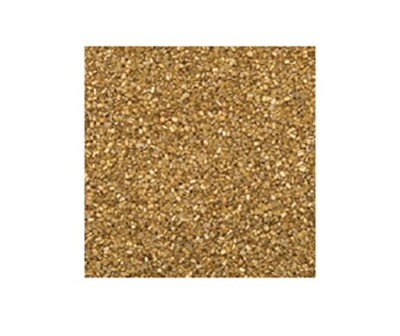
There is a certain charm to miniature desserts, and all these years later, I’m still under their spell. I don’t make petit fours very often, because –real talk—they are time-consuming and a bit of a pain to make. (I don’t mean to dissuade you, because I do love them, but there are easier ways to get your cake fix, if a quick sugar high is all you’re after.) However, for a fancy-shmancy tea party, I knew that nothing but petit fours would do. And because we are the shmanciest of the fancies, these cake bites were topped with disco dust and edible gold leaf. They glimmered and sparkled and added just the right amount of glitz to our dessert table.

I made my petit fours with my favorite cream cheese pound cake recipe. It’s soft and moist, but sturdy enough to hold up to layering and dipping. I filled them with raspberry jam and vanilla bean buttercream, but you can vary the frostings and fillings—try other jam or frosting flavors, or even a layer or two of Nutella. (Just avoid curds and creams that are too soft to allow you to dip the petit fours.) This recipe yields about 64 petit fours, so it’s perfect for a party, shower, or very belated (or ridiculously early??) Mother’s Day dessert.
Now it’s your turn—what was one career or life goal you used to dream about doing? Tell me I’m not the only one with an impractical (some might say charmingly optimistic) side!
I demonstrated how to make these on Facebook Live! If you would like to watch them, follow these links (there are two parts because Facebook was having problems): Part 1 and Part 2.
💗More Elegant Dessert Recipes

Lemon Meringue Teacup Cakes
Blueberry Pavlovas
Petit Fours
Ingredients
For the Pound Cake:
- 9 oz cake flour, (2 1/4 cups)
- 1/2 tsp salt
- 8 oz unsalted butter, at room temperature
- 8 oz cream cheese, at room temperature
- 15.75 oz granulated sugar, (2 1/4 cups)
- 5 large eggs, at room temperature
- 1 tsp vanilla extract
To Assemble:
- 1 cup water
- 1 cup granulated sugar
- 2 tbsp vanilla extract
- 13 oz raspberry jam, (1 1/2 cups)
- 1 1/4 cups vanilla frosting, homemade or store-bought
- 7 oz marzipan, optional, see Note
- 3 lbs poured fondant, see Note
Instructions
To Make the Pound Cake:
- Preheat the oven to 350 degrees F. Line a 18×12-inch rimmed baking sheet (half-sheet size) with parchment, and spray with nonstick cooking spray. Sift together the cake flour and salt.
- Combine the butter, cream cheese, and sugar in the bowl of a large stand mixer. Beat them together on medium-high speed until very light and fluffy, 3-4 minutes. Reduce the speed to medium and add the eggs one at a time, beating for 1 minute after each addition. Add the vanilla extract. Finally, turn the speed to low and add the cake flour, mixing until just a few streaks of flour remain.
- Stop the mixer and finish mixing by hand, scraping the bottom and sides of the bowl and stirring well. Scrape the batter into the prepared pan and smooth it into an even layer.
- Bake the cake for about 20 minutes, until it’s golden brown and it springs back when touched lightly with the fingertips. Let it cool completely at room temperature. The cake can be made several days ahead of time; wrap it well in cling-wrap if you’re making it in advance.
To Assemble the Petit Fours:
- Make a vanilla simple syrup by combining 1 cup of water and the sugar in a small saucepan over medium heat. Stir until the sugar dissolves, then bring the mixture to a boil. Once it boils, remove the pan from the heat and stir in the vanilla extract. Let it cool to room temperature while you prepare the cake. Have your room temperature frosting and room temperature raspberry jam ready.
- Flip the cake upside-down onto a cutting board and peel off the piece of parchment. Cut the cake into six rectangles by cutting the cake across the middle lengthwise, then cutting it into thirds widthwise. Use a long serrated knife to carefully cut each rectangle into two thin layers (like you would cut a cake into layers) so that you’re left with 12 thin rectangles.
- Brush one rectangle with the simple syrup mixture. Dollop on a spoonful of raspberry jam, and spread it in a thin layer over the cake. You want enough jam so that the flavor comes through, but not so much that the cake is unstable. Top the jam with another cake slice, and brush it with more simple syrup. Top this cake layer with a thin layer of frosting, about the same height as one of the cake layers. Brush one more cake layer with simple syrup, then place it, syrup side-down, on top of the buttercream. You should now have a 3-tiered rectangle of cake. Set it aside and repeat this process with the remaining cake layers, until you have four rectangles of assembled cake.
- If you’re using marzipan, divide the marzipan in four pieces and roll each into a very thin layer—it should be so thin it is almost translucent. Brush the top of one of the rectangles with a bit of simple syrup, and press the marzipan on top. Trim the edges so the marzipan is flush with the sides of the cake, and repeat until all of the cake rectangles are covered with marzipan. Refrigerate the tray to firm up the cake rectangles, for about 45 minutes.
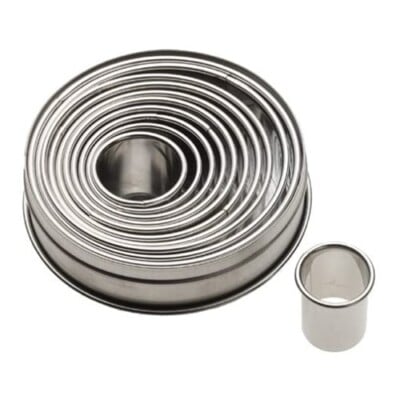
- Once firm, use a round cutter to cut small circles out of the cake, about 1 – 1 1/2 inches across. If the cake layers are taller than the cutter, try pressing the cutter down until it is flush with the top of the cake, then using a paring knife to trim around the bottom—this prevents the top of your petit fours from getting dented or smashed when you try to press the cutter to the bottom of the cake. Alternately, you can cut them into small squares instead with a large sharp knife. Place the petit fours on a baking sheet and freeze them until firm, about 1-2 hours. The petit fours should be very hard before you dip them.
- Warm up your fondant in the microwave until it is very warm and very fluid—it should readily pour from a spoon. Warm it in 30-second intervals, stirring after every 30 seconds to prevent it from overheating. You will need to warm up the fondant fairly frequently during the dipping, so it’s easiest if you work near the microwave.
- Take the tray of cake from the freezer. Press a wooden barbeque skewer through the bottom of one of the pieces, until it is firmly in the middle but not poking through the top. Dip the top of the cake into the fondant at a 45-degree angle and swirl it around. Use a spoon to pour fondant on the sides of the cake as you twirl it. Remove it from the fondant, let the excess drip back into the bowl, and use a spoon to touch up any areas that were missing fondant. Take a fork and put it under the piece of cake, twist the skewer to remove it so the cake is resting on the fork, then gently set the cake onto a wire cooling rack to set. (Refer to the video linked in the Notes section for a visual demonstration of this step.) Repeat until all of the pieces of cake are dipped. If the fondant gets too thick, re-warm it in brief intervals in the microwave. Once the fondant is set, use a sharp knife to carefully loosen them from the wire rack. If desired, you can top them with a pinch of disco dust or sprinkles when the fondant is still wet, or press a bit of edible gold leaf on top of the fondant once it is dry.
Recipe Notes
Measuring Tips
Our recipes are developed using weight measurements, and we highly recommend using a kitchen scale for baking whenever possible. However, if you prefer to use cups, volume measurements are provided as well. PLEASE NOTE: the adage “8 oz = 1 cup” is NOT true when speaking about weight, so don’t be concerned if the measurements don’t fit this formula.
Want to learn more about baking measurements and conversion?


These are stunning!!
You have inspired me with these petit fours! They look beautiful inside and out and look delicious, and appetizing as well. I plan to make these one day over the weekend. I look forward to making every single layer from scratch just for the fun of it!! Thanks for the great idea for a culinary project!
I don’t know if I will ever make petit fours. I’ll just come eat yours because these look stunning and DELICIOUS!
Your teeny tiny bakery totally made me think of Zoolander’s School for Ants. Teeny tiny, yo.
And my crazy dream? Coffee shop/bakery/cafe/book store. Cool hang out atmosphere, live, local music at night, and classrooms in the back where parents can check their kids in for arts and crafts classes, story time, movie nights, painting classes, theater classes, etc – for and hour and a half (for a charge), and mom and dad can sit and have a delicious/healthy/decadent meal in peace. Everyone leaves happy.
I wanted to open a bed and breakfast. Crazy pants idea I had there at one time.
These little cakes are adorable.
I filled them with raspberry jam and vanilla bean buttercream, but you can vary the frostings and fillings—try other jam or frosting flavors, or even a layer or two of Nutella. (Just avoid curds and creams that are too soft to allow you to dip the petit fours.)
I find it interesting that this information, copied and pasted from your recipe. is word for word the same as on a page called Rose Bakes.
Hi Sharon, I looked for similar wording on Rose Bakes and didn’t find anything via Google–maybe I misunderstood your comment. Can you clarify what you meant?
Did you use the fondant that is on the Amazon site that you referred to? Please advise so I will have the correct ingredients before I get started. Thanks.
Hey Bea, I bought mine from a local cake supply store that doesn’t have a website. I tried to find a very similar product online. The one I linked should work great! If you are wanting to look around and compare other products online, the term you would search for is “liquid fondant” or “poured fondant.” I would love to hear how it goes!
Can I freeze these for about a week?
Hey Valerie, you can definitely freeze these yes! I wouldn’t recommend freezing them once dipped. I think the condensation will affect the texture and make them tacky, you can freeze them cut into the small squares. However, my optimal recommendation would be to layer the cake, wrap it really well and freeze it that way. Leaving you with just cutting and dipping closer to when you will be serving them! I hope that helps! I would love to hear how it goes!
Every weekend i used to pay a quick visit this web site, as i wish for
enjoyment, since this this site conations truly good funny stuff too.
These are so so beautiful! I love Petit Fours, and this recipe looks perfect for my first time making them! I’m going to experiment a bit with fillings and I’m definitely not leaving out the marzipan. Can’t wait!
Hi Heather! I hope you love this recipe and have fun making them. They are so delish!! All the best.
No leaveners?
Hi Janine! The petit fours are made from a traditional pound cake which is often made without leaveners. The extended beating time at the beginning incorporates a lot of air into the batter and gives the cake its lift. I hope that helps. Happy baking!