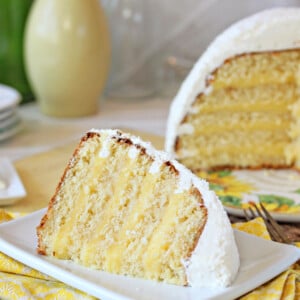
This Lemon Coconut Snowball Cake is filled with tangy lemon curd, covered with coconut buttercream and sprinkled with lots of flaked coconut on the outside.
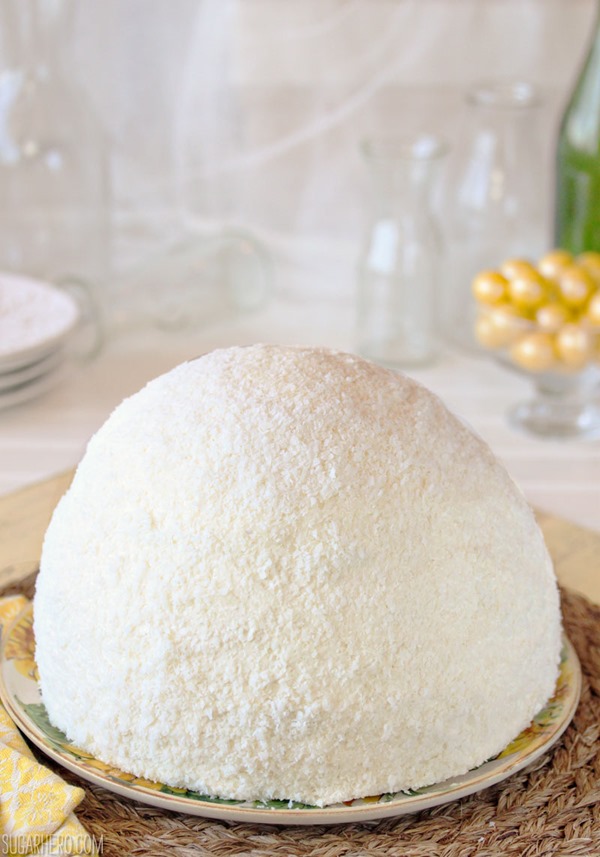
Okay, I know I wrote the word “snowball” in the title, but I promise this is not going to be yet another blog post about the weather. If you’re anything like me, you’re a little sick of reading all the breathless September: Summer or Fall?? discussion posts, and I say this as someone who is part of the problem. I’m so sorry. Please kick my ankles next time I start to get that meteorological twinkle in my eye.
No, no, today’s snowballs are of an entirely different, entirely edible variety.
A while back, I got the idea to make a giant version of the Hostess Snowball—excuse me, Snoball, because who needs great spelling when you’re a best-selling snack cake?—that classic treat with a half-round shape and a coconut-flecked exterior. The idea has nothing to do with the weather (I swear! Don’t kick me!) and everything to do with the fact that I think it’s super fun to embiggen normal desserts. What can I say? I never took up a normal hobby, like knitting.
Behold, my Big Papa cake with its smaller namesake, the humble Hostess Snoball:
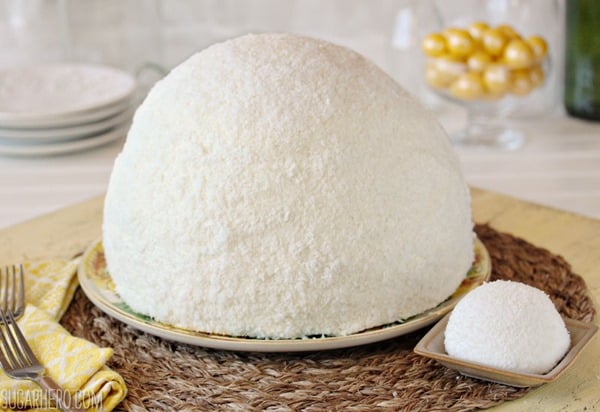
I took the name and the shape of the Snoball, but I decided to go my own way with the interior. The regular Snoball is just chocolate cake, a bit of cream filling, and marshmallow on the outside. I wanted a bit more flavor, so I made my cake coconut, filled it with tangy lemon curd, and then finished it with coconut buttercream and lots of flaked coconut on the outside. It amused me to have such bright, tropical flavors packaged in a snowball-shaped cake. I think Alanis Morissette might even call that ironic?
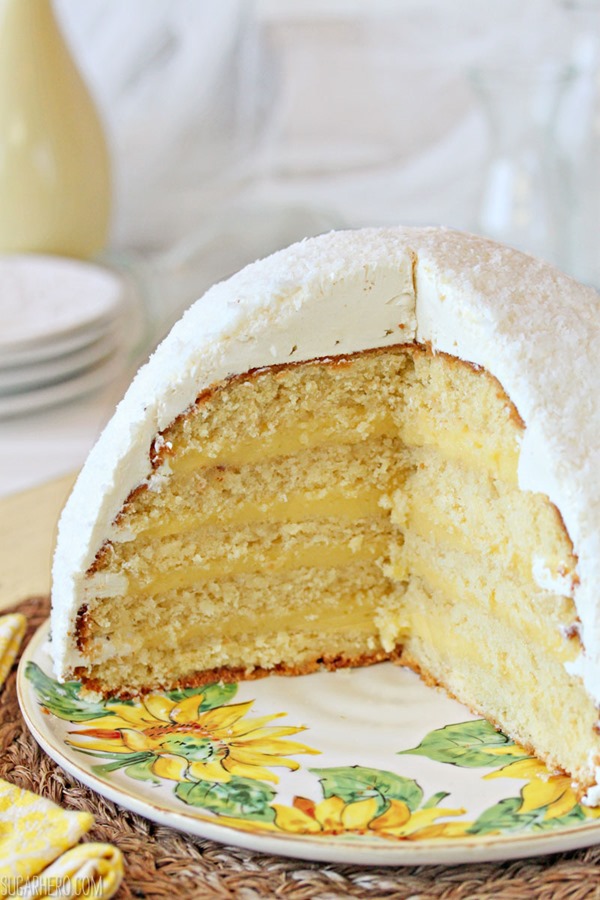
To get the classic half-sphere shape, I baked the cake in a metal mixing bowl. If you have a really large sphere-shaped pan, you can use that, but I found that my regular mixing bowl worked just fine as a makeshift cake pan. And what of the flat top on the cake? Well, that’s nothing that a little—or a lot—of frosting piled on the top can’t fix! As usual, this cake is heavy on the frosting and filling, because that’s what I love. If you’re more of a cake person, you can cut the cake layers thicker and hold back on some of the lemon curd. It’s your snowball, do what you feel!
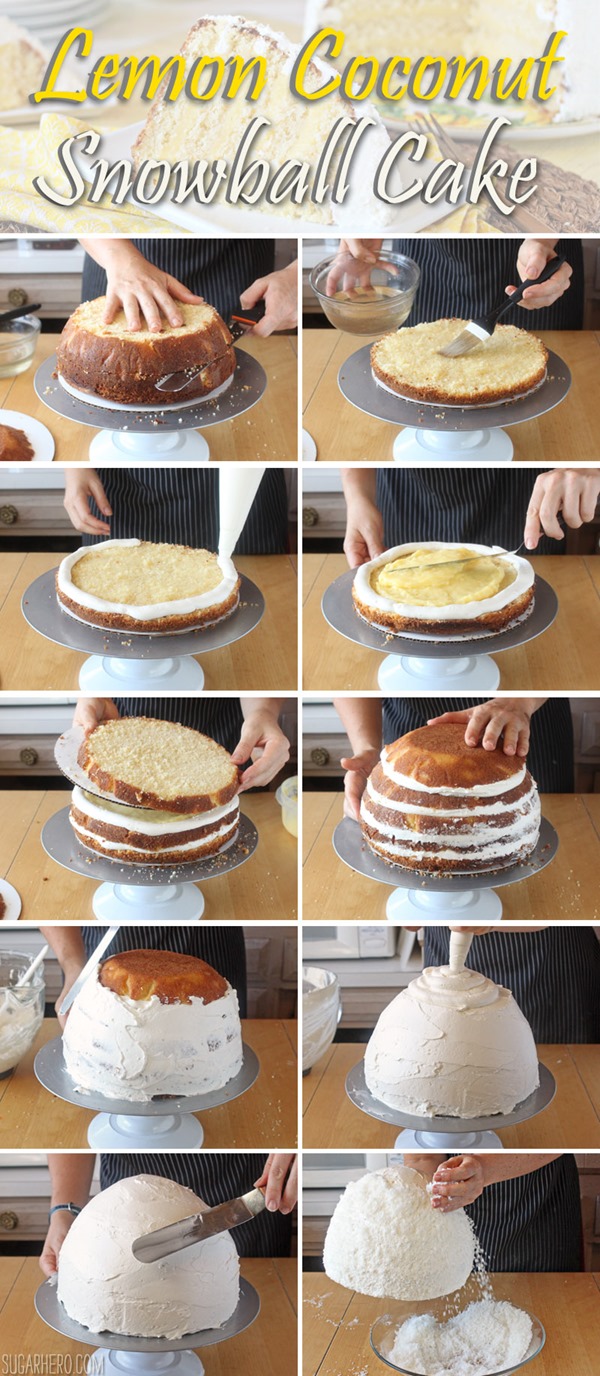
The written recipe is down below, and that’s all well and good, but sometimes you just need to see a baker in a fetching striped apron show you how to assemble a cake. It goes a little something like this…
See? Nothing to it!
Seriously, though, there’s not much different in making a half-sphere cake vs the typical round cakes, but your friends just might think you’re a ninja-genius if you pull it off. They’ll be oohing and aahing, and you’ll be like, “What, like making a cake shaped like an igloo is unusual?” *casual hair flip*
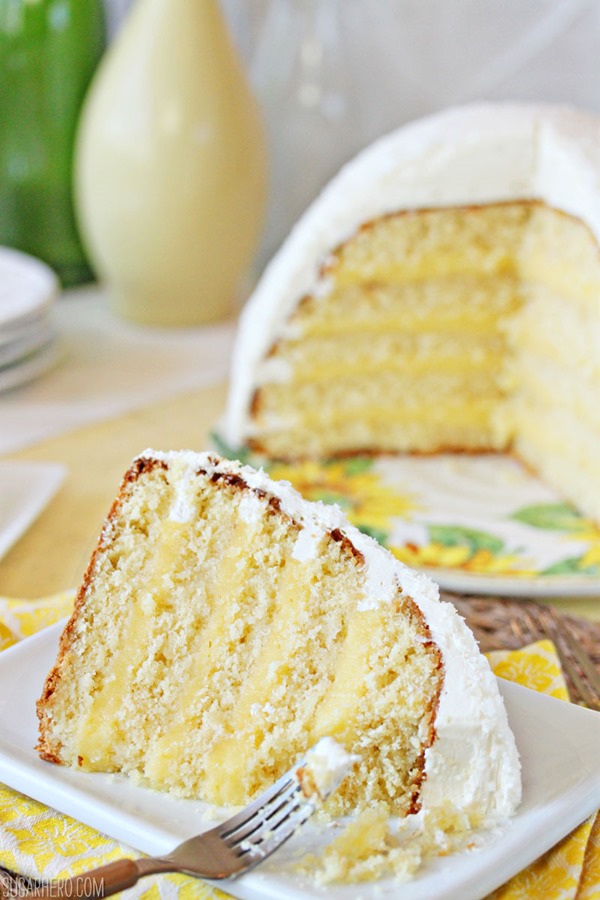
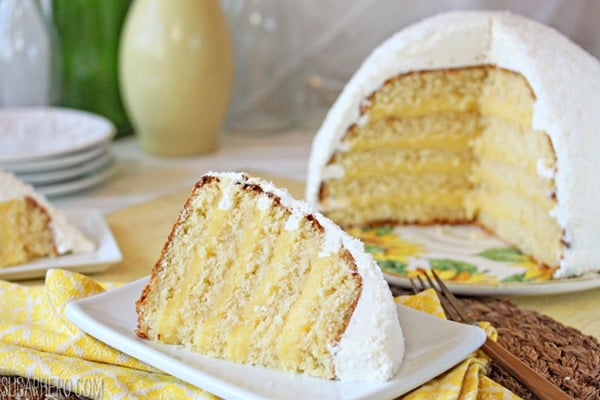
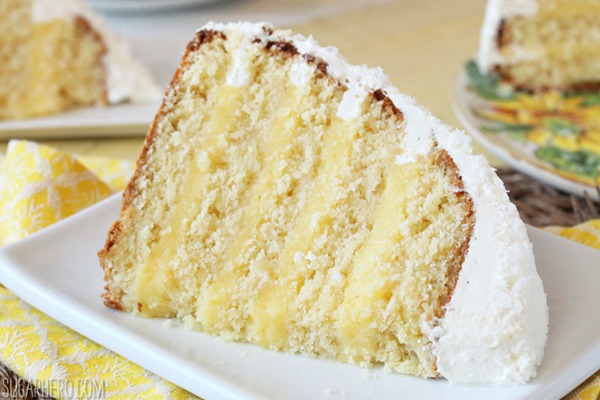
Be warned that this make a lot of cake–like, an overwhelming amount of cake–and I say that as someone whose greatest delight comes from having extra cake and sneaking illicit bites from the refrigerator. This bad boy is tall and substantial and can easily feed 16 people, or more. Come to think of it, it’s more of a Fat Snowman’s Belly than a Snowball. Too late to rebrand?
That’s all for now, friends. Tell me–what treat (Hostess or otherwise) would you love to enlarge? A Ding-Dong the size of your head? A Twinkie the size of your arm? This is a judgment-free zone!
💛More Desserts You’ll Love
Lime Cream Cheese Frosting

Clementine Cookies
Lemon Coconut Snowball Cake
Ingredients
For the Cake:
- 15.75 oz granulated sugar, (2 1/4 cups)
- 15.75 oz cake flour, (4 1/2 cups), sifted
- 2 tbsp baking powder
- 1 tsp salt
- 9 large egg yolks
- 1 1/2 cups milk
- 1 tbsp coconut extract
- 6 oz unsalted butter, at room temperature
- 6 oz sweetened shredded coconut, (1 1/2 cups)
For the Coconut Soaking Syrup:
- 1 cup water
- 1 cup granulated sugar
- 1 tsp coconut extract
For the Lemon Curd:
- .25 oz unflavored powdered gelatin, (1 envelope or 2½ tsp), optional, see Note below
- 2 tbsp cold water
- 6 oz unsalted butter
- 2 cups granulated sugar
- 4 large eggs
- 4 large egg yolks
- 1⅓ cup lemon juice, freshly squeezed
For the Coconut Buttercream and Assembly:
- 9 large egg whites
- 14 oz granulated sugar, (2 cups)
- 1 lb unsalted butter, soft but still cool
- 1-2 tsp coconut extract, to taste
- 1/4 tsp salt
- 1 lb sweetened shredded coconut, (4 cups)
Instructions
To Make the Cake:
- Preheat the oven to 350 F. Spray a 5 quart or 6 quart metal oven-safe bowl with nonstick cooking spray. Cut a sheet of parchment into strips about 2 inches wide and 14-16 inches long. Layer the strips in an asterisk shape inside the bowl, overlapping in the center. Spray the paper with nonstick cooking spray.
- Combine the sugar, cake flour, baking powder, and salt in the bowl of the stand mixer fitted with a paddle attachment. Mix on low speed for about a minute to combine the dry ingredients.
- Lightly whisk together the egg yolks and about a quarter of the milk (it doesn’t have to be a precise measurement) and the coconut extract, and set aside for now.
- Add the remaining milk and the softened butter to the large mixing bowl and mix on low speed until the dry ingredients are moistened. Turn the mixer to medium speed and mix for a minute and a half.
- Add the egg yolk mixture in three batches, mixing for 20-30 seconds after each addition, until you have a smooth batter. Scrape the bottom and sides of the bowl with a rubber spatula, and give the batter a few more stirs to make sure everything is incorporated. Add the shredded coconut, and stir it in by hand.
- Scrape the batter into the prepared bowl, and bake the cake for 85-95 minutes, until a toothpick inserted deep into the center comes out clean. If the top starts to get too brown during baking , cover it loosely with foil to prevent burning.
- Let the cake cool on a wire rack for 20 minutes, then gently turn it out and let it cool completely. I find it’s easiest to cut and stack cakes that have been chilled, so if you have time, wrap it in plastic wrap and put it in the freezer for at least 30 minutes, until it is firm but not frozen all the way through. If you are making this in advance, the cake can stay in the freezer for up to several weeks. Let it partially defrost, until it is firm but not rock-hard, before assembling.
To Make the Coconut Soaking Syrup
- Combine the water and sugar in a small saucepan over medium-high heat. Stir while the sugar dissolves, then bring the mixture to a simmer. When the sugar crystals are dissolved and the syrup is clear, remove the pan from the heat. Stir in the coconut extract, and allow to cool to room temperature before using.
To Make the Lemon Curd:
- Make the curd at least 4 hours in advance. (The curd can be made up to a week in advance and kept in the refrigerator until ready to use.) In a small bowl, combine the gelatin and cold water and whisk together. Set aside to let the gelatin absorb the water while you prepare the rest of the recipe.
- Fill the bottom of a double boiler (or a regular saucepan) with about an inch of water and bring it to a simmer on the stovetop.
- In a large mixing bowl, cream together the butter and the sugar with a handheld or stand mixer fitted with a whisk attachment until the mixture is light and fluffy. Slowly add the eggs and yolks, and beat for 1 minute more. Add the lemon juice and mix—at this point the mixture will look curdled.
- Pour the liquid into the top of a double boiler or a bowl that fits snugly over your saucepan. (I actually like to use the metal mixing bowl that goes on my stand mixer so I’m not dirtying too many dishes.) Cook the mixture over the simmering water, whisking frequently, until it thickens enough to coat the back of a spoon. If you want to use a candy thermometer, cook the curd until it reaches 175 degrees F.
- Once the curd thickens, remove the pan from the heat and add the gelatin. Whisk until the gelatin liquefies and everything is well-mixed. Pour the curd through a fine mesh strainer into a bowl to remove any bits of cooked egg. Press a layer of cling wrap directly on top of the curd, and refrigerate it until it is chilled and thick.
To Make the Coconut Buttercream:
- Combine the egg whites and the granulated sugar in the bowl of a large stand mixer, and whisk them together. Choose a small saucepan that lets you fit the base of the stand mixer snugly into the top of the saucepan—this is your makeshift hot water bath. (Alternately, you can use a different bowl or an actual bain marie and then transfer the mixture to a mixing bowl once it’s heated.) Add an inch of water to the bottom of the saucepan, and bring the water to a simmer.
- Place the mixing bowl on top of the saucepan, making sure that the bottom isn’t in contact with the water, and heat the egg white mixture. Whisk frequently so that the egg whites don’t cook. Continue to heat the whites until they are hot to the touch, and when you rub a bit between your fingers, you don’t feel any grittiness from the sugar. Once the whites are hot, transfer the mixing bowl to your mixer and fit it with a whisk attachment.
- Beat the whites on medium-high speed until they are a shiny, stiff, voluminous meringue, and are no longer warm to the touch—feel the outside of the bowl, and make sure that it is around room temperature. Depending on your mixer and the temperature of your environment, this may take 15-20 minutes, or more. Reduce the speed to medium-low and add the softened but cool butter in small chunks, a tablespoon at a time, making sure to wait in between additions. It may separate or look a little gloopy at this point—fear not. Once all of the butter is added, increase the speed again and whip until it comes together and is light and fluffy. If, after 5 minutes, it hasn’t come together, refrigerate the mixing bowl for 5-7 minutes, to cool the mixture down, and whip it again until it has thickened and is smooth and silky. Add the coconut extract and salt.
- The buttercream can be made in advance and kept at room temperature if you’re going to use it the same day, or refrigerated. If it has been chilled, let it sit at room temperature until completely soft, then re-whip it to get the smooth texture back before you use it.
To Assemble:
- Trim a cardboard cake round to fit the bottom of the cake (the bottom is the widest part) and place the cake on the cardboard. Use a sharp serrated knife to cut the cake into five thin layers. If you like thicker cake layers, you can choose to cut it in four equal layers instead.
- Use a pastry brush to brush the bottom layer with the coconut soaking syrup. Fit a piping bag with a large round tip, and fill the bag with coconut buttercream. Pipe a thick line of buttercream all along the edge of the cake layer to form a “dam” and prevent the lemon curd from leaking out.
- Whisk the curd gently to loosen it and break up any lumps, then spread a thick layer of curd on the cake, filling in the space in the buttercream circle.
- Place the next cake layer on top of the first, and repeat the process of soaking syrup, buttercream, and curd. Continue until all of the cake layers have been used. Spread a very thin layer of buttercream all along the outside of the cake, to seal in any crumbs. Refrigerate the cake for about an hour, or until the buttercream is firm, so that your cake is stable and can withstand the final decorating.
- Spread a thicker layer of buttercream all along the outside of the cake. It doesn’t need to be smooth, since it will be covered with coconut, but do make sure that no dark spots of cake are peeking through the frosting. Pipe a thick mound on top of the cake, so that it has a round shape instead of a flat top, and spread it smooth with a spatula.
- If you want really finely chopped coconut on the outside of your cake, place the shredded coconut in a food processor and process it in long bursts until it’s in small pieces. (This step is optional, but if you’re like me and hate long strands of coconut sticking out of your baked goods, it’s a lifesaver!) Pour the coconut into a wide shallow bowl.
- Hold the cake, on its cardboard, in your non-dominant hand over the bowl of coconut. Pick up handfuls of coconut and press them into the sides of the cake, letting the excess drop back into the bowl. Continue until the whole cake is covered with coconut.
Recipe Notes
Measuring Tips
Our recipes are developed using weight measurements, and we highly recommend using a kitchen scale for baking whenever possible. However, if you prefer to use cups, volume measurements are provided as well. PLEASE NOTE: the adage “8 oz = 1 cup” is NOT true when speaking about weight, so don’t be concerned if the measurements don’t fit this formula.
Want to learn more about baking measurements and conversion?




I have now made this cake twice. It is not quick. It is not easy. But it is spectacular–in its taste, texture, and appearance. Three comments: 1) When making the lemon curd, I couldn’t manage to beat the sugar and butter until “light and fluffy” , given the high sugar to butter ratio–but the fact that it stayed somewhat grainy at that stage ultimately didn’t matter. 2) Many recipes call for butter in terms of volume (tablespoons/cups) rather than weight, as a consequence of which I almost it misread 6 ounces as six tablespoons. 3) Coconut extract is not available to me locally and is available through Amazon only in amounts larger than I need. I forewent the extract the first time I made the cake, and splurged on a six pack of the stuff this last time. It IS a little better with the extract, but not so much better that you should forego making the cake just because you can’t lay your hands on it (the cake is still plenty coconutty).
Hey Charlie, thanks so much for your feedback. I am happy to hear you like it so much! Thanks for the tips, I’m glad you are able to make it work for you!
Another fab recipe. Glad you are such a wonderful cook.
Hi Marie, thank you so much! I really appreciate that!