
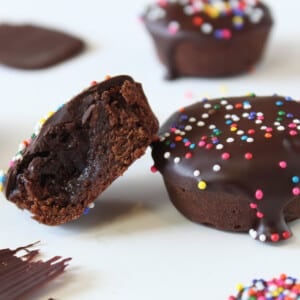
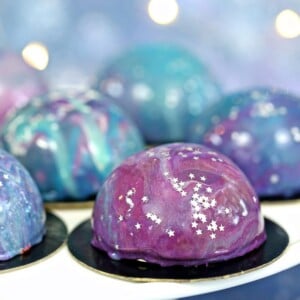
Galaxy Mousse Cakes are almost too pretty to be real! Mini chocolate mousse cakes on a brownie base are covered with a gorgeous glossy mirror glaze that’s swirled to look like the galaxy. They are delicious, edible works of art!

I can’t believe it’s taken me this long to try my hand at a mirror glaze cake! I feel like I’ve been seeing them on my Instagram feed for about a decade now, although it’s probably only been in the past year that they’ve become really popular. (…on my Instagram feed…and possibly nowhere else…the standards for popularity are pretty low around here.)

If you’re not familiar with mirror glaze, it’s a white chocolate glaze made with gelatin that is poured over cakes—usually mousse or other soft molded desserts—to give them an ultra-shiny appearance, like the surface of a mirror.
You can do SO many cool effects with mirror glazes just by adding different colors, pouring in patterns, or scraping the surface of the cake in different ways. You can create cracks, spiderwebs, tie-dye effects, and so much more. For my first go-round with mirror glaze, I decided to tackle a small subject: THE GALAXY.
*insert epic maniacal laughter here*

Here’s the bad news: this recipe has a lot of steps because there are 3 different components: the brownie base, the chocolate mousse, and the mirror glaze itself. You can skip the homemade brownies and go straight for a box mix, but it’s still going to be quite the time investment in the kitchen.

Here’s the good news: the mirror glaze itself is simple to make, easy to pour and use (what a welcome surprise that was!), and SO FREAKING COOL IN REAL LIFE.
SORRY FOR SHOUTING.
IT’S JUST REALLY COOL.

But I’m getting ahead of myself. First, the innards.
The chocolate mousse is actually sort of a cheater’s version of mousse—no eggs are involved. Instead, it uses gelatin to give the mousse some stability, and is flavored with rich chocolate.
I knew these would be intensely chocolatey, so I planned to make smaller, mini mousse cakes, both to control portions and for the cuteness factor. I thought these 3-inch spheres were the perfect serving size—enough to satisfy a big sweets craving, but not a ridiculous amount of mousse. And I love how the sphere shape makes them look even more space-themed!
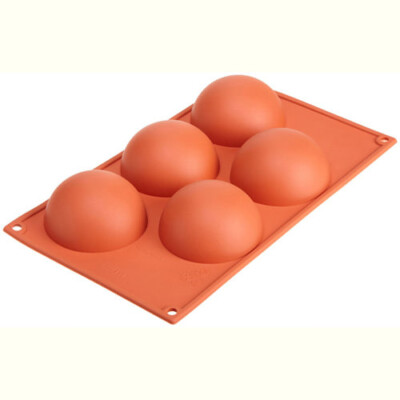
I used this silicone mold to shape the desserts. (You’ll need 2 to make the 10 cakes this recipe produces.) You don’t have to use this one, but I would be sure to pick a mold that’s deep enough to hold both mousse and brownie, smooth on the inside, so the top of the mousse won’t be textured and ruin the mirror effect, and large enough to produce a dessert that’s satisfying by itself. I don’t even know you, but I DO know you don’t have time to make a kazillion bite-sized galaxy mousse cakelets.
Oh, and you DEFINITELY want silicone, as opposed to traditional pans. Being able to flex the mold inside-out to remove the mousse is a must!

The mirror glaze seems intimidating. Believe me, I know. All those Instagram videos have been taunting me for the last year, but I had the fear in my belly. The fear that it would be a long project that would most likely leave my kitchen floors covered in sticky gelatin glaze. The last part was true (because I’m a klutz) but the first part is a lie. Mirror glaze is really not difficult! I hope the video up top will give you an idea of how simple it can be.
I went all-out with the galaxy theme, and decorated my mini mousse cakes with an assortment of gel food colors. I used swirls of navy, teal, purple, pink, and white colors (which are probably way more colorful than the actual Milky Way, let’s be real.) I finished them off with a pinch of edible silver star sprinkles, and they looked like miniature works of art. Completely edible, totally delicious works of art.
Galaxies aren’t your thing? You can do them all one color, swirl just 2 together, or go for a completely different color scheme than the one I chose.

Mirror Glaze Tips for Success
- Use real white chocolate! I’m sorry, I know it’s much more expensive, but you REALLY don’t want to cheap out and use “white chips” for this one. The palm kernel oil or other substitute fats in the white chips just doesn’t behave the same as real cocoa butter. (It doesn’t taste as good, either!) So you can look for white chocolate chips made with cocoa butter, or buy bars of real white chocolate and chop them up.
- COLD is the name of the game when it comes to molding the mousse. Give the cakes at least 2 hours in the freezer, but know that they might require more depending on your specific freezer. Well-frozen mousse will pop right out of the mold, and soft mousse with leave little bits clinging to the edges, and this rough texture is no good for the mirror glaze. After they’re unmolded, put them back in the freezer so they’re cold when you glaze them! A cold mousse cake is a happy mousse cake.
- NOT COLD is what you want when you serve them. (Sorry, I was trying to be clever but that’s just bad grammar.) I prefer to have them closer to room temperature, because then the brownies are soft and fudgy, and the glaze is very easy to cut through with a spoon. You may not agree…keep tasting them to see what you prefer! 🙂
- Speaking of the glaze…be aware that the finished texture remains sticky (some say rubbery) and it’s unlike most other cake glazes you’ve probably tried. Some people love it, some people peel it off like fondant. And the taste? It just tastes like sweet white chocolate. I found it helpful to use a candy thermometer to monitor the temperature of the glaze. If you are new to using a thermometer, check out my guides for how to use a thermometer and how to test and calibrate a thermometer correctly.
- Have fun! Be creative! Play with your food!
🍰 More Cake Recipes You’ll Love
- Chocolate Raspberry Mousse Cake
- Charlotte Royale Cake
- Strawberry Swirl Bundt Cake
- Strawberries and Cream Layer Cake
- Chocolate-Covered Strawberry Cakes
Brownie Lava Bites
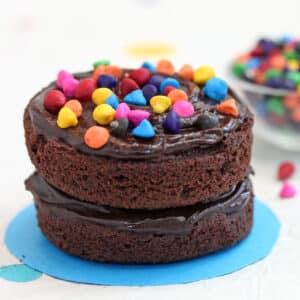
Cosmic Brownie Mini Cakes
Galaxy Mousse Cakes
Ingredients
For the Brownies:
- 6 oz unsalted butter
- 8 oz semi-sweet chocolate, chopped
- 2 large eggs
- 2 tsp instant espresso powder, optional
- 2 tsp vanilla extract
- 5 oz granulated sugar, (3/4 cup)
- 2.25 oz all-purpose flour, (1/2 cup)
- 1 tsp baking powder
- ½ tsp salt
For the Chocolate Mousse:
- 9 oz semi-sweet chocolate, chopped, or can substitute 1 ½ cups chocolate chips
- 1 3/4 cup heavy cream, divided use
- Pinch of salt
- 1 packet unflavored powdered gelatin, (.25 oz)
- 2 tbsp water
For the Mirror Glaze:
- 3 packets unflavored powdered gelatin, (.75 oz)
- 9 oz water, divided use
- 10.5 oz granulated sugar, (1 ½ cups)
- 7 oz sweetened condensed milk, (1/2 of a standard 14-oz can)
- 12 oz white chocolate, chopped, or can substitute 2 cups white chocolate chips
- Assorted gel food coloring, I used the following Americolor gel food colors: royal blue, sky blue, electric purple, electric pink, super black & bright white
Instructions
To Make the Brownies:
- Line a 9” x 13” baking pan with foil, and spray the foil with nonstick cooking spray. Preheat the oven to 350 F.
- Combine the butter and chopped semi-sweet chocolate in a large microwave-safe bowl. Melt them together in 30-second increments, stirring after every 30 seconds to prevent overheating. Once melted and smooth, let it cool to room temperature.
- Whisk in the eggs one at a time, then whisk in the instant espresso, vanilla, and granulated sugar. Continue to whisk until the texture smooths and thickens and the batter becomes glossy, like pudding. Finally, add the flour, baking powder, and salt, and stir in gently with a spatula until no streaks of flour remain.
- Scrape the batter into the prepared pan and smooth it into an even layer. Bake the brownies for 15 minutes, then remove the pan from the oven and gently rap it on the counter to release any air bubbles. Return it to the oven and bake for an additional 5 minutes (20 minutes of baking total), or until a toothpick inserted into the center comes out with just a few moist crumbs attached.
- Let the brownies cool completely, then use a 2 ¾” circular cutter to cut out 10 brownie circles. If the tops of the brownies are uneven, gently press down on them to flatten them out.
- Place the brownie circles on a covered baking sheet and freeze them until you’re ready to use them.
To Make the Chocolate Mousse:
- Combine the chopped chocolate, 3/4 cup heavy cream, and salt in a large microwave-safe bowl. Microwave in 30-second increments, whisking every 30 seconds, until the chocolate has melted and the mixture is smooth. Let it cool until it’s slightly warm or room temperature, stirring occasionally.
- While you wait for the chocolate mixture to cool, prepare the gelatin. Whisk together the gelatin and the cold water in a small bowl, and set it aside to let the gelatin absorb the water.
- Whip the remaining 1 cup heavy cream to firm peaks, and set it aside for a moment.
- When the chocolate is at room temperature, it’s showtime! Microwave the bowl of gelatin for 10-12 seconds, until it is melted. Whisk the melted gelatin and chocolate mixture together.
- Fold half of the whipped cream into the chocolate, and once it’s incorporated, gently fold in the remaining whipped cream.
- Make sure your silicone molds are clean and dry. Use a large spoon to fill the half-sphere cavities, leaving about a half-inch of space at the top. Move the spoon around as you fill them to make sure the mousse is evenly distributed and there are no air pockets that will show up later.
- Take a frozen brownie round and press it on top of the mousse, pressing firmly so the mousse comes up around the sides of the brownie. Use a spatula to smooth around the edges so they’re perfectly clean.
- Place the silicone molds on a baking sheet and freeze for at least 2 hours, until VERY firm. (Freezing time may depend on your individual freezer—when in doubt, err on the side of more time!)
- Once frozen, unmold and place each dessert on a small cardboard circle—this will make them easier to transfer later. Keep them in the freezer until you’re ready to glaze them.
To Make the Mirror Glaze:
- Whisk together the gelatin and 4 oz (1/2 cup) cold water in a bowl, and set it aside to let the gelatin absorb the water.
- Combine the remaining 5 oz water, sugar, and condensed milk in a medium saucepan, and place the pan over medium heat. Stir while the sugar dissolves, and bring the mixture to a simmer.
- Once it is simmering steadily, remove it from the heat and add the gelatin (no need to melt the gelatin first—just scrape the big blob out of the bowl!) Whisk the gelatin as the heat from the pan dissolves it, and whisk until it is almost entirely incorporated. A few small pieces of gelatin are fine.
- Add the white chocolate to the pan, and let it sit for a few minutes to soften the chocolate. If you have an immersion blender, that is best to use—just stick it right in the pan and blend until the chocolate is melted and the mixture is very smooth. If not, you can whisk everything together, just try to avoid vigorous whisking that will create a lot of air bubbles.
- Divide your glaze into as many bowls as you want. I find it’s easiest to have a few “base colors” that are larger portions, and a few “accent colors” that are smaller portions. I made 3 base colors, using Americolor Sky Blue, Royal Blue, and a mix of Royal Blue + a drop of Super Black. I made 3 accent colors using Americolor Electric Purple, Electric Pink, and Super White. All you need to do is whisk a few drops of food coloring into each bowl of glaze.
- Let the bowls set until they cool down to about 95 Fahrenheit (35 C). An instant-read thermometer is the easiest way to check this, but if you don’t have one, it should feel barely warm on your fingertip, and be thick enough to coat it. Stir the bowls occasionally as they cool, so they don’t form a skin on top.
- Take the mousse cakes from the freezer. Cover a baking sheet with parchment or waxed paper for easy clean-up, and set small jars or cups on the sheet for the mousse cakes to balance on—try to use ones that are smaller than the base of the cakes, so the glaze can drip down cleanly.
- In a new bowl, pour about 1/3 cup of one of your base colors of glaze, then drizzle the top of it with a few other colors—there’s no rhyme or reason here, so go crazy! After you’ve added all the colors you want, give it a brief stir to swirl everything together, but do NOT swirl too much and muddy the colors! Take this bowl of glaze and pour it over one of the cakes, swirling it around the top to make sure that all the sides are covered. Let the glaze drip down the cake onto the baking sheet.
- If it is dripping quickly and is a very thin layer, it’s too warm and needs to cool down a few more degrees. If it is gloopy and clinging to the cake and barely dripping, it is too cool. You can warm the bowls of glaze BRIEFLY in the microwave (start with 8-10 seconds each) and stir until they’re fluid again, and keep re-warming as necessary while glazing the cakes.
- Repeat the swirling and glazing process with the rest of the cakes. It’s fun to give them all different color schemes so they each look unique. If desired, finish the cakes with a pinch of edible silver star sprinkles. (Any remaining glaze can be saved and used on a different cake within about a week or so. Make sure it stays covered tightly with plastic wrap so it doesn’t form a skin and dry out.)
- Let the cakes sit for about 15 minutes, until the glaze is semi-set, then transfer them to small plates. Chill for an additional 10-15 minutes until the glaze is full set.
- I actually prefer to eat these when they’re closer to room temperature, so the brownie layer is softer, but that’s not everyone’s preference, so do what tastes best to you. Enjoy!
Video

Recipe Notes
Measuring Tips
Our recipes are developed using weight measurements, and we highly recommend using a kitchen scale for baking whenever possible. However, if you prefer to use cups, volume measurements are provided as well. PLEASE NOTE: the adage “8 oz = 1 cup” is NOT true when speaking about weight, so don’t be concerned if the measurements don’t fit this formula.
Want to learn more about baking measurements and conversion?


I made 50 of these little beauties for my son and daughter-in-law’s wedding rehearsal dinner. They not only looked beautiful, but tasted amazing too! Thank you for the recipe and detailed instructions!
50!? Wow you’re AMAZING! I hope they were a hit! Thanks for sharing 🙂
brownie recipe was delicious, so was the chocolate mousse. I was not a fan of the glaze. It was too sticky and just tasted sweet – nothing special and a pain in the neck to manipulate. In the future, I’ll stop with the first two steps!
Hi Ingrid! I am so glad you enjoyed the brownie and chocolate mousse. Thank you for your feedback!
Will the frozen mousse, with brownie bottom, release without sticking to the paper if I use paper cupcake liners instead of the molds? I want to make this for my book club that is happening in just a couple of days and there’s not enough time to order and receive the proper molds! Thanks!
Hi Kathy. I’ve never thought of trying it that way before. I would assume that if the mousse is well frozen, you should be able to peel the paper off fairly easily. It will change the shape a little but they will still taste great for your book club friends! Let us know how it turns out. Good luck!
Your mousse recipe is FANTASTIC! Although mine ended up looking exactly like upside down cupcakes, they were amazing! The paper cupcake liners peeled off the mousse easily. Everyone absolutely loved them. I sprinkled colored sanding sugar on top since I didn’t use the mirror glaze.
That’s AWESOME! I’m so glad they turned out so well for you. Yeah for being a SugarHero!
Can I freeze the brownie/mousse cakes a day or 2 before I make/use the glaze? I’m wondering because i don’t know how the gelatin will react in the mousse when freezing overnight
Hi Kelsie! Great question. You can definitely freeze this a day or 2 in advance. Just keep in mind that the mousse will dry out a bit and the texture gets less appetizing with time. Try to keep it well-wrapped or put a lid over the pan so that it doesn’t dry out. Thaw overnight in the fridge the day before you plan to eat it. Glaze it once thawed on the the day you plan to eat it. Happy Baking!
Hello I’m going to try this recipe for my nephews birthday. I’m wondering will they fit on top of cupcakes after making them.
Hi. The molds have a diameter of 3.15 inches. Regular cupcakes have a diameter of 2.25 inches and jumbo cupcakes have a diameter of 3.5 inches . . . so I would say they’d be too big for a regular cupcake but could work for a jumbo sized cupcake. The jumbo size will be slightly larger than the galaxy mousse cakes. If the exposed area of the cupcake bothers you, you could always add a ring of buttercream. Or, you could try making the jumbo cupcakes with less batter so that the top diameter is slightly smaller. I hope that helps. I’d love to see how they turn out! Happy baking.
Can’t wait to try this recipe!!!
I hope you enjoy it!
Hey Elizabeth. I made these 6 years ago for my daughter’s 16th birthday. I’m spending this Christmas with her and she’s asked for them again. I remember the recipe had some sort of flavored coffee creamer (salted caramel maybe?) in it but I don’t see it in the ingredients or method now. Can you let me know what it was and where it went? Please and thank you!
haha, no problem! I did change the recipe to make the ingredients more accessible to everyone, but also linked the original in the recipe card in case that’s what you prefer. Happy birthday to your daughter!!
Hi! I made a trial run of these today for a daddy- daughter event next week. They are delicious, but I am struggling to cleanly transfer them to the individual rounds after the mirror glaze- any tips for the best way to do that? Thanks!
Hi Chelsea! Elizabeth recommends placing each cake on an individual board exactly the size of the base of the cakes before pouring the glaze. Then use two small offset spatulas under the board to transfer it to the larger (serving) boards. I hope that helps. Don’t hesitate to reach out again if you need more help. We hope they turn out awesome for your event. Best!
Hi! I’m wanting to make these for Super Bowl but needed to get some clarification first! So I’m Slightly confused…the video shows a hersheys coffee creamer used, but the recipe doesn’t mention it.
Also, could I make the mousse domes the day before and just keep in freezer then the next day take out and do the glaze? Thank you!
Hi Jordanna! This recipe was originally made with a coffee creamer but has since been updated and only uses cream. There is a link to the original recipe in the notes section of the recipe card if you’d like to use the creamer instead. We need to get a new video for the post. Sorry that caused some confusion.
It’s totally fine to make the mousse domes in adavance and keep them frozen until you are ready to do the glaze. The extra freeze time will just give the mousse more time to set. Best of luck with the recipe. I hope they turn out amazing for you!
I see you use gel coloring for the glaze. I thought you couldn’t use gel coloring for chocolate? Would powdered food colorings work for this recipe? Thanks!
Hi Laurie. You are fine to use powdered food coloring for this recipe. You are correct that gel food coloring shouldn’t be used in chocolate but that’s just straight chocolate. Once chocolate has other things added to it, like this glaze, seizing is no longer an issue and you can use gel. I hope that helps. Enjoy the recipe!
Hi made 500 of these for a wedding reception. They turned out fabulous . They froze well and were stayed shiny once thawed. Thank for a great idea and well thought out recipe.
Wow!! 500 is an impressive amount! Thanks for leaving a recipe review. We are so happy they turned out well for you. Cheers.