
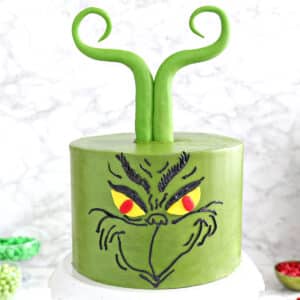
This showstopping green Grinch cake is decorated with a perfectly Grinchy face, and conceals a wonderful secret–a red heart on the inside!

Grinch Cake With A Heart Inside
I’ve been excited to share this cake with you for over a year now! I actually made this cake last year but, as so often happens, I ran out of time and didn’t have a chance to post it before Christmas. Somehow a Grinch cake didn’t seem appropriate for Valentine’s Day, so it sat in the vault for a year until it was Grinch season once again.
So I’m coming at you now, with a whole year’s worth of pent-up enthusiasm and Grinchy musings at the ready. Let’s do this.

The character of the Grinch is full of contradictions. He starts off as almost pure evil, stealing an entire town’s Christmas supplies, from their stockings and gifts to their fireplace logs. But by the end of the book, he’s had a change of heart–literally! He realizes the true meaning of Christmas and his small, shriveled heart grows three sizes. It’s a sweet story, well deserving of being immortalized in sweet cake.

This Grinch Cake, then, represents that duality of character. The outside is a simple line drawing of his face, set in its trademark scheming grin…
but the inside contains a big, bright red heart, to represent the Grinch’s big heart at the end!

Isn’t that stunning?! The combination of the bright green cake and the bold red heart gets me every time. Seeing this cake makes MY heart grow three sizes, too.
There are a few ways to hide a heart inside of a cake. One way is to cut hearts out of baked red cake, line the heart pieces up inside a cake pan, pour cake batter over them, and bake everything together–similar to the way I baked a star inside this American flag cake.

That method works well, but for this cake I wanted to try something different. This Grinch cake gave me the perfect opportunity to attempt hiding a heart inside a cake, and I have to say, I love the way it turned out! I’ll be sharing my recipe and tips down below so you can recreate this cake for yourself.

As you’ll see from the recipe and video, this method is definitely more work than your standard layer cake. Of course! You don’t just get amazing hidden hearts while slapping together some cake and frosting all casual-like.
Even though it requires a bit of precision (and maybe a sprinkling of magic Who-ville fairy dust), I would say it’s more than worth the time it takes to put together. Ultimately, the work is not that hard compared to the stunning, vibrant visual payout you get. I have a few notes and suggestions to help you below, and then a video showing how it’s done.

Grinch Cake Tips
- This cake requires several extended chilling periods, and the fondant hair will take at least 24 hours to dry, if not 48+. Give yourself plenty of time to make this cake! It can definitely be assembled in a day (minus the fondant), but if you have the time, consider doing it over the course of 2 days so you’re not overly stressed.
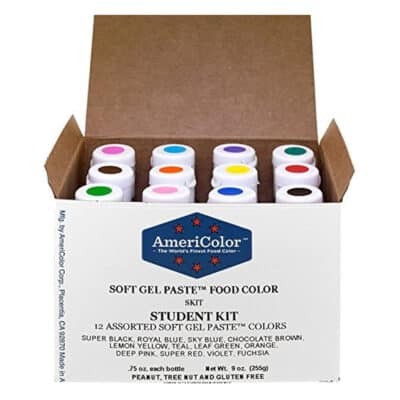
- Nailing the perfect Grinchy color is important. I used Americolor gels, and started with a base of Leaf Green. Then I added Avocado, Lemon Yellow, and Ivory to muddy it up and give it more of a brownish-yellow undertone. I used this same combination for the cake batter, buttercream, and fondant.
- For the Grinch’s face, I found a reference picture online and printed it out. Then I measured the size of my cake, and practiced drawing the face, that size, on a piece of paper. This helped me to know how big to make each element. You can practice a few times, or practice piping it on a piece of parchment paper, before you try it on a cake.
- Speaking of piping on cake…make sure your cake is very chilled when you’re decorating it. This way, if you make a mistake, you can easily scrape off the black frosting and try again without harming the smooth finish of the cake.
- Finally, don’t expect perfection! The heart is a soft(ish) cake pop mixture, and you’re basically carving inside the cake on a wing and a prayer. It’s probably going to be a little wonky. But it will also be amazing, and charming, and that’s good enough!

💚More Grinch Goodies from Other Blogs
- Grinch Pound Cake from Bearfoot Baker
- Grinch Pancakes from Hungry Happenings
- Grinch Cheese Ball from Homemade Hooplah
- Grinch Cookies from In Katrina’s Kitchen
- Grinch Fudge from How to Make Easy Fudge
💚Christmas Layer Cakes You’ll Love
- Candy Cane Chocolate Cake
- Peppermint Mocha Mousse Cake
- Candy Cane Mousse Cake
- Peanut Butter Cup Yule Log
- Candy Cane Cake
- Chocolate Orange Cake
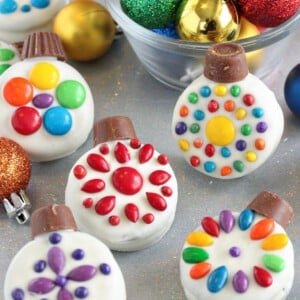
Oreo Cookie Christmas Ornaments
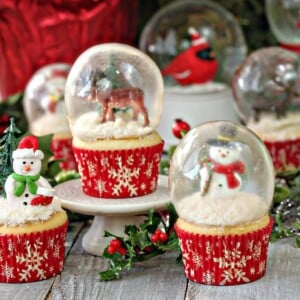
Snow Globe Cupcakes

Leave a Review!
If you make this recipe, let us know! Leave a ⭐️⭐️⭐️⭐️⭐️ rating on the recipe below, and leave a comment, take a photo and tag me on Instagram @elabau, or use #sugarhero on IG!
Grinch Cake
Ingredients
For the Fondant Decorations:
- 8 oz green fondant
- 2 skewers or dowels
- Yellow fondant
- Red fondant
For the Green Cake:
- 21 oz granulated sugar, (3 cups)
- 21 oz cake flour, (6 cups)
- 2 TBSP + 2 tsp baking powder
- 1.5 tsp salt
- 8 fl oz large egg whites, (about 8 large whites)
- 2 cups milk
- 1 TBSP vanilla extract
- 12 oz unsalted butter, at room temperature
- Assorted gel food coloring, I used Americolor Leaf Green, Avocado, Lemon Yellow, and Ivory
For the Red Cake:
- 6 oz granulated sugar, (7/8 cup)
- 6 oz cake flour, (1 1/2 cups)
- 2 ¼ tsp baking powder
- 1/4 tsp salt
- 3 fl oz large egg whites, (about 3 large whites)
- 1/2 cup milk
- 1 tsp vanilla extract
- 3 oz unsalted butter, at room temperature
- red gel food coloring, I used Americolor Super Red
For the Buttercream:
- 6 fl oz pasteurized liquid egg whites, (3/4 cup, see Note below)
- 24 oz powdered sugar, (6 cups)
- 1/2 tsp salt
- 24 oz unsalted butter, (6 sticks), at room temperature
- 2 TBSP vanilla extract
- Assorted gel food coloring, Leaf Green, Avocado, Lemon Yellow, Ivory, Super Red, and Super Black
Instructions
To Make the Fondant Decorations:
- The fondant hair will need extensive time to dry, so make it at least a day ahead of when you want to assemble the cake.
- Dust your work surface with powdered sugar, and knead the green fondant until it is smooth and supple. If you can’t find green, or if your green is the wrong shade, use food coloring to make a deep Grinchy green-yellow color. I primarily used Americolor Leaf Green, then adjusted the shade with Avocado, Lemon Yellow, and Ivory, until I got a color that matched the one from the Grinch movie.
- Divide the fondant in half. Roll half into a thick worm about ¾-inch in diameter. Keep one end of the worm thick, and roll the other half very long and thin, tapering to a point. Arrange the fondant piece so the thick end is straight up and down, then bring it out to the side and curl the tapered end up and around. (Refer to photo for guidance.)
- Repeat the process with the second half of the fondant, angling it off to the opposite side. You may not need to use all of the fondant. Brush the straight section with a bit of water on the side and press the 2 pieces together so they meld together at the base.
- Insert skewers or dowels into the bottom of the hair, and let the fondant piece dry on a powdered sugar-dusted baking sheet for at least 24 hours. If you are in a humid climate it may take several days for the fondant to dry hard enough to put on the cake, so leave yourself as much time as possible.
- To make the Grinch’s eyes, roll a bit of yellow fondant until it is 1/8-inch thick. Cut out two 2-inch ovals, then cut off the tops of the ovals to make them flat. Roll two red balls of fondant and press them between your fingers to flatten them out. Attach the red pupils to the center of the yellow eyes, and let them dry.
- Note: To speed up the fondant drying process, you can knead some CMC powder (Tylose) into the fondant before shaping the hair, which will cause it to get very hard. You can also try baking the fondant in an oven on the very lowest setting for 10-15 minutes. Both of these methods can help the fondant harden faster, but still try to leave yourself as much drying time as possible.
To Make the Cakes:
- Make the green cakes first. Preheat the oven to 350 F. Line four 8-inch cake pans with parchment rounds, and spray the parchment and pan sides with nonstick cooking spray.
- Combine the sugar, cake flour, baking powder, and salt in the bowl of the stand mixer fitted with a paddle attachment. Mix on low speed for about a minute to combine the dry ingredients.
- Lightly whisk together the egg whites together with a quarter of the milk and the vanilla extract, and set aside for now.
- Add the remaining milk and the softened butter to the large mixing bowl and mix on low speed until the dry ingredients are moistened. Turn the mixer to medium speed and mix for a minute and a half.
- Add the egg white mixture in three batches, mixing for 20-30 seconds after each addition, until you have a smooth batter. Scrape the bottom and sides of the bowl with a rubber spatula, and give the batter a few more stirs to make sure everything is incorporated. Add food coloring to make a perfectly Grinchy green color. I started with Americolor Leaf Green, then adjusted the shade with Avocado, Lemon Yellow, and Ivory.
- Divide the batter evenly between the 4 pans. Each should get about 21 oz of cake batter. Bake the cakes at 350 F for 35-40 minutes, until the sides just start pulling away from the pan, and a toothpick inserted into the center comes out clean.
- Let the cakes cool on a wire rack for 10 minutes, then gently turn them out and let them cool completely. Wrap them with plastic wrap and put them in the freezer for at least 30 minutes, until they are firm but not frozen all the way through. If you are making these in advance, they can stay in the freezer for up to several weeks. Let them partially defrost, until they are firm but not rock-hard, before assembling.
- Make the red cake the same way you made the green cakes, but use red gel food coloring instead of green. (I used Americolor Super Red.)
- Pour the batter into an 8” cake pan that is lined with parchment and sprayed with nonstick cooking spray. Bake at 350 F for 35-40 minutes, then follow the same cooling and wrapping procedure as above.
To Make the Buttercream:
- Combine the whites, powdered sugar, and salt in the bowl of a large stand mixer fitted with a paddle attachment. Mix everything together on low speed, until the sugar is moistened and no dry patches remain. Turn off the mixer, scrape down the sides and bottom of the bowl with a spatula, then turn the mixer to medium speed. Beat on medium for 5 minutes.
- After 5 minutes, turn the mixer to medium-low and start adding the softened room temperature butter, 1-2 tablespoons at a time. Once all of the butter is incorporated, add the vanilla extract and mix it in. Stop the mixer and scrape down the bottom and sides once more. Turn the speed to medium and beat the buttercream for 10 minutes. At the end, you’ll have a frosting with a wonderfully light and creamy texture.
- Color the frosting: separate out about ½ cup of frosting and color it black. Place the black frosting in a piping bag fitted with a small round #2 tip. Separate out 1 cup of frosting, color it red, and set it aside. Finally, color the remaining frosting the same green as your green cakes.
To Assemble:
- Place an 8-inch cake on a cake cardboard and place it on a cake turntable. Place a big dollop of green frosting on the cake layer—about 2/3 cup—and use a metal spatula to spread the frosting into a layer going all the way out to the edges of the cake. Top with a second green cake round. Spread a thin layer of frosting around the sides, to lock in any crumbs and provide some stability.
- Repeat this process with the other 2 cake layers. At this point you should have 2 cakes, each consisting of two layers. Refrigerate the cakes for an hour, or freeze them for 30 minutes, until they are very firm.
- While you wait for the cakes to chill, prepare the red filling. Crumble the red cake into a large bowl, working it between your fingers until it is in fine crumbs. Add about half of the red frosting, and stir them together. Gradually add more red frosting, adding just enough so that the cake is moist and holds together when you press it into a ball. Don’t add so much that it becomes goopy or greasy.
- When the green cakes are very firm, leave 1 in the refrigerator while you work on the other. Make the top of the heart first. Use a large round 5” cookie cutter (or a 5” bowl) to make an indent in the center of your cake to help you know where to cut.
- For the top, you want to first think about carving out a “W” shape—the top of the heart needs to have a peak in the center, sticking up. Take a sharp paring knife and start cutting around the circle indent you made, angling the knife down and inward about halfway to the center of the cake. Once you’ve gone all the way around the circle, place your knife in the center of the cake, this time angling it outward as you cut around, trying to get the angle right so that it meets your previous cut. Once you’ve gone all the way around, pop out the piece of cake you cut. You should have a crude “W” shape with a cone of cake in the middle.
- Use a spoon to round out the cake’s cavity, scooping out cake from the center as necessary. Trim the cone in the middle so it has a smooth, organic shape to it rather than being a jagged point. Think about how smooth and round the top of a heart is, and try to recreate that shape.
- Once you have scooped, trimmed, and smoothed, take the red cake mixture and press it into the cavity. Fill the hole completely, then smooth the top of the cake so the red cake is completely level with the green cake. Refrigerate this layer while you work on the second one.
- Good news–the bottom of the heart is easier! Mark the same 5-inch circle on top, and then cut around it. As you cut, angle your knife down toward the center of the cake, so you cut out a cone shape. Pop out the cone piece, and do any necessary trimming to make the bottom of the heart smooth and even. Fill the cavity with red cake and smooth the top.
- Spread a thin layer of green frosting around the edge of the cake. Take the second cake, the one with the top of the heart, and flip it over onto the bottom layer. Spread a thin layer of frosting all along the sides and top of the cake, then refrigerate it until completely firm, at least 45 minutes.
- To finish the cake, spread a thicker layer of frosting on the top and sides of the cake, and smooth it out with a spatula or bench scraper. Press the fondant eyes into the sides of the cake. Draw on a Grinch face with the black frosting. (I used a reference picture I found online and sketched out the face first, making it the approximate size it would be on the cake—this helped me translate it from the page to the cake surface.) Finally, press the fondant hair into the top of the cake.
- For the cleanest cuts, cut this cake when it is fairly cold, but for the best taste and texture, enjoy the slices at room temperature.
Video

Recipe Notes
- The method for making the hidden heart is from Amanda Rettke’s book Surprise-Inside Cakes.
- This recipe calls for pasteurized egg whites. It is safe to consume egg whites without cooking them, as long as you make sure that the whites you buy are pasteurized. To save time, I buy them in a carton–look for 100% egg whites, not liquid egg substitute. If you cannot find them in a carton, you can buy pasteurized eggs and separate them yourself. You’ll need about 5-6 large eggs to get the ¾ cup called for in the recipe.
Measuring Tips
Our recipes are developed using weight measurements, and we highly recommend using a kitchen scale for baking whenever possible. However, if you prefer to use cups, volume measurements are provided as well. PLEASE NOTE: the adage “8 oz = 1 cup” is NOT true when speaking about weight, so don’t be concerned if the measurements don’t fit this formula.
Want to learn more about baking measurements and conversion?


Hi Elizabeth, Thank you so much for this video and recipe! I managed to make this cake and I really appreciated your detailed instructions. The video was sooo helpful, especially to follow how to draw the face. It would have been helpful to know how long the fondant hair was supposed to be. The 8oz was way too much (as you said it might be), but even though I got rid of quite a bit of it, the hair ended up being way too tall. I prepared it 3 days in advance, so it had hardened, but still fell apart a half hour after I put it on the cake. I also would have liked to know how much food coloring to buy. I ordered all the colors you suggested, but needed much more yellow and ran out. As always, thank you so much. I’ve made so many of your recipes and they’re all wonderful! When are you going to have your own show? 🙂
And I forgot to give it 5 stars!
Thank you!!
Hi Deidra! Thank you so much for your feedback. I will look into updating the blog post to answer the questions you had. I’m sorry the fondant fell apart! That’s always frustrating but I’m glad you had a good experience with this overall! And thanks for all the love about my recipes. That makes my heart happy!
This is fabulous..
Thank you for all the efforts ❤️
Hi Ritu! Thank you for commenting. I’m so glad you enjoyed this!
Hi there, Chris here! I just had to drop a comment on this amazing Grinch Cake. It’s seriously impressive how you’ve captured the essence of the Grinch with that perfectly Grinchy face! And the hidden surprise of a red heart on the inside is pure genius. I can already imagine the joy it brings to those lucky enough to slice into it. Bravo to the talented baker behind this whimsical creation!
So glad you enjoyed the recipe! Cheers!
I want to ask for clarification on how much vanilla to use; I followed this recipe to a T and it turned out very bitter tasting. I am wondering if the amount of vanilla extract is off. My cake turned out beautifully just inedible:(
Hi Sara, I’m sorry for the disappointing Grinch Cake results. Which part was bitter – the green cake? Red cake? Buttercream? All of it? I haven’t had the experience of vanilla causing cakes to be bitter – was it real vanilla extract or imitation vanilla flavoring? Or Mexican vanilla, which also has a more assertive flavor? I can see that perhaps an imitation extract might add bitterness or some other “off” flavor, maybe, but I would still be a bit surprised if it was vanilla that made it inedible.
The more likely culprit might be the food coloring. Excess food coloring can have a bitter taste – especially red and black. What brand/type of coloring did you use? Did you notice certain parts of the cake being more bitter than others (ie, the red heart was bitter but the frosting was not, etc). How much coloring would you say you used?