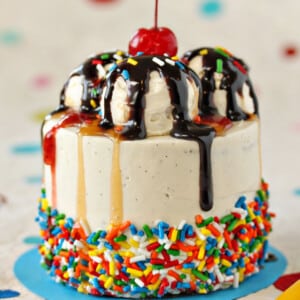
These indulgent Mini Banana Split Cakes have an amazing caramel sauce swirled into the banana cake batter before being baked. Top them with scoops of vanilla buttercream and all your favorite toppings for a treat you won’t soon forget!

Banana Cake with Sundae Toppings
Can we all agree that it’s summer already? I don’t care what the calendar says. Summer solstice, shummer shmolshtice. Graduations are happening, temps are rising, and there’s been a suspicious number of popsicles consumed at my house already. (Also a lot of boring blog entries that talk about hot weather. Sorry—I am seriously such a wimp about the heat. Note to self: get new material.)
Anyhow, since it’s officially Unofficial Summer, let’s celebrate with this adorable, perfectly summery dessert: Mini Banana Split Cakes!
I used to make a larger version of this cake at one of the bakeries years ago, and it was always a bestseller. It’s easy to understand why—what’s not to love about moist banana cake topped with scoops of frosting and decorated to look like an ice cream sundae?
Table of Contents

Why You’ll Love These Mini Cakes
For these mini cakes, I made this recipe even more indulgent by swirling caramel sauce into the banana cake batter before I baked it. The caramel flavor is subtle, but it adds a smooth, smoky sweet undertone that emphasizes the ice cream sundae connection even more.
For the buttercream, I used a meringue-based recipe full of both vanilla extract and vanilla bean paste, so it has a strong vanilla flavor that’s remarkably similar to vanilla ice cream! It handles beautifully, and if it weren’t for the fact that these “scoops” never melt, you would think the cakes were topped with actual ice cream instead of buttercream.

I had a great selection of toppings to choose from: two kinds of chocolate sauce, caramel, three kinds of fruit toppings, and two kinds of sprinkles. It should surprise exactly none of you that, when faced with a tough decision like “which ice cream topping should I use?” I acted with bold decisiveness and said, “All of them. I shall use ALL OF THEM. Preferably all at once.” That is how you handle business like a boss.
I knew I would like the chocolate toppings, and I knew that the caramel would be an awesome addition to the banana cake, but my favorite discovery turned out to be the fruit toppings! They’re actually quite tart and a great contrast to sweet ice cream (or in this case, frosting.)

This recipe makes enough for 8 mini cakes, so they’re perfect for summer dinner parties—I think it would be awesome to set up a toppings bar and give your guests a “decorate-your-own” mini banana split cake at the end of the evening. Or if you really love your children, maybe you could make this recipe with them and let them go crazy with the toppings—you know, once the novelty of summer has worn off and they’re sooooo bored at home. And if you think these little banana split cakes are fun, be sure to check out these mini birthday present mini cakes as well!
🎂 More Fun Party Cakes
- Circus Animal Cake
- Curious George Cake
- Striped Buttercream Balloon Cake
- Watermelon Cake
- Unicorn Cakes
- Piñata Cake

Doughnut Ice Cream Sundaes

The Ultimate Banana Split
Mini Banana Split Cakes
Ingredients
For the Banana-Caramel Cake:
- 2 cups ripe bananas, mashed , from 5-6 very ripe bananas
- 8.75 oz granulated sugar, (1 1/4 cup)
- 8.88 oz brown sugar, (1 1/4 cup), packed
- 7 fl oz vegetable oil, (1 cup)
- 4 large eggs, at room temperature
- 8 oz full-fat sour cream, (1 cup), or Greek yogurt
- 1 tbsp vanilla extract
- 18 oz all-purpose flour, (4 cups)
- 2 tsp baking soda
- 1 tsp salt
- 6 oz caramel sauce
For the Vanilla Bean Buttercream:
- 9 large egg whites, at room temperature
- 14 oz granulated sugar, (2 cups)
- 1/4 tsp salt
- 1 lb unsalted butter, slightly softened to the touch but still cool—not greasy or warm
- 1 tbsp vanilla extract
- 1 tbsp vanilla bean paste, can substitute with an additional 1 tbsp vanilla extract
Assembly and Recommended Equipment
- Fudge sauce
- Caramel sauce
- Sprinkles
- Sundae toppings, assorted, optional
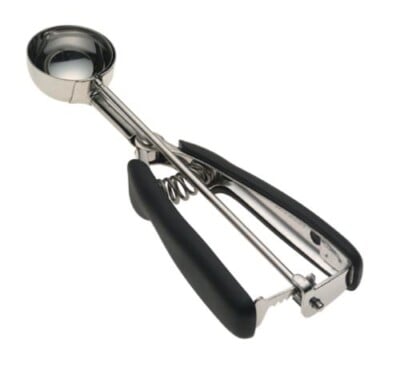
- Cookie scoop
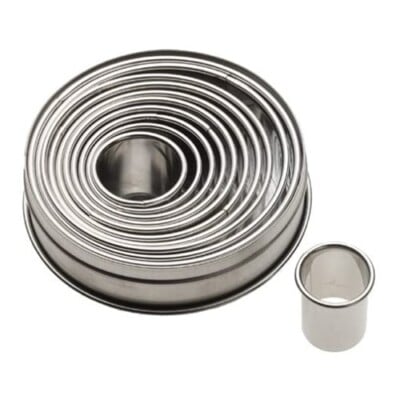
- 3.5” round cutter
- Small offset spatula
- 8 3.5” cardboard rounds to assemble the cakes on, can cut from larger cake rounds or other cardboard
- Cake turntable, optional, but makes decorating easier
Instructions
To Make the Banana-Caramel Cake:
- Preheat oven to 350 F (177 C). Line a half-sheet pan (a rimmed 18×13 pan) with parchment paper and spray the paper with nonstick cooking spray.
- Combine the banana and both sugars in the bowl of a large stand mixer fitted with a paddle attachment. Mix them together on medium speed until well-combined. Add the oil, eggs, sour cream, and vanilla, and mix again until the batter is smooth.
- In a separate bowl, whisk together the flour, baking soda, and salt. Turn the mixer to low and add the flour in a steady stream. When almost all of the flour streaks are gone, stop the mixer and finish by hand, scraping the bottom and sides of the bowl with a spatula.
- Scrape the batter into the prepared pan, and smooth it into an even layer. Drizzle the caramel sauce over the top, and swirl it gently into the batter with a knife.
- Bake the cake at 350 F for about 25 minutes, rotating halfway through the baking. The cake is done when it’s golden brown and puffed and a toothpick inserted into the center comes out clean. Cool cake completely on a wire rack.
To Make the Vanilla Bean Buttercream:
- Combine the egg whites, granulated sugar, and salt in the bowl of a large stand mixer, and whisk them together. Choose a small saucepan that lets you fit the base of the stand mixer snugly into the top of the saucepan—this is your makeshift hot water bath. (Alternately, you can use a different bowl or an actual bain marie and then transfer the mixture to a mixing bowl once it’s heated.) Add an inch of water to the bottom of the saucepan, and bring the water to a simmer.
- Place the mixing bowl on top of the saucepan, making sure that the bottom isn’t in contact with the water, and heat the egg white mixture. Whisk frequently so that the egg whites don’t cook. Continue to heat the whites until they are hot to the touch, and when you rub a bit between your fingers, you don’t feel any grittiness from the sugar. Once the whites are hot, transfer the mixing bowl to your mixer and fit it with a whisk attachment.
- Beat the whites on high speed until they are white, shiny, opaque, and very voluminous, like a very stiff meringue. They should not be warm to the touch—feel the outside of the bowl, and make sure that it is around room temperature. Depending on your mixer and the temperature of your environment, this may take 10-20 minutes, or more.
- Reduce the speed to medium-low and add the softened but cool butter in small chunks, a tablespoon at a time, making sure to wait in between additions. It may separate or look a little gloopy at this point—fear not. Once all of the butter is added, increase the speed again and whip until it comes together and is light and fluffy. If, after 5 minutes, it hasn’t come together, refrigerate the mixing bowl for 5-7 minutes, to cool the mixture down, and whip it again.
- Once the butter is fluffy, add the vanilla extract and vanilla bean paste and mix until well-blended. The buttercream can be made in advance and kept at room temperature if you’re going to use it the same day, or refrigerated. If it’s been chilled, let it sit at room temperature until it softens, then re-whip it to get the fluffy texture back before you use it.
Assembly:
- Once the cake is completely cool, cut out 16 3.5” circles from the cake. If your cutters are a bit smaller, you might be able to get 18 circles, but if you plan on assembling more than 8 cakes, you’ll need to either ration the frosting, or increase the frosting recipe a bit. Use the cookie scoop to scoop 24 balls of frosting into a separate bowl, and set aside for now. This will ensure that you have enough frosting for the ice cream decorations at the end.
- Place a cake round on a cardboard circle. Top it with a few tablespoons of frosting, and spread it in an even layer out to the edges using an offset spatula. (Because there’s so much frosting on top of the cake, you’ll want to use a thin layer in the middle.) Top with another layer of cake. Cover the sides and top of the cake with a thin layer of frosting. Don’t worry about getting it too smooth, since most of the frosting will be covered by sprinkles or other toppings. Repeat until you have 8 miniature cakes assembled.
- Use the cookie scoop to top each cake with three scoops of buttercream from the reserved bowl. Now for the fun part: decorating the cakes! Pour the sprinkles into shallow bowls or pie pans, and holding a cake in one hand over the bowl, press sprinkles into the side of the cake. Top the cakes with fudge sauce, caramel, fruit sauce, sprinkles, coconut, nuts, or any other toppings you want.
- These cakes are best eaten soon after they are decorated, but they can be assembled in advanced and stored, undecorated, in the refrigerator for several days. Let the cakes come to room temperature before serving.
Recipe Notes
Measuring Tips
Our recipes are developed using weight measurements, and we highly recommend using a kitchen scale for baking whenever possible. However, if you prefer to use cups, volume measurements are provided as well. PLEASE NOTE: the adage “8 oz = 1 cup” is NOT true when speaking about weight, so don’t be concerned if the measurements don’t fit this formula.
Want to learn more about baking measurements and conversion?


me and my wife buy nuts in bulk and chop them up
Hot fudge, caramel and whipped cream
ELizabety. I think I’ve already commented on this post but these cakes are too cute. I’m thinking of doing something this size for my birthday with a the ‘icecream scoops’ on top
I would love to win banna cake
Made these for my boyfriend’s birthday at the beginning of the year. They are extremely delicious! It’s now a favorite of mine! I want to make a full round cake for my goddaughter’s birthday. Would this recipe work to make a 9 inch cake?