


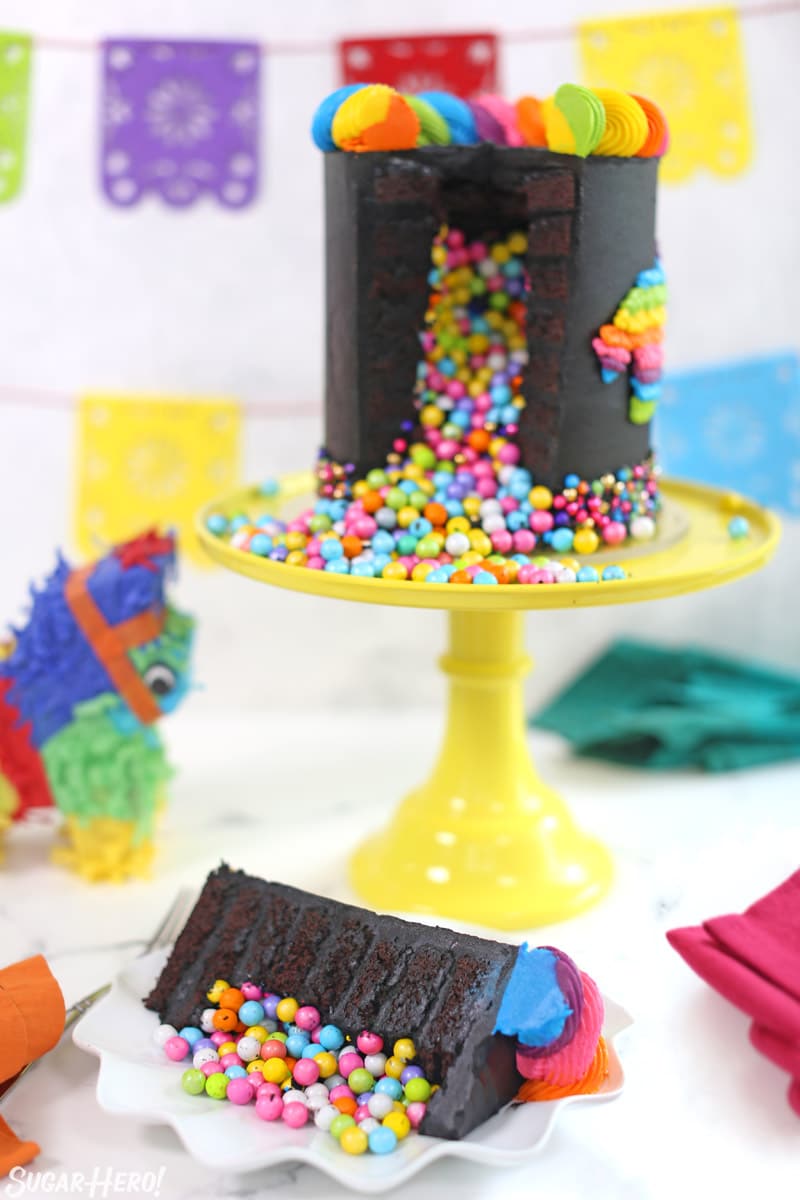
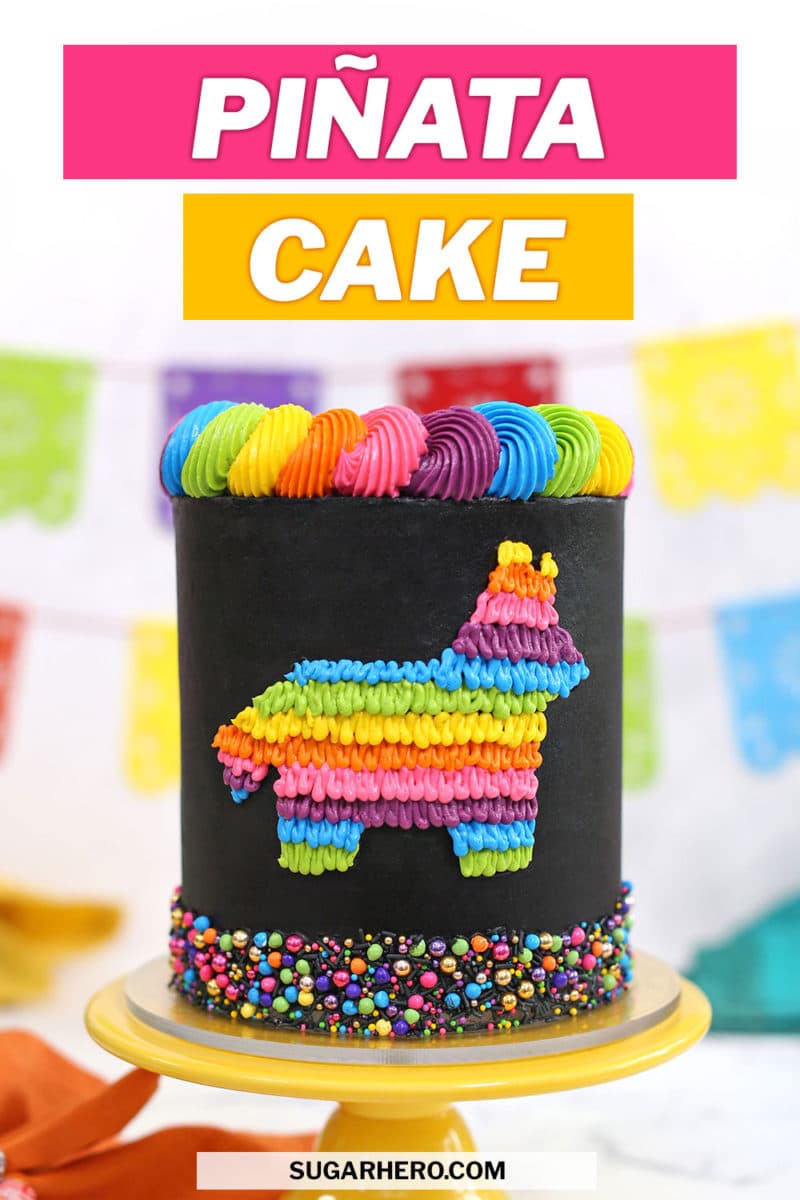
This Piñata Cake is the ultimate party cake! Picture layers of moist, deep dark chocolate cake, stacked with rich chocolate buttercream, and filled to the brim with colorful chocolate candy that POURS out when you cut into it! And the best part? It’s easier to make than you’d think! Read on to learn how to make your own piñata cake at home.
🎉 What IS a piñata cake?
What’s the only thing better than a tall chocolate cake with rich chocolate buttercream? A tall chocolate cake, with rich chocolate buttercream, packed full of CANDY that comes pouring out when you cut into it!
Yep, piñata cakes are inspired by piñatas–you know, those cardboard and tissue paper characters that are filled with goodies and then attacked by sugar-crazed, bat-wielding children at birthday parties. But instead of whacking a cardboard princess to get at stale lollipops and toys, you just cut a slice from an innocent-looking cake, and candy pours out instead!
Piñata cakes are the best of both worlds – you get a delicious slice of cake, served with a side of candy! Kids love them, of course, but they’re not just for kids. The spectacle of the candy pouring out turns any gathering from a ho-hum party into a par-tay!
🍬 The ultimate chocolate cake with candy inside!
It was important to me that this piñata cake not only look amazing, but taste amazing too. That’s why it’s made with eight (eight!!!) layers of tender homemade chocolate cake, an ultra-dark and rich black chocolate buttercream, vanilla buttercream for those bright neon colors, and–of course–glimmering candy-coated chocolate inside.
If you’re looking for more amazing chocolate layer cakes, don’t miss our Agate Cake, Mint Chocolate Chip Cake, or decadent Rocky Road Cake!
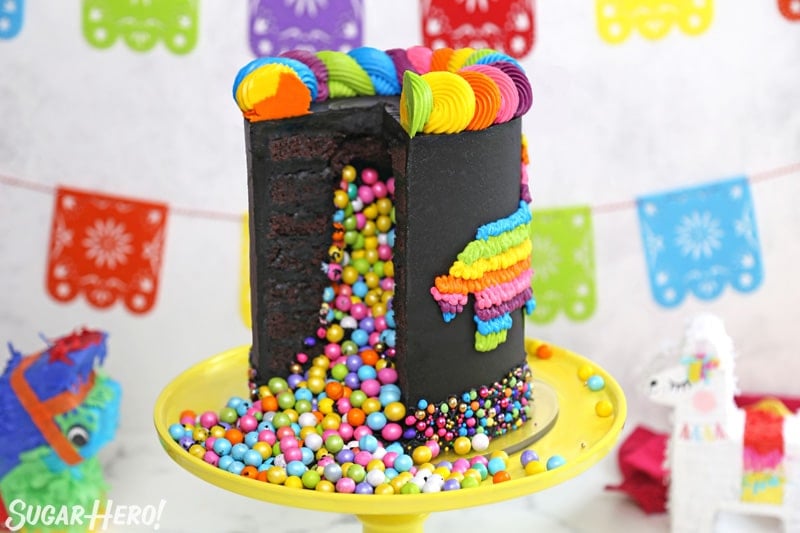
Table of Contents
🧾 What You’ll Need
There are 3 main components to this cake:
- chocolate cake
- black (chocolate flavored) buttercream
- vanilla buttercream
I’m providing all of the recipes for you down in the recipe card, so you can make it exactly as shown in the pictures and video!
However, if you have a favorite cake recipe, chocolate buttercream, or vanilla buttercream recipe, you are welcome to swap them in instead! The assembly and decorating tutorial will work with a variety of cake and frosting types.
Important: Just be sure that any cake you use is sturdy enough to be stacked into a tall layer cake (I don’t recommend cake mixes for this reason), and that your frosting is medium to medium-stiff consistency.
Having said that, here are some specific notes about the ingredients and equipment used in this recipe! Whenever possible, I’ve linked the exact products I used to help you find them.
Ingredient Notes
- Cocoa powder: Cocoa powder is used in both the chocolate cake and the chocolate frosting recipes. I recommend using Dutch-processed (alkalized) cocoa, and my absolute favorite brand is Cacao Barry. I buy this in bulk and swear by it! The cocoa powder you use makes a HUGE difference in the final flavor of your baking, so it pays to buy great quality.
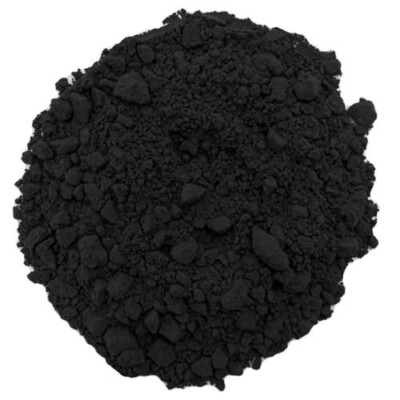
- Black cocoa powder: This is my secret for getting deep, dark black frosting. (It’s also my secret ingredient in Homemade Oreos and Cookies and Cream Cake!) I love this Black Onyx brand and always keep some on hand. In this recipe, I use a combination of black and regular cocoa powder to give the frosting a black color. I find that black cocoa powder can be bitter and drying when used on its own, so I like to blend it with regular cocoa for better results. If you don’t have any, you can swap in more regular cocoa, just know that you’ll probably have to compensate with additional black food coloring.
- Black food coloring: Speaking of food coloring…you’re gonna need some! It’s a fact of life that you can’t get dark black or bright neon without using a little food coloring! I always use Americolor Super Black gel coloring.
- Neon food coloring: Love those bright-bright-bright colors? Me too! I achieved them with this Americolor “Electric Kit.” It has seven dazzling neon colors, and I used six of them to decorate this cake.
- Candy: It wouldn’t be a piñata without candy, now would it? I used multicolored Sixlets, and I think M&Ms would be another great choice. Avoid using sprinkles or unwrapped hard candies–anything that’s primarily sugar will absorb moisture from the cake and quickly become a sticky mess.
🥄 Equipment
You will need some standard cake-decorating tools to make this cake, and I’ve also included a few optional tools that will make your cake life much easier! If you don’t have all of these items, you can modify the assembly or design to work with what you have. (Links are affiliate links and I earn a small commission from qualifying purchases.)
Must-Haves
- Cake pans: You will need four 6″ cake pans. I like the 3-inch deep ones because they’re so versatile. If you only have two pans, you can halve the recipe and make/bake it twice to end up with four 6″ cakes.
- Basic cake tools: Assembling and decorating will be MUCH easier if you have a cake turntable and offset spatula. I keep a ton of these cheap gripper pads in my kitchen to use on my turntable so cakes don’t slide around.
- Piping tools: To create this design, you’ll need at least six piping bags, six #4 round tips to pipe the donkey, and six large French star tips.
- Round circle cutter: to cut out the circles from the cake. I found 3″ circles were a good size, but anything from 2.5-3.25″ should be fine.
Nice-to-Haves
- Acrylic Discs: you’ll see me using these discs to frost the cake in the video. These are definitely optional, but I LOVE mine–it makes getting smooth, straight sides and razor-sharp corners a breeze! I’m using 6.5″ discs from CakeSafe.
- Super-tall scraper: this 10″ straight edge is a lifesaver for extra-tall cakes! If you don’t have one you can always use that metal spatula we talked about earlier, but if you’ll be making a lot of cakes, it’s worth it to invest in a tall scraper.
⏲ Let’s Talk Timing
If it wasn’t obvious from the 12-page recipe, this is a bit of a project! (I kid about the 12 pages…kinda.) It’s a FUN project, and completely worth your time, but just know that it’s not the kind of cake you bust out 45 minutes before company is due to arrive.
I strongly encourage you to break this cake assembly up into a few days, if possible. Here’s why:
- The frosting really needs at least a day to develop the best colors. You’ll get a deeper, richer black, and brighter, more vivid neons, if you color the frosting and then let it sit overnight.
- There are multiple long chilling times during the cake assembly. A cold cake is an easier cake to work with, and you don’t want to cut corners, especially when cutting corners means your cake is tilting like the leaning tower of Pisa and sliding all over your turntable!
- And finally, most importantly: you’ll have more fun making it if you’re not stressed, and you’ll do your best decorating if you’re not sweating the clock. Baking should be fun, so set yourself up for success from the start!
⏰ Recommended Schedule
Here is my ideal schedule for putting together this cake:
- Day 1: bake the cake layers, wrap them well, and put them in the freezer. Make and color all frosting, wrap well, and leave at room temperature or in refrigerator.
- Day 2: Assemble the cake layers, fill with candy, and crumb coat. Chill well, then do the final frosting coat.
- Day 3: Decoration day!! Add the sprinkle border, pipe the piñata design, and finish with the thick rope border.
Do you have to do it this way? Of course not! But please read through the recipe before starting to figure out what kind of timing and schedule will work for you!
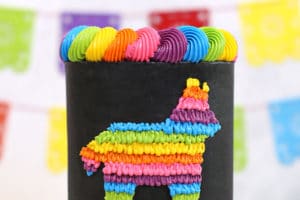
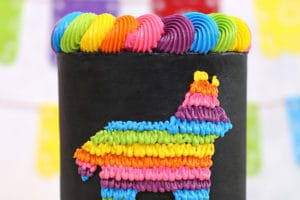
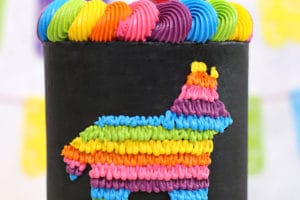
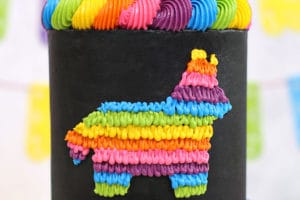
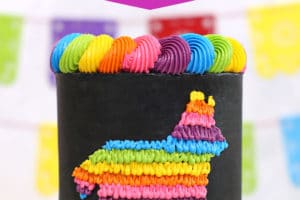
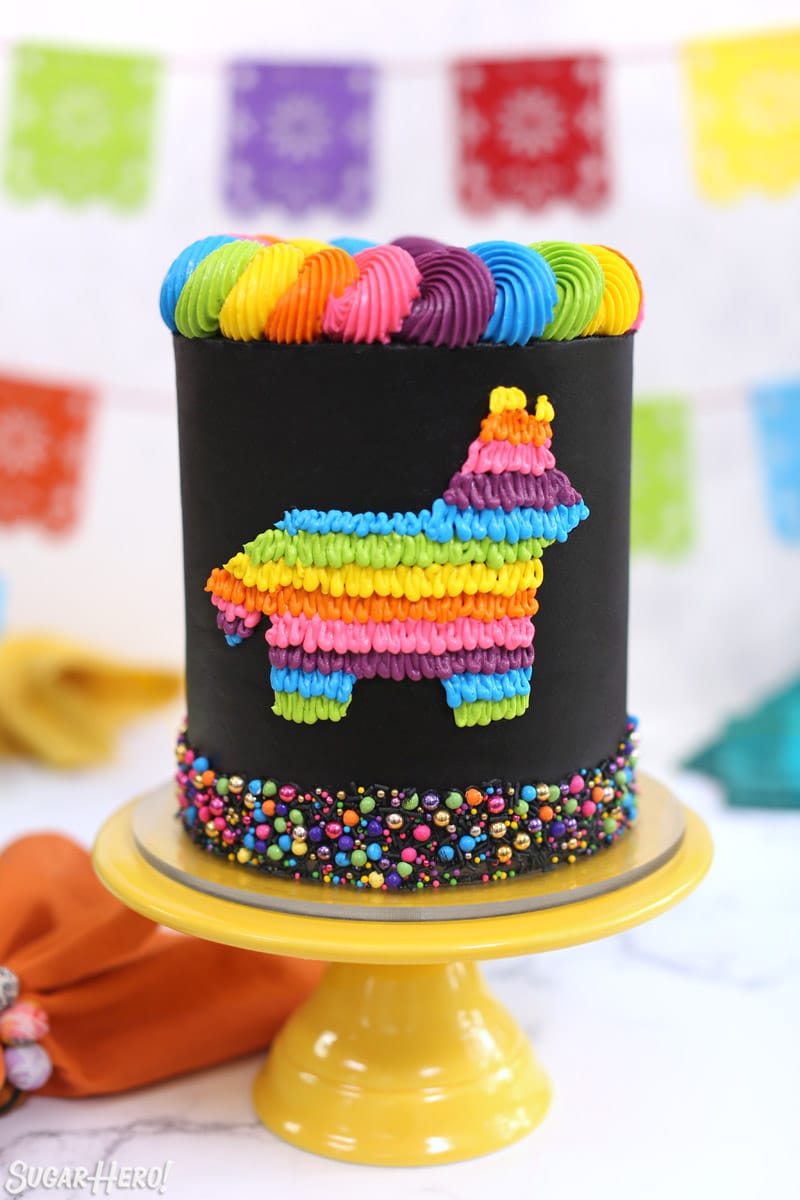
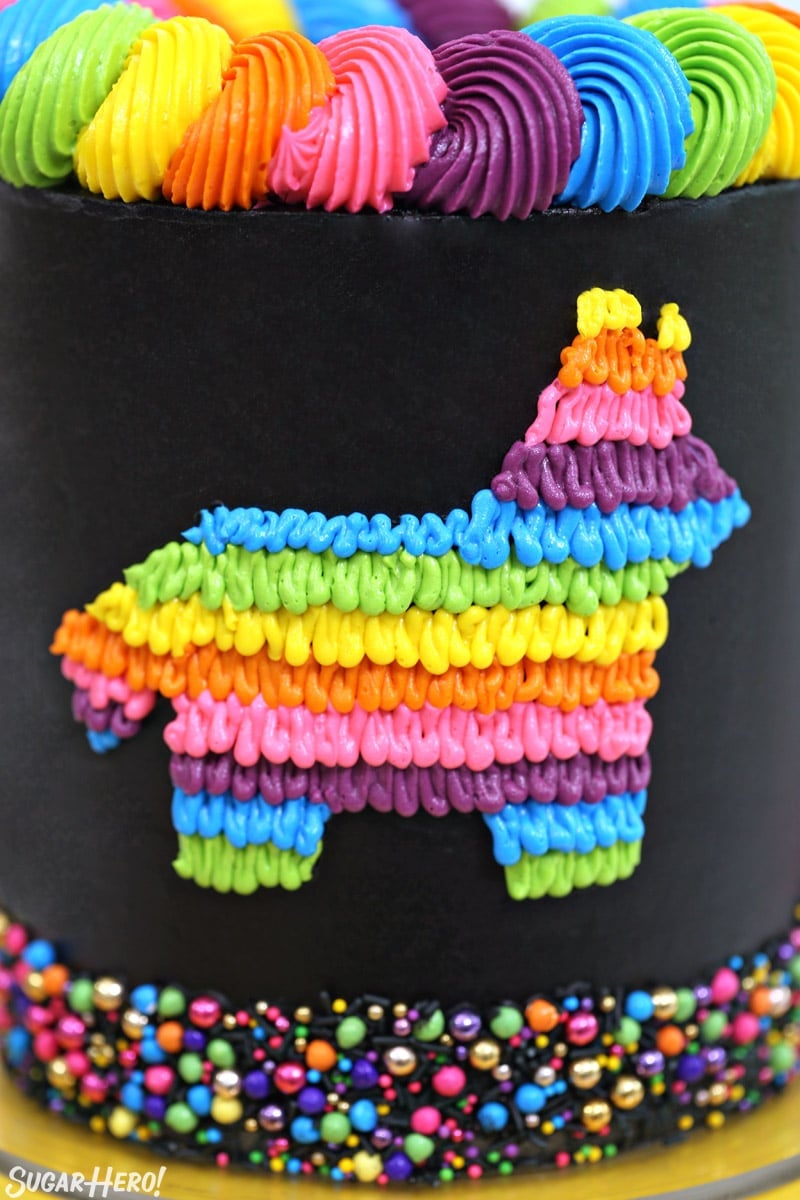
🐴 Get the Donkey Piñata Template
You can decorate this piñata cake however you’d like! But if you’d like to recreate this cake and do a donkey piñata design, you can download the pdf here.
Print this design out on cardstock and cut it out. Trace around it on your cake to create a cute donkey piñata shape.
💡 Tips
It’s easiest to cut this cake when it is still chilled, but not straight from the refrigerator. (You want the stability of the cold to keep the slices intact, but straight from the fridge can make the frosting extremely hard.)
The candy will roll everywhere once it’s cut, so put it on a rimmed cake stand or plate if you want to avoid that! Cut the cake into slices (don’t forget to ooh and aah as the candy pours out) and serve with a few pieces of candy on the side of the plate!
For the best taste and texture, enjoy this cake at room temperature. Cold cake and frosting is great to cut, but mediocre to eat. Store leftovers, covered, at room temperature for 3 days or in the refrigerator for up to a week.

🎂 More Fun Party Cakes
If you like this piñata cake, I already know you love a good party cake! Try one of these fun ideas:
- Circus Animal Cake
- Curious George Cake
- Mini Banana Split Cakes
- Striped Buttercream Balloon Cake
- Watermelon Cake
- Where the Wild Things Are Birthday Cake

Birthday Present Mini Cakes

Colorful Unicorn Cakes
Leave a Review!
If you make this recipe, let us know! Leave a ⭐️⭐️⭐️⭐️⭐️ rating on the recipe below, and leave a comment, take a photo and tag me on Instagram @elabau, or use #sugarhero on IG!

Piñata Cake
Ingredients
For the chocolate cake:
- 9 oz unsalted butter, at room temperature
- 7 oz granulated sugar, (1 cup)
- 7.5 oz brown sugar, (1 cup, lightly packed)
- 3 large eggs, at room temperature
- 1 TBSP vanilla extract
- 18 fl oz buttermilk, (2 ¼ cups, at room temperature)
- 1 TBSP instant espresso powder, optional
- 12 oz all-purpose flour, (2 ⅔ cups)
- 4.5 oz unsweetened cocoa powder, (1.5 cups)
- 2 ¼ tsp baking soda
- 1 tsp salt
For the black chocolate buttercream:
- 24 oz unsalted butter, at room temperature
- 4-6 TBSP milk, 1 or 2% is fine
- 1 TBSP vanilla extract
- ½ tsp salt
- 3 oz unsweetened cocoa powder, (1 cup)
- 1.5 oz black cocoa powder, (½ cup) or substitute with more regular cocoa powder
- 32 oz powdered sugar
- 2 TBSP Black gel food coloring, I recommend Americolor Super Black
For the colored buttercream:
- 1 lb unsalted butter, at room temperature
- 4 TBSP milk, 1 or 2% is fine
- 2 tsp vanilla extract
- ⅛ tsp salt
- 28 oz powdered sugar
- Neon gel food coloring, I used 6 "electric" Americolor gels
For the assembly and decorations:
- 3 cups candy, I used Sixlets
- ¼ cup light corn syrup, or piping gel
- 1 cup multicolored sprinkles, I used Sweetapolita “Lite Brite” mix
Instructions
To make the cake:
- Preheat the oven to 350 F. Line four 6-inch cake pans with parchment circles and spray them with nonstick cooking spray, or brush them with pan release.
- Add the butter and both sugars to the bowl of a large stand mixer fitted with a paddle attachment. Beat them together on medium-high speed, until light and fluffy, about 5 minutes. Add the eggs one at a time, beating well after each addition. Add the vanilla extract and espresso powder, if using, and mix them in.
- In a different bowl, sift together the flour, cocoa powder, baking soda, and salt. With the mixer running on low, add a quarter of the sifted flour mixture. When the flour streaks have almost all disappeared, add a third of the liquid to the mixing bowl. When that’s incorporated, continue to add the drys and wets in an alternating pattern, ending with the dry ingredients.
- When the dry ingredients are nearly incorporated, stop the mixer. Scrape down the bottom and sides of the bowl with a rubber spatula, and finish mixing the cake by hand.
- Divide the batter between the prepared pans — each should get about 16 oz batter. Bake the cakes at 350 F for about 45 minutes, until a toothpick inserted into the center comes out with just a few moist crumbs attached. Cool the cakes for 15 minutes, then turn them out of the pans and cool completely.
- The cakes can be made several days in advance and kept, well-wrapped and frozen, until ready to use. If you freeze them, make sure they are partially defrosted before using them so they can be cut easily.
To make the black buttercream:
- Place the butter in the bowl of a stand mixer fitted with a paddle attachment. Beat the butter for 2-3 minutes, until light and creamy.
- While the butter is beating, mix together 4 TBPS of milk, the vanilla, and the salt in a small bowl, and stir to help the salt dissolve.
- With the mixer on low, add the milk mixture. At first it will resist coming together, but raise the speed to medium-low and continue to beat it for about a minute, until it comes together and you have a smooth and creamy mixture.
- Sift both cocoa powders together to remove any lumps.
- Turn the mixer back to low and add the cocoa powder. When it’s mixed in, add about half of the powdered sugar.
- Let that powdered sugar incorporate, then add the rest of the powdered sugar. Let it mix, then stop the mixer and scrape down the bottom and sides of the bowl to get any dry pockets.
- Mix at medium speed for 2 minutes, then lower it to the lowest speed and run the mixer for about 5 minutes. If the frosting is very stiff, add additional milk, a teaspoon at a time, until it is creamy, smooth, and easily spreadable.
- Add the black food coloring and mix it in. Add additional coloring if desired. The black color will darken and deepen over time, so if you’re able to make this a day in advance, you’ll have more success getting a true dark black.
- Press a layer of plastic wrap directly on top of the frosting, and store it at room temperature for up to a day, or in the refrigerator for a week, until ready to use. When you’re going to use it, stir it for several minutes by hand with a rubber spatula to remove any air bubbles and restore its creamy texture.
To make the colored buttercream:
- Place the butter in the bowl of a stand mixer fitted with a paddle attachment. Beat the butter for 2-3 minutes, until light and creamy.
- While the butter is beating, mix together the milk, vanilla, and salt in a small bowl, and stir to help the salt dissolve.
- With the mixer on low, add the milk mixture. At first it will resist coming together, but raise the speed to medium-low and continue to beat it for about a minute, until it comes together and you have a smooth and creamy mixture.
- Turn the mixer back to low and add about half of the powdered sugar.
- When that’s mixed in, add the rest of the powdered sugar. Let it mix, then stop the mixer and scrape down the bottom and sides of the bowl to get any dry pockets.
- Mix at medium speed for 2 minute, then lower it to the lowest speed and run the mixer for about 5 minutes. At the end, your frosting should be creamy and smooth.
- Divide the frosting evenly into 6 bowls–each should have a little over a cup of frosting. Add a big squirt of neon food coloring to each bowl and stir well, then add additional coloring if you want a brighter color. All food coloring intensifies over time, so if you’re able to make this several hours or even a day ahead of time, you’ll have brighter colors.
- Press a piece of cling wrap directly on top of the frosting and keep it covered until you’re ready to use it, so it won’t dry out. When you’re ready, transfer each color into a piping bag fitted with a small round #4 tip.
To assemble:
- If your cakes have domed, trim off the tops to make them flat, then slice each cake in half, so that you have eight thin cake layers.
- Leave three of the layers as they are, and for the remaining five, use a 3-inch circle cutter to cut a circle out of the center of the cakes. You can eat the centers, or save for another use. Put one of your intact cake layers on a cake cardboard to be the base of the cake.
- If you are using acrylic discs, put a nonskid pad on your cake turntable, then a 6.5” disc, then another nonskid pad, then top with a cake on a cake cardboard. If you aen’t using discs, just place the cake on a cardboard on your cake turntable with a nonskid pad underneath if you have one.
- Spread about ½ cup of black frosting on top of the base cake layer. Take a second cake layer without the center hole, and place it on top. Spread more frosting on this second layer.
- Now grab those layers with the center holes! Stack them, one on top of the other, with a thin layer of buttercream between each. I like to use a piping bag to pipe a ring of buttercream on the cake rounds, and then spread it evenly with a mini spatula. Try to make sure you’re stacking the cake as straight as possible as you add the layers.
- Take a mini spatula and spread a thin layer of frosting on the walls of the hole inside the cake– this just helps the cake’s stability and also seals in the cake so it stays moist. Refrigerate the cake for 20-30 minutes, until the frosting is firm.
- Fill the hole in the cake with candy of your choice. I recommend candy-covered chocolates like Sixlets or M&Ms, or candies that are individually wrapped. Avoid unwrapped hard candies–they will absorb too much moisture from the cake and will be a sticky mess.
- Add a thin layer of frosting around the top of the cake, and press the final cake layer on top. Spread a thin layer of frosting all over the top and sides of the cake to lock in any crumbs. Refrigerate for at least an hour, until firm.
- To finish frosting the cake, spread a thick layer of frosting on top of the cake and smooth it out all the way to the sides. If you are using acrylic discs: take a second 6.5” disc and place a few dabs of frosting along the outside edge. Press a parchment circle onto the disc, then place the disc parchment side-down on top of the cake. Try to make sure the top disc is in line with the bottom disc.
- Cover the sides of the cake with frosting. Take a tall straight edge and start scraping the extra frosting off, filling in the areas where it’s sparse. As you work, make sure you are holding the scraper in a straight line against both the top and bottom disc. Fill in any frosting gaps, and keep filling and scraping until you’re happy with the buttercream. Chill for at least 20 minutes, then run a hot, thin sharp knife under the top disc so that it pops off. Carefully peel off the parchment from the top.
- If you are not using acrylic discs: Once the top is frosted, spread a thick layer of black frosting along the sides of the cake. Use a metal spatula, bench scraper, or tall straight edge to smooth the frosting into an even layer. Wash the spatula frequently in hot water to make the smoothing process easier.
- Scoop a little more black frosting on top, and spread it almost to the edge. Take a mini spatula and hold it against the cake as you turn it on the turntable, to create a spiral design. Don’t worry about making the cake edges look nice, since those will be covered up later. Chill the cake for at least an hour, until very firm. This is also a good stopping place if you want to refrigerate it overnight.
- To decorate:
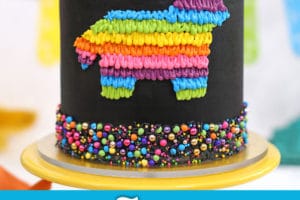
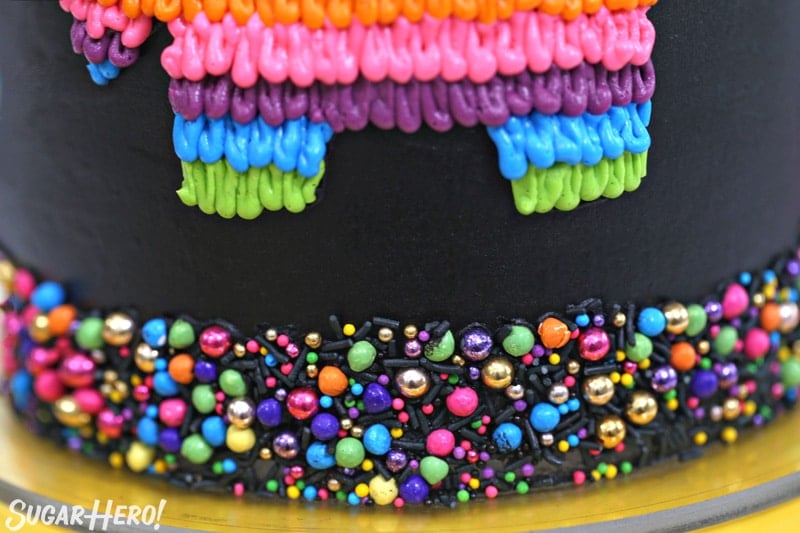
- Use a pastry brush to brush the bottom inch of the cake with corn syrup or piping gel, and press sprinkles all around to make a sprinkle border.
- Cut the pinata donkey or other shape of your choice out of cardstock. With one hand hold it against the cake, and with the other lightly trace around it with a toothpick.
- Take one of your frosting bags, and use an up and down motion to make a small zig-zag pattern across the bottom of the shape.
- Once you’ve done your first line, use a different color for the second layer. Make sure you slightly overlap the first layer so that it looks like the second color is laying on top of the first. Keep repeating this design with different colors as you work your way up the pinata shape.
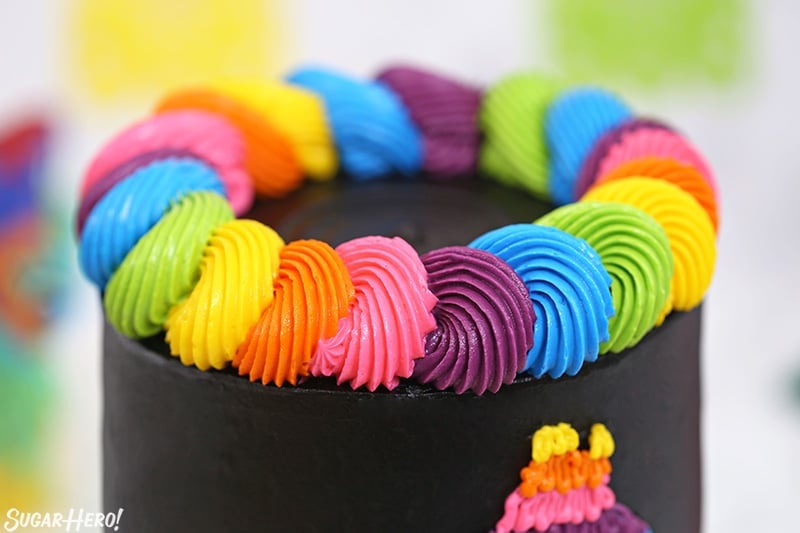
- When the shape is completely filled in, swap the small round tip for a large French star tip for each piping bag. (I used Wilton #8B). Pipe a rope border in alternating colors all along the top edge.
- It’s easiest to cut this cake when it is still chilled, but not straight from the refrigerator. (You want the stability of the cold to keep the slices intact, but straight from the fridge can make the frosting extremely hard.) The candy will roll everywhere once it’s cut, so put it on a rimmed cake stand or plate if you want to avoid that!
- Cut the cake into slices (don’t forget to ooh and aah as the candy pours out) and serve with a few pieces of candy on the side! For the best taste and texture, enjoy this cake at room temperature. Store leftovers, covered, at room temperature for 3 days or in the refrigerator for up to a week.
Video

Recipe Notes
Measuring Tips
Our recipes are developed using weight measurements, and we highly recommend using a kitchen scale for baking whenever possible. However, if you prefer to use cups, volume measurements are provided as well. PLEASE NOTE: the adage “8 oz = 1 cup” is NOT true when speaking about weight, so don’t be concerned if the measurements don’t fit this formula.
Want to learn more about baking measurements and conversion?
Nutrition
What You'll Need
 Black Cocoa PowderBuy now
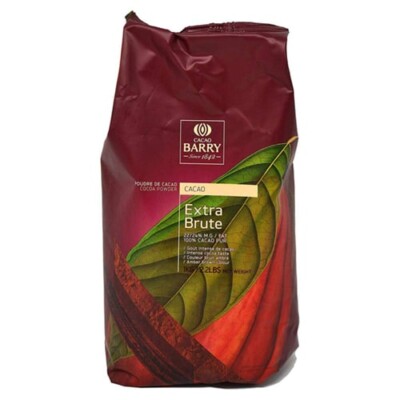 Cacao Barry Cocoa PowderBuy now
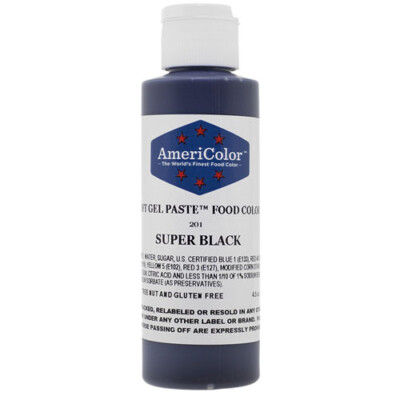 Black Gel Food ColoringBuy now
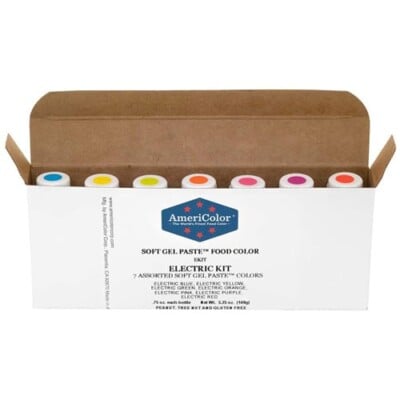 Neon Food ColoringBuy now
 Spring SixletsBuy now
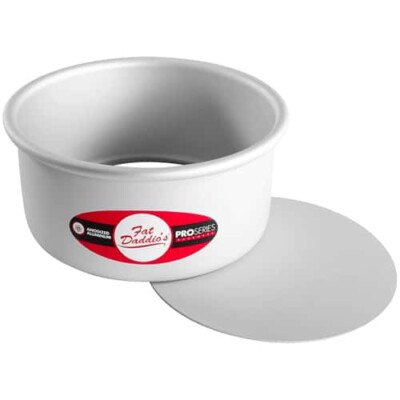 Cake Pan – 6-InchBuy now
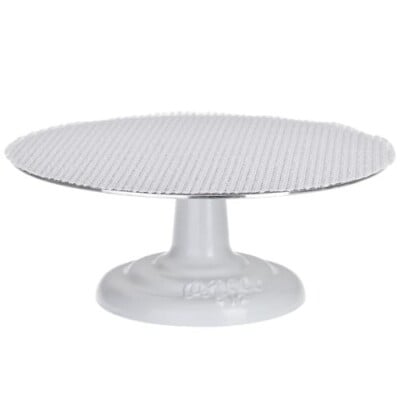 Revolving Cake StandBuy now
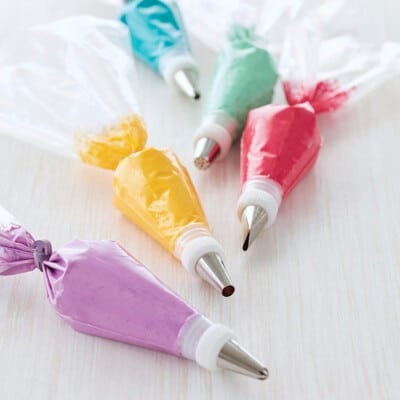 12-Inch Piping BagsBuy now
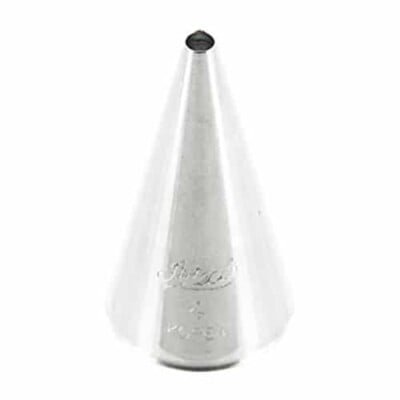 Small Round Piping Tip – #4Buy now
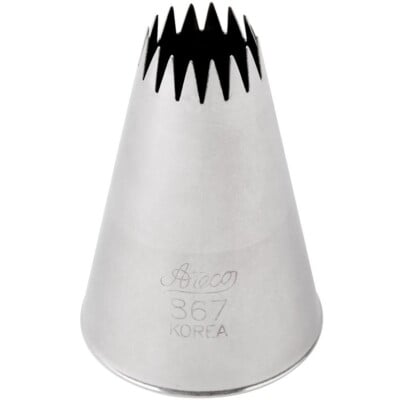 Large French Star Piping Tip – #867Buy now
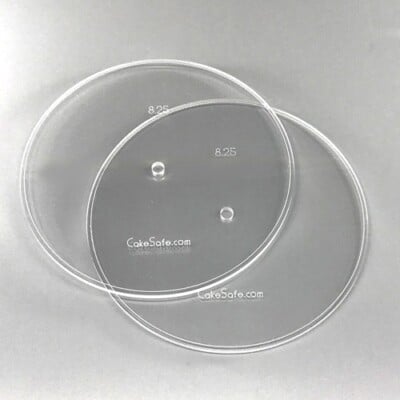 Acrylic DiscsBuy now
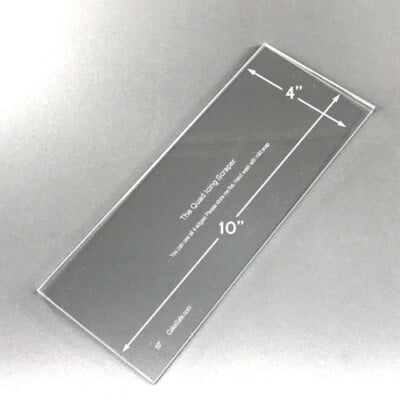 Tall Cake ScraperBuy now


Oh my goodness, this cake looks incredible! The idea of turning a piñata into a cake is pure genius. I can’t wait to try this out with my kids. The video was super helpful in showing the steps and the end result is just wow!
I hope you enjoy the recipe! It’s a real show stopper!
Love this idea! I’ve always wanted to make a piñata cake for a special occasion, and this tutorial makes it look so easy. Can’t wait to try it out and impress my guests with a delicious and decorative dessert. Thanks for sharing!
You’re welcome! Enjoy it.
I absolutely loved this tutorial! The video made it so easy to follow along, and the cake turned out beautifully. Can’t wait to surprise my friends with this piñata cake at the next party! Thank you, SugarHero!
Hi! So happy to hear the tutorial was helpful and that your cake turned out AMAZING! Way to go!
This piñata cake looks absolutely amazing! I loved the step-by-step video—it made the process so much easier to follow. Can’t wait to try it for my next party!
Thanks for the comment! We hope you have so much fun making it!