
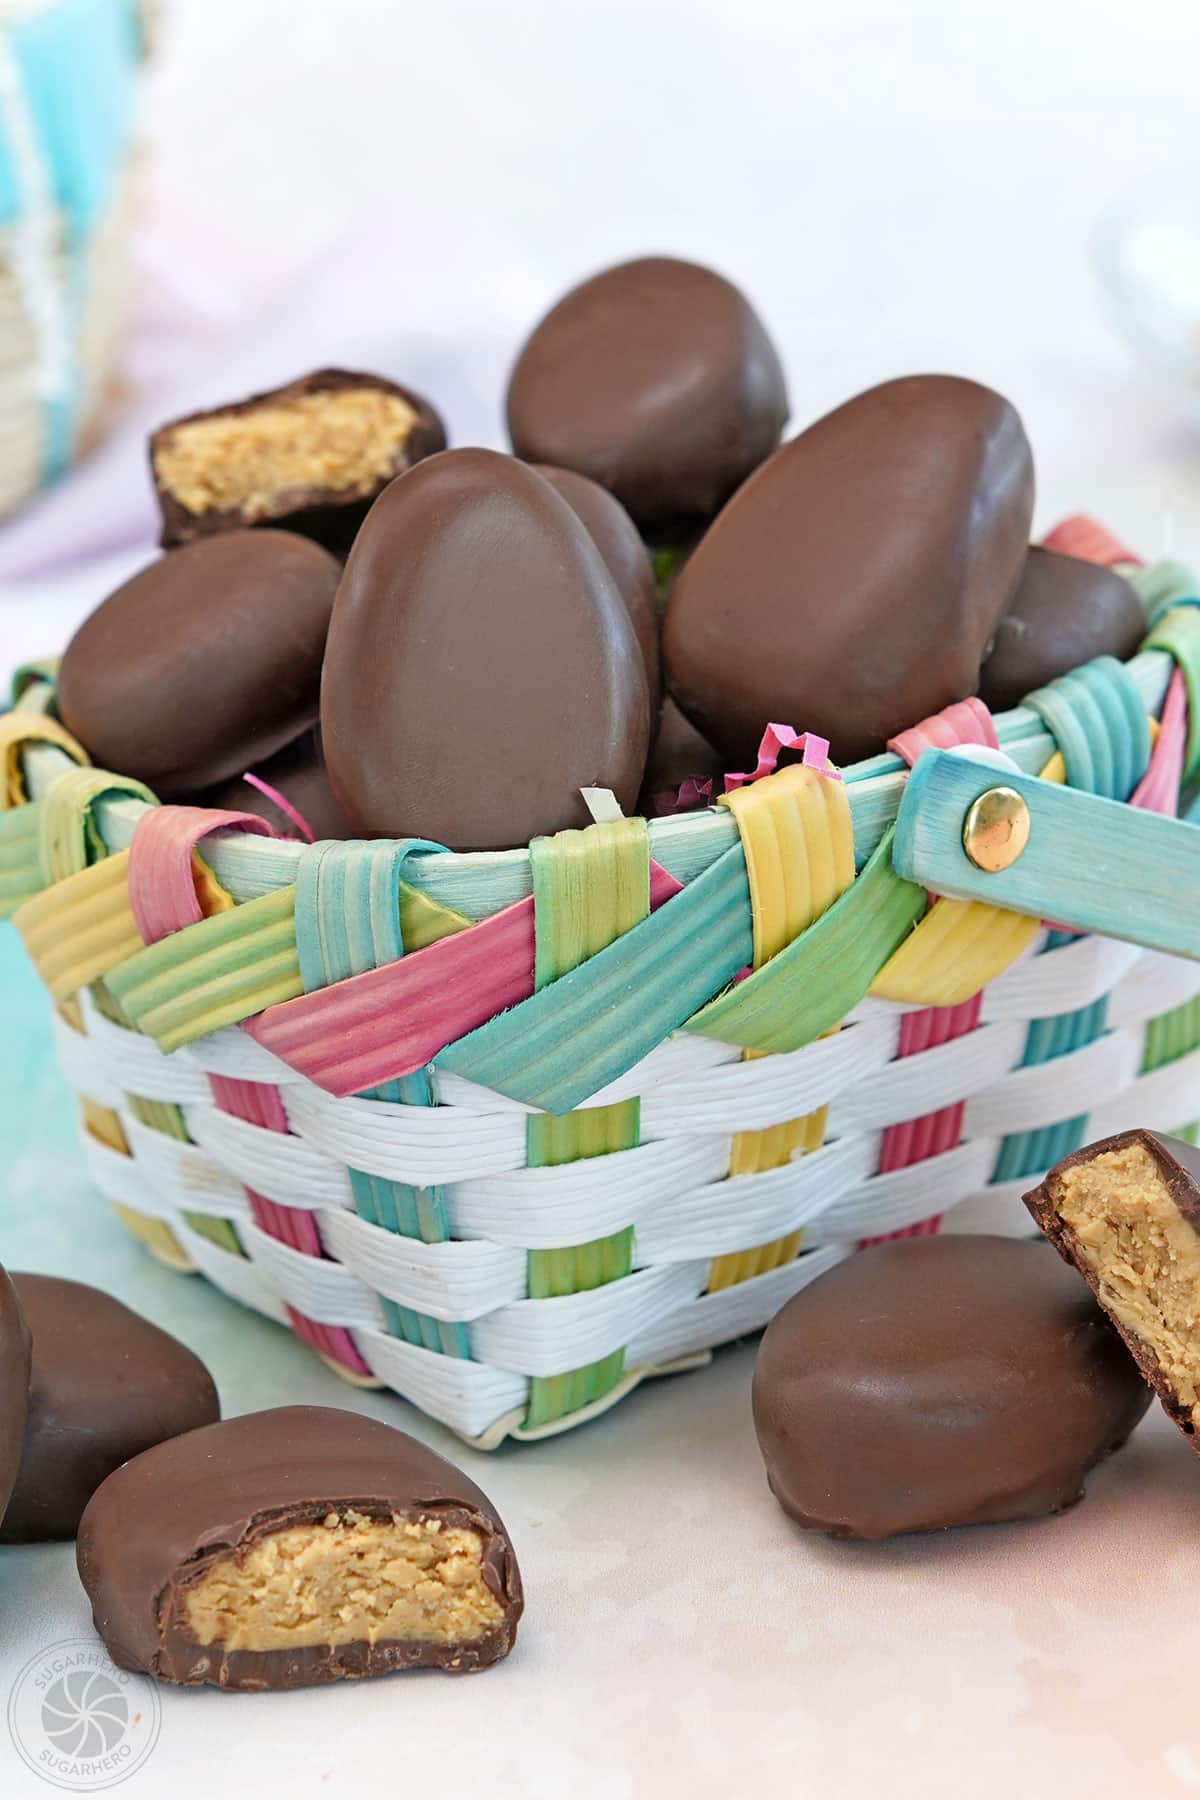
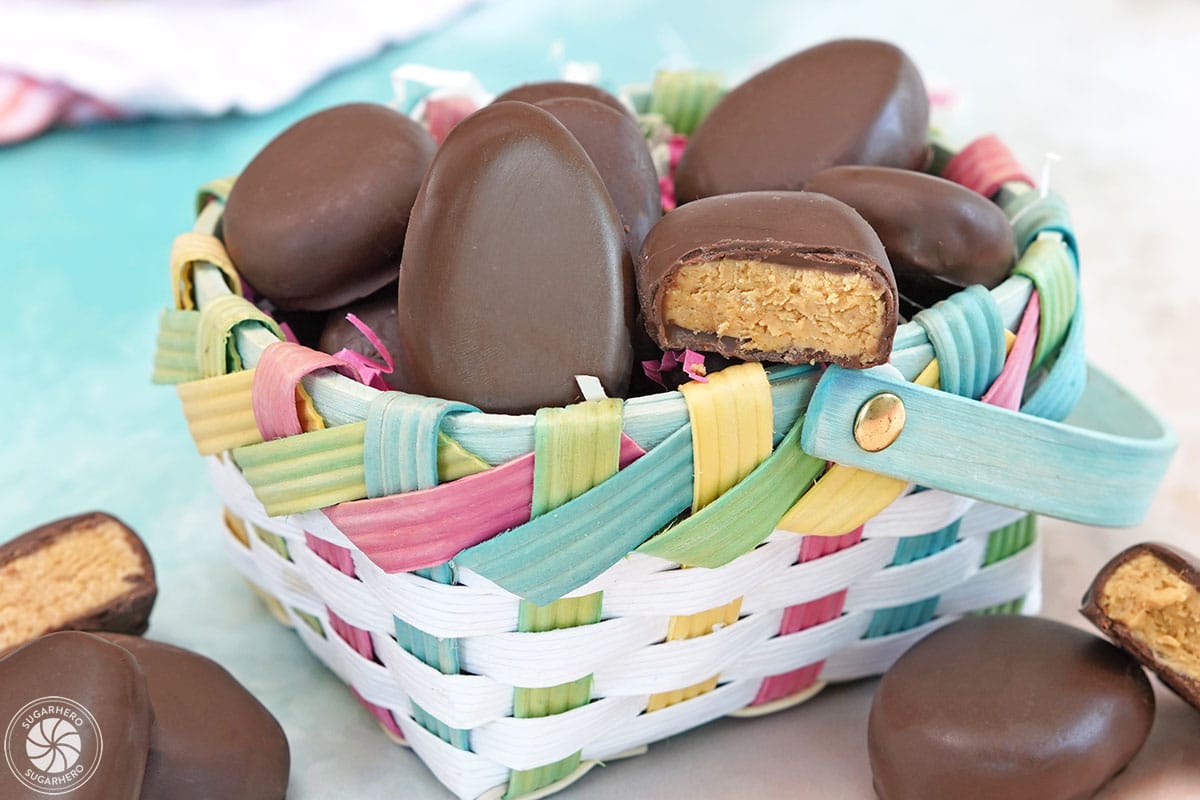
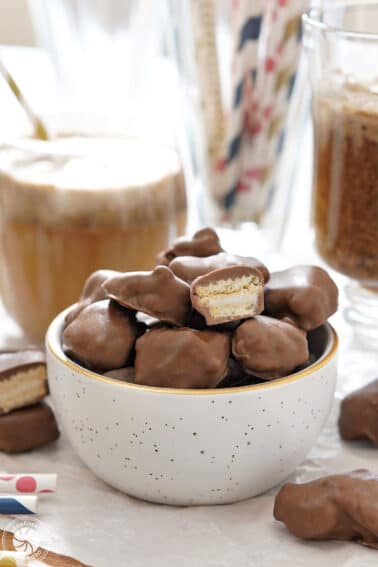
Skip the store-bought candy and make your own Peanut Butter Easter Eggs with our easy recipe. These no-bake homemade treats feature a sweet-and-salty peanut butter filling in a rich chocolate shell.
🥚 Homemade Peanut Butter Eggs: Reese’s Copycat Recipe
Peanut Butter Eggs, once one of my favorite Easter candies, just don’t hit the same these days. I loved them as a child, but somewhere between childhood and adulthood, something changed—and it wasn’t just my taste buds growing up. Now when I eat one, the filling seems overly sweet and artificial, and the chocolate is waxy and flavorless. Womp-woooomp.
The good news? Making your own peanut butter eggs at home isn’t just easy—it’s a complete game-changer! This recipe yields peanut butter eggs the way I think they SHOULD be: with a thick chocolate shell, and a soft but slightly crumbly filling packed with sweet-and-salty peanut butter flavor.

I already have one recipe for peanut butter eggs on SugarHero – these pastel-decorated peanut butter Easter egg candies, made using a chocolate mold. They’re tasty and gorgeous, but a bit difficult to make without advanced planning, since you have to have the right candy mold.
For this recipe, I wanted to keep things simple and recreate Reese’s eggs as closely as possible, so we’re ditching the chocolate mold and dipping the peanut butter filling in chocolate instead.
The filling is the best part. It’s easy (made with just 6 common ingredients!), just the slightest bit crumbly (just like a regular Reese’s egg), and has a strong nutty flavor. You’ll want to eat it with a spoon!
Speaking of the filling – you can use this same filling to make Buckeyes, or homemade peanut butter cups…or even Mega Peanut Butter Cups!
Table of Contents
🧾What You’ll Need

Ingredients
Ready to get started? Here are a few helpful ingredient tips to make sure you get everything you’ll need. (Links are affiliate links and I earn a small commission from qualifying purchases.)
- Graham crackers: You’ll need three full graham cracker sheets to make enough crumbs for the filling.
- Unsalted butter: Before getting started on the recipe, give the butter about 30 minutes on the counter to come to room temperature. It will make it much easier to blend.
- Creamy peanut butter: To make sure the peanut butter filling has the right texture, use creamy peanut butter. I’ve used both Jif and Skippy with great results. I have not tried this recipe with natural peanut butter.
- Salt
- Vanilla extract: A hint of vanilla sets the filling apart from the store-bought kind. I love this vanilla extract by Nielsen Massey because it’s got amazing flavor, but feel free to use any brand you like.
- Powdered sugar: Helps to sweeten and thicken the peanut butter filling, without adding a grainy texture.
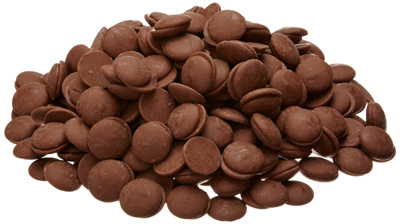
- Chocolate wafers (candy coating): I like using chocolate candy coating because it is easy to use, dries shiny, and stays hard at room temp. Chocolate chips or chopped chocolate can be substituted, but they tend to be duller, softer, and stickier unless tempered before use. See the Tips below for more information about how to use chocolate chips.

Equipment
Candy making is a lot of fun and you’ll only need a few tools so that you can make these year after year! Here’s what I recommend having on hand. (Links are affiliate links and I earn a small commission from qualifying purchases.)
- Mixer: You can use a stand mixer or hand mixer to make the filling.
- Small cookie scoop: It’s really helpful to use a small #60 cookie scoop that holds 1 tablespoon to make the candy eggs so that they are all roughly the same size.
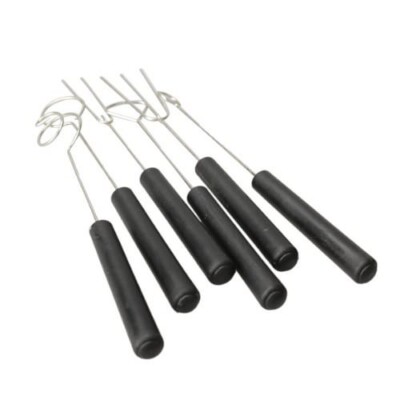
- Dipping tools: I like to use dipping tools when making candy, but if you don’t have a set, a fork will also work just fine.
- Baking sheet and parchment paper: The peanut butter eggs will need to chill and set on a baking sheet lined with parchment paper.
- Rolling pin and zipper bag: To crush the graham crackers into a fine crumb, place them in a plastic zipper bag and crush them with a rolling pin. You can also pulse them in a food processor.

💗More Chocolate Easter Desserts


Leave a Review!
If you make this recipe, let us know! Leave a ⭐️⭐️⭐️⭐️⭐️ rating on the recipe below, and leave a comment, take a photo and tag me on Instagram @elabau, or use #sugarhero on IG!

Homemade Peanut Butter Easter Eggs
Ingredients
- 3 graham cracker sheets, yielding 1.6 oz crumbs
- 2 oz unsalted butter, (4 TBSP) at room temperature
- 9.5 oz creamy peanut butter, (1 cup)
- ½ tsp salt
- 2 tsp vanilla extract
- 8 oz powdered sugar, (2 cups)
- 12 oz chocolate candy coating, (2 cups)
Instructions
- Crush the graham crackers. Place the graham crackers in a plastic zip-top bag, and roll over it with a rolling pin to crush them into fine crumbs.
- Cream the butter. Place the butter in the bowl of a large stand mixer fitted with a paddle attachment, or use a large bowl and a hand mixer. Beat the butter for a minute, until light and creamy.
- Add the peanut butter. Add creamy peanut butter, salt, and vanilla to the bowl, and mix them together.
- Add dry ingredients and mix well. Finally, add the powdered sugar and graham cracker crumbs, and mix everything on low until the sugar is incorporated. Then continue to mix until everything comes together and you have a candy mixture that is smooth and pliable, but not sticky.
- Scoop and shape the eggs. Scoop 1 tablespoon of candy into your hands – if you have a 1 TBSP/#60 cookie scoop, this makes the job go faster and the eggs more uniform. Roll the candy into a ball, then press it flatter into an oval. Pinch one end slightly to make it more of an egg shape, then place it on a baking sheet lined with parchment or waxed paper.
- Chill the candy. Continue making peanut butter eggs until you’ve used all the candy – you should get 24-28 eggs from the recipe. Chill the candy for at least an hour, so it will be firm enough to dip.
- Melt the candy coating. Melt the chocolate candy coating in the microwave, stirring frequently to prevent overheating.
- Add a chocolate base (optional). Use a small offset spatula or knife to spread a thin layer of melted chocolate on the bottom of each egg. Place the eggs back on the baking sheet, and refrigerate again for 10 minutes or so, to set the chocolate. Although optional, I highly recommend this step to make the dipping process easier and your candy prettier.
- Dip the eggs. Use dipping tools or a fork, and drop a peanut butter egg into the bowl of melted coating. Press it down so it’s fully submerged, then use dipping tools or a fork to scoop it out of the chocolate. Let the excess drip back into the bowl, then gently set the egg back onto the baking sheet. Repeat until all of the peanut butter eggs are dipped.
- Refrigerate until set. Refrigerate the tray for about 20 minutes, until the candy coating is completely set.
- Storage. These eggs can be stored at cool room temperature for a week, or in the refrigerator for up to 3 weeks. They are best enjoyed served at room temperature.
Measuring Tips
Our recipes are developed using weight measurements, and we highly recommend using a kitchen scale for baking whenever possible. However, if you prefer to use cups, volume measurements are provided as well. PLEASE NOTE: the adage “8 oz = 1 cup” is NOT true when speaking about weight, so don’t be concerned if the measurements don’t fit this formula.
Want to learn more about baking measurements and conversion?
Nutrition
📸Photo Tutorial: How to Make Copycat Reese’s Peanut Butter Eggs
Stay on track as you make these better-than-store-bought peanut butter eggs and avoid common mistakes by following along with this step-by-step photo tutorial. Full instructions are included in the recipe card above.
- Crush the graham crackers. Put 3 graham cracker sheets in a plastic zip-top bag, and crush them into fine crumbs with a rolling pin. This should yield 1.6 oz of crumbs.
- Cream the butter. In a large mixing bowl, beat 2 oz (4 tablespoons) butter until light and creamy, about 1 minute.


- Add the peanut butter. Add 9.5 oz (1 cup) creamy peanut butter and blend it into the butter.
- Add salt and vanilla. Then add ½ teaspoon salt, and 2 teaspoons vanilla to the bowl, and mix them together.


- Add dry ingredients. Now add 8 oz (2 cups) powdered sugar and the graham cracker crumbs.
- Mix well. Mix on low until the sugar is incorporated and the filling is smooth and pliable, but not sticky. It should have the texture of Play-Doh. Check the Tips if your filling seems too soft or sticky.

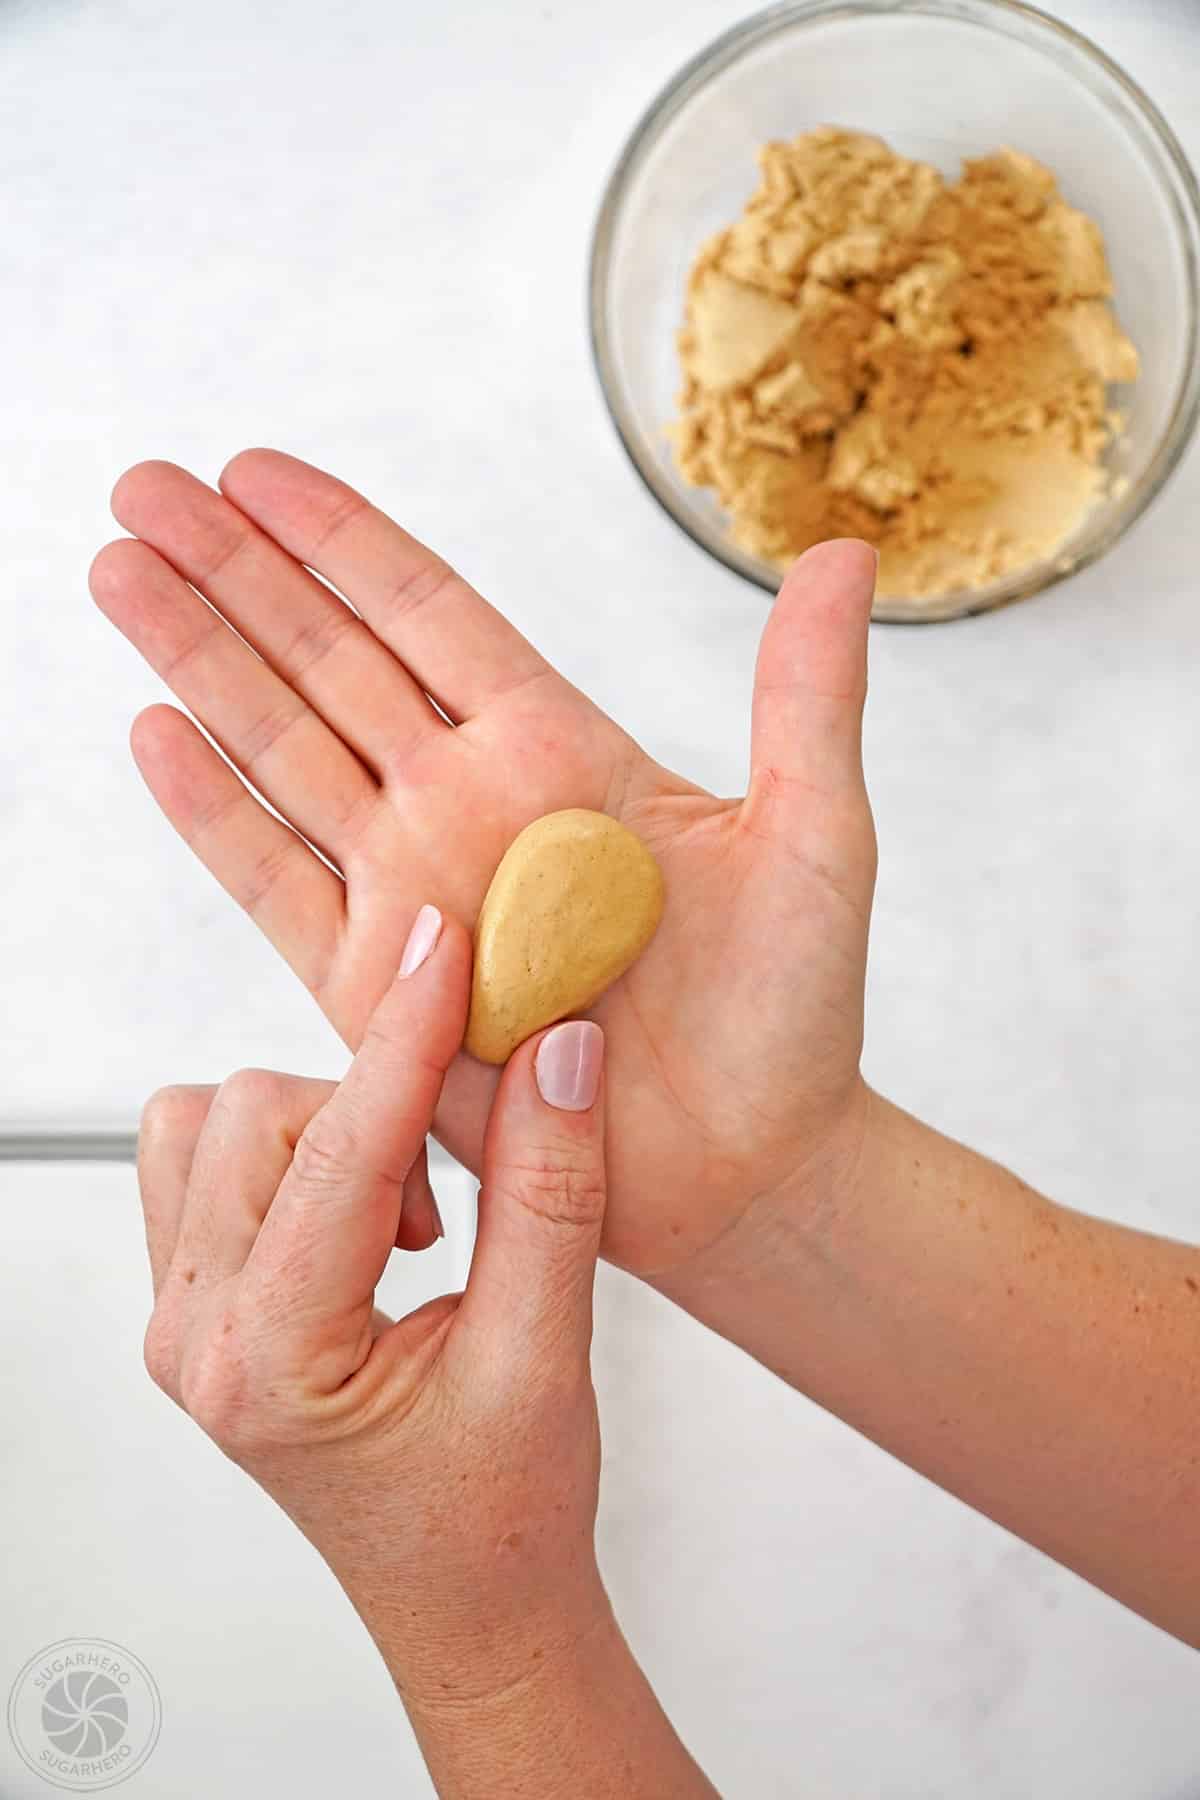
- Scoop the filling. Scoop 1 tablespoon of peanut butter filling into your hands and roll it into a ball.
- Shape the egg. Press the ball flatter into an oval shape and pinch one end slightly to make it egg-shaped. Place it on a parchment-lined baking sheet. Continue this process until all the filling has been molded into eggs and placed on the baking sheet (about 24-28 eggs).


- Chill the candy. Place the baking sheet(s) in the refrigerator for at least an hour to firm the candy for dipping.
- Melt the candy coating. Melt 12 oz (2 cups) chocolate candy coating in the microwave, stirring frequently to prevent overheating.
- Add a chocolate base (optional). Spread a thin layer of melted chocolate on the bottom of each egg, and place them back on the baking sheet(s). Refrigerate the candy for an additional 10 minutes to set the chocolate foot. Although optional, I highly recommend this step because it makes your candy a lot easier to dip!


- Dip the eggs. Use a dipping tool or fork to drop a peanut butter egg into the warm chocolate coating and submerge it fully. Scoop the egg out with your tool and let the excess drip back into the bowl. Gently set the egg back onto the baking sheet and repeat this process until all of the peanut butter eggs are dipped. (Feel free to reheat the chocolate as needed if it becomes too thick for dipping.)
- Refrigerate until set. Refrigerate the tray(s) for about 20 minutes, until the candy coating is completely set.
- Enjoy! Your candy is ready to be enjoyed and tastes best when served at room temperature.

💡Tips and FAQs for Success
Yes! I do recommend candy coating, because it is easier to use, shiny, and stays hard at room temperature. However, I know it’s not as easy to find, so you can swap in melted chocolate chips or chopped chocolate bars instead.
Both chocolate chips and chopped chocolate tend to be duller, softer, and stickier at room temperature. If you decide to use chopped chocolate bars, you can temper the chocolate to make it hard and shiny – check out my tutorial on how to temper chocolate before getting started. Chocolate chips typically do not temper well.
Chocolate chips tend to be thicker when melted – that’s because they are designed to hold their shape when baked, so melted chips are not as fluid as candy wafers or chopped chocolate. This thick texture can make dipping candy more difficult. If you are using melted chocolate chips, and it seems too thick, you can add a spoonful of shortening or coconut oil into the warm chocolate to thin it out and make dipping easier.
The peanut butter filling should be soft enough to roll, but not too soft or sticky. It should have the texture of Play-Doh when it’s ready. However, different brands of peanut butter can produce different filling results. If you’ve followed the directions and feel like the filling is too soft to easily hold its shape or too sticky, increase the powdered sugar by ¼ – ½ cup (about 1-2 additional ounces). Add it gradually at the end and just keep mixing more in until it feels smooth and easy to mold. You can also add an additional crushed graham cracker if you want a crumblier texture.
If you are new to dipping treats into chocolate, it might seem a bit daunting — even tear-inducing. Occasionally dipped candies actually taste better than they look! 😂 You won’t be the first (or last!) person to have the tines of a dipping tool or fork cut into your soft candy fillings, leaving marks that are hard for chocolate to cover up.
To make sure your peanut butter eggs look pretty right from the get-go, without any tears, I want to share my top pro tip: give the eggs a chocolate base before dipping them completely in the chocolate! This is technically an extra step, but it really makes the dipping process easier because the chocolate “foot” forms a protective layer between the soft filling and sharp dipping tool tines, allowing the candy to be completely enrobed in chocolate without any unsightly dings or scratches.
To make the chocolate base, use a small offset spatula or knife to spread a thin layer of melted chocolate on the bottom of each chilled egg. Then place the eggs back on the baking sheet, and refrigerate them for another 10 minutes to set the chocolate into a solid base. Check out the step-by-step photo tutorial above!
Room temperature: These eggs can be stored at cool room temperature for one week. If you plan to stack them, place a sheet of parchment paper between each layer.
Refrigerate: They can also be stored in the refrigerator in an airtight container for up to 3 weeks. Bring them to room temperature before enjoying!


Is it possible to omit the butter to make these dairy free due to allergies? Or substitute with oil? Thank you
Hi Essie! Although we haven’t tried it, a 1:1 dairy-free butter replacement should work just fine. I wouldn’t recommend using oil though. Let us know how it turns out!