


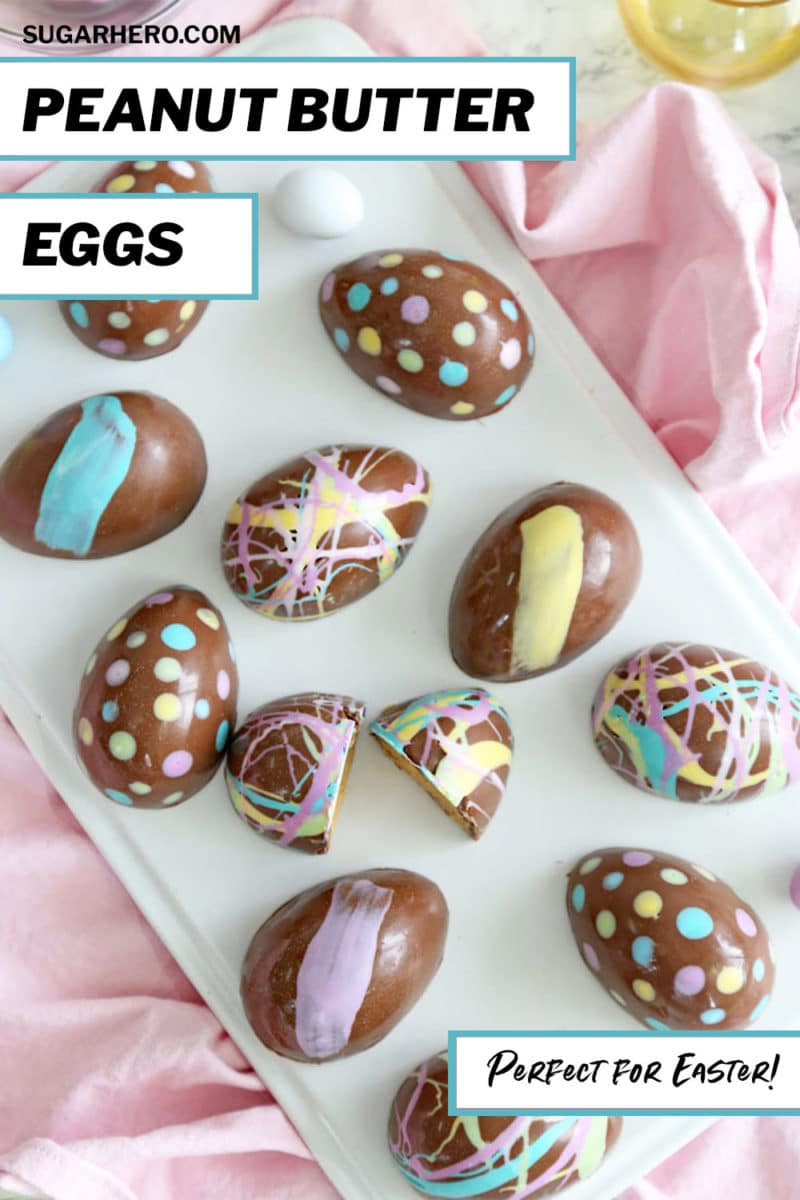
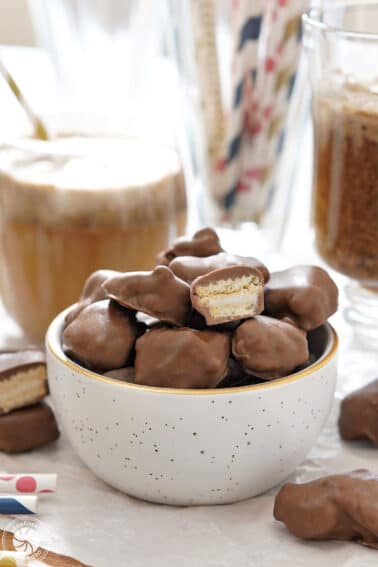
This homemade Peanut Butter Easter Eggs recipe has it all–a sweet, salty, slightly crumbly peanut butter filling, a coating of creamy chocolate on the outside, and sweet pastel decorations for that perfect Easter touch. Once you try these Peanut Butter Eggs, you’ll never buy store-bought again!
🥜 Why You’ll Love This Peanut Butter Eggs Recipe
Homemade candy is the best. Of course store-bought candy has its place, but let me make the case for homemade:
- It’s fresher. No stale filling or crumbly chocolate coating if you’re making it from scratch!
- You know exactly what goes into it!
- No mystery ingredients with unpronounceable names. You can customize the flavor, texture, colors, appearance, etc.
Custom candy? Now you’re livin’ like a millionaire. If you’re looking for more homemade candy inspiration, try your hand at these Mega Stuffed Peanut Butter Cups, Peanut Butter Cup Fudge, Marbled Easter Egg Truffles, Twix Kat Bars or these cute and easy Chocolate Easter Nests!
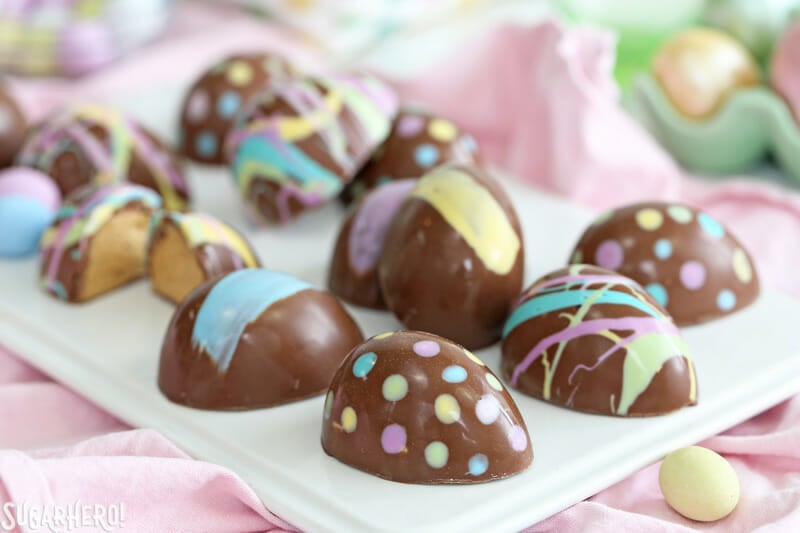
Table of Contents
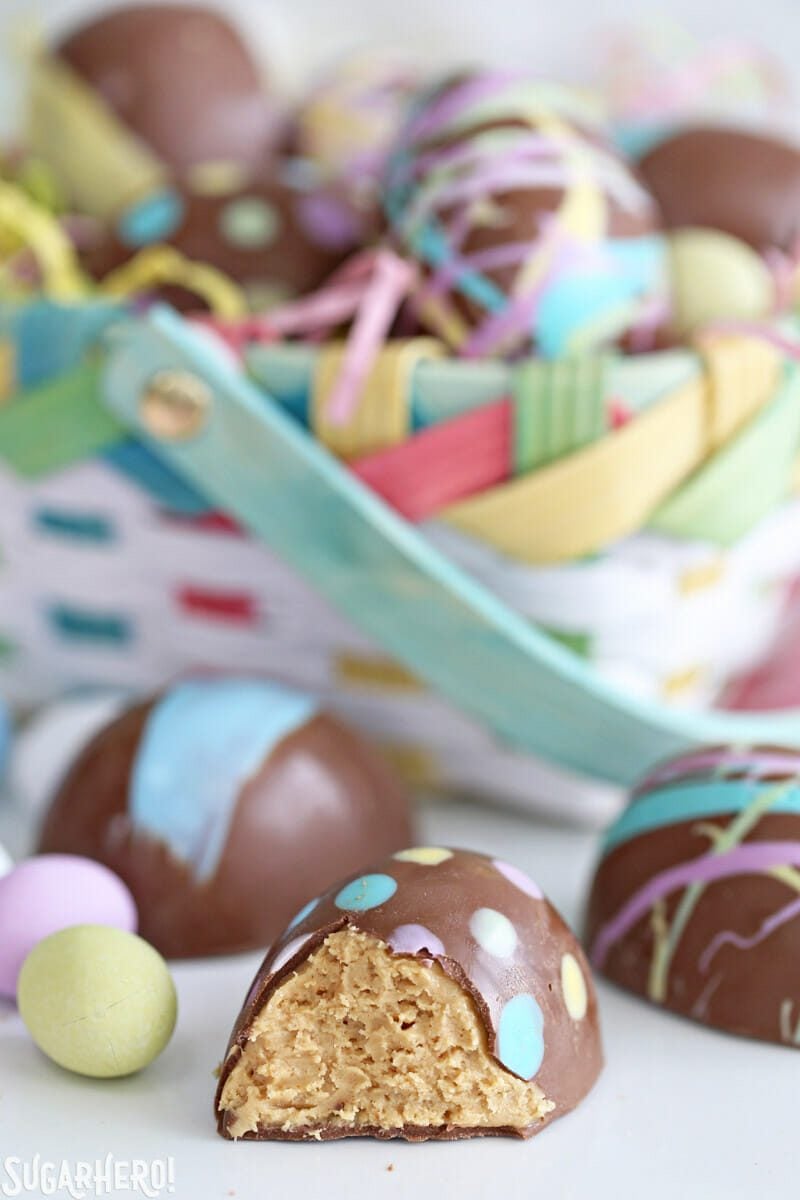
When I started thinking about Easter recipes, I knew I needed to re-create one of my favorite Easter basket treats, the Reese’s peanut butter egg! No shade, I still love a classic peanut butter egg, but I like this homemade version a LOT more, and I think you will too.
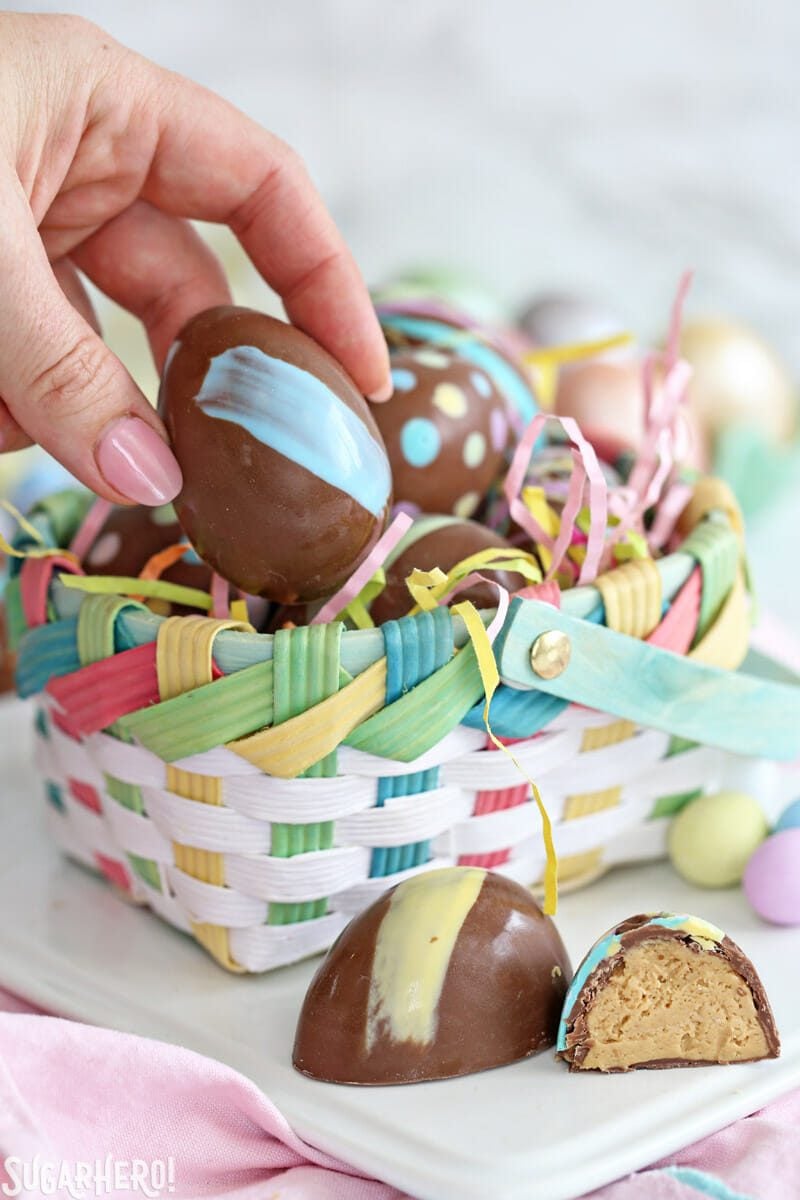
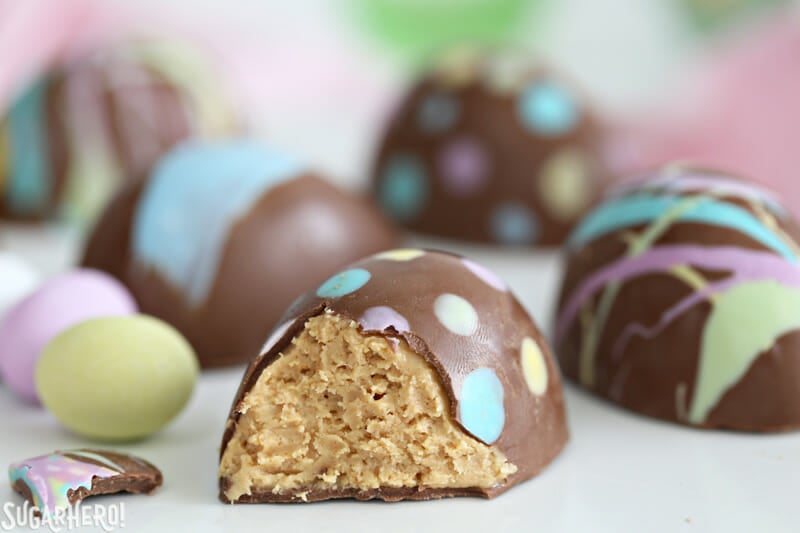
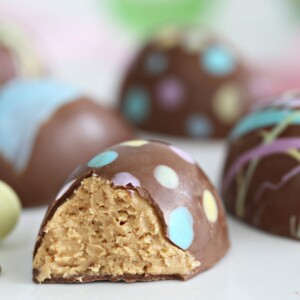
For one, look at all that filling! Every true peanut butter lover knows that mo’ filling, mo’ betta. No thin, skimpy filling layer here.
For another, the filling is fresh-fresh-fresh. It actually tastes like peanut butter, not sugar-with-a-smattering-of-peanut-dust! I also recreated the classic PB egg texture by adding in some graham cracker crumbs.
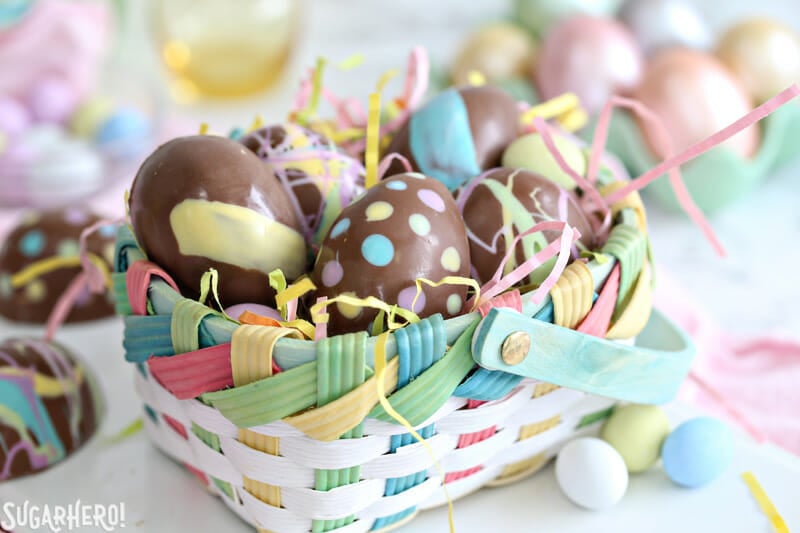
This version of peanut butter eggs is made using an egg-shaped mold and pretty pastel decorations. If you like this, you’ll also like my Peanut Butter Eggs. They are made with the same delicious filling but no mold is required!
🧾 What You’ll Need
Ingredients
To make these easy peanut butter eggs, you’ll need the following ingredients: (Links are affiliate links and I earn a small commission from qualifying purchases.)
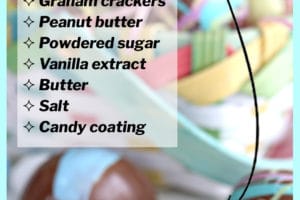
- Graham Crackers: Graham crackers might be a surprising ingredient, but in my opinion they’re completely necessary. Traditionally, peanut butter eggs are a little dry and crumbly. I use graham cracker crumbs to give the filling a bit of that crumbly texture, and to keep the peanut butter mixture from becoming too gloopy and sticky.
- Smooth Peanut Butter: This recipe was made with standard super market smooth peanut butter. (Jif and Skippy both work well!) Looking to use a different nut butter? Check out the Variations section below.
- Powdered Sugar: Two cups of powdered sugar is the perfect amount to give the filling body and sweetness, without being overly sweet.
- Butter: Butter adds a smooth, creamy richness to the filling. You can use salted or unsalted butter. If using salted, I recommend leaving out the added salt at first, taste the filling, then adding additional salt if desired.
- Vanilla & Salt: Both add great flavor to round out the peanut butter filling.
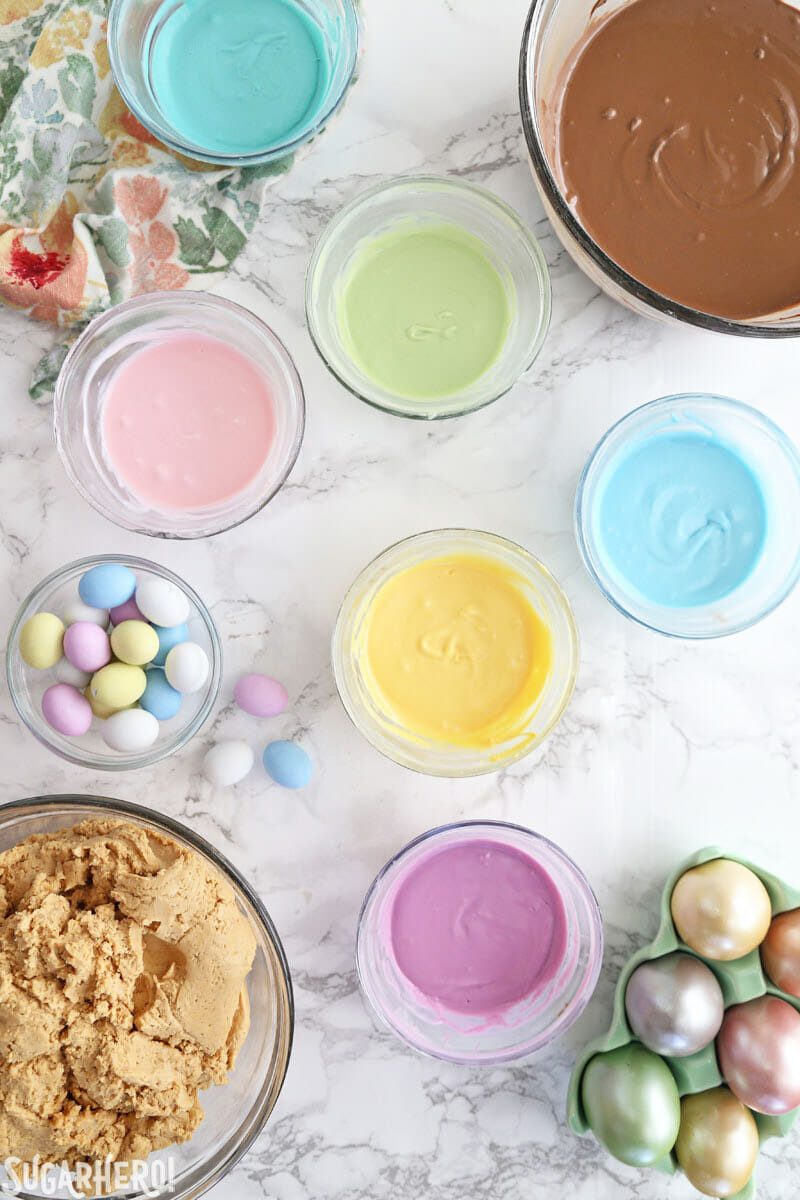
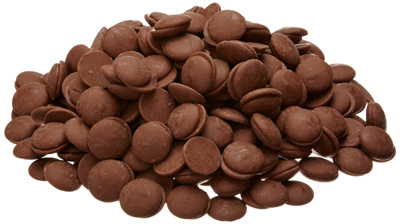
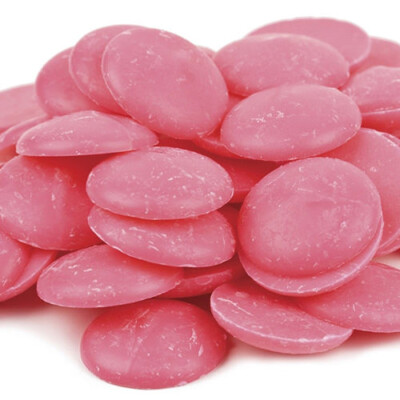
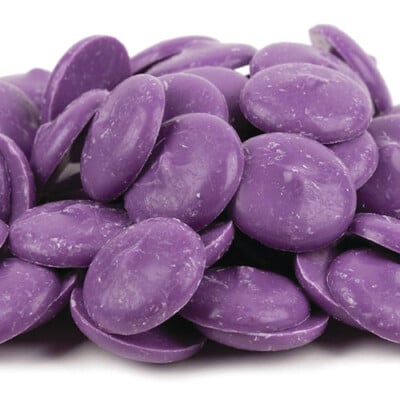
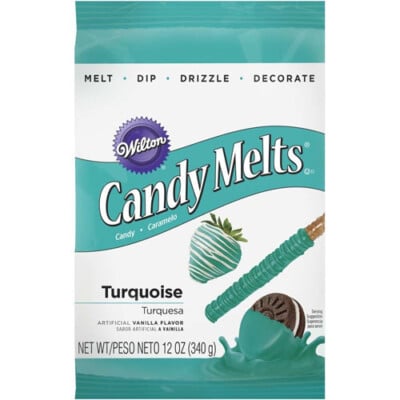
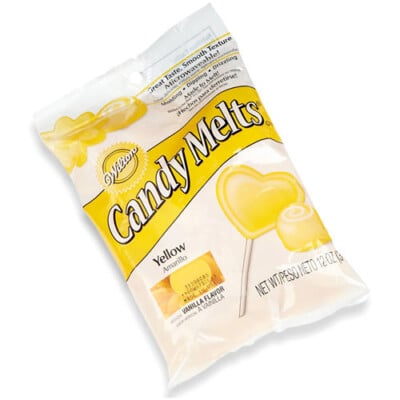
- Candy Coating: I use chocolate candy coating to make the shells, and pastel coating for decorations. Merckens and Ghirardelli both make coatings that are easy to work with and tasty! If you prefer, you can use real chocolate–just make sure you follow these instructions to temper the chocolate so it turns out hard and shiny.
🥄 Equipment
You only need a few tools to make these cute peanut butter eggs!
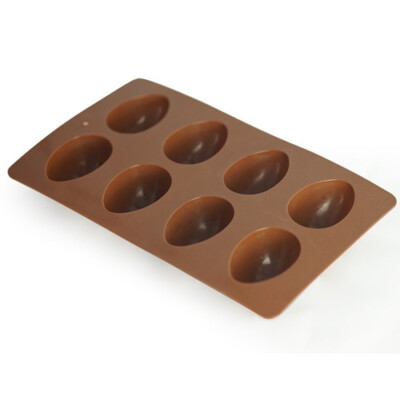
- Silicone egg mold:I recommend this silicone egg mold for making the perfect size peanut butter eggs. No mold? Check out the FAQ section below for suggestions!
- Mixer: A hand mixer or stand mixer will both work.
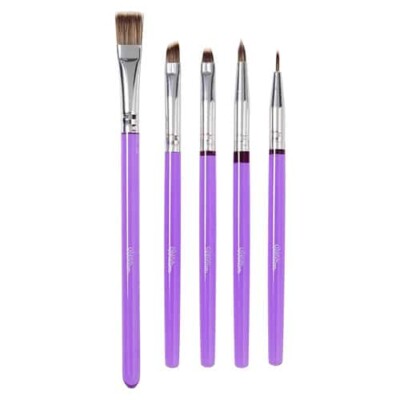
- Paintbrush: For the brush decorating effect, you’ll want a food-safe paintbrush.
📋 How to Make Peanut Butter Eggs
Here’s a quick overview of how to make peanut butter eggs! Full instructions in the recipe card below.
Step 1: Make the Peanut Butter Filling
Mix all of the filling ingredients using a mixer, until you have a smooth mixture that’s just a bit dry and crumbly. Refrigerate it until you’re ready to use it.
Step 2: Make the Chocolate Shells
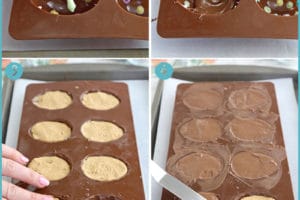
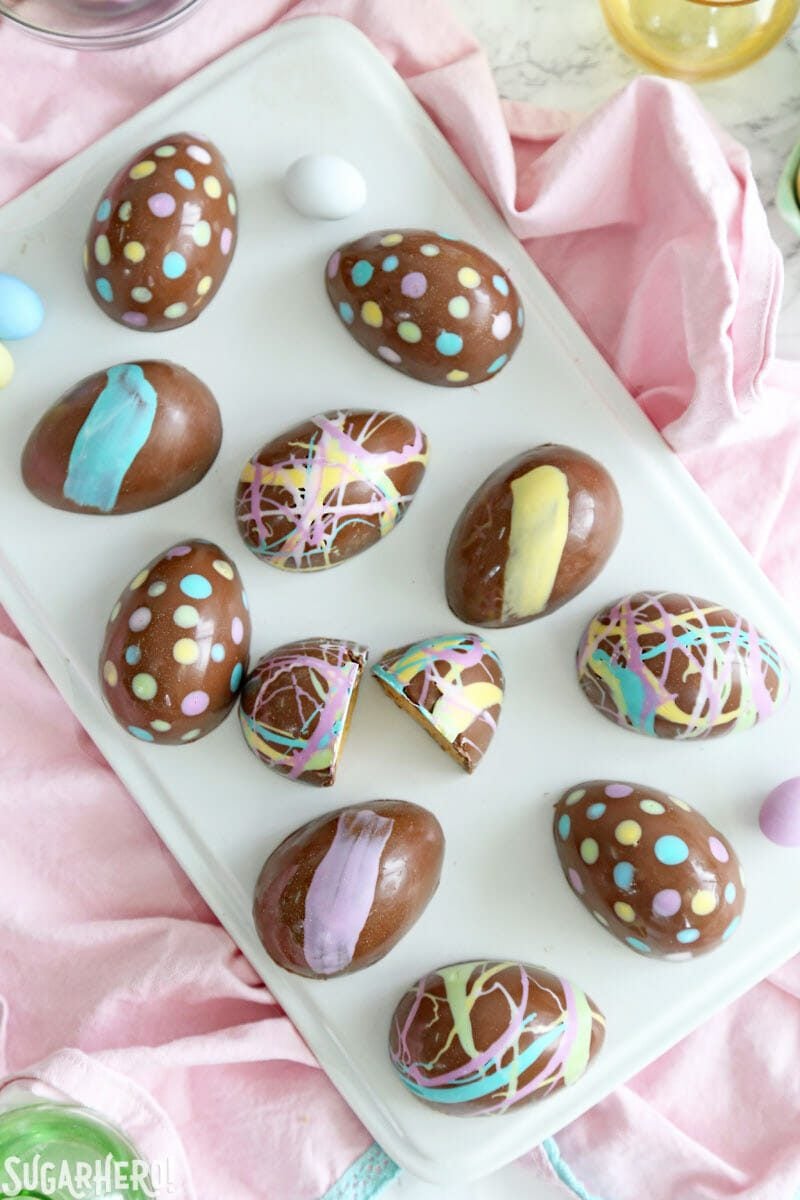
The pastel decorations on the eggs are completely optional. If you want to add them, you should do the decorating first, on the inside of the shell. This keeps the finished product looking perfectly glossy and smooth. If you decorate at the end, the dots/swirls will be raised and textured. I’ve included instructions for making polka dots, brush strokes, and color swirl eggs.
Once your decorations inside the mold have set, the dark chocolate coating is brushed on the inside of the molds. I tried the technique of filling the molds and then inverting them, letting the chocolate run out, but that caused the colorful decorations to bleed and run. The brushing technique is more reliable and produces better results. Just make sure you get a thick enough layer of chocolate on the inside of the shells.
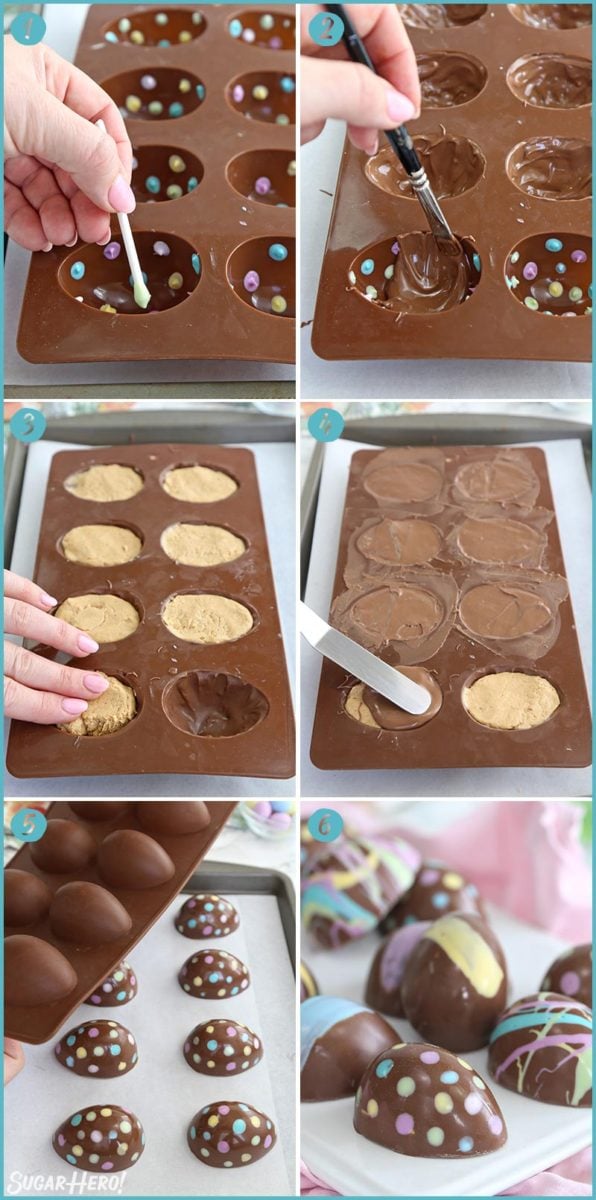
Step 3: Add the Peanut Butter Filling
Let the chocolate set completely, then press the peanut butter filling into the molds. Don’t go all the way to to the top–be sure to leave a small space at the top for more chocolate.
Step 4: Seal with Chocolate
Spread a thin layer of melted chocolate coating all the way to the edges of each egg, so it forms a seal and no peanut butter filling can leak out the bottom.
Step 5: Unmold and Enjoy!
Refrigerate the molds so the candy coating sets completely, then invert the molds over your work surface and gently flex them so the eggs pop out.
💭 Variations
- Using other nut butters: If you are a fan of natural peanut butter or other nut butters, you’re welcome to swap them in, but I can’t guarantee success. Many natural nut butters have a thinner texture than standard peanut butter, meaning the filling will turn out softer. If you swap out nut butters and your filling is too soft, you can experiment with adding more powdered sugar or graham crumbs to compensate.
- Using real chocolate: candy coating is used in this recipe to simplify things. If you’d like to use real chocolate, I recommend a semi-sweet chocolate (55-65% cacao). Follow this tempering tutorial to temper the chocolate and ensure a shiny, hard finish.
💡 Tips and FAQs
Making Peanut Butter Eggs Without Molds
No molds? No problem! Here’s how you make them without molds:
- Refrigerate the peanut butter filling for about 1 hour, until firm.
- Use a tablespoon or candy scoop to form the peanut butter into balls. Flatten them between your palms until about 1/2 inch thick, then pinch one end thinner to make an egg shape.
- Refrigerate the egg-shaped patties again for at least 30 minutes so they are very firm.
- Melt the candy coating.
- Use a fork or dipping tools to dip a peanut butter patty into the candy coating. Let the excess drip back into the bowl, then set the peanut butter egg onto a baking sheet covered with parchment or waxed paper.
- Repeat until all the eggs are dipped!
Make-Ahead and Storage Instructions
These eggs keep well, and can be stored in an airtight container at room temperature for up to 2 weeks, or in the refrigerator for up to a month.
You can also make the components separately ahead of time. Store the peanut butter filling in an airtight container in the refrigerator, with plastic wrap pressed on top.
Make the empty chocolate egg shells and carefully remove them from the silicone molds. Store the shells at cool room temperature in plastic tubs separated by cupcake liners or pieces of paper towel.
🥜 More Peanut Recipes
- Snickers Cupcakes
- Chocolate Peanut Butter Milkshakes
- Peanut Butter Cup Banana Cake
- Peanut Butter and Jelly Sandwich Cake
- Peanut Butter Cup Brownies
- Peanut Butter Cup Ice Cream
- Peanut Butter Pie
- Chocolate Peanut Butter Cheesecake
🐣More Easter Recipes
- Easter Baby Chick Cupcakes
- Easter Egg Sugar Cookies
- Easter Egg Doughnuts
- Easter Egg Brownies
- Easter Egg Petit Fours
- Easter Bunny Cupcakes
Frosted Easter Brownies

Marbled Easter Egg Truffles
Don’t miss the step-by-step tutorial showing how to make Peanut Butter Easter Eggs – check out the web story here!
Leave a Review!
If you make this recipe, let us know! Leave a ⭐️⭐️⭐️⭐️⭐️ rating on the recipe below, and leave a comment, take a photo and tag me on Instagram @elabau, or use #sugarhero on IG!
Peanut Butter Easter Eggs
Equipment
Ingredients
- 2 graham crackers, (2 rectangular sheets)
- 9.5 oz smooth peanut butter, (1 cup)
- 8 oz powdered sugar, (2 cups)
- 1 tsp vanilla extract
- 2 oz unsalted butter, (4 TBSP, at room temperature)
- 1/2 tsp salt
- 4 oz colored candy coating melts, (I used about 1 oz each of various pastel shades)
- 12 oz chocolate candy coating melts, (about 2 cups)
Instructions
To Make the Peanut Butter Filling:
- Place the graham crackers in a plastic bag and finely crush them with a rolling pin.
- Combine the graham cracker crumbs, peanut butter, powdered sugar, vanilla extract, butter, and salt in the bowl of a large mixer fitted with a paddle attachment.
- Mix everything on low until it’s blended together, then turn it to medium speed and beat for 30-60 seconds, until it’s very smooth and well-combined. Press a layer of plastic wrap on top and set aside until you’re ready to fill the eggs.
To Make the Chocolate Shells:
- Make sure your silicone egg mold(s) are clean and dry. Melt the colored candy coating individually in small bowls in the microwave. Heat them in short increments and stir frequently to prevent scorching.
- To make polka dot eggs, dip the bottom of a lollipop stick in one of the colors, and add dots of color to the inside of the silicone egg mold. Repeat with all of your colors. Refrigerate the molds until the colored dots are hard.
- To make brush stroke eggs, take a clean, dry paint brush and dip it in the melted colored coating, and brush one long stroke of color on the inside of the silicone egg mold. Repeat with different colors, one per egg, then refrigerate the molds.
- To make color swirl eggs, dip a spoon in one of the melted colors, and let some excess run off the spoon until it is only a thin line. (If the colored coating is too thick to run off the spoon, add in a small amount of vegetable oil and stir until the coating is fluid.) Flick the spoon over the top of the mold so that streaks and swirls of color are on the inside of the egg molds. Repeat with other colors until you’re happy with the design, then refrigerate the molds.
- Melt the chocolate candy coating in the microwave, stirring frequently to prevent overheat. Once the chocolate is melted and smooth, spoon a teaspoon or two of chocolate into one of the egg cavities. Take a clean, dry paintbrush and paint the chocolate up the inside of the cavity. Make sure the chocolate is in a thick, even layer. After all of the cavities are painted with a chocolate shell, run a metal spatula around the top of each egg to clean off the edges. Refrigerate until the chocolate layer is hard.
- Use a spoon or cookie scoop to put a spoonful of peanut butter filling into each cavity, and press down with your fingers until it’s in an even layer. Leave a small margin clear (about 1/8”) at the top of each egg.
- Re-melt the chocolate candy coating, if it has started to set, and then spoon a bit on top of the peanut butter filling. Spread it all the way to the edges of the cavity, so it forms a seal and no peanut butter filling can leak out the bottom. Repeat until all of the eggs are finished, then refrigerate the molds for at least 10 minutes, until the chocolate coating is shiny and hard.
- Invert the molds over your work surface and gently flex them so the eggs pop out. For the best taste and texture, serve these eggs at room temperature. They can be stored in an airtight container at room temperature for up to 2 weeks.
Recipe Notes
Measuring Tips
Our recipes are developed using weight measurements, and we highly recommend using a kitchen scale for baking whenever possible. However, if you prefer to use cups, volume measurements are provided as well. PLEASE NOTE: the adage “8 oz = 1 cup” is NOT true when speaking about weight, so don’t be concerned if the measurements don’t fit this formula.
Want to learn more about baking measurements and conversion?
Nutrition


So apparently my mom follows you on instagram, saw your post about these, and made them for Easter. She gave us a few – they turned out WONDERFULLY!
That is so fun!! I’m thrilled to hear that you guys enjoyed them, and hello to your mom! 😀
I made these for Easter this year as a surprise treat. Everyone absolutely loved them! They are both pretty and delicious! They are time consuming and patience is key, but well worth the effort. Thank you for this recipe!
Thank you for the feedback! I’m so glad to hear that they turned out for you!
Yum! My husband loves these.
I’m so glad to hear that! They are delightful 🙂
I have Graham crackers crumbs on hand. How much would I need to equal 2 crackers? Thank you . Looking forward to making these this Easter. They look absolutely delicious.
Hi Diane! 2 graham crackers are equal to 1/4 cup of graham crumbs, or about 1 oz of graham crumbs. Hope this helps!
Thank you Elizabeth, they turned out perfect.
Oh good! Thank you for sharing 🙂
Hi I love the information you give about tempering chocolate it was very informative . I do have a few quick questions for you I did check but I couldn’t fine the answer to my question. Can I freeze the eggs and if so how long after being made or should they be refrigerated. Also can I use a cream cheese based filling in them that I know would have ot be refrigerated? Thank you !
So happy I found you r site!
Hello Debra. Great questions! The chocolate eggs can be frozen but as with all chocolate, the finish is not the same afterward. The condensation from defrosting usually makes it less pretty and shiny. If you make the eggs with the peanut butter filling, they can be out at room temp for over a week. If you use the cream cheese filling then you’d need to refrigerate pretty soon after making them. I hope that helps.
Thank You Jill !
This recipe sounds easy. Can I use melted chocolate chip’s maybe with a little oil for the shell? Thankyou
Yes, definitely! If you do that, you might want to consider storing them in the refrigerator instead of at room temperature, depending on the temp of your home. Candies made with melted chocolate chips soften easily in warm weather. Please come back and let us know how they turn out!