


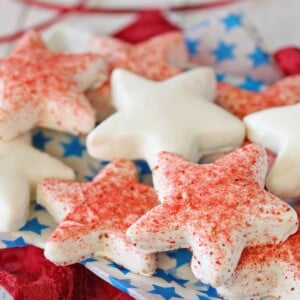
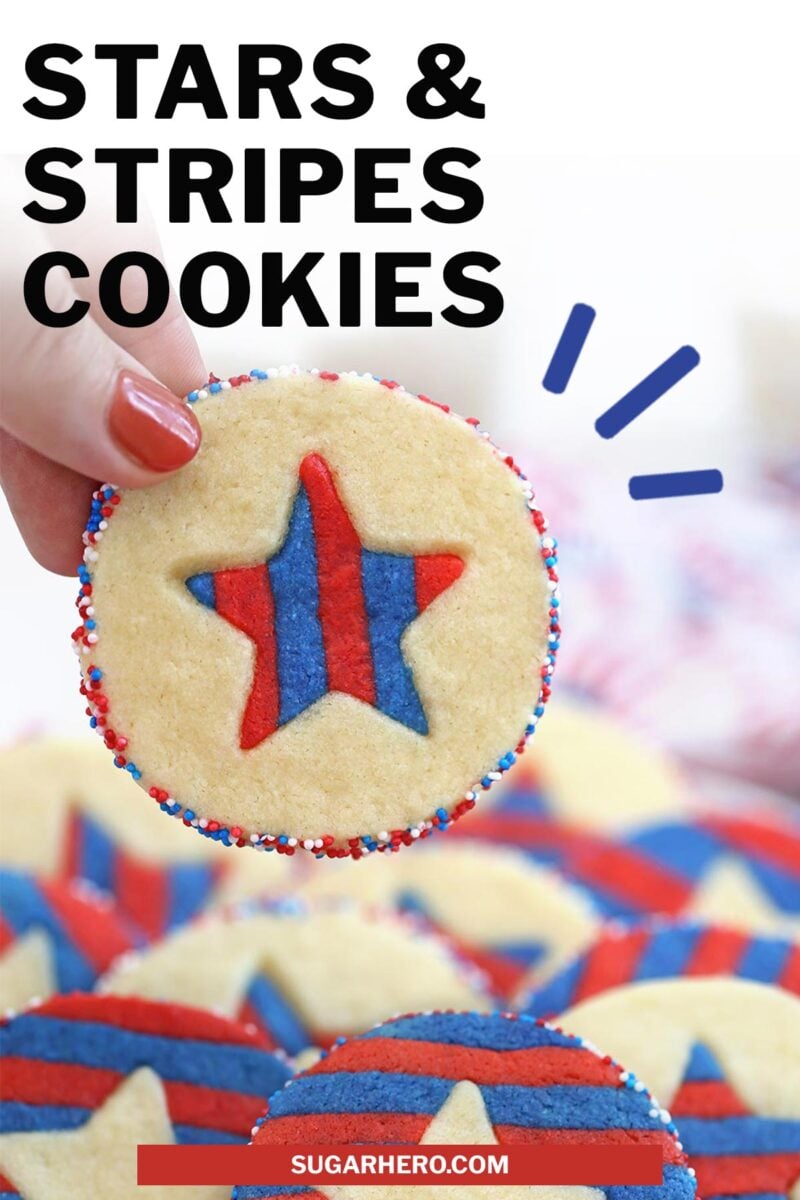
These Stars and Stripes Sugar Cookies are perfect for the 4th of July. The hidden star shape inside the cookies is surprisingly easy to make, and I’ll show you all the tips and tricks you need to know to make these dazzling cookies.
🌟 How to Make Star Sugar Cookies
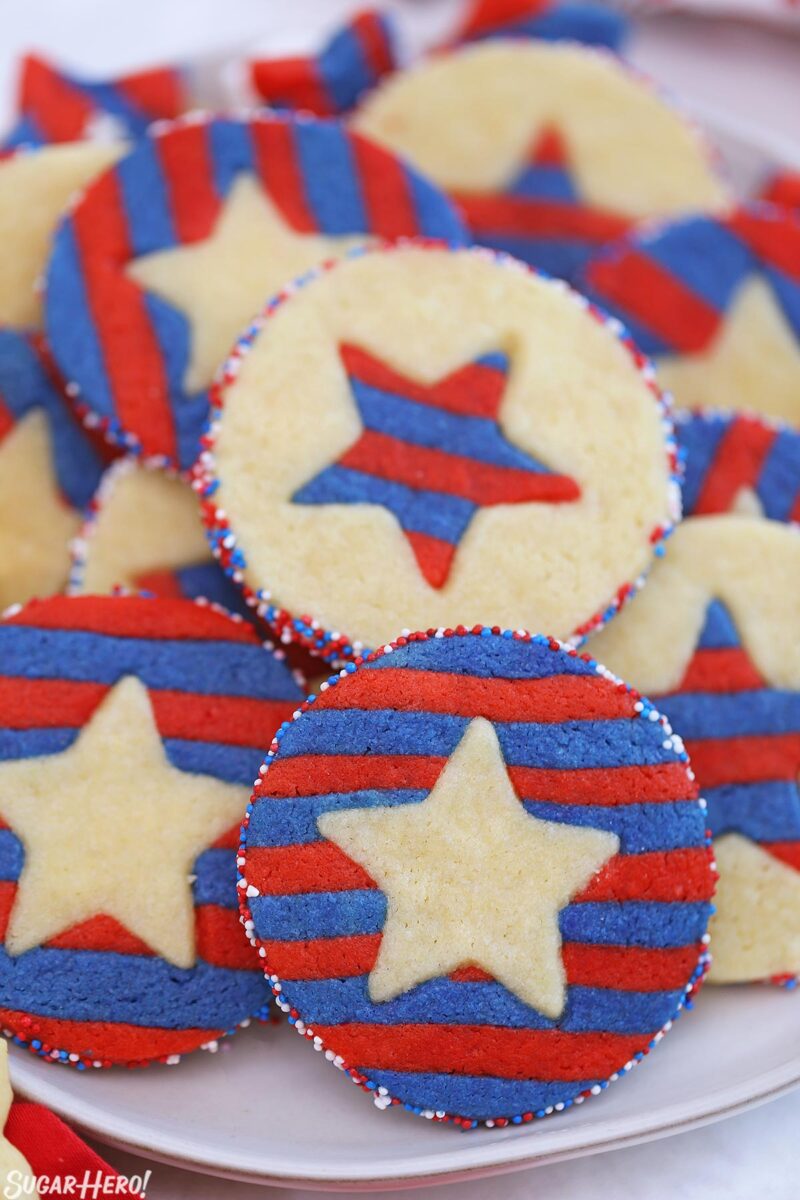
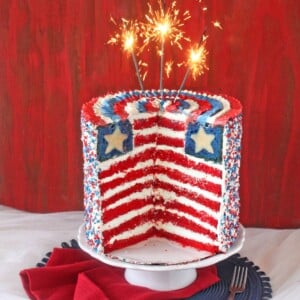
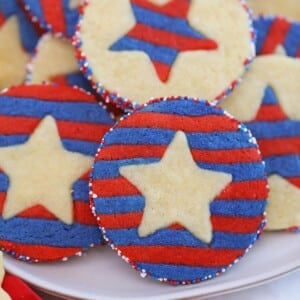
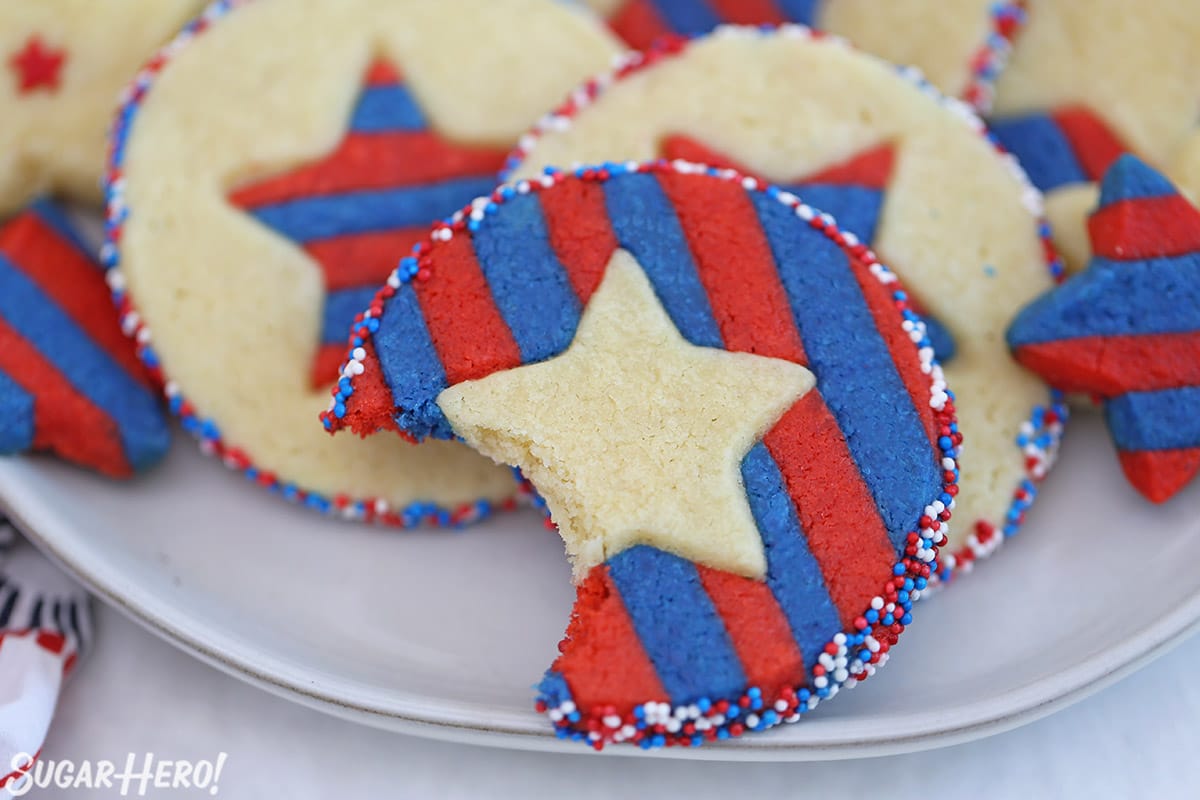
Oh say can you see…these super cute sugar cookies?! They’re crunchy on the outside, soft and tender on the inside, and best of all, have an eye-catching design of bright stripes and embedded stars. Obviously they’re appropriate for the Fourth of July, but you can switch up the stripe colors and the inside shape and make them for any occasion. Think pink and red stripes with a hidden heart for Valentine’s Day, or pastel stripes with a flower inside for Easter–the possibilities are endless!
These cookies were inspired by our super-popular Christmas Pinwheel Cookies, and originally they were just going to be red, white, and blue pinwheels. (And if you want to try that design, check out the Variations section below for instructions!) But instead, we took the same basic sugar dough and used it to create the stars and stripes design instead, perfect for patriotic potlucks and BBQs.
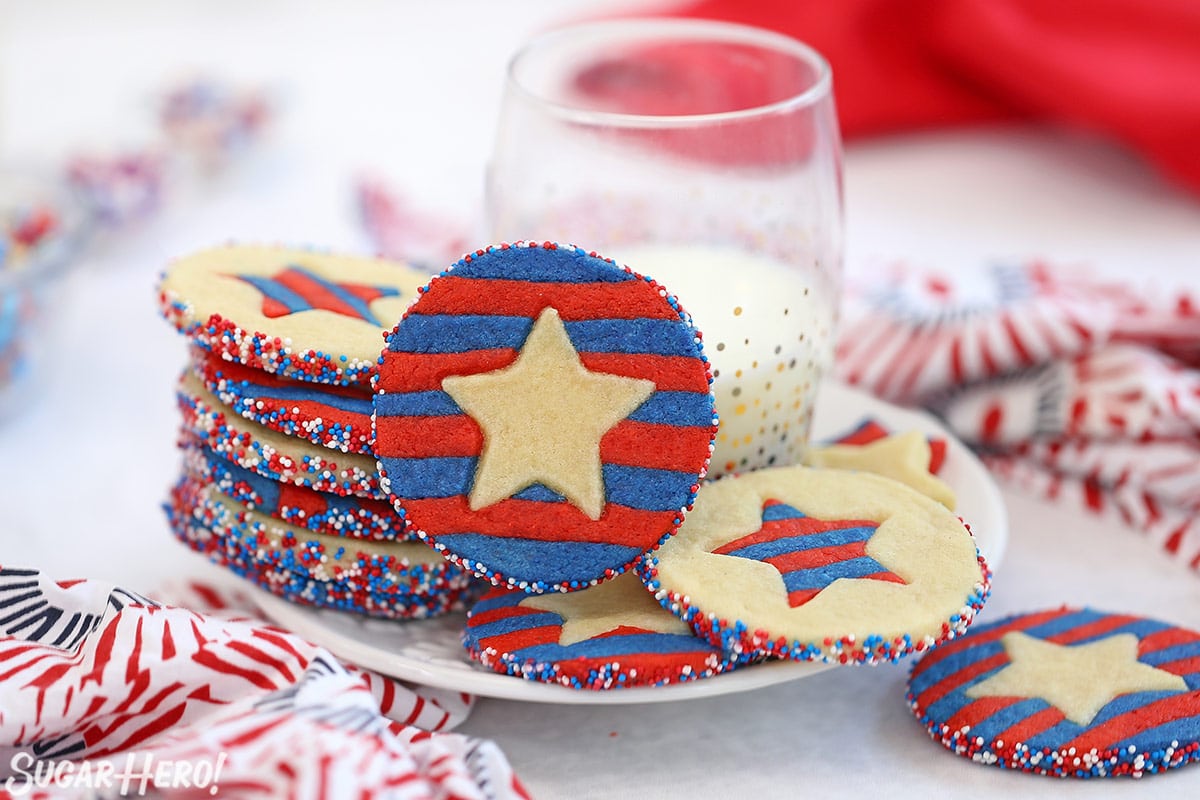
Table of Contents
🧾 What You’ll Need
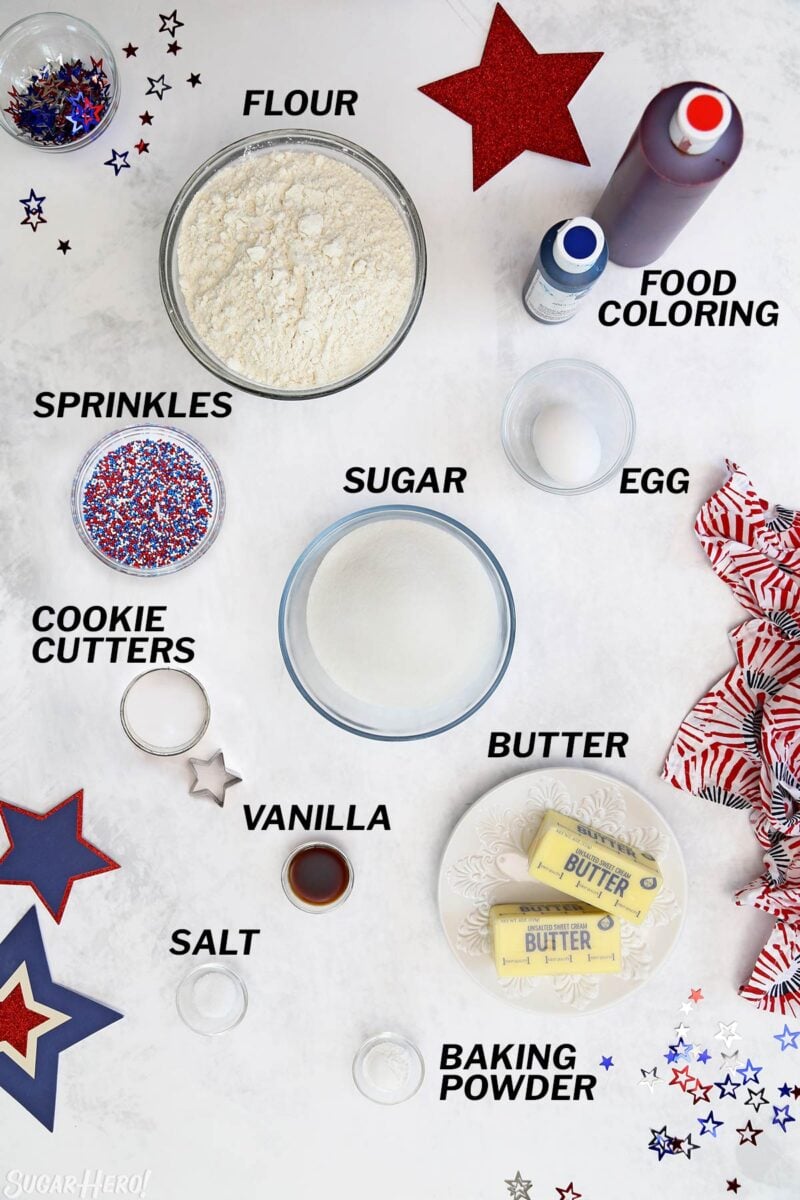
Ingredients
Like many cookie recipes, these require just a handful of pantry staples. Here are a few tips to keep in mind when assembling the ingredients. Full ingredient amounts are located on the recipe card below. (Links are affiliate links and I earn a small commission from qualifying purchases.)
- All-purpose flour: It’s important to measure the flour correctly to prevent dry cookies.
- Baking powder
- Unsalted butter and salt: Your butter should be at room temperature to make these cookies. This means it’s pliable but cool–you don’t want it to be greasy and melty. I always recommend unsalted butter in baking, so you can control the precise amount of salt. If you only have salted butter, use that but omit the additional salt in the recipe until you have tasted the completed dough, then add additional salt if desired.
- Granulated sugar
- Large egg: A room temperature egg is best. If you need to warm up an egg quickly, place it in a bowl of hot water for 5 minutes. This won’t cook the egg, but will bring it to room temperature so it’s perfect for baking.
- Vanilla extract: Vanilla is the classic sugar cookie flavor. My favorite vanilla extract is by Nielsen-Massey.
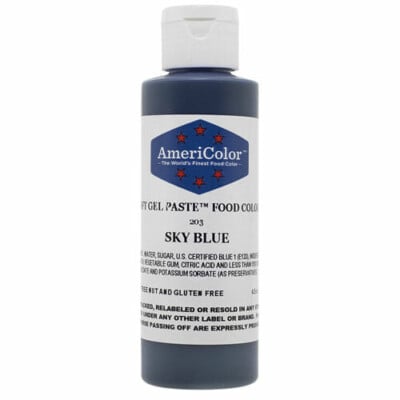
- Gel food coloring: It’s more concentrated than typical water-based colorings. You won’t have to use as much coloring to get strong, vibrant shades. For this recipe, I used Americolor Super Red and Americolor Royal Blue.
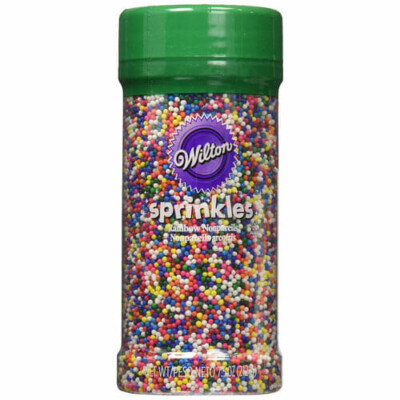
- Sprinkles: I used nonpareils, but most sprinkles will work. Jimmies, nonpareils, and sparkling sugar are all great choices. Avoid any sprinkles that are too large, or made of chocolate or royal icing.

Equipment
The equipment list is pretty basic, but you will want to make sure you have the right size cookie cutters to achieve the look you see here. (Links are affiliate links and I earn a small commission from qualifying purchases.)
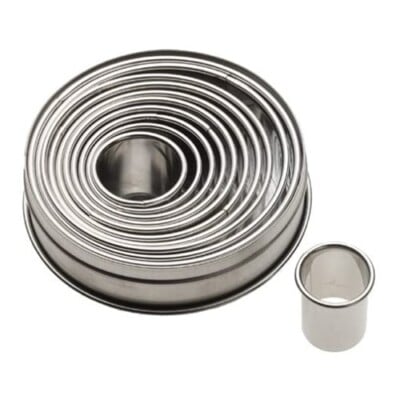
- Circular cookie cutter: Grab a circular cookie cutter – the one I used is 2.25″, but anything from 2-2.5″ should work well. I own and love this circular cutter set; it gives me lots of options!
- Star cookie cutter: The size of the star is flexible, but you’ll just want to make sure that the cutter you use doesn’t come too close to the edges of the cookie. I have this star cookie cutter set, and I used the one that is about 1.5″ wide.
- Baking sheets: Heavy-duty baking sheets will keep the bottoms of the cookies from burning and help cookies bake evenly
- Parchment paper: I never bake directly on my baking sheets–it’s all about the parchment, baby! Save time and cleanup by using silicone liners or parchment paper when baking cookies. I also roll my cookie dough out between sheets of parchment to avoid adding extra flour, which will make the cookies tough.
- Rolling pin: I like using a French rolling pin to roll out cookie dough, but whatever you have should work just fine.
- Mixer: A stand mixer or a hand mixer will both work in this recipe.
Leave a Review!
If you make this recipe, let us know! Leave a ⭐️⭐️⭐️⭐️⭐️ rating on the recipe below, and leave a comment, take a photo and tag me on Instagram @elabau, or use #sugarhero on IG!
Stars and Stripes Sugar Cookies (Fourth of July Cookies)
Ingredients
- 13 oz all-purpose flour, (3 cups)
- 1 tsp baking powder
- ½ tsp salt
- 8 oz unsalted butter, (1 cup), at room temperature
- 8.75 oz granulated sugar, (1 ¼ cups)
- 1 large egg, at room temperature
- 2 tsp vanilla extract
- red gel food coloring, I used Americolor Super Red
- blue gel food coloring, I used Americolor Royal Blue
- 6.75 oz sprinkles, (1 cup)
Instructions
- Combine dry ingredients: Whisk together the flour, baking powder, and salt in a medium bowl, and set aside temporarily.
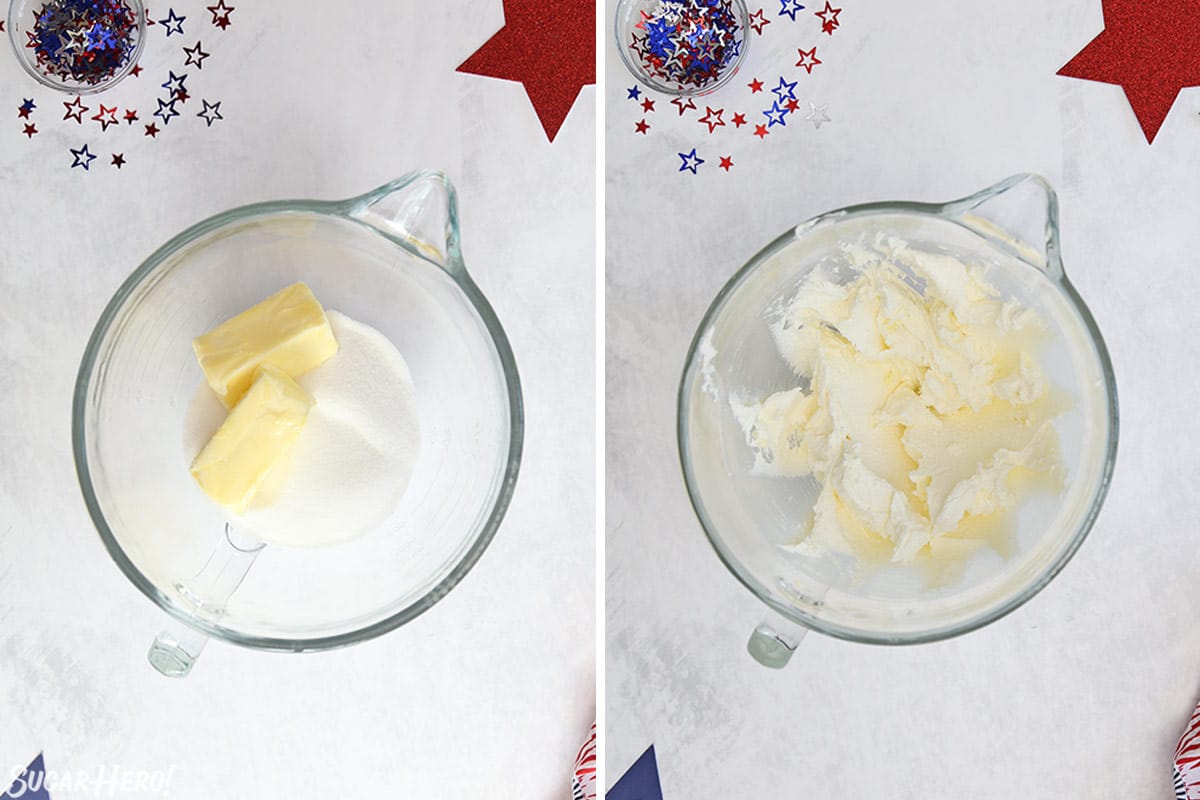
- Cream butter and sugar: Combine the butter and granulated sugar in the bowl of a large stand mixer fitted with a paddle attachment. Mix the butter and sugar together at medium speed for 2-3 minutes until light and fluffy.
- Add egg and vanilla to butter mixture: Turn the mixer to low, add the egg and vanilla extract, and mix until well-incorporated.
- Add dry ingredients to wet: With the mixer still on low speed, slowly add the flour and mix until just a few streaks of flour remain. Stop the mixer, and finish scraping down the bottom and sides of the bowl with a rubber spatula. The dough should be soft and supple but not sticky.
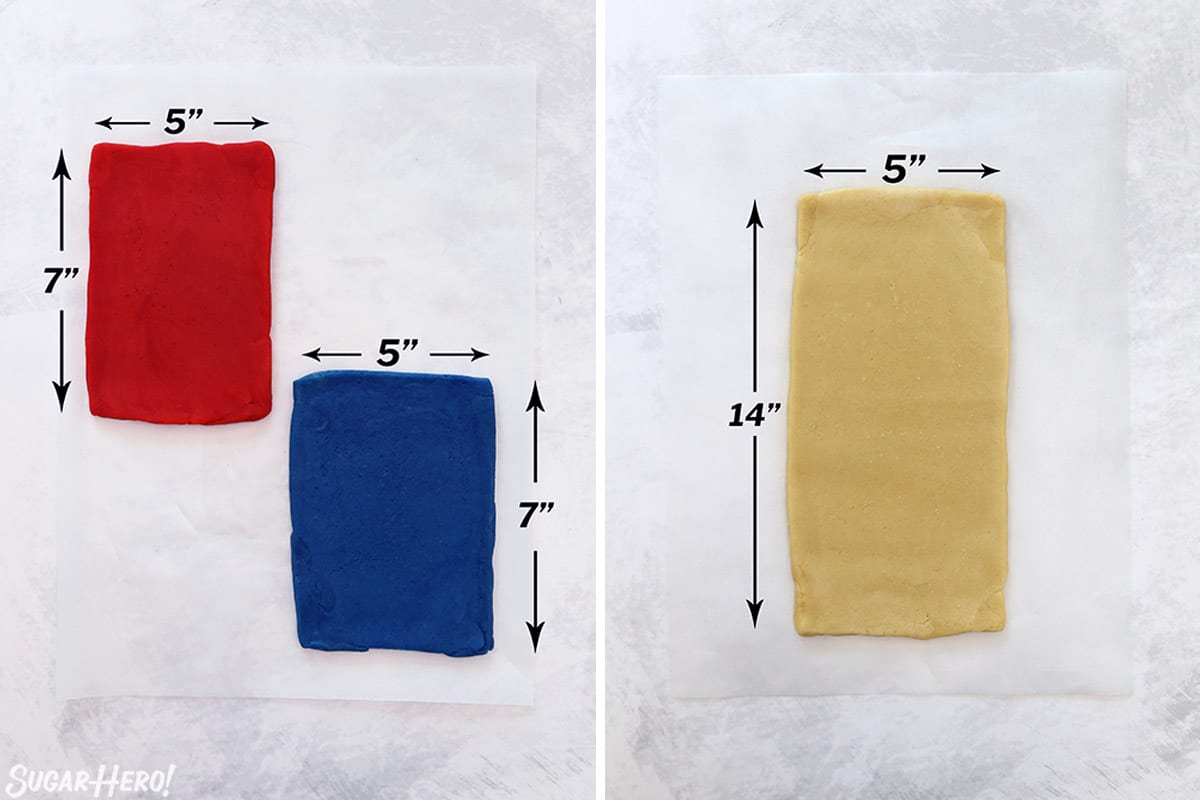
- Separate the dough: Divide the dough into 3 parts, with one part twice the size of the other two. If you have a kitchen scale, the large portion should be 15 oz and the two smaller portions each about 7.5 oz.
- Wrap large portion tightly: Leave the large portion uncolored, and form it into a disc and wrap tightly with plastic wrap.
- Color and wrap smaller portions: Use gel food coloring to color the other two portions red and blue. You can stir the food coloring in by hand, knead it in like bread dough, or mix it in using the mixer. (If you use the mixer, keep a close eye on the dough and run it for a short time so the dough doesn’t get overmixed and tough.) Wrap the red and blue in plastic wrap as well.
- Chill: Refrigerate the three wrapped discs of dough for at least 45 minutes, until firm.
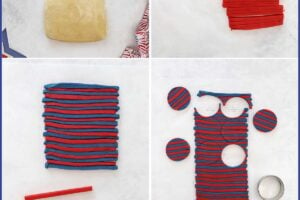
- Roll red and blue dough: Roll the red and blue doughs out between two sheets of parchment paper until they are rectangles ¼” thick, approximately 5” x 7” long. Try to avoid adding additional flour at this step, or else the cookies might be tough.
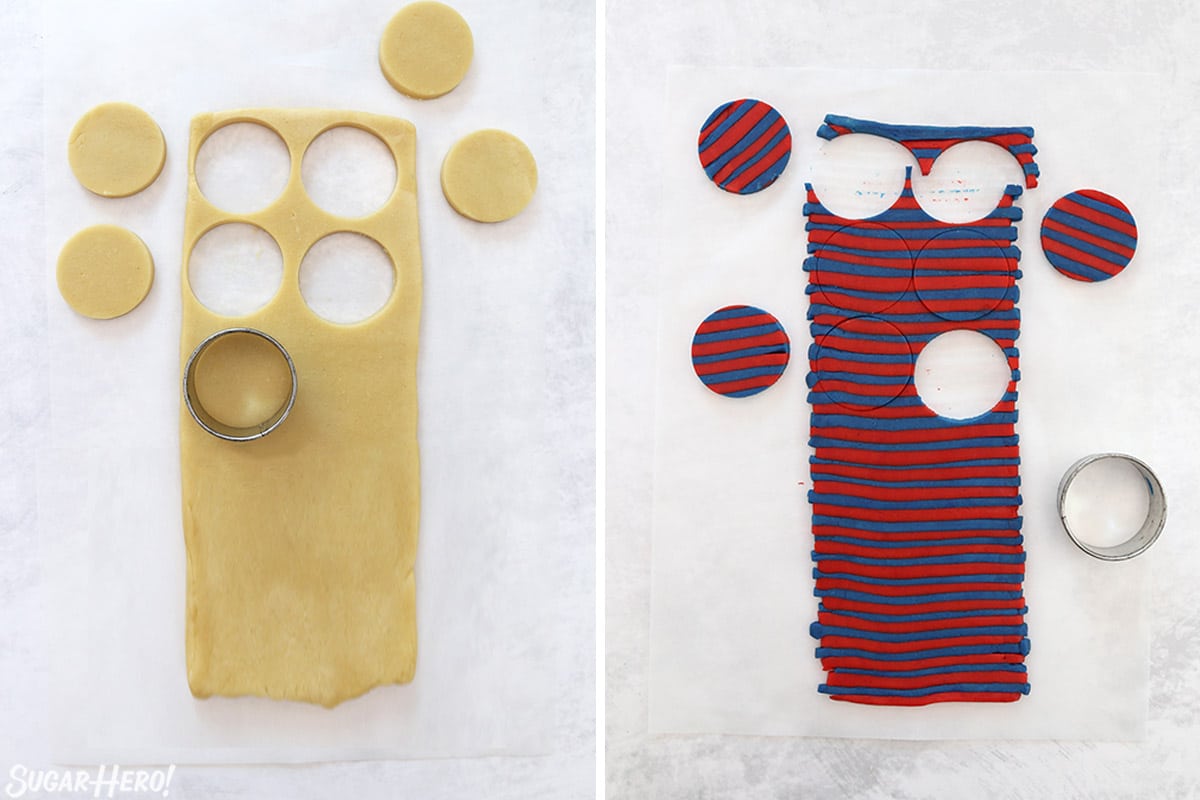
- Cut colored dough into strips: Use a sharp knife to cut the red and blue doughs into thin strips widthwise, about ¼” x 5” each.
- Press strips together: Arrange the strips into a long rectangle, alternating the colors red-blue-red-blue, and pressing the strips together as you go. If the dough becomes too soft to easily work with, refrigerate or freeze briefly to chill.
- Roll over rectangular strips: Once all of the red and blue strips are arranged into one long rectangle, place a piece of parchment over the top and gently roll over the top so they adhere together. Refrigerate again until firm.
- Prep oven and baking sheets: Preheat the oven to 350 F, and cover 2 baking sheets with parchment.
- Roll and cut uncolored dough: Roll out the uncolored dough to a rectangle ¼” thick, about 5” wide and 14-15” long. Cut out 2.25” circles of dough. You should get 12 cookies – you can re-roll the scraps and cut out more dough if necessary.
- Roll in sprinkles: Roll the edges of the cookies in sprinkles and place on a parchment-covered baking sheet. (If the sprinkles don’t stick well, you can lightly brush the edges with egg whites or corn syrup.)
- Cut and add sprinkles to striped dough. Cut out 12 circles from the striped dough and roll the edges in sprinkles.
- Cut stars and swap centers: Now, take a star cookie cutter and cut a star from the middle of each cookie. Press the plain stars into the middle of the striped cookies, and add striped stars to the plain cookies.
- Bake and cool: Bake the cookies for 9-10 minutes, until they have spread and puffed, and no longer have a raw shine in the center. They will continue to cook for a few minutes after they’re out of the oven, so don’t wait until they feel firm in the center or they will be overcooked. Once cool, remove from the baking sheets and enjoy!
- Storage: These cookies can be stored in an airtight container at room temperature and should be enjoyed within 4-5 days for maximum freshness. Unbaked cookies can be frozen, well-wrapped, for up to 3 months.
Measuring Tips
Our recipes are developed using weight measurements, and we highly recommend using a kitchen scale for baking whenever possible. However, if you prefer to use cups, volume measurements are provided as well. PLEASE NOTE: the adage “8 oz = 1 cup” is NOT true when speaking about weight, so don’t be concerned if the measurements don’t fit this formula.
Want to learn more about baking measurements and conversion?
Nutrition
📸Photo Tutorial: How to Make Fourth of July Sugar Cookies
Here’s how to make these stars and stripes cookies, step by step! You can also check out the video for more help, and you can find printable instructions in the recipe card above.
Make the cookie dough
- Combine dry ingredients: In a medium bowl, whisk together the flour, baking powder, and salt, and set aside temporarily.
- Cream butter and sugar: Combine the butter and granulated sugar in the bowl of a large stand mixer fitted with a paddle attachment. Mix the butter and sugar together at medium speed for 2-3 minutes until light and fluffy.
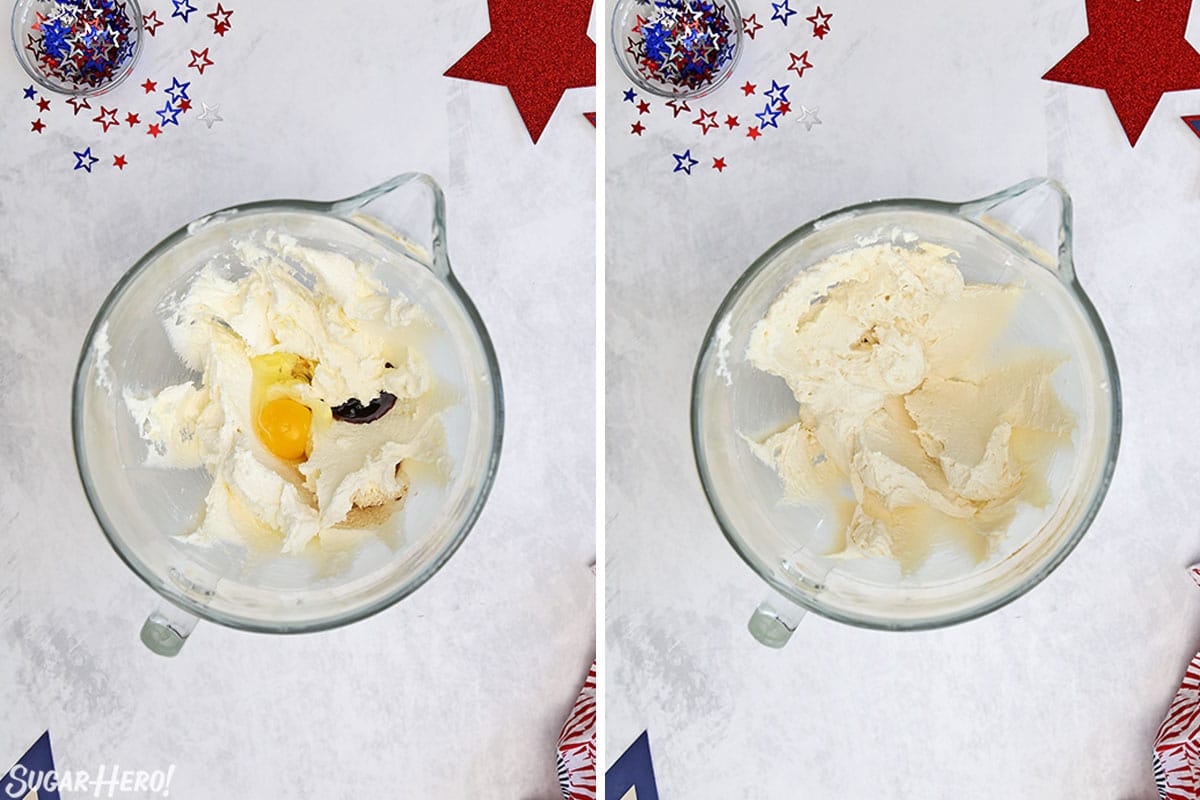
- Mix in egg and vanilla: Add the egg and vanilla extract, and mix until well-incorporated.
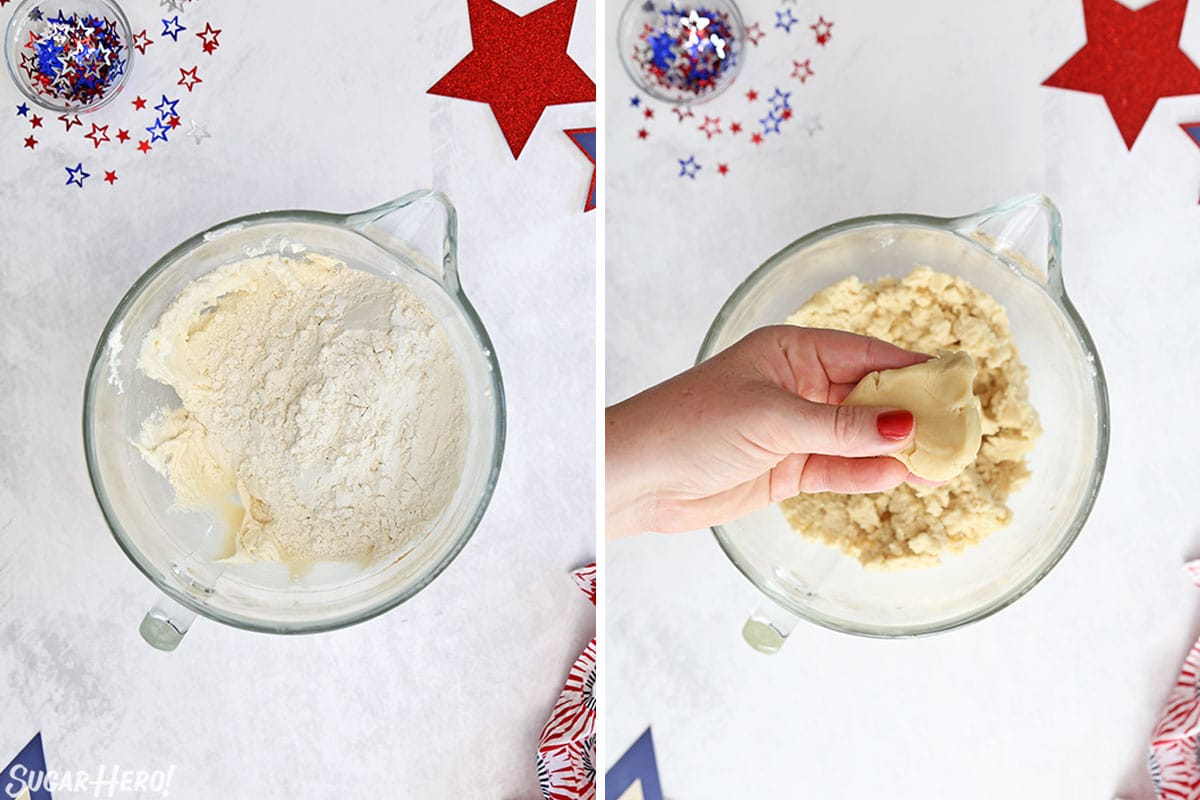
- Add flour mixture: With the mixer still on low speed, slowly add the dry ingredients and mix until just a few streaks of flour remain. Stop the mixer, and finish scraping down the bottom and sides of the bowl with a rubber spatula.
- Check dough texture: The dough should be soft and supple but not sticky when you press it between your fingers.

Divide and color the dough
- Divide dough: Divide the dough into 3 parts, with one part twice the size of the other two. If you have a kitchen scale, the large portion should be 15 oz and the two smaller portions each about 7.5 oz.
- Wrap large portion: Leave the large portion uncolored, and form it into a disc and wrap tightly with plastic wrap.
- Color two smaller portions: Use gel food coloring to color the other two portions red and blue. Wrap those in plastic as well.
- Chill: Refrigerate the dough for at least 45 minutes, until firm.
Roll out the dough
- Roll colored dough: Roll the red and blue doughs out between two sheets of parchment paper until they are rectangles ¼” thick, approximately 5” x 7” long. Try to avoid adding additional flour at this step, or else the cookies might be tough.
- Roll plain dough: Roll out the uncolored dough to a long rectangle 1/4″ thick, about 5″ x 14″. You can do this step now, or wait until later when you’re ready to cut out the circles.

Cut the dough into strips
- Cut colored dough into strips: Cut the red and blue doughs into thin strips widthwise.
- Press strips together: Arrange the strips into a long rectangle, alternating the colors red-blue-red-blue, and pressing the strips together as you go. Once all of the red and blue strips are arranged into one long rectangle, place a piece of parchment over the top and gently roll over the top so they adhere together.
- Chill: Refrigerate again until firm.
Cut out cookie dough circles
- Cut circles: Cut 2.25″ circles from each rectangle of dough. You should get about 12 circles of each type. You can re-roll the uncolored dough to make more cookies, if you’d like. (You can also re-roll the striped dough, but you will lose the stripe pattern.)
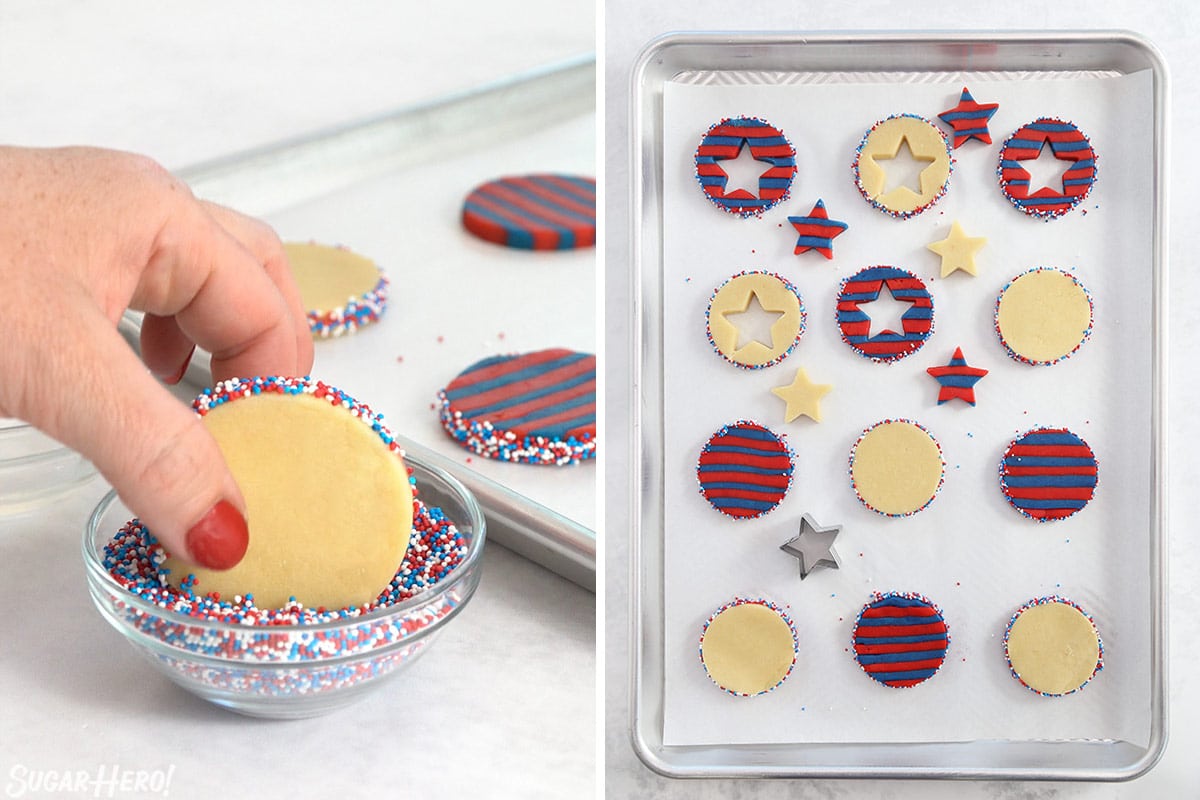
- Roll in sprinkles: Roll the edges of the cookies in sprinkles and place on a parchment-covered baking sheet. If the sprinkles don’t stick well, you can lightly brush the edges with egg whites or corn syrup.
- Cut stars: Take a star cookie cutter and cut a star from the middle of each cookie.
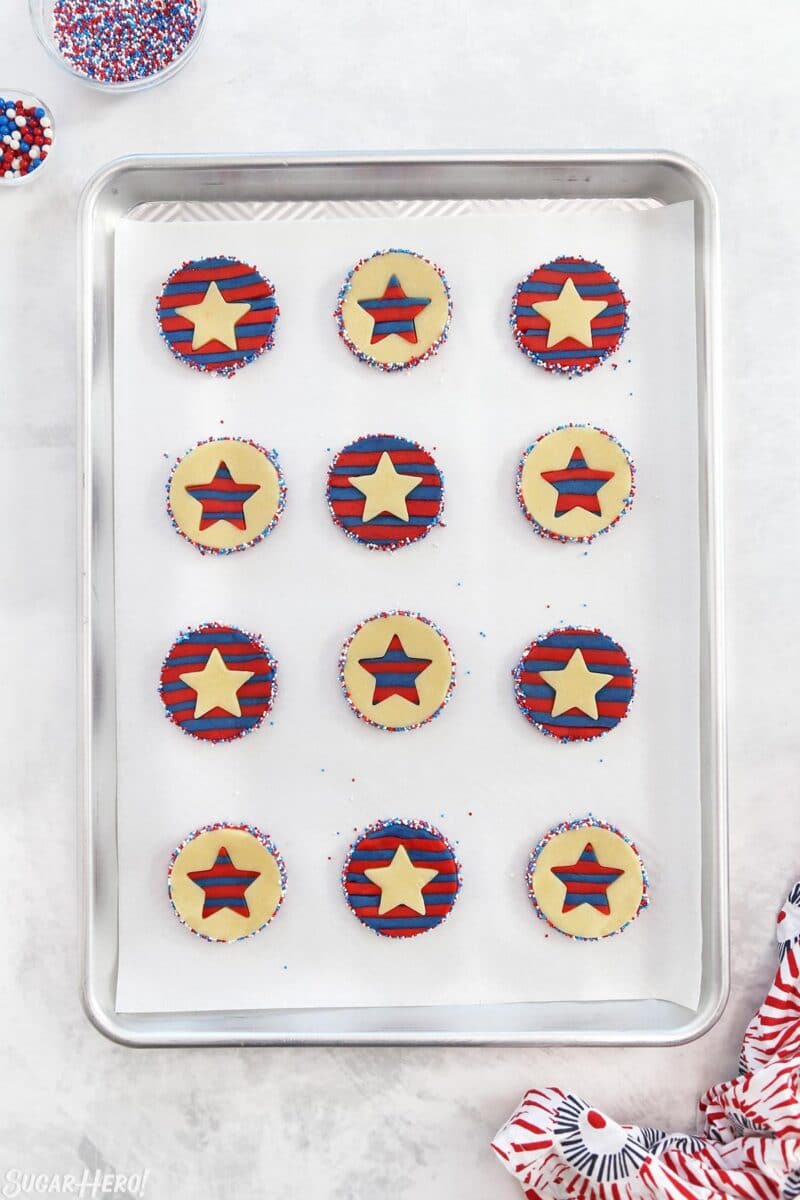
- Swap star centers: Press the plain stars into the middle of the striped cookies, and add striped stars to the plain cookies.
- Bake and cool: Bake the cookies for 9-10 minutes, until they have spread and puffed, and no longer have a raw shine in the center. Cool on the baking sheet and enjoy!
💭 Variations
- Customize colors and shapes: Change the dough colors and center shape to make them suit any holiday. How about red and green stripes with a Christmas tree shape? Or orange and black with a pumpkin?
- Different coating: Instead of sprinkles, roll the cookies in finely chopped nuts or toasted coconut. You can also bake them without rolling the edges in anything!
- Mix up the flavorings: Add some almond in addition to the vanilla (start with 1/2 tsp and add more to taste), or swap in coconut instead. Or, add some lemon or orange extract and zest!
- Pinwheel variation: divide the dough into 3 equal parts, leaving one plain and coloring the remaining two red and blue. Follow these instructions for creating red, white, and blue pinwheel cookies.

💡Tips and FAQs for Cookie Baking Success
Here are our top baking tips for making these patriotic cookies:
- Don’t overmix the dough. A common mistake when making cookies is overmixing the dough which creates tough, dense cookies. You should only mix until a few streaks of flour remain. Then finish mixing by hand to prevent the gluten in the flour from becoming over-actived.
- Measure with precision. Either use a kitchen scale (the best!), or use measuring cups and spoons with caution, especially when it comes to flour. Measure your flour by spooning it into your measuring cup, then use the back of a knife to level off the top of the cup. This method is better and more precise than just dipping your measuring cup into the flour because it won’t get compacted. Compacted flour means more flour per cup than the recipe calls for = dry cookies that don’t spread.
- Cream the butter and sugar. There’s more to creaming butter and sugar than simply mixing them together. It takes about 2-3 minutes to fully cream them. Watch for visible changes in color and texture; it should look lighter and fluffier. Under-creaming = cookies that don’t spread and have a coarse texture. Over-creaming = cookies that are too flat.
- Use the right baking surface. It’s important to use aluminum, light-colored, non-insulated baking sheets lined with parchment paper. There’s no need to grease the parchment or pan. I don’t recommend using insulated baking sheets or dark-colored baking sheets.
If your cookies spread too much and are too flat, the most common reasons are:
– the butter and sugar were creamed together for too long
– your baking powder is old and not as effective
– not enough flour was used
– insulated baking sheet was used
– oven runs cool (temperature not high enough)
If your cookies didn’t spread after baking, or have a lumpy or coarse texture, the most common reasons are:
– the butter was too cold
– the butter and sugar weren’t creamed together for long enough
– too much flour was used
– dark baking sheet was used
– oven was too hot
It is important that any refrigerated ingredients be at room temperature before beginning, and that you cream the butter and sugar together for several minutes, until light and fluffy. Under-creaming the butter/sugar can result in a coarse cookie that doesn’t spread properly, and ingredients cream together easier when they are not cold.
I can’t guarantee it will work with your favorite recipe, but I can tell you that it is pretty flexible and forgiving! If you have a sugar/rolled cookie recipe that’s medium textured–meaning not too dry/stiff, and not extremely soft/sticky, then odds are good you can use this technique. If you do try other recipes, please come back and let us know how it goes!
These cookies can be stored in an airtight container at room temperature and should be enjoyed within 4-5 days for maximum freshness.
If you want to make the dough in advance, you have a few options. You can freeze the colored portions of dough, wrapped very well, for up to 3 months. I recommend letting it defrost in the refrigerator overnight, then rolling and assembling as usual.
You can also freeze individual unbaked cookies. I don’t recommend adding sprinkles if you are planning on freezing unbaked cookies, since many sprinkles will bleed color due to condensation. Freeze the cookies in single layers in an airtight container or freezer zip-top bags for up to 3 months. To bake, let the frozen cookies sit at room temperature while the oven preheats, then add a few extra minutes to the baking time to make sure they’re baked all the way through.
Don’t miss the step-by-step tutorial showing how to make Stars & Stripes Cookies – check out the web story here!


these are so easy and very festive the kids can help and we can do a bake day together cant wait!
Yes, I think most kids will LOVE them! Thanks for your comment Claudia 🙂
These are perfect for the upcoming celebration. I already made a batch and they were delicious!
So glad to hear you enjoyed these festive cookies! Thanks for sharing!
These are the perfect 4th of July treat. They sound delicious, and I love the look of them.
Thanks Beth! I think they are so fun and different from the other Fourth of July desserts I’ve seen!
These cookies are too cute. I’m going to try these with my kids. I’m sure we will have fun making the stars and eating them this weekend.
Thank you Mirlene! I hope your kiddos loved them!
I love these cookies, simple but so stunning! Can’t wait to see what other holidays I can make these fit with. Thanks for the recipe!
Thank you for your comment Nathan! Come back and tell us what you come up with for other holidays!
Just adorable, I wish i had the time to make beautiful creations like this on. I bake some but nothing like you. I think you are amazing. I love looking at the gorgeous baked items you post. I have made a few off them but no that many. Thank you and God Bless. Happy 4th of July to you and your family.
Happy 4th to you Donna! Thank you so much for your comment 🙂 I’m sure all of your desserts are stunning!