


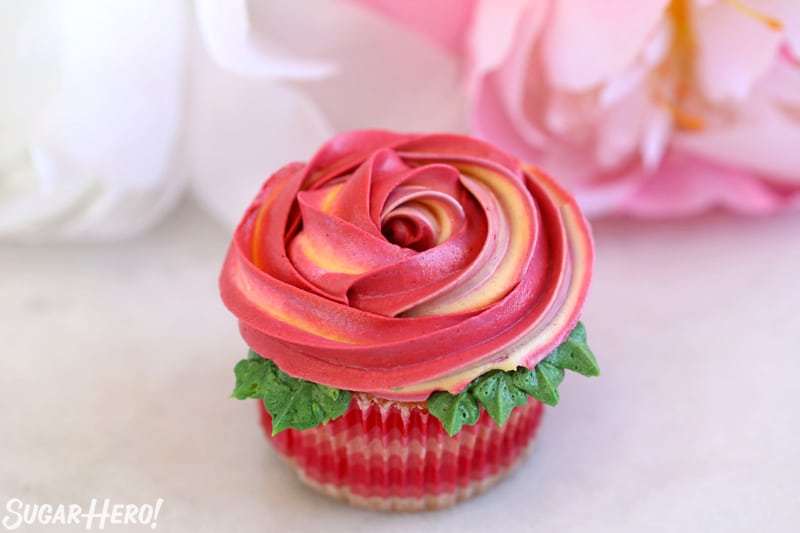
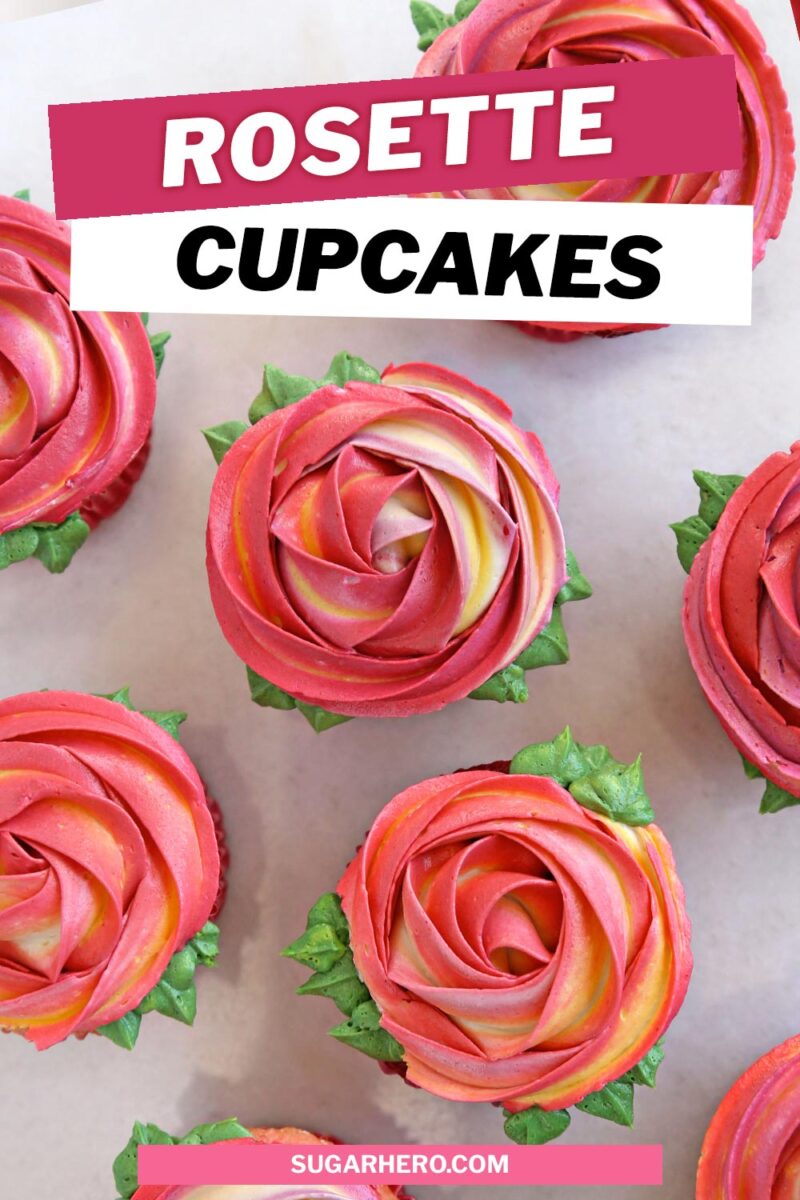
Rosettes are one of the easiest buttercream decorations to make, and also one of the prettiest! Learn how to pipe rosettes, what piping tips work best, and more expert tips to make your rosette cupcakes the best ever.
🌹 How to Pipe Frosting Rosettes
There’s a reason rosettes are one of the most popular frosting decorations: they’re easy to master, and drop-dead gorgeous! Whether you’re topping individual cupcakes with a single rosette, or covering a towering layer cake with them, rosettes elevate any dessert.
But just because they’re easy doesn’t mean there aren’t a few tips and tricks to share to make your rosettes the prettiest ever. Read on to find out how to pipe rosettes, and what tip(s) are best for making these beautiful buttercream flowers.
Don’t miss my other romantic cupcake decorating tutorials: Fondant Rose Cupcakes, Swirled Chocolate Heart Cupcakes, and Sprinkle Heart Cupcakes. And these Easy Chocolate Flower Cupcakes are perfect for any occasion!
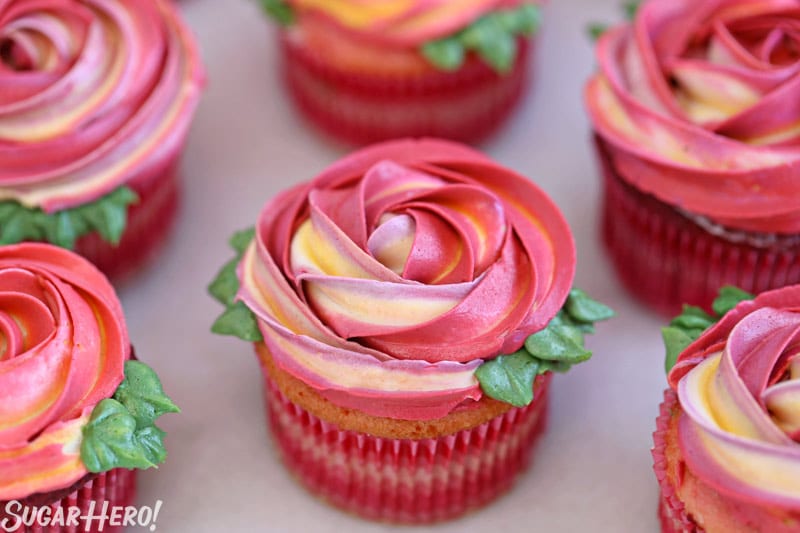
Table of Contents
🧾 What You’ll Need
What frosting works best for rosettes?
The two most common questions I see about rosettes are, “What frosting should I use?” and “What piping tip is best?” We’ll discuss the piping tip question down below (spoiler: you’ve got options!) but here’s the skinny on frosting.
Rosettes will work with a wide variety of frosting recipes, from simple American buttercream to silky Italian meringue. Even something like cream cheese frosting will work, provided it is not too soft. With this decorating technique, you want to use a frosting that is medium consistency–stiff enough to hold its shape once piped, but not so stiff that the edges are ragged and uneven. For this reason, store-bought canned frosting won’t work–it’s too soft to make nice rosettes.
🧁Here are a few of my favorite frosting recipes to try:
- The Best Vanilla Buttercream
- Swiss Meringue Buttercream
- Chocolate Buttercream
- Strawberry Buttercream
🧁You’ll need some cupcakes to go along with that frosting! Try one of these delish homemade cupcake recipes:
Equipment
Here’s what you’ll need to rock these rosettes! Note that you won’t (necessarily) need all of the tips – pick your favorite rosette style below, then grab the accompanying tip.
These are affiliate links and I earn a small commission when you purchase something through them.
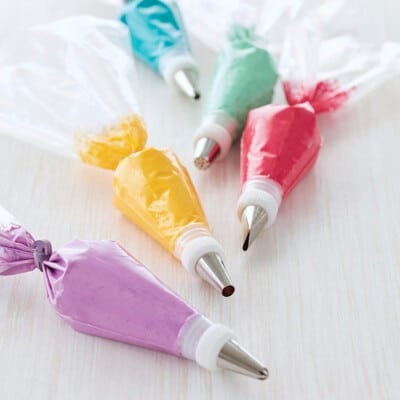
- Piping tip – pick at least one:
- Piping bag
- Mini spatula
- Food coloring: I recommend Americolor gel food coloring, which gives vibrant colors with just a small amount.
📋 Instructions
Buttercream Rosettes Step by Step
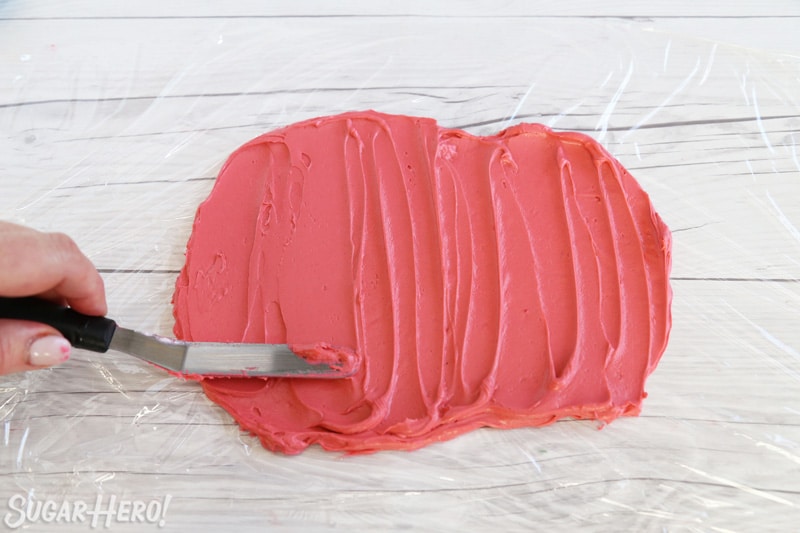
Step 1: Rosettes look beautiful with a multi-colored frosting effect, so here’s how you achieve it! Spread out a layer of plastic wrap on your work surface. Spread your first color in a rectangle in the center of the plastic wrap.
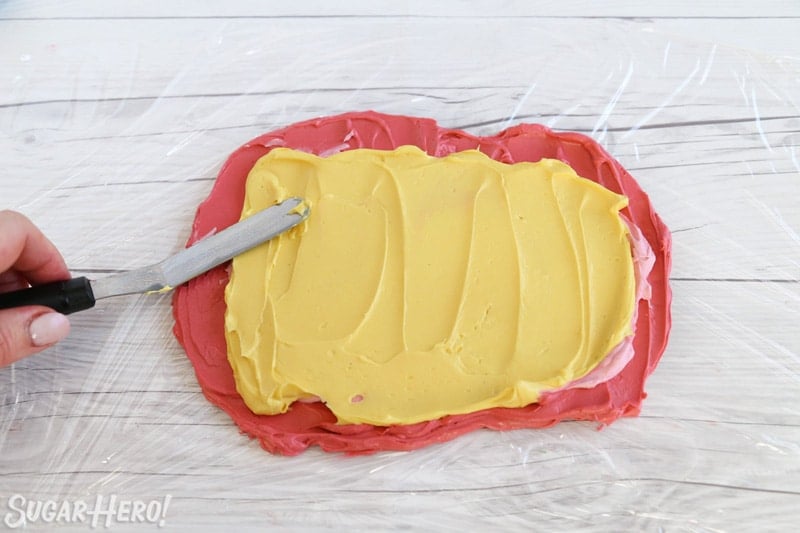
Step 2: Layer on 2-3 more colors on top of the first. Choose colors that will look nice when mixed together–don’t pick ones that will make muddy brown when mixed!
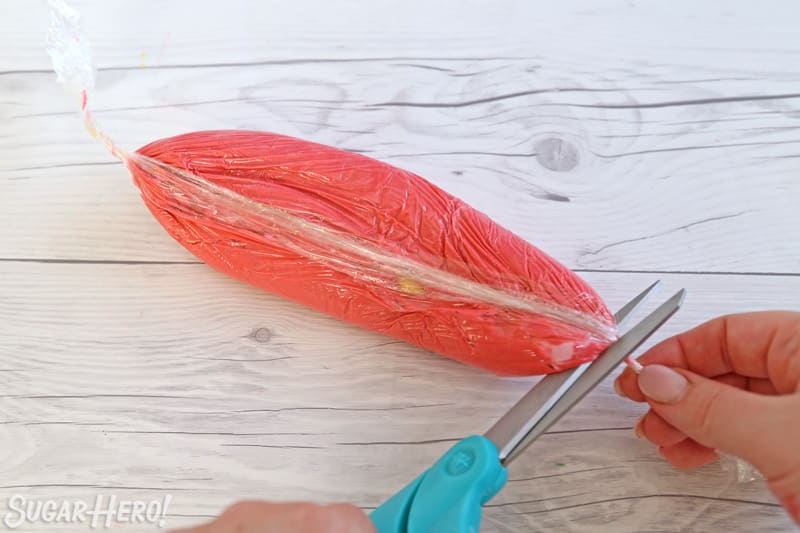
Step 3: Roll the plastic wrap up like a burrito. Hold both ends, and twirl them to tighten. Snip one end of the frosting packet, then insert it, snipped-side down, into a piping bag fitted with a tip.
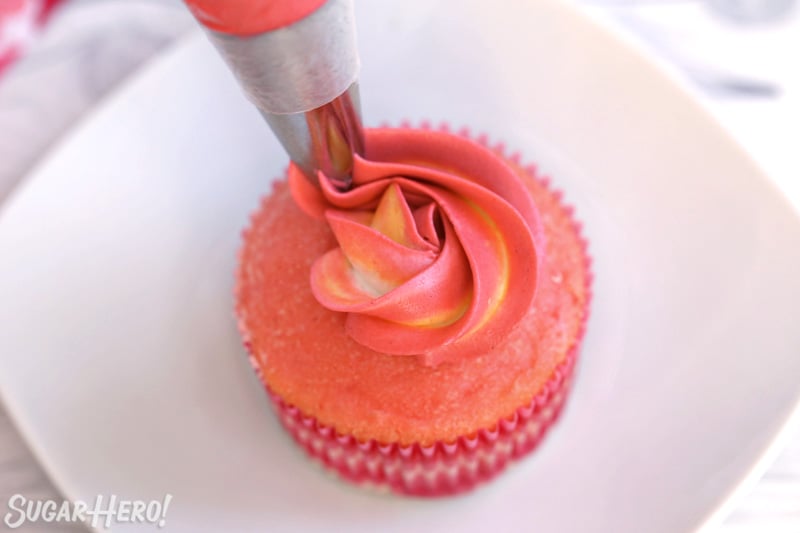
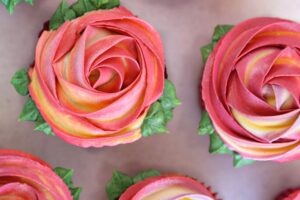
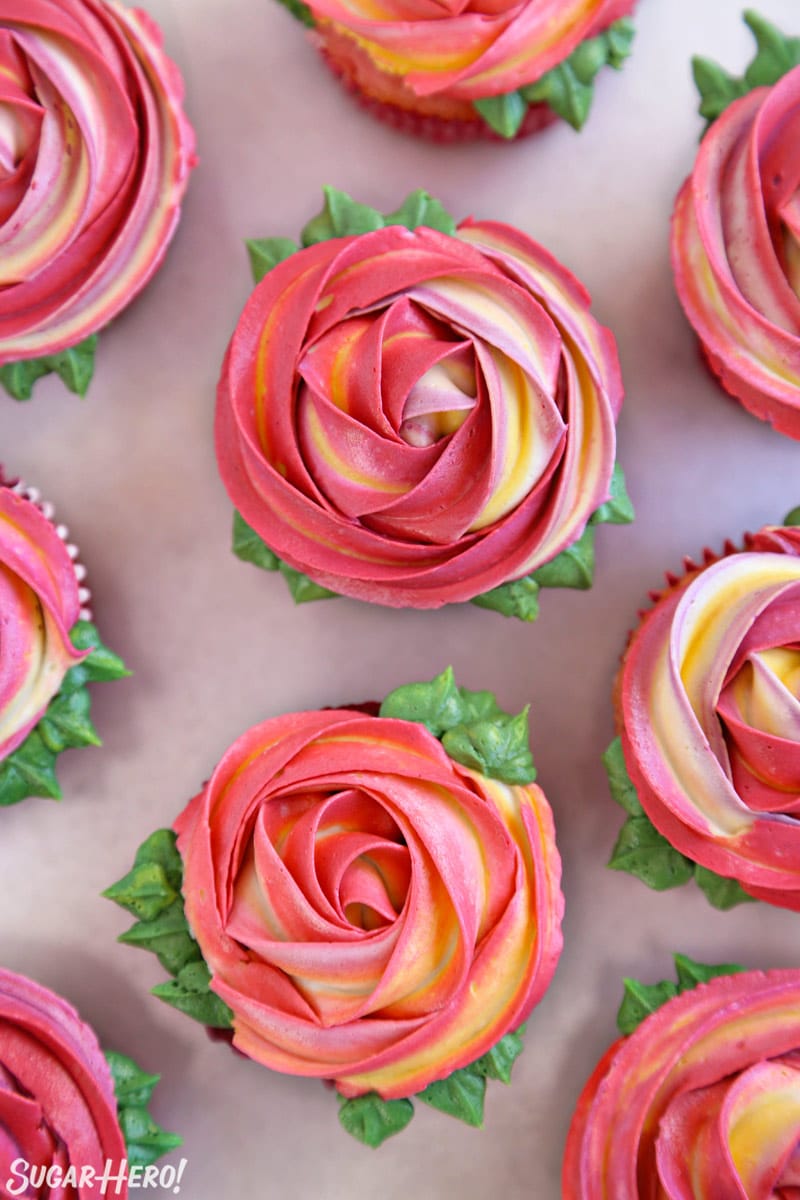
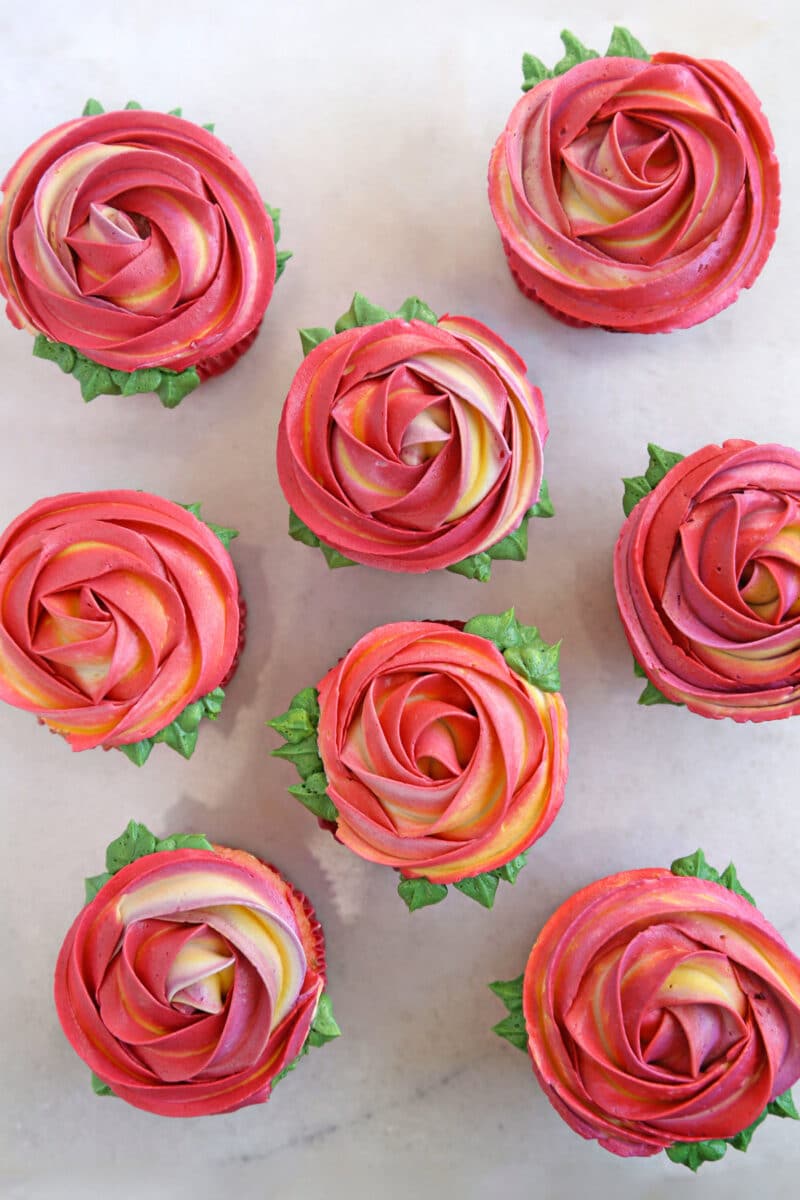
Step 4: The most important thing to know about rosettes is that you start piping in the center and work your way outward. This is opposite of typical frosting swirls, which require you to start on the outside edge of a cupcake. When you start in the center, the outer rings overlap and slightly hide the center. You don’t end up with an awkward point in the middle–just a lovely, natural, floral-like effect.
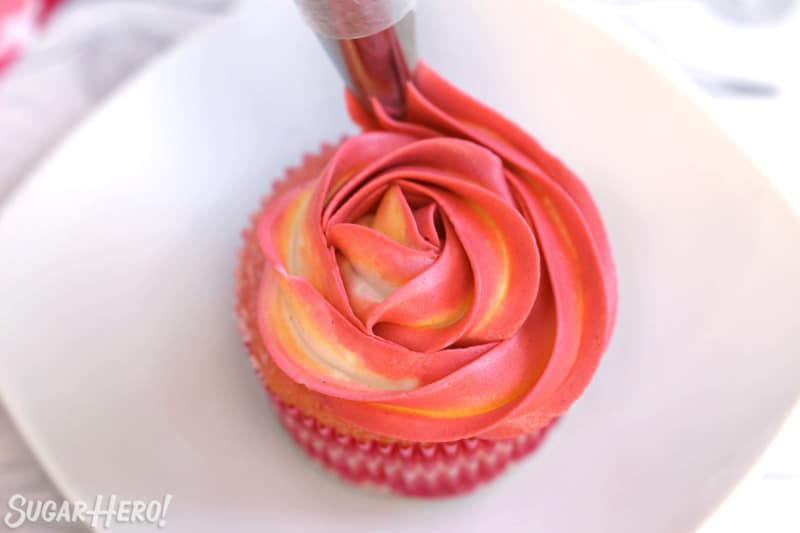
Step 5: Use gentle, even pressure as you spiral the frosting from the center to the outer edge of the cupcake. As you reach the edge, stop squeezing and gently pull away, so the frosting “tail” tapers off into the side.
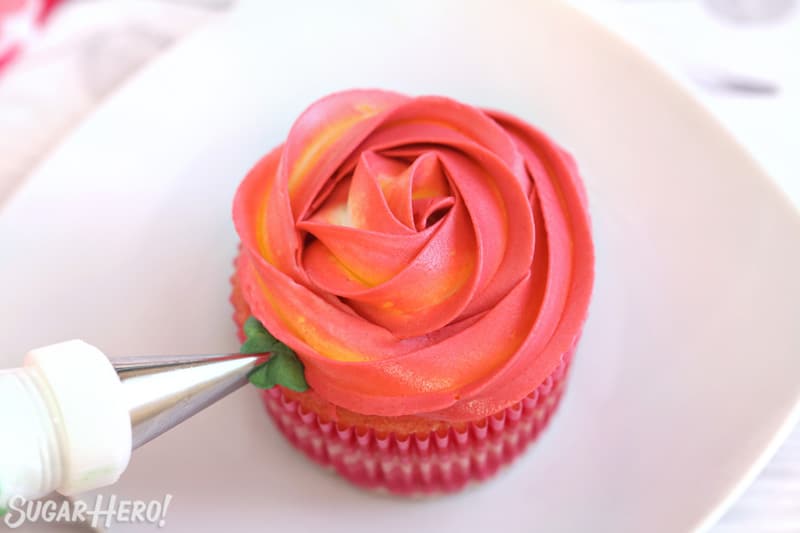
Step 6: This is optional, but if you want to add a little extra flourish, take some green buttercream and a leaf tip (I’m using Wilton #352) and add a few leaves around the edges of the cupcake. This makes them look a little more “finished” and is also a good way to hide any unseemly edges!
💭 What piping tip is best for piping rosettes?
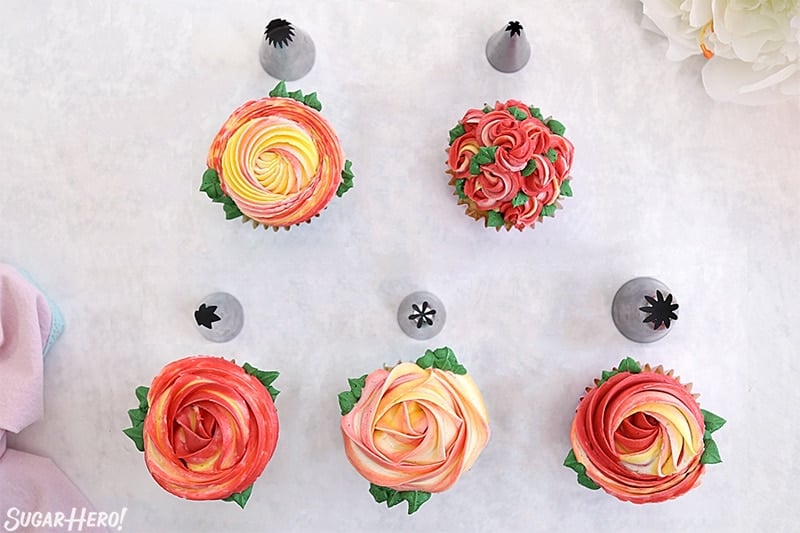
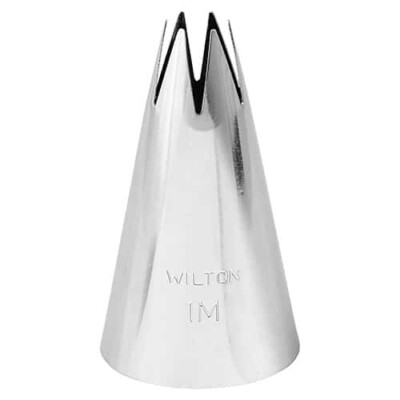
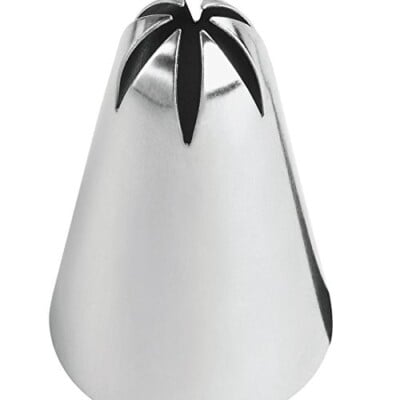
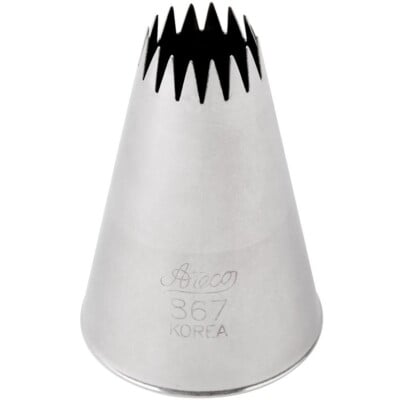
The Wilton 1M tip is probably the most popular tip for piping rosettes, and for good reason! It’s a great all-purpose size: large enough to cover the top of a cupcake, but small enough to use for a cake/tart border, or to cover small (or large) cakes entirely with rosettes. However, the 1M isn’t the only game in town! You can create different effects just by switching up your piping tip. Here’s a quick rundown of some of the most popular tips:
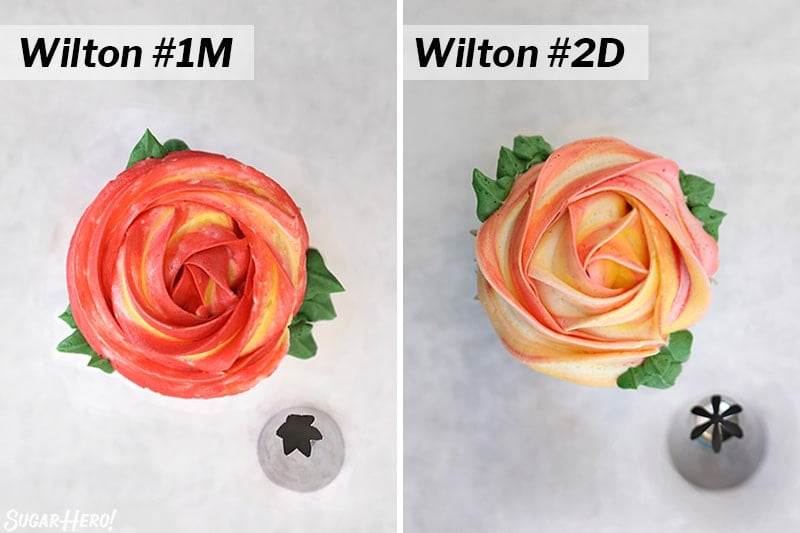
- Wilton 1M: a medium-sized open star tip. As mentioned above, this is an extremely popular tip. It’s versatile, inexpensive, easy to find, and good for all sorts of piping techniques. (buy it here)
- Wilton 2D: a medium drop-flower tip. This is my personal favorite tip to use! It’s perhaps a little less common, but I think it creates a beautiful, realistic flower effect. The very deep grooves in the tip create a slightly “droopy” petal effect that is especially beautiful when using multi-colored frosting. (buy it here)
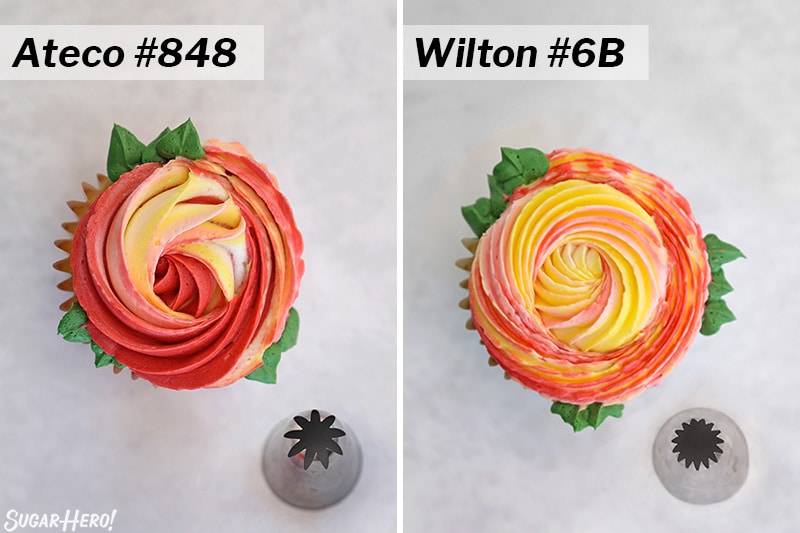
- Ateco #848: a large closed-star tip. The large size of this tip makes it great for covering jumbo cupcakes or large layer cakes. (buy it here)
- Wilton #6B: a large French star tip. This is a less common style of rosette, but sometimes it’s fun to shake it up and do the unexpected! (buy it here)
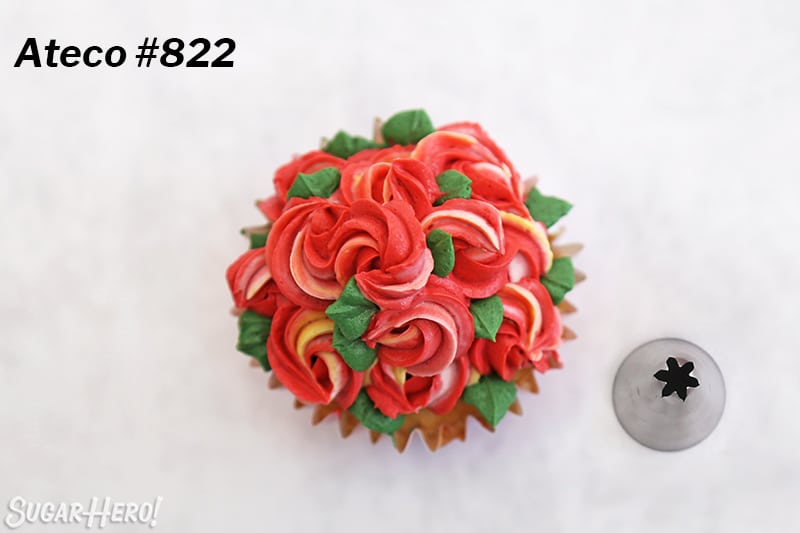
- Ateco #822: small star tip. This one is probably cheating, since it’s not a single rosette–it’s more like a whole bouquet on top of a cupcake! Regardless, it uses the same piping technique, so I’m going with it. I love that this towering rosette cupcake looks fancy, but takes less than a minute from start to finish. (buy it here)
Have fun, happy decorating, and as always, please let us know how it goes if you give it a try!
🌹 More Flower Desserts
Don’t miss the step-by-step tutorial showing how to make Rosette Cupcakes – check out the web story here!
Leave a Review!
If you make this recipe, let us know! Leave a ⭐️⭐️⭐️⭐️⭐️ rating on the recipe below, and leave a comment, take a photo and tag me on Instagram @elabau, or use #sugarhero on IG!

Rosette Cupcakes
Ingredients
- 24 Baked and cooled cupcakes
- Frosting, (about 6 cups / 36 oz for 24 cupcakes)
- Piping bags
- Piping tips
- Assorted gel food coloring
Instructions
- Decide how many colors you want to use for the rosettes. Divide the frosting into smaller bowls, and color each one with gel food coloring. If you want to add leaves, be sure to color some of the frosting green.
- Lay out a piece of plastic wrap about 16 inches long. Spread a rectangle of frosting on the plastic wrap. Take a second color of frosting and spread it on top of the first. If desired, add a third or even a fourth color on top. Depending on the size of your piping bags, you’ll probably need to make several different packets of frosting, so don’t try to over-stuff the frosting into your bag–instead, prepare several smaller frosting packages, and vary the color order to make your rosettes unique!
- Use the plastic wrap to roll the frosting over itself to make a cylinder. Grasp the ends of the plastic wrap in each hand, and twirl it quickly so the frosting is burrito-shaped and the ends of the plastic are tightly twisted. Snip off one of the plastic wrap “tails.”
- Insert a piping tip into a piping bag, and insert the frosting cylinder into the piping bag, snipped-side down. Squeeze a little frosting out, until you can see several colors coming out of the tip. You’re ready to decorate!
- Start with the piping bag perpendicular to your cupcake, about a half-inch above the top. Begin in the center of the cupcake, and squeeze steadily as you pipe the buttercream in a spiral out to the edge of the cupcake. When you reach the edge, stop squeezing and gently pull away, so the frosting “tail” tapers off into the side.
- If you are adding leaves, put your green frosting in a piping bag fitted with a leaf tip. Add a few leaves in clumps around the side of the cupcake – this is a great time to hide any small errors or uneven edges.
- Repeat with the remaining cupcakes and frosting, and enjoy!
- Place frosted cupcakes in an airtight container and refrigerate. They will keep for up to 5 days, however, they will start to dry out. For the best taste and texture, you'll want to eat them within 2-3 days. And, before serving the cupcakes, it's best to give them time at room temperature to take the chill off.
Video

Measuring Tips
Our recipes are developed using weight measurements, and we highly recommend using a kitchen scale for baking whenever possible. However, if you prefer to use cups, volume measurements are provided as well. PLEASE NOTE: the adage “8 oz = 1 cup” is NOT true when speaking about weight, so don’t be concerned if the measurements don’t fit this formula.
Want to learn more about baking measurements and conversion?
THE BEST VALENTINE’S DAY CUPCAKES
27 cute and delicious Valentine’s Day cupcake ideas — click here to get all the recipes!


Thanks for sharing your detailed instructions on how to make rosette cupcakes! Very helpful!
These are absolutely stunning! Not just a cupcake but a literal edible showpiece.
Thank you Dana 🙂 Aren’t they beautiful?! Such a fun one for Valentine’s Day!
I had no idea it was so easy to make such beautiful rosettes! I’m so in love with the ombre! Thank you so much for teaching me how to do this!
You bet! Rosettes are beautiful and once you have all the tricks they are pretty simple 🙂
These are so pretty! Almost too pretty to eat! You gave me all the confidence I need
Thank you Jess, I have total confidence in you 🙂
I never realized how easy it was to do a color swirl with frosting! Can’t wait to pipe some rosettes myself the next time I make cupcakes, thanks for all of the tips!
It is much easier than it looks! Come back and share how yours turn out! 🙂
beautiful!!!!!!! precioso, precioso…gracias
Oh thank you so much Virginia!
I’m going to try this for Valentine’s. Thank you for sharing.
Hi Donna! I’m excited for you to make these!! I hope you have fun making them.
So Beautiful. I just learning to use a piping bag with frosting. I love trying new things with all the tip. I love the 2 tone frosting that you used to make these lovely cupcakes. Thank you for always sharing your beautiful work with all of us. I enjoy everything you make, and trying a few of them out. So far your Peanut Butter Brownies with all of the candy on top is one of the favorites all over my office and home
Hi Donna! Thank you for leaving this beautiful comment. I love helping people learn to bake and try new things in the kitchen. Your office must love it when you bake!! Keep it up!
How far in advance can I make these and should they be fridged?
LOVE your recipes!
Hi Peggy! So glad you are enjoying our recipes. These cupcakes can keep in the fridge for up to 5 days after being frosted. However, they will start to dry out. For the best taste and texture, you’ll want to eat them within 2-3 days. And, before serving the cupcakes, it’s best to give them time at room temperature to take the chill off. Best of luck with your baking project!
Thanks for sharing and thank so much for the tip info.
You’re welcome Marilyn! So glad it was helpful for you.