Chocolate-Covered Strawberries are so delicious, and so simple to make! Here are 5 easy decorating tricks to make the most gorgeous chocolate-dipped strawberries ever!

Chocolate-Covered Strawberries are one of those recipes that’s so simple, you really don’t need a recipe. I mean, the NAME is the recipe. Strawberries. Covered in chocolate. Ding ding ding. You’ve got it!
Of course, there are some tips and tricks to getting good results and pretty berries, and I’ll get to those in a bit. But in general, you could give an 8-year old a bar of chocolate, a microwave, and a pint of berries, and you’d at least end up with something edible. So why give Chocolate-Covered Strawberries the SugarHero treatment?

For one thing, Valentine’s Day is just a month away (ahem, subtle hint for my blog-reading husband right there) and nothing says loooooove like a big plate of chocolate-covered berries.
For another, because they ARE so simple, they’re also really easy to jazz up with decorations! Just a few extra minutes spent decorating your strawberries turns a simple candy into a work of art. There are probably an infinite number of ways to adorn your berries, but in this post, I’m going to share my top 5 favorite Chocolate-Covered Strawberry hacks.

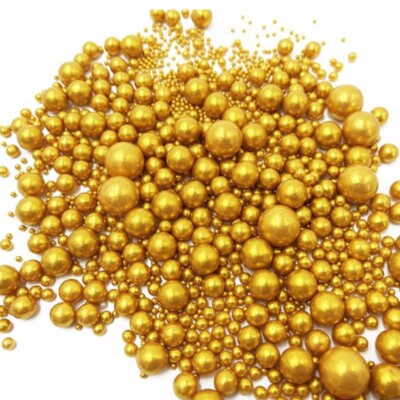
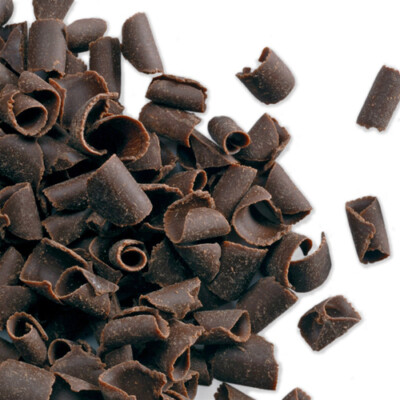
A few of these ideas are as simple as pressing something into the wet chocolate after the berry is dipped. Chocolate curls and gold dragees both make this easy candy super elegant. You could also use white sugar pearls on white chocolate for a really classy, wedding-appropriate look. And of course, with the wide variety of sprinkles out there these days, the sky’s the limit!

To save time with the chocolate curls, I sometimes buy a little bottle of chocolate curls from the store, but since they’re so simple to make at home, I’ve also included directions for that in the recipe if you want to give homemade curls a try! All you need is a vegetable peeler and a chocolate block—tempted yet?

The other ideas involve mixing dark and white chocolate to beautiful effect. If you swirl them together just a bit in a bowl, and then dip the berry in the swirled chocolate, you can create a really lovely marbled pattern on the berries. I love this one because it’s so simple, but it looks really striking, and every berry is completely unique! You can also mix it up and use any colors you like—so for Valentine’s Day you could marble with pink, red, and white!

I also love simple piping on strawberries. I’ve gone a little overboard in the past, piping long phrases, drawings, and even Cornelli lace (sigh), but in this case I think simpler is better. Just a few thin stripes in a contrasting color, or a quick zig-zag pattern to make those colors bleed together, is all that you really need to make your berries pop.
And finally, the tuxedo strawberries! I’ve been making these for a decade now and I’m still not tired of them. I’m sorry, but if loving food dressed in miniature people clothes is wrong, then I don’t want to be right! They’re most commonly served at weddings, I think, but I like them for basically ANY fancy or romantic occasion. Heck, I could be sitting and eating these in my sweatpants and I’d still think tuxedo strawberries are appropriate. They’re just that cute. And surprisingly easy! The hardest part is probably piping on the tiny bow ties, and all that takes is a little bit of practice.

So between the video above and the recipe below, you’re probably covered on all the How’s of Chocolate-Dipped Strawberries. I just want to leave you with a few quick tips for maximum success:
💡Chocolate-Covered Strawberry Tips
1. Just Say No to Water. You’ll want to wash your berries before you eat them, of course. But make sure your berries are COMPLETELY dry before you dip them. Damp berries, or even just a stray water droplet here or there, can cause your melted chocolate to seize. What does that mean? It means your pretty, glossy, fluid chocolate will turn into a lumpy mess. You won’t be able to dip your berries. You will try gnawing on the chocolate tumors, but it will feel like a hollow victory. You will be sad.
2. Use Tempered Chocolate or Candy Coating. This one’s probably controversial, and it’s definitely my opinion more than a hard-and-fast rule. But when dipping anything, I always recommend either using tempered chocolate or candy coating. If you just melt regular chocolate without tempering it, it can bloom, meaning it develops white or gray streaks and is soft and sticky. If you temper chocolate you avoid this problem, and if you use candy coating (aka candy melts, summer coating, or almond bark) it doesn’t have to be tempered, so you can just melt it and go. For something like these strawberries, that spend most of their short lives in the fridge, it’s not entirely necessary. But depending on how/where you’ll be serving them, you might want them to be able to hold at room temperature for a few hours and keep them looking good, so I always take the “Better safe than sorry” approach. You can learn a LOT more about what tempering is and how to do it by checking out my How to Temper Chocolate guide!
3. Eat them ASAP. This is probably a “duh” statement, but these have a very short shelf life! I think Chocolate-Covered Strawberries are best within a few hours of dipping, and when possible should be eaten the day they are made. Of course, there’s nothing in the ingredients list that means they can’t survive 2-3 days in the refrigerator, but I find the taste and texture to be best when they’re eaten soon after they’re assembled.
4. Dip, baby, dip. My biggest strawberry pet peeve is probably the little puddle of liquid that sometimes forms around the base of the strawberries. Groooosssss. It’s not possible to avoid this entirely, but if you want to give yourself a fighting chance, make sure your chocolate has a good seal around the berry. I like to dip the strawberry, let the excess drip off into the bowl, scrape the bottom gently against the lip of the bowl—just to remove excess! not to scrape down to the berry itself!—and place it on a parchment-covered sheet. The scraping keeps it from forming a chocolate foot, but if you’re gentle about it, you can still make sure the berry is well-sealed and help prevent that weeping.

💖More Romantic Desserts!
- Chocolate-Covered Strawberry Cakes
- Truffle-Topped Heart Cake
- Deep Fried Chocolate-Covered Strawberries
- Watercolor Rose Sugar Cookies
- Emoji Cakes
- Box of Chocolates Cake
- Swirled Chocolate Heart Valentine’s Day Cupcakes

Red Hot Love Cookies

Love Potion Valentine’s Day Drink
Don’t miss our collection of Fun Valentine’s Day Dessert Ideas – see the whole web story here!

Chocolate Covered Strawberries
Ingredients
- 1 lb large strawberries, washed and dried
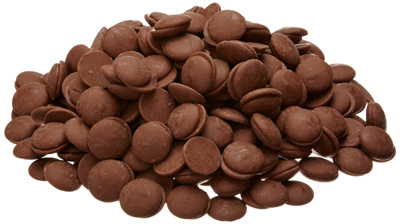
- 12 oz chocolate candy coating melts
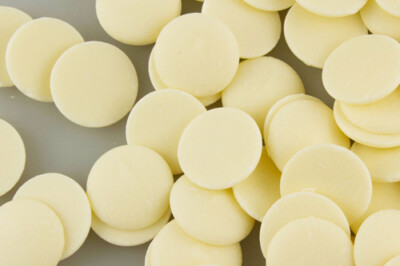
- 12 oz white chocolate candy coating melts
- 1/4 cup chocolate curls
- 2 TBSP gold dragees, or gold sprinkles of choice
Instructions
To Make Basic Chocolate-Covered Strawberries:
- Prepare a baking sheet by lining it with parchment paper or waxed paper and set aside for now. Wash the strawberries and dry them carefully, as excess water can interfere with the dipping process.
- Melt the chocolate candy coatings in separate bowls in the microwave, stirring after every 30 seconds to prevent overheating. Stir until the chocolates are completely melted and smooth.
- Dip a strawberry into the chocolate until it is almost submerged, but leave about 1/4-inch of undipped berry at the top. Allow excess chocolate to drip back into the bowl, and gently scrape the bottom of the berry against the lip of the bowl to remove excess chocolate that might pool around the bottom of the berry. Set the chocolate-dipped berry on the prepared baking sheet, and proceed with one of the decorating ideas! After the strawberries are finished, refrigerate them briefly to set the chocolate before serving. They will keep in the refrigerator for several days, but I think they are best enjoyed soon after they are made. If you do save them for a day or two, expect to see some condensation on them as they come to room temperature.
To Make Chocolate Curl Strawberries:
- While the chocolate is still wet, carefully press chocolate curls into the wet chocolate, covering it completely. Once they’re all dipped and decorated, refrigerate the tray briefly to set the chocolate before serving.
- (Note: The chocolate curls can be store-bought, or you can make them yourself with just a chocolate bar and a vegetable peeler. Hold the bar of chocolate in one hand, and the peeler in the other. Allow the heat from your hand to soften the chocolate for a moment or two, then run the vegetable peeler along the softened edges, forming small chocolate curls. Continue to “peel” the chocolate bar, rotating it in your hand as necessary to get the best edges for curls, until you have a pile of chocolate curls.)
To Make Gold Button Strawberries:
- While the chocolate is still wet, carefully press gold sugar pearls or dragees into the wet chocolate in a straight line from the top to the bottom. If you are having trouble doing it cleanly, try using a pair of tweezers to place the pearls more precisely. Once they’re all dipped and decorated, refrigerate the tray to set the chocolate before serving.
To Make Striped or Zig-Zag Strawberries:
- First, place your “accent” chocolate (the one that is going to be the stripes or zig-zags) in a piping bag, paper cone, or plastic zip-top bag with a small hole cut in the corner.
- After you dip your strawberry, hold it in one hand slightly above the baking sheet, and drizzle thin horizontal lines across the chocolate. If you just want stripes, set the strawberry down and allow it to dry. If you want zig-zags, take a toothpick and gently drag it vertically through the chocolate, going in alternate direction with each line, to make a beautiful pattern. It is important to do this step quickly, because the chocolate will soon start to set and won’t work well for this pattern. Once all of the berries are dipped and decorated, refrigerate the tray to set the chocolate before serving.
To Make Marbled Chocolate Strawberries:
- Drizzle thin lines of dark chocolate in the bowl of white chocolate. Hold a strawberry by the stem and drag it through the white and dark chocolate, moving in one direction and then rotating the strawberry and moving in the opposite direction to ensure the front and back are both covered. Hold the berry above the chocolate to allow the excess to drip down, and then place it carefully on the prepared baking sheet.
To Make Tuxedo Strawberries:
- Dip your strawberries in melted white chocolate, and refrigerate the tray of berries until the white chocolate is set.
- Once the white chocolate is completely set on the berries, take one berry and dip it into the melted dark chocolate at a 45-degree angle, so that the chocolate covers one side of the berry on the diagonal. Now turn it in the opposite direction and dip the other side on a 45-degree angle. The final result should be a berry that has a white “V” of chocolate showing through a darker outer coating. Place the berry onto the baking sheet, and repeat with the remaining berries, until they all have the dark chocolate “V.”
- Now it’s time to give your berries bow ties and buttons! Place some melted dark chocolate in a piping bag, paper cone, or plastic zip-top bag with a small hole cut in the corner. Make a bow tie by drawing two connected triangles at the top of the white V. Below this, place two or three dots for buttons. Repeat until all of your strawberries are decorated. Place the tray back in the refrigerator to set the dark chocolate, for about 10 minutes.
Video
Recipe Notes
Measuring Tips
Our recipes are developed using weight measurements, and we highly recommend using a kitchen scale for baking whenever possible. However, if you prefer to use cups, volume measurements are provided as well. PLEASE NOTE: the adage “8 oz = 1 cup” is NOT true when speaking about weight, so don’t be concerned if the measurements don’t fit this formula.
Want to learn more about baking measurements and conversion?


These look absolutely beautiful and amazing – thanks for sharing!
These look delicious! Love chocolate and strawberries. Perfect for Valentines Day 🙂
These are so pretty, love what you have made these look like. Love the tux!
Wow, these look like the perfect combination! Who’d have guessed it would be so easy to make something so pretty?
They may sound easy but I don’t think I can ever get mine to look this pretty! Chocolate covered strawberries are the one dessert my husband and I compromise on (I love chocolate, he loves berries)
These look beautiful….just like those pretty expensive ones on line…must try!
Wow, these strawberries turned out so pretty! I love chocolate covered strawberries!
Im planning on making this for my parents anniversary.. and they look so cute, my parents will love them!
Very nicely described recipe! I need them for a party tomorrow, should i make them today or wait untill tomorrow morning. I plan to use candy melts.
Thank you!
Hi, if possible I would try to make them the day of the party. Refrigerating them overnight once they’re dipped usually leads to the chocolate getting condensation on it and some moisture collecting in between the chocolate and berry. They’re still edible but I think the texture is much better when they’re fresher! Please let me know how they turn out!