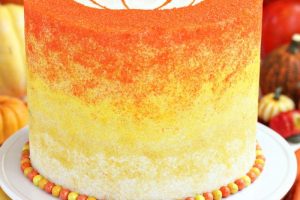
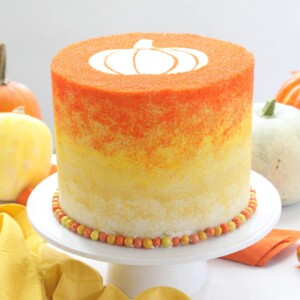
This simple white cake with buttercream frosting and sprinkles makes a fa-BOO-lous presentation! It’s featured in candy-corn themed colors of white, yellow and orange. With a parchment stencil and ombre sprinkles, this cake couldn’t be easier to make!

With Halloween just a few weeks away, I’m ready to shift into holiday overdrive. I’m ordering the last few pieces we’ll need for our costumes (that is, if a certain short blondie would make up his mind about what he wants to be), the house is decked out in spooky holiday decorations, and all of the baked goods coming out of my kitchen for the next 2 weeks must be Halloween-themed.
This Stenciled Halloween Sprinkle Cake certainly fits the bill. It’s made using a parchment stenciling technique that I’m teaching in my new Craftsy class! The class is all about easy cake decorating, using materials you probably already own, or can easily find. My guess is, most of you already have sprinkles and parchment (or waxed paper) in your house right now, meaning that you can make this cake!

In the Craftsy course, I demonstrate the technique using a heart shape and red sprinkles, to make a romantic Valentine’s cake, but I really want to emphasize that ALL of the techniques can be easily changed and adapted for any holiday or situation. So that Valentine’s heart cake? Forget about it! We’re going full-on pumpkin now, baby.

Using parchment or waxed paper to make a stencil could not be easier. You can draw the shape you want, or print out a picture from your computer. You don’t want a picture that’s too detailed (simple shapes, letters, and numbers work best) but as you can see, I got a little cute with the pumpkin segments and the sprinkles easily produced the thin lines between the pumpkin, so it is possible to get some level of detail. But don’t plan on creating an intricate sprinkle portrait of the Barefoot Contessa or anything.

I also got a little creative with the sprinkles. Rather than use just one color, I created an ombre pattern on the outside of the cake, with white, gold, yellow, and orange sprinkles. This worked because I am a compulsive sprinkle purchaser with a hoarding problem (and a wall-mounted rack that’s JUST full of sprinkles) but if you don’t suffer from my brand of crazy, this will look just as cute with a solid color on the outside!

I used that same color gradient with the frosting inside the cake, going from white to orange over the course of seven (seven!!!) thin frosting layers. Again, this is optional, but if you’re already going to the trouble of creating a tall, striking Halloween cake, why not keep the showstopping moves going by having a little fun with the inside too?

🕷🎃👻More to die for Halloween Cakes:
- Spiderweb Naked Red Velvet Cake
- Red Velvet Marshmallow Spiderweb Cake
- Monster Cake
- Devil’s Food Cake with Pumpkin Butterscotch Frosting
- Skull Cake for Dia de los Muertos
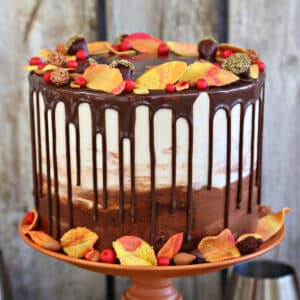
Festive Fall Layer Cake
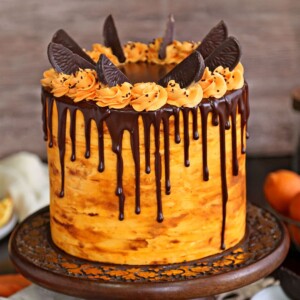
Chocolate Orange Cake
Stenciled Halloween Sprinkle Cake
Ingredients
For the Cake Layers:
- 8 oz unsalted butter, at room temperature
- 21 oz granulated sugar, (3 cups)
- 6 large eggs, at room temperature
- 20.25 oz all-purpose flour, (4 1/2 cups)
- 2 tsp salt
- 7 tsp baking powder, (2 tbsp+1 tsp)
- 2 1/2 cups milk, at room temperature
- 1 TBSP vanilla extract
For the Buttercream:
- 8 fl oz pasteurized liquid egg whites, (1 cup)
- 32 oz powdered sugar, (8 cups)
- 3/4 tsp salt
- 32 oz unsalted butter, (4 cups), at room temperature
- 2 1/2 TBSP vanilla extract
To Assemble:
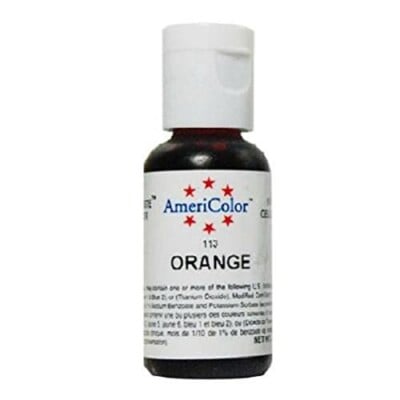
- Assorted gel food coloring, I used Americolor Lemon Yellow, Orange, and Electric Orange
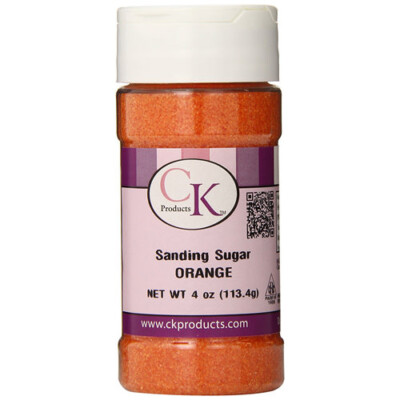
- Sanding sugar, I used CK Products Sugar Crystals in white, gold, yellow, and orange
- Parchment paper
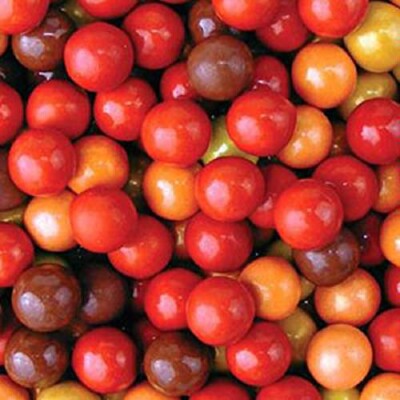
- Orange and yellow round candies, I used Sixlets
Instructions
To Make the Cake Layers:
- Preheat the oven to 350 F. Line four 9-inch cake pans with parchment rounds, and spray the parchment with nonstick cooking spray.
- Combine the butter and granulated sugar in the large bowl of a stand mixer fitted with a paddle attachment. Beat the butter and sugar together on medium speed for 5-6 minutes, until light and fluffy.
- Add the eggs one at a time, beating at least 30 seconds between each addition. Turn the mixer to low and add the flour, salt, and baking powder, then the milk and vanilla extract. Continue to beat on low speed until the flour is moistened and everything has roughly come together. At this point the batter might look a little broken or curdled—that’s okay.
- Scrape down the sides of the bowl and turn the mixer to medium-high speed, and beat the batter for 2-3 minutes more until it’s beautifully smooth. Divide it between the prepared pans—if you have a scale, each pan will get about 20 oz of batter.
- Bake the cakes at 350 F for 25-30 minutes. They won’t take on much color, so don’t depend on that to gauge doneness. Instead, look for the tops to spring back when you press down lightly, and the sides of the cake to start pulling away from the pan.
- Let the cakes cool at room temperature for 15 minutes on a wire rack, then run a thin knife around the sides and turn them out of the pan. Let them cool completely before assembling.
To Make the Buttercream:
- Combine the whites, powdered sugar, and salt in the bowl of a large stand mixer fitted with a paddle attachment. (A 6 quart mixer is preferred. 5 quarts will work, but you might want to shield the bowl when mixing so the sugar doesn’t fly everywhere.) Mix everything together on low speed, until the sugar is moistened and no dry patches remain. Turn off the mixer, scrape down the sides and bottom of the bowl with a spatula, then turn the mixer to medium speed. Beat on medium for 5 minutes.
- After 5 minutes, turn the mixer to medium-low and start adding the softened room temperature butter, 1-2 tablespoons at a time. Once all of the butter is incorporated, add the vanilla extract and mix it in. Stop the mixer and scrape down the bottom and sides once more. Turn the speed to medium and beat the buttercream for 10 minutes. At the end, you’ll have a frosting with a wonderfully light and creamy texture. It can be used right away, or stored in the refrigerator for up to two weeks, or the freezer for up to two months. If you have chilled the frosting, let it come to room temperature and then beat it for several minutes to smooth it out and restore its texture before using it.
To Assemble:
- Place each cake round on a 9” cake cardboard, and use a serrated knife to slice them in half, so you have 8 cake rounds. Place one cake round, on a cake cardboard, on a cake turntable. Top it with a generous cup of frosting, and use an offset spatula to smooth the frosting out to the edge of the cake. Add a second cake round on top.
- Place a generous cup (about 7 oz) of frosting in a separate small bowl, and add a bit of yellow food coloring to it, to make a nice light yellow shade. Use this light yellow on top of the second cake round. Add a third cake round, and again separate out a cup of frosting and tint this one a darker shade of yellow (you can do this in the same small bowl you used before, no need to wash more dishes!) Continue to build your cake in this way, gradually transitioning the frosting colors from yellow to yellow-orange to dark orange each time you add a layer of frosting, until you’ve used all 8 layers of cake.
- Once the final layer is on, spread a very thin layer of white frosting all around the top and sides of the cake, to seal in any crumbs and blend in any of the yellow/orange frosting colors from the layers inside. Refrigerate the cake for at least an hour, until it’s firm.
- While you wait for the cake to firm up, prepare your parchment stencil. Print out or draw your chosen design. Make sure that it will fit on top of your cake and that it’s not too complicated—simple shapes work best. Trace it onto your parchment, and cut out the parchment shape.
- When the cake is firm, use the remaining white frosting to frost the top and sides of the cake, to make a smooth, even layer. Use a metal offset spatula to make the top and sides even. It doesn’t have to be perfect, because you’ll be covering it with sprinkles, but the top especially should be as smooth as you can get it, since some of it will be exposed due to the stencil.
- Divide your sprinkles into separate bowls. Place the cake on a smaller cake pan, bucket, or anything that elevates it and allows you access to work on the bottom of the cake unencumbered. Place the cake, on the pan, on a baking sheet, to help with clean-up.
- Start with your white sparkling sugar, and gently press the sprinkles into the fresh buttercream, coming about 1 inch up the sides of the cake. Use the lightest pressure you can so that you don’t leave finger indentations. Switch to a light gold or yellow color (or, if you don’t have a wide variety of colors, mix together white and yellow to make it lighter) and add another inch of sprinkles above the white. You should be almost tossing them onto the cake, the pressure is so light, not firmly pressing them. Continue up the sides of the cake, gradually transitioning from white to yellow to yellow-orange to orange sprinkles. Make sure the top inch of the sides is your orange color.
- Take your parchment stencil, and lay it in the center of the top of the cake. Once positioned, lightly press it down with your fingertips to make sure the whole surface is touching the buttercream, paying special attention to the edges. Don’t press down hard—you don’t want to leave finger indentations—just gently rub it to get it to adhere. Sprinkle your orange sanding sugar all over the top of the cake, going out to the edges where it will meet the sprinkles on the sides.
- Refrigerate the cake for at least 1 hour, until the frosting is totally firm. Remove the stencil by using a knife or toothpick to pry up one corner of the parchment, then gently peel it back, showing the white buttercream underneath. As long as the buttercream is firm when you peel it off, the frosting should have a nice and smooth texture. If there are any stray sprinkles on the buttercream, use a soft paintbrush to remove them.
- Finally, finish by pressing Sixlets or M&Ms around the bottom of the cake. If you have trouble getting them to stick, pipe a thin layer of buttercream around the bottom and press the candies into that. For the best taste and texture, serve this cake at room temperature!
Video
Recipe Notes
Measuring Tips
Our recipes are developed using weight measurements, and we highly recommend using a kitchen scale for baking whenever possible. However, if you prefer to use cups, volume measurements are provided as well. PLEASE NOTE: the adage “8 oz = 1 cup” is NOT true when speaking about weight, so don’t be concerned if the measurements don’t fit this formula.
Want to learn more about baking measurements and conversion?


Wow… just WOW Elizabeth! ALL your cakes just knock my socks off! I LOVE this Halloween treat! So beautiful and.. so yummy! Seven layers Boo-ha! I’m sure you’ve got your hands full with two kiddies…make that three counting hubby! 😉 A wink w/a smile. Doesn’t seem to stop you from turning out beautiful cakes/cookies/candy, etc. And the best time of the year is JUST around the corner. I’m looking forward to your Thanksgiving + Xmas recipes!
Luv from
MaryO
San Pedro, CA
Thank you so much, Mary! You are the absolute sweetest. The holidays are definitely busy–I call them my “SuperBowl,” between family and work stuff! But it’s also such a joyful time, and it’s so fun to make holiday desserts, how could I mind? 🙂 Your comments always bring a smile to my face–thank you!
This cake is such a stunner – reminds me of candy corn! I give you credit too — I definitely don’t have the patience for 7 colors of frosting and 7 layers — plus how in the heck did you manage such a great job with the ombre sprinkles? I would have ended up with sprinkles all over the kitchen and not an ombre cake. LOL!
Haha! I tried to keep the sprinkles contained to a baking sheet, but I most definitely had to sweep afterwards!
This is one of the nicest Halloween cakes that I’ve ever seen! Love the stencil, and the layers of colored filling. Nice job.
Thanks so much!
This cake Does look like candy corn! Orange and yellow are some of my fav colors– this is gorgeous!
I was definitely going for a candy corn vibe! Orange is actually my favorite color too. 🙂 Thanks Sarah!
Such a stunning cake! The concept could be used in so many different colors and themes!
Definitely, Lisa! There’s a whole world of sprinkle colors out there just waiting to be used. 🙂
This is so cute, I love the stencil and the ombre effect. Very nice job and great pictures.
Thanks so much, Dahn!
Wow, this cake is gorgeous! Not only is the frosting pretty but I love the ombre frosting!
Thank you Miranda! Ombre is one of my favorite decorating trends.
My jaw just dropped! Wow! How absolutely stunning. I’ve shared on Pinterest and on my Facebook page.
Thanks for sharing, Andrea!
Stunning cake. Well done. Cake baking, I can manage … it’s the frosting and decorating that gives me trouble. 🙂
Thank you so much! The decorating is definitely the tricky part, but it’s also one of my favorites–it’s just fun to get a little creative!
Woow ! Stunning ! Very beautiful cake! And delicious i am sure ;)!