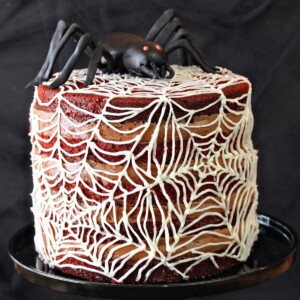
This Spiderweb Naked Red Velvet Cake has nine layers of awesomeness with a bit of spooky webbing allowing you to see each beautiful layer. Layers of delicious chocolate-cream cheese frosting and Morello cherries are nestled between the red velvet cake.

Are you hip to naked cakes? Whoa there–I’m not talking about the bachelor/ette party cakes that are anatomically correct to an uncomfortable degree. I still don’t think I’m old enough to view those. No, I’m talking about the latest cake trend of leaving the outside of layer cakes unfinished, so that the layers of cake and frosting are on display. If you haven’t seen them then we’re obviously looking at different Pinterest boards, because those things are everywhere.
I’m torn. On one hand, I love a good bandwagon-jumping as much as the next trend chaser. On the other hand, too many naked cakes look a little sloppy. I mean, I want to bedazzle everything I see—do I really have it in me to be content with a naked cake?
So, I compromised and made a “semi-dressed” cake instead. Perfect for the innocent baker who’s not ready to commit to culinary nudity just yet.
This cake is the best of both worlds: the cake and frosting layers are partially visible, but the intricate spiderweb piping leaves just enough to the imagination. Mrow!

Of course, since it’s October, I’m contractually obligated to put a spider on it. Sorry to anyone who’s sick of Haloweenie desserts—I don’t make the rules, I just laboriously sculpt the fondant arachnids. It’s a hard life.

To make this cake, I used my trusty red velvet recipe, and added a little extra cocoa powder since I thought a more burgundy color would be appropriately spooky. I filled it with a rich chocolate-cream cheese frosting, and tossed in several handfuls of chopped Morello cherries (tart cherries preserved in syrup). The combination of the buttermilk/cocoa cake, tangy chocolate cream cheese, and juicy, tart fruit was fantastic.

I reserved some of the cream cheese frosting before adding the chocolate, and used the plain cream cheese frosting to pipe the spiderweb design on the outside of the cake after it had chilled for a few hours. Fun fact: it is surprisingly hard to make a decent-looking spiderweb! I don’t think we’re giving the spiders in our lives nearly enough credit. They may be freaky-looking, but apparently they’re really smart and good at spatial relationships.
I went with a dense, intricate web pattern all over the top and sides of the cake, but you can save time by making your web larger, or just drawing one or two webs on the cake and leaving more of it plain. I mean “naked.”

To make the fondant spider, you’ll need black fondant. I always recommend buying black fondant (as opposed to trying to dye white fondant yourself) because you’ll never end up with a true black—you can use a whole bottle of food coloring and still have a muddy gray. Better to spend a few extra dollars and a get a deep, shiny black without any hassle! I like Satin Ice brand, but my local Michael’s store sells Duff Goldman’s brand if that’s more convenient for you.

Forming the body is easy, but the legs are tricky! I actually pressed the fondant around thin wires that were bent into leg shapes, and left about 1/2-inch of wire exposed on the ends, to stick into the body. After forming the body and all the legs separately, I let everything dry overnight on a cocoa-dusted baking sheet, then assembled the spider on top of the cake the next day. Don’t try to assemble it and then transfer it, and don’t strap it into the passenger seat and go joy-riding over bumpy roads—this little guy is delicate! But if you can stand handling him with kid gloves, it’s worth it, because he adds the perfect touch to this creepy-cool cake.

So what about you: are you pro or con naked cake? Or will you join me in my semi-dressed cake compromise? Or are you ready to throw something at me if I don’t stop talking about the dressing habits of inanimate baked goods?
🕷More Dreadfully Good Halloween Desserts🕷
- Red Velvet Marshmallow Spiderweb Cake
- Matcha Chocolate Tarts
- Red Velvet Hot Chocolate
- Spiderweb Cupcakes and Chocolate Spiders
- Stamped Halloween Cupcakes
- Stenciled Halloween Sprinkle Cake
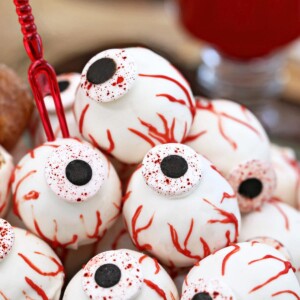
Donut Hole Eyeballs

Slice and Bake Halloween Cookies
Spiderweb Naked Red Velvet Cake
Ingredients
For the Red Velvet Cake:
- 21 oz all-purpose flour, (5 cups)
- 21 oz granulated sugar, (3 cups)
- 2 tsp baking soda
- 2 tsp salt
- .75 oz unsweetened cocoa powder, (1/4 cup)
- 2 cups vegetable oil
- 3 cups buttermilk, at room temperature
- 4 large eggs, at room temperature
- 2 tbsp red gel food coloring, or 4 tbsp red liquid food coloring
- 2 tsp white vinegar
- 2 tsp vanilla extract
For the Frosting:
- 2 1/2 cups morello cherries
- 8 oz semi-sweet chocolate, or bittersweet chocolate
- 24 oz cream cheese, (1 1/2 lbs), at room temperature
- 12 oz unsalted butter, at room temperature
- 2 tbsp vanilla extract
- 1/4 tsp salt
- 2 1/4 lbs powdered sugar
- 3 tbsp milk
Instructions
To Make the Red Velvet Cake:
- Preheat oven to 350 F. Line five 8-inch cake pans with parchment rounds, and spray the pans with nonstick cooking spray.
- In a medium bowl, sift or whisk together the flour, sugar, baking soda, cocoa, and salt. In a separate mixing bowl, combine the oil, buttermilk, eggs, food coloring, vinegar, and vanilla, and mix on medium speed with a paddle attachment until everything is smooth.
- Stop the mixer, add the dry ingredients, and mix on low until the flour streaks disappear. Turn the speed to medium and continue to mix until any lumps are gone and the batter is smooth, 1-2 minutes. Divide the batter between the five cake pans. If you have a kitchen scale, each pan will get about 18 oz of batter.
- Bake the red velvet cakes for 30-35 minutes, until the tops spring back when touched lightly and a toothpick inserted into the center comes out clean.
- Cool the cakes completely on a wire rack, then turn them out of the pans and wrap them well in plastic wrap. Place the cakes in the freezer to chill for at least 1 hour before assembling the cake. They shouldn’t be frozen solid, but it will be much easier to assemble if they are partially frozen and firm. If you do want to make them in advance and freeze them for several days or several weeks, that’s fine—they will keep well. Just let them sit at room temperature for 10-15 minutes before trying to slice them so they’re easier to cut.
To Make the Frosting:
- Drain the cherries and chop them coarsely. Line a baking sheet with several layers of paper towel, spread the chopped cherries on top, and then place another few layers of paper towel on the cherries. Press down gently to soak up excess liquid from the cherries, then let them sit while you prepare the rest of the frosting.
- Finely chop the chocolate, and place it in a microwave-safe bowl. Microwave the chocolate, stirring after every 30 seconds, until it is melted and smooth. Set aside for it to cool to room temperature while you prepare the rest of the frosting.
- Combine the cream cheese and butter in the bowl of a large stand mixer fitted with a paddle attachment. Cream them together until they’re light and fluffy, without any chunks of butter or cream cheese. Add the vanilla and salt, and mix it in.
- Combine the butter and cream cheese in the bowl of a large stand mixer fitted with a paddle attachment. Cream them together until they’re light and fluffy, without any chunks of butter or cream cheese. Add the vanilla and salt, and mix it in.
- Add the powdered sugar and milk, and mix on low speed until the sugar is moistened. Turn the speed to medium and beat until the frosting is fluffy and light. Add more cream or sugar as desired, to get your optimal texture. Remove about 1 1/2 cups of cream cheese frosting, transfer to a storage container, and refrigerate until you’re ready to decorate the cake.
- Once the melted chocolate is no longer warm to the touch, add it to the large bowl of frosting and mix them together until you have a smooth, rich chocolate frosting. Add the chopped cherries and gently stir them in by hand. Frosting can be made in advance and stored in the refrigerator. Allow the frosting to come to room temperature before using.
To Assemble:
- It’s easiest if you’re working with partially frozen cakes. Place a red velvet round on a cardboard cake circle, and top it with about a quarter of the chocolate cream cheese frosting. Use an offset spatula to spread the frosting to the very edge of the cake. Place a second red velvet round on top, and top it with more frosting.
- Continue to layer the cakes and frosting until you have stacked all 5 cake layers. Use a large offset spatula or a bench scraper to scrape around the outer edge of the cake, smoothing any frosting that has squirted out between the layers so that the sides of the cake are completely smooth.
- Refrigerate the cake until the frosting is firm, for at least 1-2 hours.
- Transfer the reserved white cream cheese frosting to a piping bag fitted with a small round tip (I used an Ateco #2 tip). Pipe a spiderweb pattern all over the top and sides of the cake to finish it. Top with a fondant spider, if desired. For the best taste and texture, serve this cake at room temperature.
Measuring Tips
Our recipes are developed using weight measurements, and we highly recommend using a kitchen scale for baking whenever possible. However, if you prefer to use cups, volume measurements are provided as well. PLEASE NOTE: the adage “8 oz = 1 cup” is NOT true when speaking about weight, so don’t be concerned if the measurements don’t fit this formula.
Want to learn more about baking measurements and conversion?
Nutrition
This post contains Amazon affiliate links. For more information, see my Affiliate and Advertising Policy.


I really want to make this cake However, you mention marshmellow cream but it is not listed in the ingredients. Help Could you please email me back. thanks Jean