
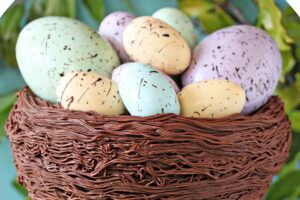
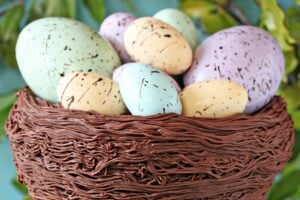
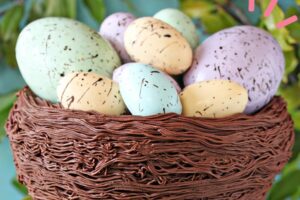


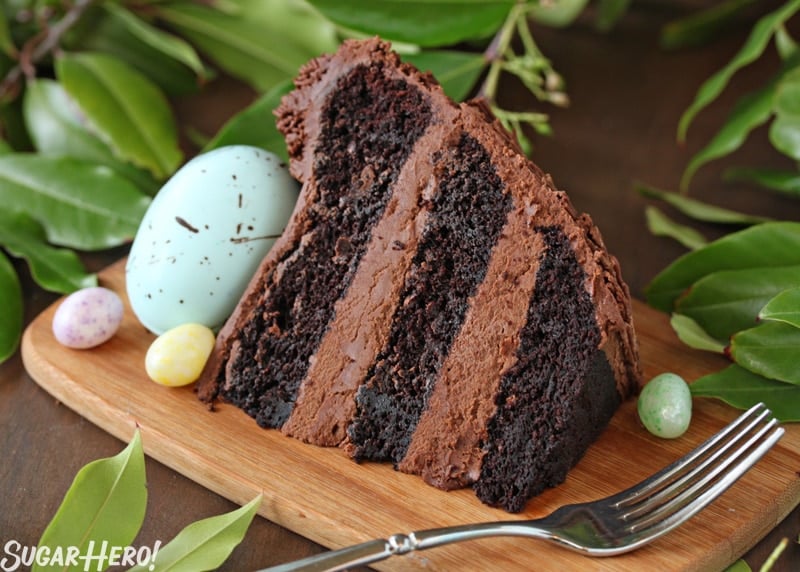
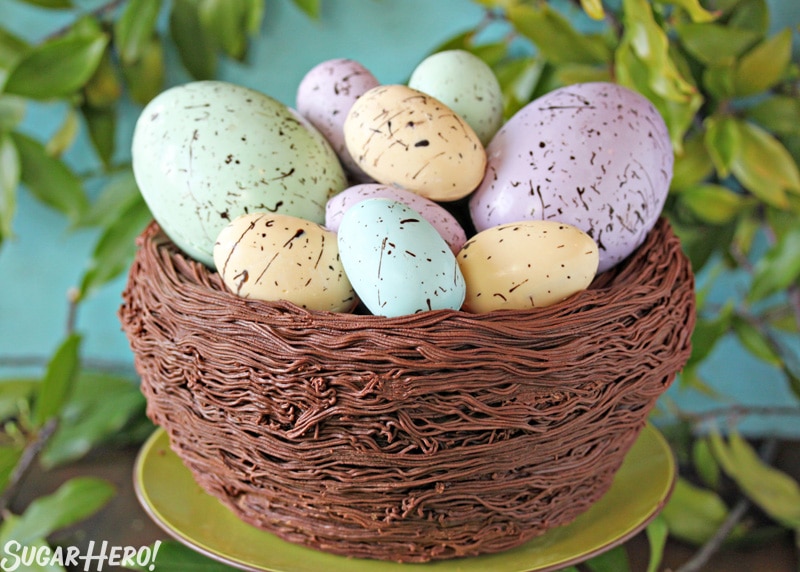
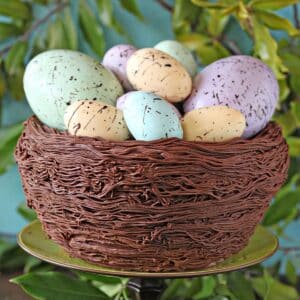
This Easter Nest Cake is perfect for any Easter get-together. It’s made with a rich and moist chocolate cake, layered with chocolate buttercream frosting, and topped off with your favorite Easter candies!

🥚 Make A Cute Nest Cake this Easter
This Easter Nest Cake recipe was first published in 2015, and since then has become one of SugarHero’s most popular Easter desserts. Every year, I receive emails and pictures from readers who have fallen in love with the cake — from first-time makers to folks who’ve made it a family tradition, this fun and whimsical cake converts new fans every year.
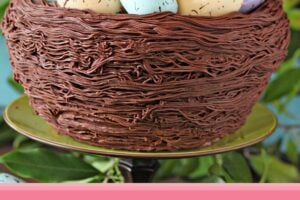
It’s easy to see why this cake recipe is so popular. Obviously, it’s ADORABLE (said with all the bias of a proud parent gazing down at their newborn baby), but it’s also an eye-catching, clever design that looks difficult, but is actually simple (and fun!) to decorate. You don’t need a special cake pan to make it, and you can make the nest decorations as simple or as complex as you’d like.
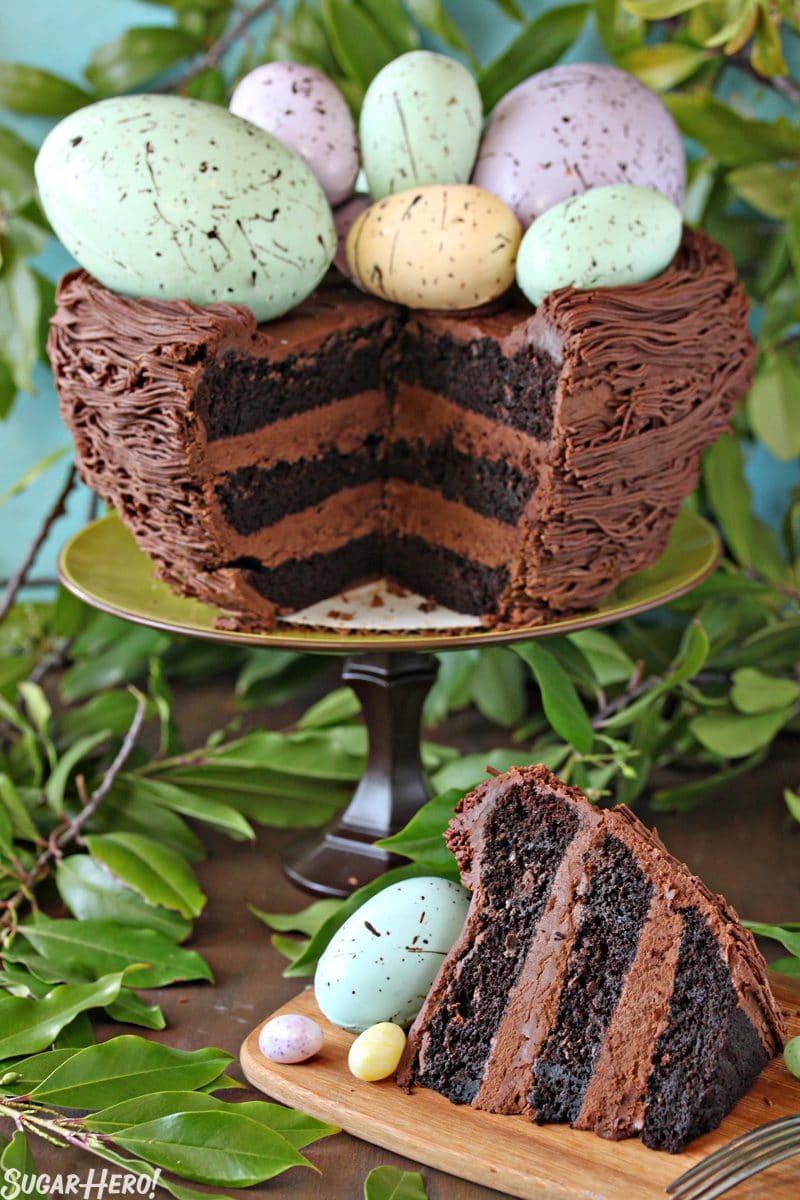
The BEST part? This Bird’s Nest Cake is deeply, divinely, unapologetically full of chocolate flavor. From the moist cake layers to the fudgy frosting in between, this is a chocolate lover’s dream come true.
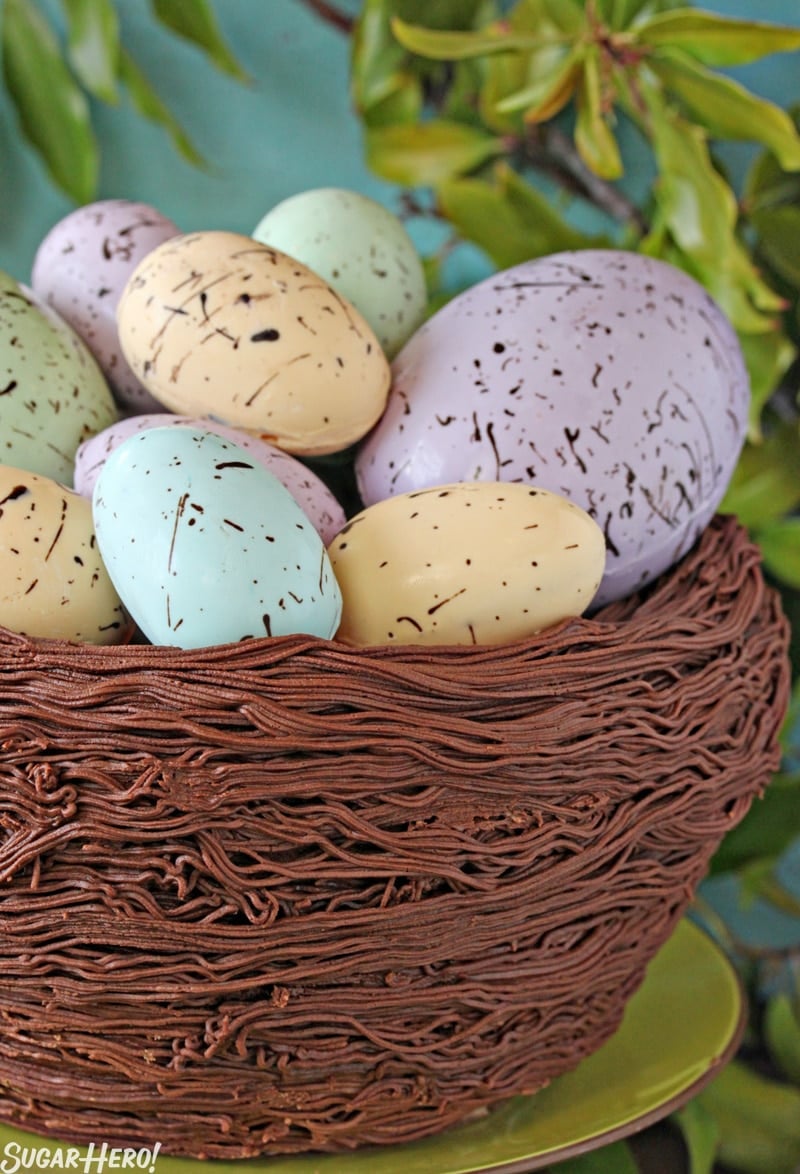
Table of Contents
🧾 What You’ll Need
Ingredients
This recipe is built on pantry staples, so chances are you have a good amount of the ingredients already. Here are a few notes to keep in mind as you gather ingredients: (Links are affiliate links and I earn a small commission from qualifying purchases.)
- Unsweetened Cocoa Powder – Since this cake gets all of its chocolate flavor from cocoa powder, I recommend using a high-quality cocoa powder. Cheap cocoa powders can be nearly flavorless, or worse, impart a bitter, dusty, or stale flavor. My personal favorite is Cacao Barry Extra Brute – it hits that sweet spot between very high quality but also pretty affordable since it is sold in bulk. Whatever you use, make sure that it is dutch-processed (also known as alkalized), because that will make a huge difference in the final taste and texture of the cake!
- Butter – Use unsalted butter, and leave it at room temperature before you start baking. This is an all-butter cake, which is my favorite type of chocolate cake to make. Using butter instead of oil gives the cake more flavor, makes it less prone to a greasy texture, and also makes the cake sturdy enough for layering into tall cakes. Chocolate butter cakes can also be turned into great cupcakes, and if you’re looking for a no-fail cupcake, check out my Chocolate Cupcake recipe.
- Unsweetened Chocolate: the frosting uses unsweetened chocolate, which gives it an ultra-rich texture and deep chocolate flavor. Any unsweetened bar you pick up from the grocery store will work – I typically use Guittard or Baker’s unsweetened chocolate.
- Decorations: use coconut or edible Easter grass to line your nest, then fill it with your favorite Easter egg candies. Just like these Easter Egg Brownies, you can’t go wrong with which candies you choose!
Equipment
There are a few must-haves to make this cake: (Links are affiliate links and I earn a small commission from qualifying purchases.)
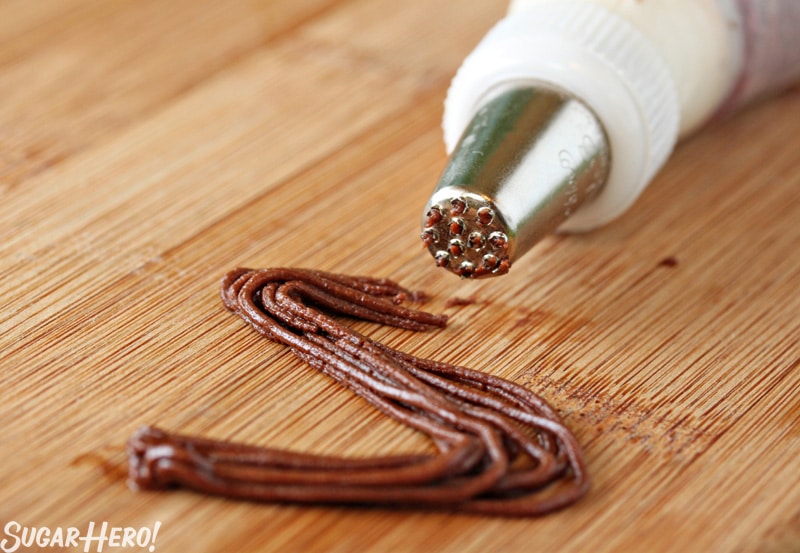
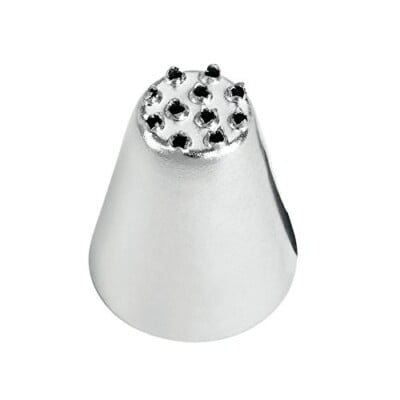
- Grass Piping Tip: the secret to getting that messy, swirled bird’s nest look is a multi-opening piping tip, also known as a “grass” tip.
- Piping Bags: use piping bags to add the frosting and to any additional decoration.
- Metal Bowl:we’re using a 4-quart mixing bowl as the baking pan to create that perfect nest shape.
- Egg Candy Molds: I use both large and small egg candy molds to shape the chocolate eggs for decorating. You can skip this if you’re using pre-bought Easter decorations!
📋 Instructions
Curious about how to construct this cute nest shape? I’ve got ya covered! Here’s a quick overview of the decorating process. You can find full printable instructions in the recipe card below.
Bake & Layer the Cake
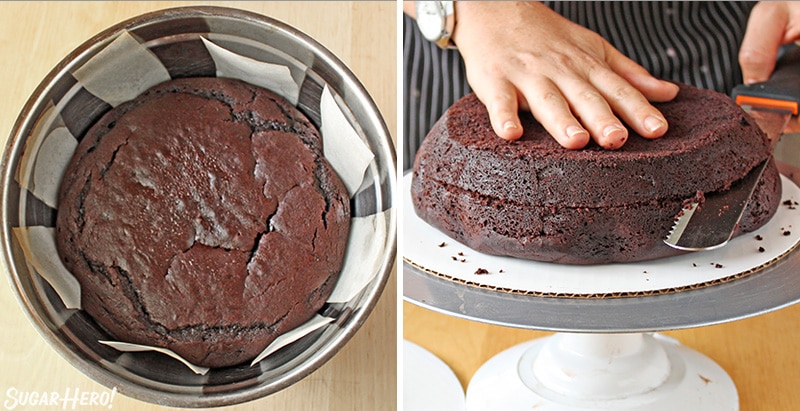
- Line a 4-quart metal bowl with overlapping strips of parchment paper, then spray well with nonstick cooking spray.
- Pour in the cake batter and bake until a toothpick inserted comes out with just a few moist crumbs attached.
- Let the cake cool completely, then wrap it in plastic wrap and chill it well. An hour in the freezer or several hours in the refrigerator is perfect!
- Flip the cake out onto a cardboard circle, so the widest part is now the base. Cut the cake into three equal layers.
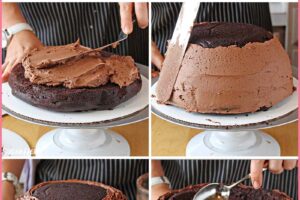
Frost the Cake
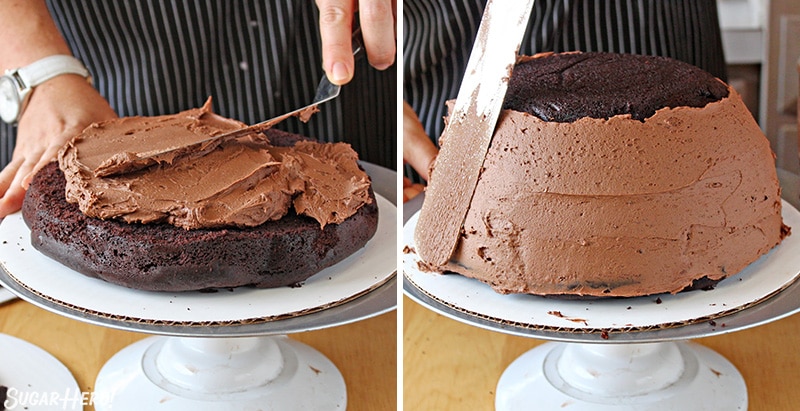
- Spread a thick layer of chocolate frosting on the bottom cake layer, and use a metal spatula to smooth it out to the edges.
- Top that layer with a second cake layer, and add more frosting. Finally, add the final third of cake.
- Once all of the cake layers are assembled, spread a thin layer of chocolate frosting all along the sides of the cake, to seal in any crumbs and to give it more structural support. Don’t put any frosting on the “top” of the cake, because once we’re done decorating it, the cake will be flipped over and that will be the bottom!
Add Frosting Decorations
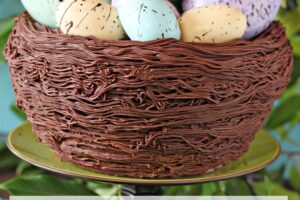
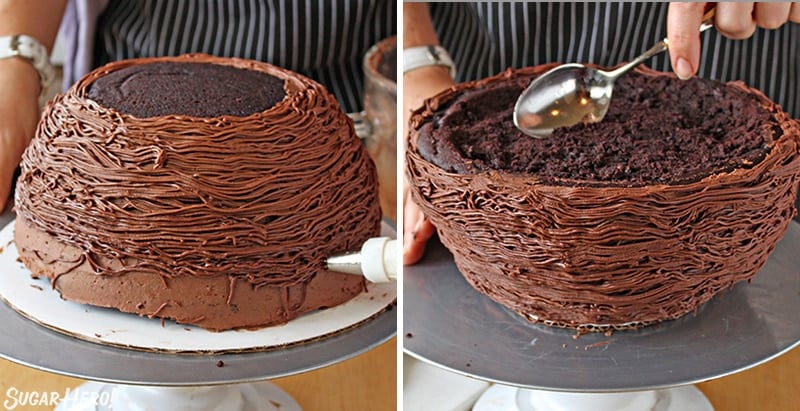
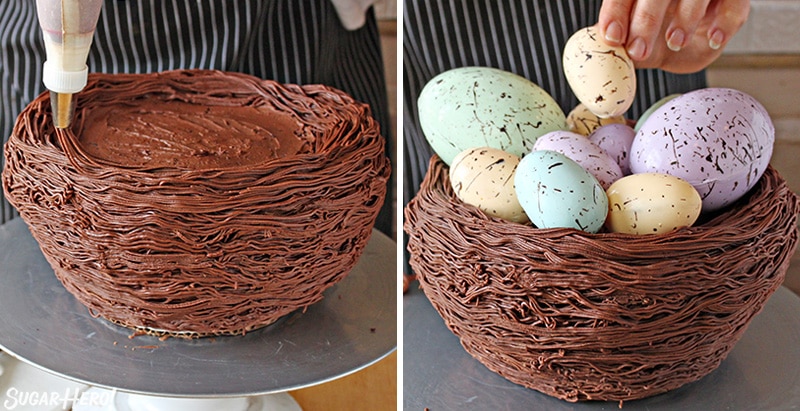
- Fit a piping bag with a grass tip and fill it with chocolate frosting. Starting at the top of the cake, squeeze the frosting out onto the sides, going around and around the cake as you work your way down. Don’t worry about making it “pretty”—this actually looks best when the frosting weaves around in a random pattern.
- Place a small cardboard cake circle on top of the cake, and flip the cake upside-down so it is now a nest shape. If you have bare spots on the sides that you couldn’t decorate before, add frosting to them now.
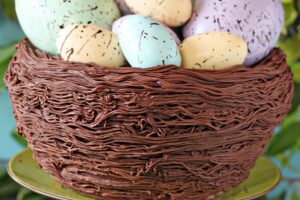
- Use a spoon to scrape out a shallow hole in the top of the cake. Leave a lip around the edge to hold the eggs in.
Add Finishing Touches
- Spread a thin layer of frosting on the top of the cake, and go around the edges with the grass tip so the nest’s texture covers the edge around the top.
- Fill the nest cake with chocolate eggs, jelly beans, marshmallow chicks, edible grass, or any other combination of Easter candy you can dream up!
💡 Tips
- Chill out. You will have a much easier time decorating this cake if it is well-chilled before you start assembly. It can even be partially frozen (completely frozen will make it hard to slice!) Working with a cold cake provides more stability during the assembly process. Consider baking the cake on one day, and doing the decorating on the next.
- Assemble upside down. I recommend assembling and frosting the nest cake upside-down so it’s more stable. Once it’s assembled, then you can flip it over and add the topping!
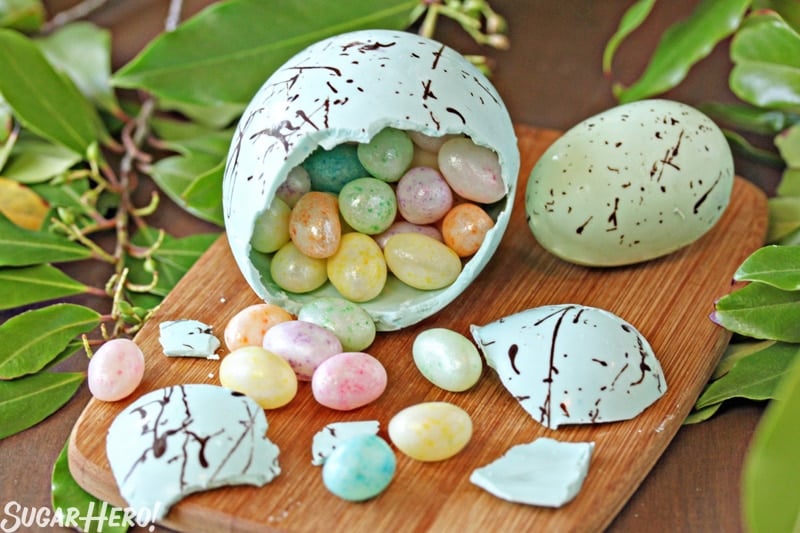
- To make the speckled eggs pictured in this post, check out these instructions for Hollow Chocolate Easter Eggs. I make them in different sizes using both a small egg mold and a large egg mold. The video shows an alternative way to decorate, using store-bought Easter candies.
- Play around with decorations. You can add any Easter-y decorations your heart desires! Try coconut grass, Peeps, jelly beans, chocolate figurines, or anything else you enjoy eating.
💭 Easter Nest Cake FAQs
No, if you don’t have a bowl (or simply don’t want to use one) you can use three standard 8- or 9-inch cake pans. If you bake traditional layer cakes, I don’t recommend carving it into a nest shape (this cake recipe isn’t sturdy enough for serious cake sculpture!), but you can still do the chocolate twig decorations on top of the standard cake.
You can make both the cake and the frosting ahead of time and store them separately until you’re ready to assemble.
The cake can be wrapped and stored in the refrigerator for 2-3 days or in the freezer for up to 4 months. When you’re ready to assemble, thaw it long enough in the fridge so it can be easily sliced, then proceed with the recipe as instructed.
The frosting can be made and stored in the fridge for up to a week before serving. Press a piece of cling wrap directly on top of the frosting so it doesn’t form a crust. Let it come to room temperature before using, and mix it briefly to restore the smooth and creamy texture.
The simple answer is yes, but let me give you a little more guidance. The issue with this type of cake is that because the shape is a little unusual (with the base being narrower than the top), it puts some added stress on the stability of the cake. If you use a really soft cake and/or soft frosting like carrot cake or cream cheese frosting, the cake is more prone to splitting apart because it is top-heavy. The risk of having the cake split apart is really only an issue if it will be out at room temperature for a long time or gets overly warm. So, if you choose to use other cake or frosting recipes and aren’t sure about how soft they might be, I’d recommend keeping the the cake in the refrigerator until just before serving to help with stability.
Once the cake is fully assembled, I recommend serving it right away. Any leftover cake will last in an airtight container in the fridge for up to 4 days. For the best taste and texture, serve this cake at room temperature.
💙 More Easter Desserts You’ll Love
This Easter Nest Cake is just one of my delicious Easter recipes. Here are a few more to try!
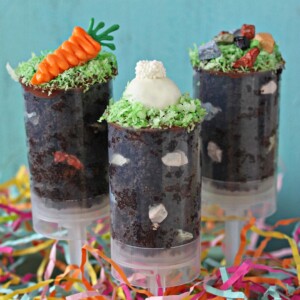
Easter Push-Up Pops
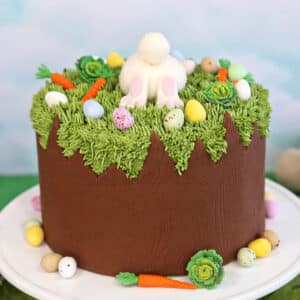
Chocolate Easter Bunny Cake
Leave a Review!
If you make this recipe, let us know! Leave a ⭐️⭐️⭐️⭐️⭐️ rating on the recipe below, and leave a comment, take a photo and tag me on Instagram @elabau, or use #sugarhero on IG!
Easter Nest Cake
Ingredients
For the Cake:
- 6 oz unsalted butter, at room temperature
- 4.75 oz granulated sugar, (2/3 cup)
- 5 oz brown sugar, (2/3 cup packed)
- 2 large eggs, at room temperature
- 2 tsp vanilla extract
- 8 oz buttermilk, 1 cup, at room temperature
- 4 oz sour cream, 1/2 cup, at room temperature
- 2 tbsp water , or brewed coffee
- 7.8 oz all-purpose flour, (1¾ cups)
- 3 oz unsweetened cocoa powder, (1 cup)
- 1½ tsp baking soda
- ½ tsp salt
For the Frosting:
- 12 oz unsweetened chocolate, finely chopped
- 36 oz powdered sugar, (9 cups)
- 12 oz unsalted butter, (3 sticks, or 1.5 cups) at room temperature
- 1/2 cup milk, plus more if necessary
- 1 tbsp vanilla extract
- 1/4 tsp salt,
For Decoration:
- Candy eggs, assorted variety, optional
- Peeps, optional
- Easter candy, optional
Instructions
To Make the Cake:
- Preheat the oven to 350 F. Cut 4 strips of parchment paper about 2 inches wide and 14-16 inches long. Spray an oven-safe 4-quart metal bowl with nonstick cooking spray. Arrange the parchment strips in an asterisk in the center of the bowl, so they overlap each other in the middle and extend up the sides. Spray the parchment with nonstick cooking spray—this process makes it easy to remove the cake after baking.
- Combine the butter and both sugars in the bowl of a large stand mixer fitted with a paddle attachment. Beat them together on medium-high speed, until light and fluffy, about 5 minutes. Add the eggs one at a time, beating well after each addition. Add the vanilla extract and mix it in.
- In a separate bowl, whisk together the buttermilk, sour cream, and water (or coffee, if using). In a different bowl, sift together the flour, cocoa powder, baking soda, and salt. With the mixer running on low, add a quarter of the sifted flour mixture. When the flour streaks have almost all disappeared, add a third of the liquid to the mixing bowl. When that’s incorporated, continue to add the drys and wets in an alternating pattern, ending with the dry ingredients.
- When the dry ingredients are nearly incorporated, stop the mixer. Scrape down the bottom and sides of the bowl with a rubber spatula, and finish mixing the cake by hand. Pour the batter into the prepared bowl and smooth it into an even layer. Bake the cake for about 70 minutes, until a toothpick inserted into the center comes out with just a few moist crumbs attached. If the top seems to be getting too dark during baking, cover it with foil to prevent it from burning. Because of the unique shape of the bowl, it takes a little longer to bake than other cakes, and can sometimes bake a little unevenly. Cool the cake completely on a wire rack.
- Unmolding the cake should be a simple matter of turning it out onto a cake cardboard—the parchment is a big help here. If you’re having trouble, gently use a small metal spatula around the sides to loosen the cake before unmolding it. The cake can be made several days in advance and kept, well-wrapped and refrigerated or frozen, until ready to use. If you freeze it, make sure it’s partially defrosted before you use it so you can cut it easily.
To Make the Frosting:
- Place the chopped unsweetened chocolate in a microwave-safe bowl and melt it in 30-second increments, stirring after every 30 seconds until melted and smooth. Set aside to cool to room temperature.
- Place the remaining ingredients (sugar through salt) in the bowl of a large stand mixer fitted with a paddle attachment. Mix on low speed until the sugar is thoroughly moistened, then raise the speed to medium and beat for 1-2 minutes, until light and fluffy.
- Turn the mixer speed back to low, and add the chocolate. Once the chocolate is mixed in, raise the speed back to medium and beat for one minute more. If it seems too stiff, add a bit more milk until you get a texture that you like. Use immediately, or place in an airtight container with plastic wrap pressed on top. The frosting can be made several days in advance and kept in the refrigerator. Allow to come to room temperature before using.
To Assemble:
- Cut out a cardboard cake circle the same size as the bottom of the chocolate cake. If the inside of your bowl was round, instead of having a flat bottom, trim the rounded part off the bottom of the chocolate cake, to give the cake a flat base.
- Place a large cake cardboard on a cake turntable, and flip the cake upside-down so the widest part is now on the bottom. Cut the cake into three layers with a long serrated knife. Spread a thick layer of chocolate frosting on top of the cake layer, and use a metal spatula to smooth it out to the edges.
- Top the cake with the second layer, and add another layer of frosting. Finally, add the final layer of cake. Once all of the cake layers are assembled, spread a thin layer of chocolate frosting all along the sides of the cake, to seal in any crumbs and to give it more structural support. Don’t put any frosting on the “top” of the cake, because once we’re done decorating it, the cake will be flipped over and that will be the bottom!
- After your sides are covered with chocolate, transfer some of the frosting to a piping bag fitted with a grass tip (I used Ateco #133). Starting at the top of the cake, squeeze the frosting out onto the sides, going around and around the cake as you work your way down. Don’t worry about making it “pretty”—this actually looks best when the frosting weaves around in a random pattern, because that makes it look more like a nest. Just make sure to fill in all the gaps so there aren’t any naked areas not covered in the long strings of chocolate frosting. It might get more difficult as you get toward the bottom of the cake, so just go as far down as you can.
- Place the small cardboard cake circle on top of the cake, and using the large circle underneath to support it, flip the cake upside-down so it is now the typical nest shape. If you have bare spots on the sides that you couldn’t decorate before, add frosting to them now.
- Use a spoon to scrape out a shallow hole in the top of the cake. You just want to create a little indentation where the eggs will rest, so only scrape about 1/2- or 3/4-inch of cake, and leave a lip around the edge to hold the eggs in. Spread a thin layer of frosting on the top of the cake, and go around the edges with the grass tip so the nest’s texture covers the edge around the top.
- Fill the nest cake with chocolate eggs, jelly beans, marshmallow chicks, edible grass, or any other combination of Easter candy you can dream up!
Video

Measuring Tips
Our recipes are developed using weight measurements, and we highly recommend using a kitchen scale for baking whenever possible. However, if you prefer to use cups, volume measurements are provided as well. PLEASE NOTE: the adage “8 oz = 1 cup” is NOT true when speaking about weight, so don’t be concerned if the measurements don’t fit this formula.
Want to learn more about baking measurements and conversion?
Nutrition
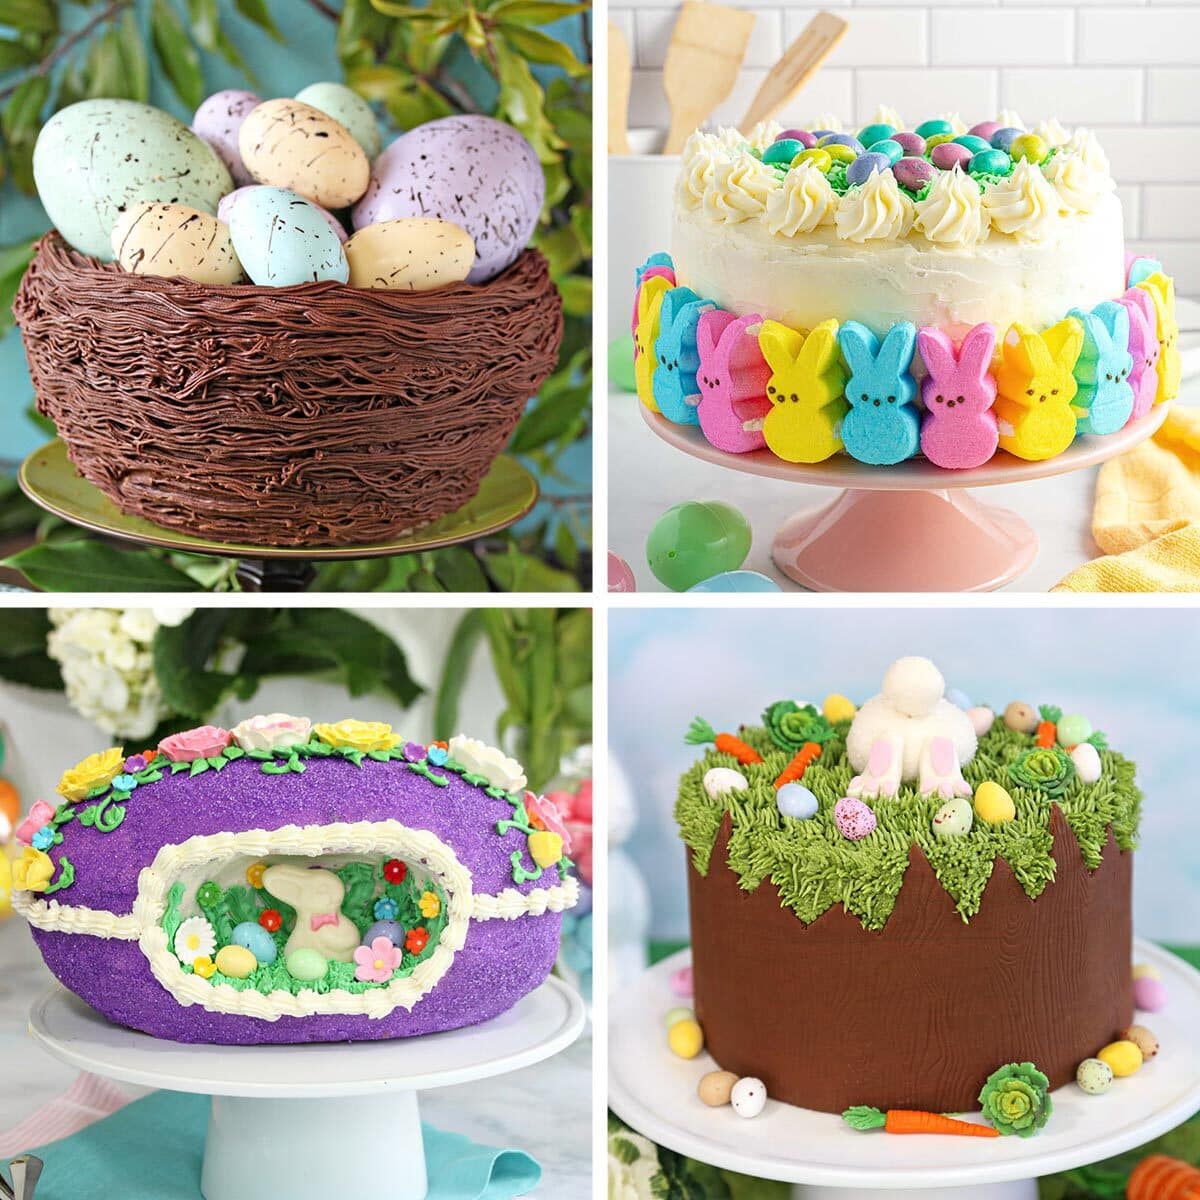
EASTER CAKE RECIPES 🐇
We’ve rounded up 35 adorable Easter cake recipes that will make your holiday extra-special — click here to get all the recipes!


Mine ended up like an episode of “Nailed It”. The buttercream frosting is amazing, but flipping the cake was a disaster. Very dense cake.
Hey Elizabeth, I’m sorry to hear that the cake wasn’t a success. If you ever want to send me and email with more details I would be happy to troubleshoot it with you! I am glad to hear you enjoyed the buttercream!
Hi, I make the cake and it looks wonderful. I wish i can send you a picture. For those that are trying to make the cake a have a tip , before you flip the cake, put in the refrigerator for about 20 minutes, in this way the frosting will not come off.
Thanks for the tip, Pilar! I’m so glad it worked out well for you. Happy Easter!
I’m not a fan of chocolate cake, but WOW! This one is fantastic! And both my husband and daughter told me it’s the best chocolate cate I’ve made. I didn’t make this as a “nest” – just as a regular cake. The frosting makes a lot so I had a lot left over. All in all, I will definitely make this recipe again!
Thank you, Judy! I’m thrilled to hear that it worked out for you and that you all enjoyed it. 😀
Can’t wait for Easter to come and make these Easter eggs! They look so pretty!
Thanks Tavo! There are so many cute desserts to make for Easter!
Can I just say that I scrolled quite a bit on this page looking for the cake photo. I swear I thought the photos were of an actual basket and I’m like “where’s the cake?” This is SO impressive. I can’t even imagine eating something so beautiful.
Thank you so much Vicky! I’m glad the cake caught your eye without you even realizing! 😉
What an amazing creation!!!! I love every single thing about this!
Thanks Casey! I think it is one of my favorite Easter cakes!
This Easter cake is beautiful and delicious.
I tried this cake to practice before easter. The cake Came out good. Thanks for the recipe.
I’m sure it turned out beautifully! Your Easter guests will love it 🙂
Hi,
This is not a review but a couple of questions. Could not figure how to post questions. 1) How well would it work using a cake mix? 2) instead of just frosting between the layers would it work to use homemade raspberry curd?
The cake is absolutely beautiful. Thank you for sharing with us.
Hi TJ, using a cake mix (1 box) can be done, I would just recommend serving it slightly chilled for stability reasons (because cake mix tends to yield a softer cake). Raspberry curd also could be used for the filling, although I would recommend adding gelatin to the curd to make it a bit firmer since the shape of this cake makes it less stable than a standard cake and again, serving it chilled. I hope this helps! Come back and let us know how it turns out 🙂
Everything turned out amazing until I started to pipe the sides of the cake. It was probably my technique but for some reason I just couldn’t get the buttercream to stay on the cake?
Any advice or ideas ? I did have a solid crumb coat as a base. Thanks
Hi Bridgette, I’m sorry to hear you had trouble with the piping! That can sometimes happen if the base cake is very cold and/or the frosting is fairly thick (it’s not “sticky” enough and kind of slides off.) If this happens in the future, you can brush the outside of the cake with a thin layer of thinned out corn syrup to help the outer layer adhere. I hope you were still able to enjoy the flavor, and that you had a happy Easter!
Could you make this from any other types of cake like carrot cake with cream cheese frosting? I would like to use your idea to make an Easter basket cake.
Hi Janice. The simple answer is yes but let me give you a little more information to guide you. The issue with this cake is that because the shape is a little unusual with the base being narrower than the top, it puts some stress on the stability of the cake. If you use a really soft cake and/or soft frosting, the cake is more prone to splitting apart because the shape is top-heavy. The problem of having the cake split is really only an issue if the cake will be out at room temperature for a long time or gets overly warm. Carrot cake and cream cheese frosting are softer than the chocolate cake and chocolate buttercream I used in the recipe. So, if you decide to use carrot cake and cream cheese frosting, I’d recommend keeping the the cake in the refrigerator until just before serving to help with stability. Please let me know if you have any other questions. I’m happy to help. All the best to you!