


These Cream Tarts are all the rage! Also known as cream biscuits or cream cakes, they’re a beautiful and unique twist on traditional cakes. You can cut them into letters, numbers, or shapes, and decorate them with fruits, flowers, and all your favorite candies.

For the past few months, I’ve been obsessed with these cream tarts, without even knowing what they’re called. I would see beautiful double-decker pastries cut into letters or numbers on my Instagram explore page constantly, but the captions were usually just something unhelpful like “This is so pretty!” or “Loving this new cake trend!” Excuse me, Instagram, but I really must insist you spoon-feed me every little bit of information I require.

So I did a little web sleuthing, and I have to say, googling “letter tart” or “number cake” is kind of a frustrating experience. Do you know how many children’s birthday cakes I had to sift through in my quest to figure this out?! But google hasn’t failed me yet, and in the end I learned they’re most commonly called “cream tarts,” “cream biscuits,” “cream cookies,” or “cream cakes.” That clarifies everything, right?

As far as I can tell, these gorgeous desserts are the brainchild of Israeli baker Adi Klinghofer, who makes large cakes in the shape of numbers and initials. (Her work is beautiful and you should definitely check out her Instagram page!) Since first seeing her version, I’ve seen so many twists on the original idea, including tarts made out of red velvet or chocolate cake, fluffy sponge cake, and even rice crispy treats! I love that this idea has taken on so many unique forms.

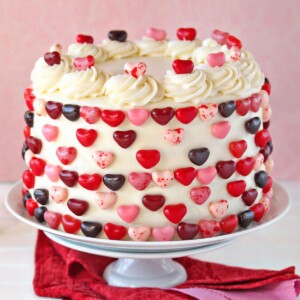
I like large cakes, but I’m also a big believer in the appeal of adorable small desserts, so I opted to make six single-serving heart cakes instead. “Single-serving” might be a little generous, since they’re about 6 inches across and absolutely covered with goodies on top, but you get the basic idea–petite mini cakes, each perfect for two lovebirds or one glutton. (in other words, me!!)

As I mentioned above, there are a million different versions of this idea out there, so I would say there’s no wrong way to make these. Some people make them with a sweet tart dough, others use a basic sugar cookie recipe. I did a lot of reading and testing to see what I liked, and for these cookies, I ended up using a new-to-me recipe for honey cookies!
Full disclosure, I have no idea what the “official” name of this recipe might be. I found it on a charming Russian dessert blog, and I used Google translate to figure out the gist of the recipe. After trying it a few times, and making my own tweaks to the recipe, I’m in love! The cookies have a light honey flavor, which is lovely when paired with the white chocolate frosting I used.

The BEST thing about them, though, is the texture. Unlike sugar cookies or tart dough, they stay soft and supple after baking, thanks to the honey and the unique preparation method. I imagine most other cream tarts end up fairly soft, since the moisture of the whipped cream or frosting will soak into the tart and soften it up over time, but I like that these start off quite soft, because after a few hours’ chilling time in the refrigerator, their texture is absolutely cake-like.

The “cream” layer, too, can be anything you’d like. I recommend something light but stable and not too sweet. A stabilized whipped cream would be delicious, or diplomat cream (pastry cream mixed with whipped cream.) I used a super simple frosting made from white chocolate ganache and cream cheese. The cream cheese keeps the white chocolate from being too sweet, and it has a nice pipable texture without being too stiff.
For the toppings, I went a little wild–but isn’t that the point of cream tarts?? I used fresh strawberries and raspberries, fresh roses (you can wrap the stems in plastic wrap if you’re concerned about using fresh flowers), meringues, half macarons (because my cookies were smaller, using whole ones looked a little oversized), pink popcorn, and an assortment of pink and white sprinkles and Sixlets. You can use whatever you’d like, but an assortment of sizes and textures always looks best. If you want to make your own meringues, try my classic meringue recipe here!

You can enjoy these cream tarts right away, but I find that for the best taste and texture, I like them after they’ve been refrigerated for several hours. The frosting firms up a bit, the cookies soften even more, and it’s like eating a beautiful, delicious, petite piece of cake.
Have you tried your hands at making a cream tart yet? I’d love to hear about it!
🍓More Beautiful Dessert Recipes:
Sky-High Pink and Red Velvet Cake
How to Make Trendy Cream Tarts – Live Video!
Don’t miss our collection of the 10 Best Valentine’s Day Cookies – see the whole web story here!

Trendy Cream Tarts
Ingredients
For the Tart Dough:
- 2 large eggs
- 5.5 oz granulated sugar, (3/4 cup)
- 3 oz honey, (1/4 cup)
- Pinch salt
- 1 tsp vanilla extract
- 3.5 oz unsalted butter
- 1/2 tsp baking powder
- 1/2 tsp baking soda
- 13.5 oz all-purpose flour, (3 cups)
For the White Chocolate Frosting:
- 10 oz white chocolate, finely chopped (or real white chocolate chips)
- 10 oz heavy cream
- 16 oz cream cheese, at room temperature—do not use low-fat or non-fat varieties
To Decorate:
- Flowers, berries, meringues, candies, or anything else you want!
Instructions
To Make the Tart Dough:
- Combine the eggs, granulated sugar, honey, salt, and vanilla extract in a medium saucepan, and whisk together. Add the butter, and place the pan over medium heat. Watch the pan and whisk frequently while the mixture heats up and the butter melts. Continue to whisk until it starts to simmer, but don’t bring it to a full boil.
- Once the honey mixture is hot, remove the pan from the heat and whisk in the baking powder and baking soda. It will foam up and get thick and frothy. Set aside to cool until it is warm but not hot.
- While you’re waiting for the honey mixture to cool, sift the flour to remove any lumps, then pour half of it out onto a cutting board or your countertop.
- Stir the other half of the flour into the honey mixture, and whisk until it’s all incorporated. The batter should still be pretty runny. Scrape the batter out onto the flour on your work surface, and gently use your hands to work the flour into the dough, gently kneading it just until the flour is incorporated and the dough is mostly smooth and only a bit sticky. Flatten the dough into a disc, wrap it in plastic wrap, and refrigerate it for an hour, until firm.
- Preheat the oven to 350 F. Roll the dough out onto parchment or a sil-pat, dusting with a bit of flour only if necessary to prevent sticking. Cut out 6” hearts, then use a smaller 2.5” heart cutter to cut out the middle. (Alternately, you can cut any shape you’d like out of cardstock, and trace the shape with a sharp knife onto the dough.) Re-roll the dough until you’ve cut out 12 heart shapes, to make a total of 6 cream tarts. Use excess dough to make small hearts for decorations, if desired.
- Place the large hearts a few inches apart on baking sheets covered with a sil-pat or parchment paper. Bake for 6-8 minutes (I find that cookies on parchment cook faster than cookies on a sil-pat.) The cookies won’t take on any color on top, but should puff and expand a bit, and if you use a spatula to take a peek under the cookie, the bottom should be golden brown.
- Let them cool completely before decorating.
To Make the White Chocolate Frosting:
- Combine the chopped white chocolate and heavy cream in a medium bowl, and microwave it for 1 minute. Whisk the cream and white chocolate together until the chocolate is completely melted and smooth. Press a piece of plastic wrap directly on top, and refrigerate for at least 4 hours, until completely cold. It should have the texture of thick syrup after it has been chilled.
- Place the room temperature cream cheese in the bowl of a large stand mixer fitted with a paddle attachment. Beat until the cream cheese is creamy and no lumps remain. Switch to the whisk attachment, and add the cold white chocolate ganache. Mix on low at first, to incorporate the ingredients, then scrape down the bottom and sides of the bowl.
- Turn the mixer to medium speed and beat for a few minutes until the frosting becomes thick and holds its shape well.
To Decorate:
- Fit a piping bag with a round coupler, and fill it with white chocolate frosting. Take one cookie and pipe two rows of frosting around the edges of the cookie, covering the top surface completely. Gently place a second cookie on top of the first, and repeat the frosting pattern.
- Decorate the top of the cookie with fresh flowers, fresh berries, candies, macarons, or anything else you’d like! They look best when covered with a colorful assortment of treats. Repeat until all of the cookies are frosted and decorated.
- Since the cookies remain soft after decorating, they can be enjoyed right away, but I think the texture is best after they have been refrigerated for at least an hour, so the frosting can firm up a little bit and the cookies soften a bit more—at that point, they have a cakey texture that’s divine! They can be enjoyed up to 8 hours after assembly, but I wouldn’t recommend pushing it much past that—the edges will start to get a bit stale. If you do need to do parts in advance, the cookies and frosting can both be made several days ahead of time, and then it’s short work to assemble everything on the day of serving.
Recipe Notes
Measuring Tips
Our recipes are developed using weight measurements, and we highly recommend using a kitchen scale for baking whenever possible. However, if you prefer to use cups, volume measurements are provided as well. PLEASE NOTE: the adage “8 oz = 1 cup” is NOT true when speaking about weight, so don’t be concerned if the measurements don’t fit this formula.
Want to learn more about baking measurements and conversion?


Hi, I tried this recipe n it was fabulous. Thank you for sharing such great recipes
Hey Shobana, I am so glad to hear you enjoyed it!! Thanks for your feedback!
I’m wanting to make this but can’t have honey. Is there an alternative ingredient that could be used so that the biscuits are still easy to cut through?
Hey Christy, I haven’t tried it with a honey substitute, but if I were going to experiment I would start with golden syrup. It has a similar consistency and a nice light flavor. If you give it a try I would love to hear how it goes! Thanks!
What would be the cooking time if you do a larger number as opposed to 6 small hearts
Hey Annushka, it’s hard to say for sure because it is going to depend on the size and shape of the number. I would suggest having 8 minutes be your base if it’s a bit bigger then keeping a close eye on it, checking it every two minutes. I would love to hear how it goes. I hope this helps!
Love it!!! But what can I use instead of honey (for the little kids)?
Hey Vera, I am not sure you would have much success replacing honey in this recipe. However you can totally use a sugar cookie recipe you know you like and do the same idea with it!
Hi Elizabeth – Cannot wait to try these — I am making them for a baby shower… I was thinking of making them about half the size (3″ circles), Wondering how you would adjust the baking time. Also how long did you bake the mini decoration hearts you have displayed in the video?
Hey Cheryl, if they are about half the size I would suggest checking them at around five minutes. It may still take about six to seven minutes but you will have a better guess at the five minute mark. As for the little hearts to be honest I cannot remember. My guess would be about four or five minutes. I would suggest just baking them on a separate pan and then keep an eye on them. I am sorry I can’t be more specific, I am so excited for you to try it out! I would love to hear how it goes! Thanks!
This recipe was great, but the process of making the dough was really different. It was interesting that you cook the eggs sugar and honey first before adding the other ingredients. Why do you do that? what does that add to the recipe?
Hey Tammy, cooking those first reduces the honey a bit and also cooks the egg slightly. Which makes the cookies more stable and less crumbly! I am so happy you gave it a try! I am thrilled to hear it worked out for you. Thanks for your feedback!
I made this for my daughters 7th birthday but made in the shape of a giant 7 with a few heart ones. I have had sooo many requests to make it again… especially the frosting which is insanely good. This cake is also really easy to make but looks so impressive! I’m making it again this week for my other daughters first birthday. Thank you!
Hey Emily, I am so glad to hear it was enjoyed by so many! Thank you so much for your feedback, I love hearing that! Happy Birthday to your daughter!!
I tried to make this but I also found that the dough was extremely dry. I would recommend not using all of the flour and to add gradually. In my case I think 2 cups of flour would have been about right. I will give it another go next time. Fingers crossed!
Amazing recipe and so much fun to make! Quick question, the dough for the tart came out a bit to dry. Any way to make it more moist?
Hi, I am sorry to hear it came out a bit dry. There isn’t much you can do after the fact but in the future if you make these again my first thought is that you wouldn’t have needed to use all the flour. I would suggest next time that once it reaches the stage of being smooth and not sticky stop adding the flour regardless of how much is left on the cutting board. I hope that makes sense and can be of help!
how long can you keep this out? Can I assemble at night for a party the next evening? or better to assemble morning of?
thanks!
Hey Benedetta, It is fine to assemble the evening before! That shouldn’t be problem at all, it works great and it also gives plenty of time for it to set. I would suggest putting it in the fridge so that it can get a little firm with the frosting, then just taking it out the day of so that it can get to room temperature for when you serve it. I hope that helps, I would love to hear how it goes once you give it a try! Good luck and have fun!
How can I make the tart layers chocolate? thanks
Hey, I haven’t tried it myself to be honest. I would say your best bet would be to just find a chocolate sugar cookie because you will have more of a guarantee of them turning out. If however you want to experiment and give it a try I would love to hear how it goes. I do plan on trying a chocolate version of this in the future so keep an eye out!