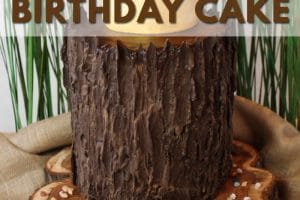

Where the Wild Things Are Birthday Cake is a beautiful nine layer cake! It has a layer of chocolate cake, sandwiching chocolate buttercream, salted caramel buttercream, and salted caramel filling. It is delicious and perfect for birthday parties!

Wild Things Layer Cake
My son Asher turned two this month. I know. I KNOW. It seems like only yesterday I was writing a blog announcement and posting pictures of him in a wee Hershey’s kisses hat. Like every parent always says, the past few years have sped by and I can’t believe I now have a toddler who runs and sings and eats us under the table and tells me over and over that he’s a big kid. This parenting stuff is heartbreaking and wonderful.
Last year we threw him a big Very Hungry Caterpillar birthday party, and it was a blast! (You can see the 3-tiered Caterpillar cake I made here, and read more about the party details here.) I loved everything about it–the park setting, the big gathering of our friends from all over the city, and the use of a literary theme. We decided to recreate the magic this year, and threw him a party based on the book Where the Wild Things Are. I have a big post coming up with all the party details, but before that happens, we have to talk about the most important thing: the cake!
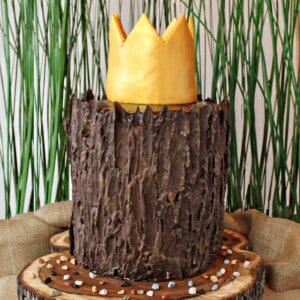
This beauty is nine layers of chocolate cake, sandwiching chocolate buttercream, salted caramel buttercream, and salted caramel filling. I wanted to evoke the feeling and imagery of the book without being super literal and sculpting mini Wild Things out of fondant or something. I decided to make my cake look like a tree stump, complete with rough chocolate bark, and topped it with a gleaming gold fondant crown.

Table of Contents
Tree Bark Decoration
I wouldn’t necessarily say that any type of layered cake is easy, but I do think that this type of decoration is easier and faster than traditional fondant-covered layer cakes. It’s meant to look rough and imperfect, so the texture of the cake can go a long way toward hiding any mistakes. The tree bark effect is made by pressing long strips of curled chocolate into the buttercream, then painting over it with more melted chocolate. The protruding curls, uneven brush strokes, and globs of chocolate really made the cake look like realistic!


The full recipe is below, and I’ve put together a little photo tutorial showing how it was done. Please excuse the uneven lighting, these were (sadly) taken in the middle of the night. Maybe one day I’ll figure out the secret to making birthday cakes in advance and sleeping like a normal person.

Equipment
One thing you might notice in the pictures is that the cake is not actually nine layers stacked on top of each other. Rather, I made three 3-layer cakes (each cake is 9″) and put them on individual cake boards, then stacked the cakes on top of each other using dowels for support–much the way you would stack a regular tiered cake. I wanted my cake to be really tall and visually striking, but I also wanted to be able to serve people reasonable portions, so this seemed like the easiest way to get the look I wanted without having to serve small children a heart attack on a plate.
You can make a short layer cake or a tall layer cake like mine. Either way, you’ll want some essential equipment to bring this cake to life. (Links are affiliate links and I earn a small commission from qualifying purchases.)
- 9×3-Inch cake pan: I love this 9×3-inch cake pan by Fat Daddio’s. It’s got a removable bottom which makes baking a dream. If you are planning to make the extra tall tiered cake, you’ll want to have three of these pans.
- Cake dowels: If you’re planning to make the tall tiered cake, cake dowels are a must. They provide stability and prevent having all your hard work slide off or get smashed. These 7.25-inch paper dowels are my go to dowels. They are a good size for most baking projects.
- Parchment paper: You can always cut your own parchment circles to fit your cake pans, but I really like using premade parchment circles.
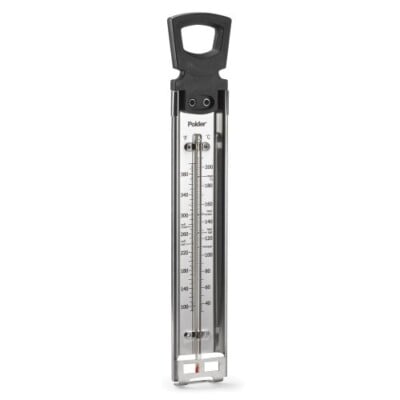
- Candy thermometer: The caramel filling tastes divine. Make sure to use a candy thermometer so that you can get it to the correct temperature.
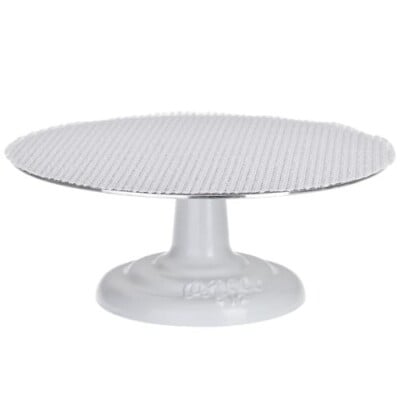
- Revolving cake stand: Making a layer cake can be tricky if you don’t have the right equipment. If you’re new to cake baking, you’ll definitely need a revolving cake stand. You can place the cake on the stand and turn it in any direction to easily reach any part of the cake.
- Cake rounds: When making layer cakes, it’s helpful to use cardboard cake rounds. Once you place the cake on the cardboard plate, you can easily move it from one location to another. If you are making a tiered layer cake, the cake boards also help to create stability between the layers. Plus, they make it easier to cut and serve reasonably sized slices of cake once it’s time to enjoy your creation.
- Stand mixer: This cake has a lot of steps. I highly recommend using a stand mixer to get the right consistency for the bake batter and buttercream. This is not a job for hand mixers.
- Fondant tools: To create the fondant crown on top, you’ll want some basic fondant tools.

Decorate with a Natural Look
The cake was a huge hit at the party. Several people asked me if it was really a cake, and I know there were a few children who were concerned that Asher didn’t have a cake at all! (I guess it blended well with the rest of the decor!) I served it on a giant 16″ tree slab, scattered with chocolate rocks, and set it on a burlap runner backed with green grass–all of the natural elements really made the gold crown pop.
Sadly, this is the best picture I have of Asher with the cake. He wasn’t feeling well for his party (more on this in the next post!) and didn’t even want a slice of his own cake. He also didn’t enjoy having everyone sing–this is him crying on my shoulder during Happy Birthday. Like I said: heartbreaking.

Fortunately, no one else objected to having cake, and most of it was demolished during the party. We had over 50 people, about half of them children, and I’d say we served about 75% of the cake. The remaining 25% we sent home with friends, and a few stray pieces came home with me (for photography purposes, of course!). Having the cake boards in between the layers was a godsend in dishing it up, and it was easy to cut small slices right off the top of the cake. The sides did get messy, though, and I generally had to pull the chocolate off because it didn’t cut cleanly into slices. So I was left with a lot of chocolate scraps, although people did come up and munch on it as I was dishing up the slices.

A Flavorful Layer Cake
And here’s what it looks like on the inside! The cake itself is my go-to chocolate cake recipe. It’s moist, with a deep chocolate flavor, but also holds up well to stacking and layering. I spread a thin layer of salted caramel on the bottom layer, then topped that with salted caramel buttercream. The second frosting layer is a chocolate buttercream, which was also used around the outside of the cake. I wasn’t sure how well the salted caramel would do as a layer (whether it would cut cleanly, whether it would hold its shape, etc) so I was reluctant to use too much of it. In retrospect, it was one of my favorite parts of the cake, and I wish I’d used it for both filling layers instead of just one. I wrote the recipe with this change in mind–more salted caramel is never a bad thing!

How to Make a Giant Layer Cake
The recipe down below will make one 9-inch cake. I figure most people probably won’t have many occasions to make cake for 50 people, but there are plenty of occasions where a 9-inch cake could come in handy! So you can recreate our Wild Things cake at home any time, but if you need to make a giant one like I did, you’ll need to triple this recipe. I’ve labeled the instructions for a short layer cake or a tall layer cake to help you navigate making the cake size that is right for your gathering.
I’ll be back soon with all the party details, and gratuitous cute pictures of my kid. Sorry not sorry!

💛More Chocolate and Caramel Dessert Recipes
- Caramel-Stuffed Chocolate Cupcakes with Caramel Skulls
- Baileys Chocolate Caramel Tarts
- Salted Caramel Hot Chocolate
- Spicy Chocolate Caramel Sandwich Cookies
- Caramelized White Chocolate Truffles
- Salted Caramel Chocolate Mousse
Black Forest Cake
Mini Buche de Noel
Where the Wild Things Are Birthday Cake
Ingredients
For the Cake:
To make the cake as tall as mine, make this recipe 3 times. You'll need 3 cake pans.
- 6 oz unsalted butter, at room temperature
- 4.75 oz granulated sugar, (2/3 cup)
- 5 oz brown sugar, (2/3 cup), packed
- 2 large eggs, at room temperature
- 2 tsp vanilla extract
- 8 oz buttermilk, (1 cup), at room temperature
- 4 oz sour cream, (1/2 cup), at room temperature
- 2 tbsp water , or brewed coffee
- 7.8 oz all-purpose flour, (1 3/4 cups)
- 3 oz unsweetened cocoa powder, (1 cup), sifted
- 1 1/2 tsp baking soda
- 1/2 tsp salt
For the Salted Caramel Filling:
To make enough for a cake as tall as mine, double this recipe.
- 4 oz unsalted butter
- 7.5 oz brown sugar, (1 cup), packed
- 5.5 oz light corn syrup, (1/2 cup)
- 7 oz sweetened condensed milk, (1/2 cup)
- 2 tbsp heavy cream, or whole milk
- 1 tsp vanilla extract
- ½-1 tsp salt, to taste
For the Buttercream:
To make enough for a cake as tall as mine, triple this recipe.
- 9 large egg whites, at room temperature
- 14 oz granulated sugar, (2 cups)
- 1 lb unsalted butter, softened but still quite cool
- ½ tsp salt
- 1 cup thick salted caramel sauce, homemade or store-bought
- 4 oz bittersweet chocolate, finely chopped
For the Chocolate Curls and Decoration:
To make enough for a cake as tall as mine, triple this recipe.
- 1 lb chocolate candy coating melts, I used Merckens brand
- 1/4 cup unsweetened cocoa powder
- Fondant, if desired, to make crown
Instructions
To Make the Cake(s):
- To make a shorter layer cake, line a 9×3-inch cake pan with parchment, and spray it with nonstick cooking spray (If you don't have a 9×3 inch pan, three shorter 9-inch pans can be used.) To make a tall layer cake like mine, you will need to make three 9×3-inch cakes and will need three 9×3-inch cake pans. You will make the entire chocolate cake recipe 3 times. Preheat the oven to 350 F.
- Add the butter and both sugars to the bowl of a large stand mixer fitted with a paddle attachment. Beat them together on medium-high speed, until light and fluffy, about 5 minutes. Add the eggs one at a time, beating well after each addition. Add the vanilla extract and mix it in.
- In a separate bowl, whisk together the buttermilk, sour cream, and water (or coffee, if using). In a different bowl, sift together the flour, cocoa powder, baking soda, and salt. With the mixer running on low, add a quarter of the sifted flour mixture. When the flour streaks have almost all disappeared, add a third of the liquid to the mixing bowl. When that’s incorporated, continue to add the drys and wets in an alternating pattern, ending with the dry ingredients.
- When the dry ingredients are nearly incorporated, stop the mixer. Scrape down the bottom and sides of the bowl with a rubber spatula, and finish mixing the cake by hand. Pour the batter into the prepared pan and smooth it into an even layer.
- Bake the cake(s) for 55-60 minutes, until a toothpick inserted into the center comes out with just a few moist crumbs attached. Cool the cake completely before using.
- The cake(s) can be made several days in advance and kept, well-wrapped and refrigerated or frozen, until ready to use. If you freeze it, make sure it's partially defrosted before you use it so you can cut it easily.
To Make the Salted Caramel Filling:
- For a short layer cake, this recipe makes a little more than you will need, and you will probably have some filling left over. It keeps in the refrigerator for several weeks, and is great on toast or ice cream. For a tall layer cake like mine, double this recipe to make enough filling.
- Combine the butter, brown sugar, corn syrup, sweetened condensed milk, and cream in a medium saucepan over medium heat. Stir while the butter and sugar melts. Once the mixture comes to a boil, insert a candy thermometer.
- Continue to cook, stirring frequently to keep the caramel from scorching, until it reads 236 F on the candy thermometer. Remove from heat, stir in the vanilla and salt, and quickly pour it into another bowl to stop the caramel from cooking.
- Press a layer of cling wrap on top, and refrigerate it until thickened and chilled. Salted Caramel Filling can be made several weeks ahead of time and kept in the refrigerator until ready to use.
To Make the Buttercream:
- For a short layer cake you will make one batch of buttercream. For a tall layer cake like mine, you will need to make the buttercream recipe three times. Make each batch separate from the others. They will whip up better that way.
- Combine the egg whites and the granulated sugar in the bowl of a large stand mixer, and whisk them together. Choose a small saucepan that lets you fit the base of the stand mixer snugly into the top of the saucepan—this is your makeshift hot water bath. (Alternately, you can use a different bowl or an actual bain marie and then transfer the mixture to a mixing bowl once it’s heated.) Add an inch of water to the bottom of the saucepan, and bring the water to a simmer.
- Place the mixing bowl on top of the saucepan, making sure that the bottom isn’t in contact with the water, and heat the egg white mixture. Whisk frequently so that the egg whites don’t cook. Continue to heat the whites until they are hot to the touch, and when you rub a bit between your fingers, you don’t feel any grittiness from the sugar. Once the whites are hot, transfer the mixing bowl to your mixer and fit it with a whisk attachment.
- Beat the whites on medium-high speed until they are no longer warm to the touch—feel the outside of the bowl, and make sure that it is around room temperature. Depending on your mixer and the temperature of your environment, this may take 15-20 minutes, or more. Reduce the speed to medium-low and add the softened but cool butter in small chunks, a tablespoon at a time, making sure to wait in between additions. It may separate or look a little gloopy at this point—fear not. Once all of the butter is added, increase the speed again and whip until it comes together and is light and fluffy. If, after 5 minutes, it hasn’t come together, refrigerate the mixing bowl for 5-7 minutes, to cool the mixture down, and whip it again. Add the salt.
- Divide the mixture in half, and to one half, add the caramel sauce, mixing until it is well-blended. Melt the chocolate in the microwave in 30-second intervals, and cool to room temperature. Add the chocolate to the remaining half of the buttercream and mix it in. The buttercreams can be made in advance and kept at room temperature if you’re going to use them the same day, or refrigerated. If they have been chilled, let them sit at room temperature until soft, then re-whip them to get the fluffy texture back before you use them.
To Make the Chocolate Curls:
- For a short layer cake you will make one batch of chocolate curls. For a tall layer cake like mine, you will need to make the chocolate curls recipe three times.
- Pour the melted chocolate out onto a large sheet of parchment, and spread it into a thin layer. Place another sheet of parchment on top, and smooth it out with your hands. Working from the long end, roll the parchment up into a cylinder, and secure it with a rubber band. Refrigerate it until the chocolate coating has set completely. Once set, unroll the parchment—the chocolate will shatter into curled shards as you unroll it.
To Create the Cake Layers (and Tiers):
- For a short layer cake, use a large serrated knife to cut the cake into three even layers. Place the first layer face-up on a cake cardboard and set the remaining layers aside. For a tall layer cake like mine, use a large serrated knife to cut all three of the the cakes into three even layers. Place the base of each cake on a cake cardboard and set the remaining layers aside.
- For a short layer cake, take the first layer and scoop some salted caramel buttercream into a pastry bag fitted with a 1/2-inch round tip. Pipe a ring of buttercream all along the edge of the cake round to act as a barrier and make assembly neater. Scoop about 2/3 cup salted caramel filling into the center, and spread it in an even layer until it covers the cake and reaches the buttercream ring. Spread a layer of salted caramel buttercream on top of the caramel filling. For a tall layer cake like mine, you will repeat this step three times for each layer cake base.
- For a short layer cake, now take the second cake round and place it on top of the first. Repeat the process of piping a ring of buttercream and spreading the caramel filling on top. This time, top with a layer of chocolate buttercream instead. For a tall layer cake like mine, you will repeat this step three times for each of the three layered cakes.
- For a short layer cake, place the third cake layer on top. For a tall layer cake like mine, place the third cake layer on each of your three layered cakes.
- For a short layer cake, you will not need to tier your cake and you can move on to the crumb coat section. For a tall layer cake like mine, you'll need to tier the cake, we’ll use dowels between the layers to add support. You can use “real” cake dowels, lollipop sticks, or even extra-large straws (like boba tea straws.) Push 4 dowels or straws into the first layered cake in a rough square shape, pushing them all the way down until they hit the cake cardboard on the bottom. Leave a few inches between each dowel to help distribute the weight.
- Using a marker, make a mark on each dowel to show where the top of the cake hits, pull it out of the cake slightly, then cut the dowel with scissor right where your mark is. Push it back down into the cake—it should be flush with the top of the cake, not sticking out. Add a squirt of frosting on top of the cake in between the dowels, then carefully place the second layered cake on top of the base layered cake.
- Repeat the dowel process with the second layered cake. Then add the third and final layered cake on top (no dowels needed in the top layer). Now you should have 3 layered cakes (3 tiers) stacked on top of each other.
Add the Crumb Coat and Decorate:
- For a short or tall layer cake, spread some buttercream along the sides and top of the cake in a very, very thin layer—this is just to hold the crumbs in. Refrigerate the cake until it's firm, at least 1 hour.
- Once firm, go back and add another thick layer of buttercream on the outside of the cake. It doesn’t matter if you use chocolate buttercream, caramel buttercream, or a mixture of both, and it doesn’t matter if it’s perfectly smooth—it will all be covered in the end anyhow.
- Press your chocolate shards into the sides of the cake, letting the top shards extend a little ways past the top. They should be close to each other, but the occasional small space between chocolate curls is fine. Once the chocolate is applied, refrigerate the cake again to firm up the buttercream and chocolate.
- For a short layer cake, melt the remaining 8 oz of chocolate coating in the microwave. For a tall layer cake, melt the remaining 24 oz of chocolate coating in the microwave. Use a pastry brush to brush the melted chocolate onto the sides of the cake. Cover every surface liberally, and don't be afraid to go back and add a second layer if it looks thin in spots. Once the sides are covered, pour a small amount of chocolate on top of the cake and spread it to the edges, so all of the buttercream is covered. Refrigerate the cake to set the chocolate completely.
- Finally, brush some cocoa powder in random spots on the sides of the cake to give it the look of dusty tree bark. Your cake is finished! Store it in the refrigerator, but for the best taste and texture, allow it to come to room temperature before serving.
Recipe Notes
Measuring Tips
Our recipes are developed using weight measurements, and we highly recommend using a kitchen scale for baking whenever possible. However, if you prefer to use cups, volume measurements are provided as well. PLEASE NOTE: the adage “8 oz = 1 cup” is NOT true when speaking about weight, so don’t be concerned if the measurements don’t fit this formula.
Want to learn more about baking measurements and conversion?
Nutrition
This post contains Amazon affiliate links. For more information, see my Affiliate and Advertising Policy.


Hi! I was just wondering if the bark would work with a frosting other than buttercream.
Hi Elizabeth! I was wondering if using 3 shorter 9” pans would require a shorter bake time?
Hey Stephanie, yes it will be a shorter time. My suggestion would be to start checking it 10 minutes earlier and keep an eye on it. Thanks so much!
Hi there, can’t wait to try this for my friend’s baby shower this weekend. What is your advice on making in advance? I was thinking of making the cake and the frosting the day before, wrapping the layers, and leaving it room temp. Then rewhipping the buttercream and assembling the day of the party. What are your thoughts?
Hey Tory, making the stuff in advance sounds great I would recommend putting the cakes in the freezer and then letting them partially defrost before assemble. Good luck that’s so fun! Let me know how it goes, Thank you!
Made a cake inspired by this one for my husband’s birthday. He loves woodworking and collecting logs and making things out of them. Unfortunately his birthday wad on passover (Jewish holiday) so I made a mouse cake and whipped cream filling and the outside was from the recipe. Came out amazing, and he loved it!! Thank you!
*Mousse cake. Sorry, autocorrect.
Hey Adina, That looks so good! I am so glad to hear you enjoyed it so much! Thank you so for your response, I love the picture!
Lone love love! It turned out amazing! Next time I may play with it a bit to make it a bit less rich.
Hey Joy, your cake looks AMAZING! Thank you so much for sharing, I am so happy to hear you loved it!! Totally play around with it and see what works best for you! Thanks again!
I made this cake for my grandson’s first birthday party. It was a big hit! I was so nervous about the cake actually looking like a log, but i followed her instructions and the pictures were so helpful. It came out great! Everyone was asking how i did it. I tried to post a picture but i guess my jpg is too large. Thanks for helping me pull off a fantastic cake!
Hey Linda, I am so glad to hear you loved it so much, I love hearing that it was enjoyed by so many!!
Hi there! I’m making this cake for my son’s first birthday party on Saturday. I’ve already made the cake layers and they turned out beautifully. I just made the buttercream – I was super nervous because this was my first attempt at Swiss merengue buttercream rather than American buttercream! But it set up perfectly. My question is purely out of curiosity: why does this recipe not include vanilla, but the recipe on your Swiss merengue buttercream page does? (I read everything you’ve ever written about frosting before I started because I was so nervous!) thank you!
Hey Lauren, I am thrilled to hear the cake layers turned out as well as the buttercream! That is so exciting you gave Swiss Meringue a shot, I am glad to hear it set up perfectly for you! Honestly, I don’t tend to put vanilla in if I’m adding other flavors that will over power the vanilla. It is a little more expensive so I won’t plan to use it if the taste won’t be very present anyway. It is totally personal preference though. If you want to add vanilla you totally can! I hope that makes sense. I am so excited you are making this recipe. I would love to hear how it goes once you are done! Happy Birthday to your son!
Amazing cake! We had our own wild rumpus birthday party for our twins and the cake turned out fantastic. Presentation was spectacular and the buttercream is absolutely phenomenal! I’m making it again in a different design for our older son’s birthday tomorrow.
Hi Briana, That sounds amazing! I am so thrilled to hear it worked so well, and that you loved it so much you’re planning to make it again!!! I love that, thank you so much for you response!
Is the salted caramel you put in the buttercream the same as your salted caramel filling you make or salted caramel sauce you buy in the store for ice cream?
Hi Roxanne, the homemade caramel sauce for the filling should work, you would just need to double the recipe to make enough. You can definitely use store bought caramel sauce. I recommend using a thicker caramel sauce, like the kind found in a jar, as opposed to the kind in a bottle for drizzling over ice cream (those tend to be more runny). Hope this helps!
Thank you for this! I really hope it comes out. I am wondering how many pieces of parchment it took for that big cake?
Hi Rachel! I would say a few sheets of parchment, two for the chocolate (and a few more for the parchment rounds inside the cake). I hope this helps!