


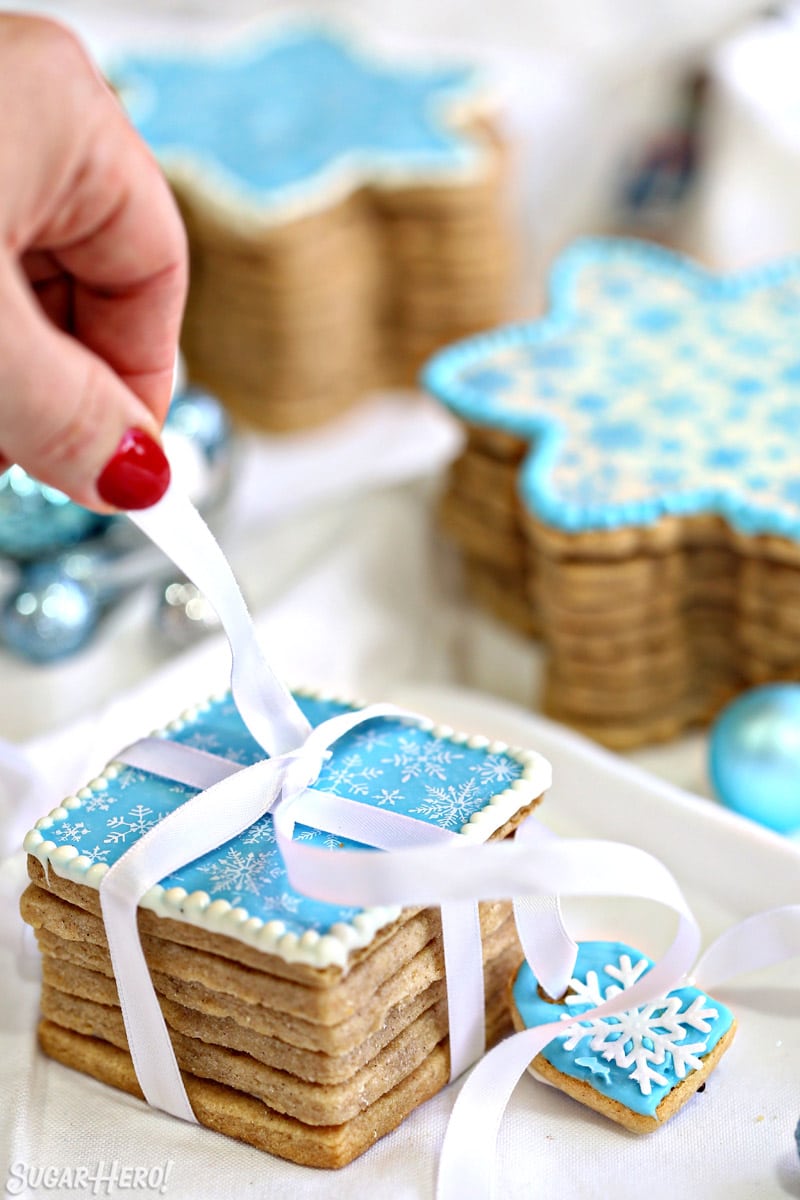
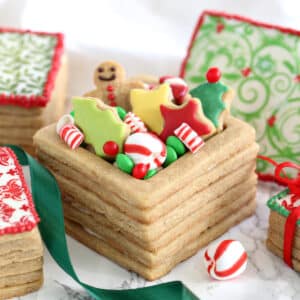
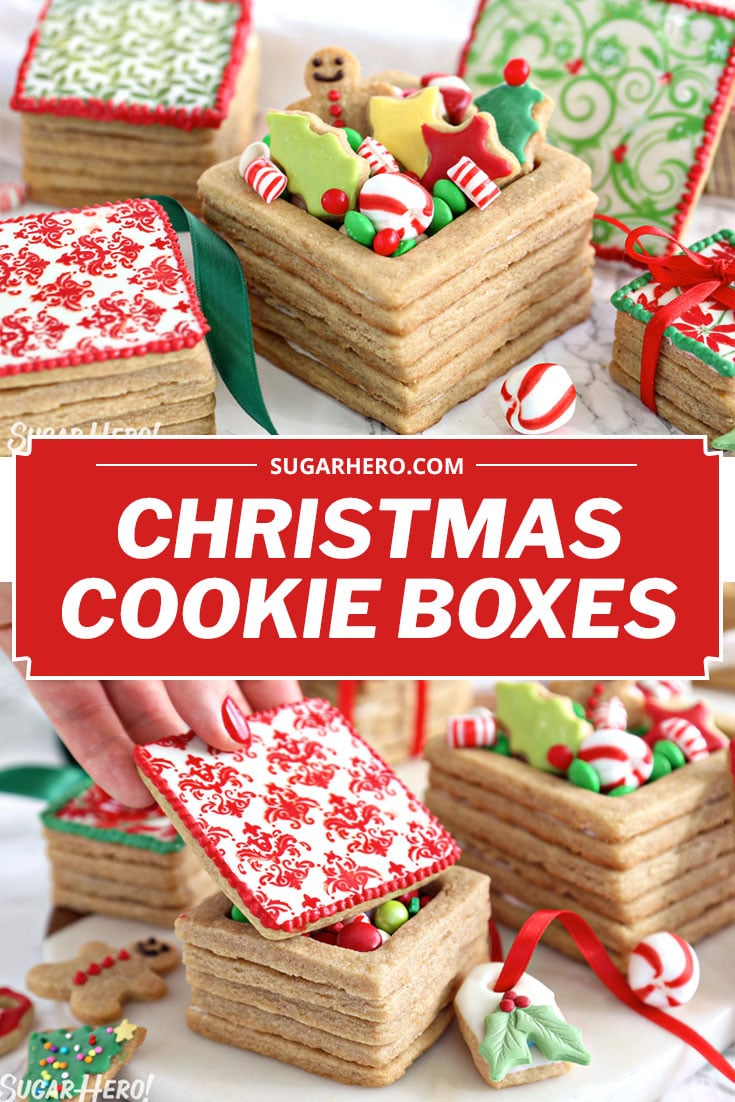
Edible Christmas Cookie Boxes are a sweet baking project and gift idea in one! Homemade sugar cookies are assembled into miniature gift boxes, then decorated to look like Christmas presents. Fill them with your favorite treats, like candies and cookies, for a completely edible (and delicious!) holiday treat!
🎁 The Cutest Sugar Cookie Gift Boxes!
What are the two best parts of the holiday season? Baking and gift-giving, of course! (Some people might say that eating and gift-getting are the best parts, but around here we’re trying to get on Santa’s Nice List, so let’s keep things selfless, okay?)
What if I told you that we could combine both baking and gifting in one fun—and delicious—recipe? Sold!
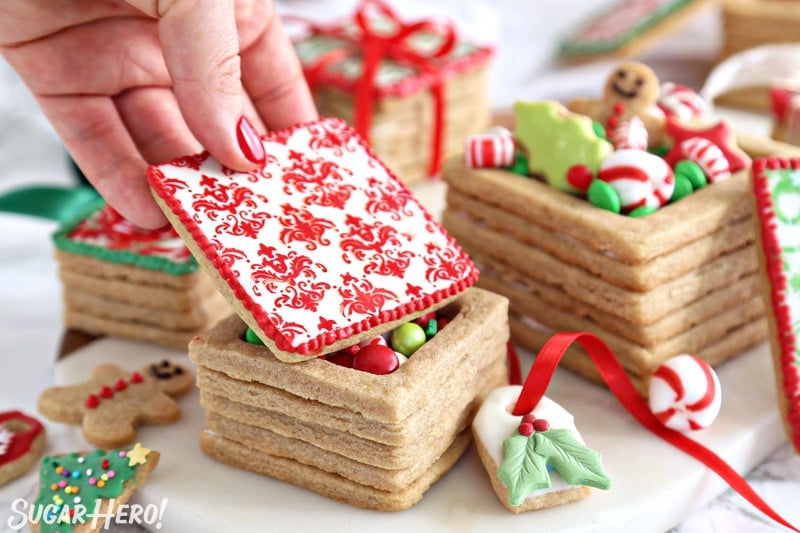
Table of Contents
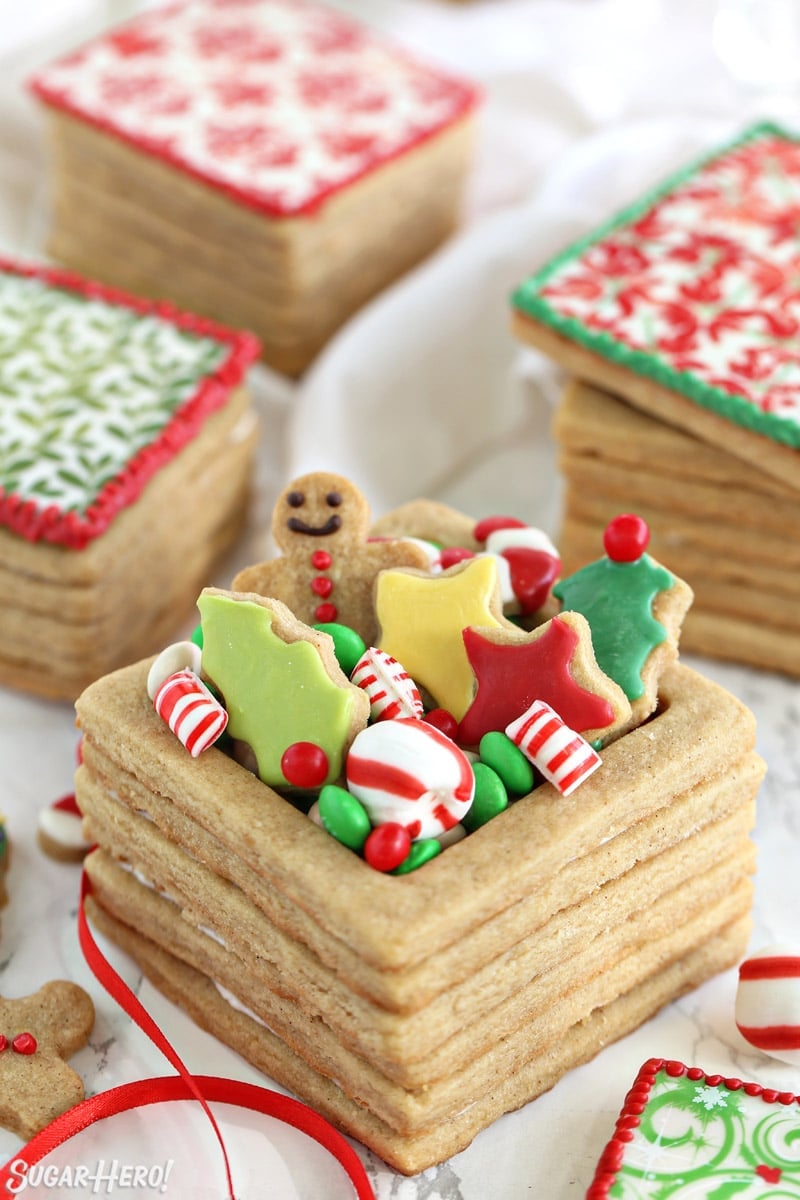
These Christmas Present Cookie Boxes just might be cutest cookie recipe you’ll ever see. First of all, EVERYTHING is cuter in miniature form, and not only are these tiny versions of gift boxes, but they’re filled with even smaller cookies, so it’s like mini cookie inception, and it’s adorable.
Secondly, I just love the thought of gifting someone a fun box filled with candy, and then having them chow down on the box itself after they eat the goodies inside. Tasty AND eco-friendly! We’re basically saving the world over here, one dessert at a time.
If you’re looking for even more Christmas cookie recipes perfect for gifting, you’ll love these Big Soft Sugar Cookies, Oreo Cookie Christmas Ornaments, Chocolate Truffle Peppermint Crunch Cookies.
🧾 Ingredients
The good news: you probably already have most, if not all, of the ingredients you’ll need to make these cookie boxes! I made a few changes to the standard sugar cookie recipe to give these a little holiday flair, so here are a few tips to keep in mind as you make this recipe. (Links are affiliate links and I earn a small commission from qualifying purchases.)
- Brown sugar: In this recipe, I swapped the standard white sugar for brown sugar. Using brown sugar gives these cookies a softer texture and a subtle caramelized sugar flavor that immediately brings to mind cozy winter nights. If you’d rather make a standard sugar cookie recipe, I recommend checking out these Valentine’s Day Sugar Cookies or my Big Soft Sugar Cookies (with Frosting!).
- Orange Zest: I love the little zing of citrus in this recipe, but you can omit it if you don’t have an orange handy. If you are adding it, make sure you use a microplane to make the zest, so it’s in tiny pieces.
- Cinnamon: I wanted to have a light spice cookie taste, so added a bit of ground cinnamon. If you want even more of a gingerbread taste, feel free to add ground ginger and any other spices you’d like—I think cardamom would also be a delicious addition!
🥄 Equipment
You’ll need a few common baking tools for these cookie boxes, as well as a few specialty decorating products if you want them to look like the pictures.
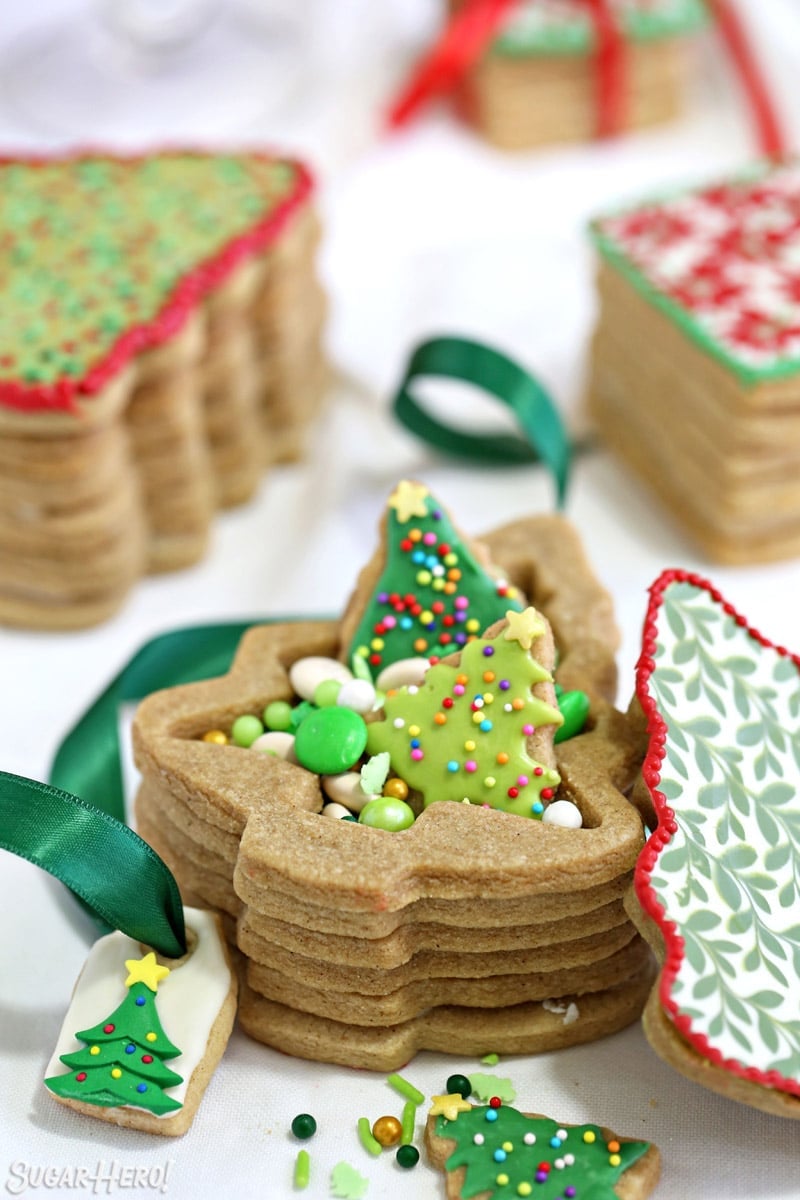
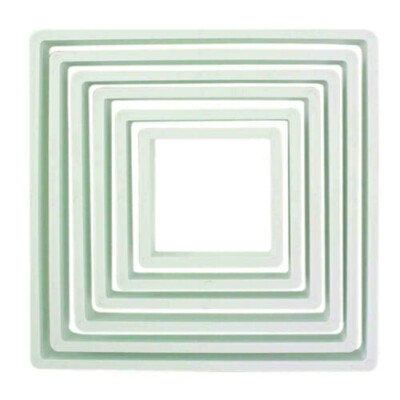
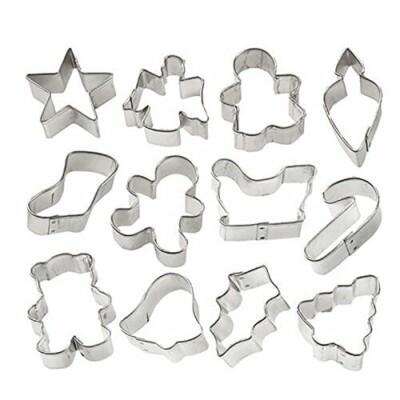
- Cookie cutters: You can freehand the square shapes, but a set of nested square cookie cutters will make your life MUCH easier! You can also pick up these mini Christmas cookie cutters to make adorable mini cookies to fill the boxes. You can make other non-square shapes, like trees, snowflakes, or stars, as long as you have 2 nestled cookie cutters in those shapes.
- Baking Sheet: I love this half sheet pan from USA Pan–it’s heavy-duty, sturdy, and fits a ton!
- Parchment paper or Silpat: A half-sheet Silpat is the perfect nonstick cookie solution
- Piping bags: I like these disposable piping bags for the price and convenience. Pro tip: I wash them and re-use them to reduce waste!
- Chocolate transfer sheets: You’ll need a large enough sheet to cover three 3×3″ squares, but I recommend having a little extra on hand in case of mistakes or re-dos. Here are a few beautiful transfer sheet patterns you might like: one, two, three, four.
- Candy Coating: Pick up candy coating in traditional Christmas colors: white, red, and green.
📋 Instructions
Now I won’t tell you that these come together in under 10 minutes, because that’s a lie and I’ve still got my eyes on the Nice List prize. There is a lot of dough rolling and cookie cutting involved, after all.
But I can promise that if you’ve ever made any sort of sugar cookie, you’ve got this one in the bag. And if you haven’t, no time like the present to start! Here’s how easy it is, step by step.
To Bake & Assemble the Sugar Cookies:
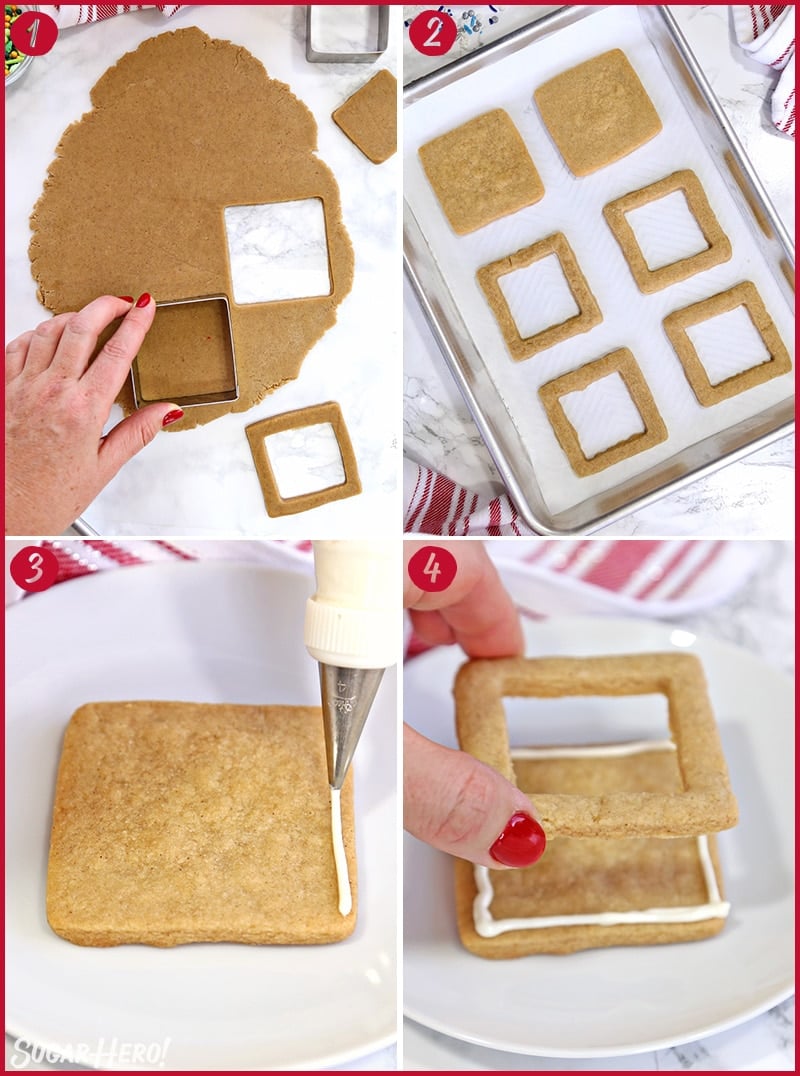
To start, make sure you have 2 cookie cutters that nestle together with about ½” space between the edges. You can make squares, trees, stars, or anything else you’d like. This recipe is written to make three complete 3″ boxes, so if your cutters are approx 3″ wide, you should get a similar yield.
You’ll cut out 7 cookies for each cookie box—two solid cookies, for the top and bottom, and then 5 “frames,” that are basically just an outline of the shape, with the middle removed. I found that larger boxes looked good with 5 middle layers, while smaller ones looked more proportional with 4 layers. But you can experiment and see what works best for you!
- Roll out the dough between two sheets of waxed paper until it is ¼-inch thick. Refrigerate for at least an hour, until firm, then cut out the tops, bottoms, and middle frames for the cookie boxes.
- Bake the cookies at 350 F: 10-12 minutes for the solid pieces, and 8-10 minutes for the frames.
- Melt the white candy coating, and place it in a piping bag with a small round tip. Pipe a thin line of coating around the border of one of the base cookies, and gently press a frame cookie on top.
- Repeat the layering process until you’ve added 5 frames to the base. When all the frames are added, fill the boxes with whatever goodies you’d like!
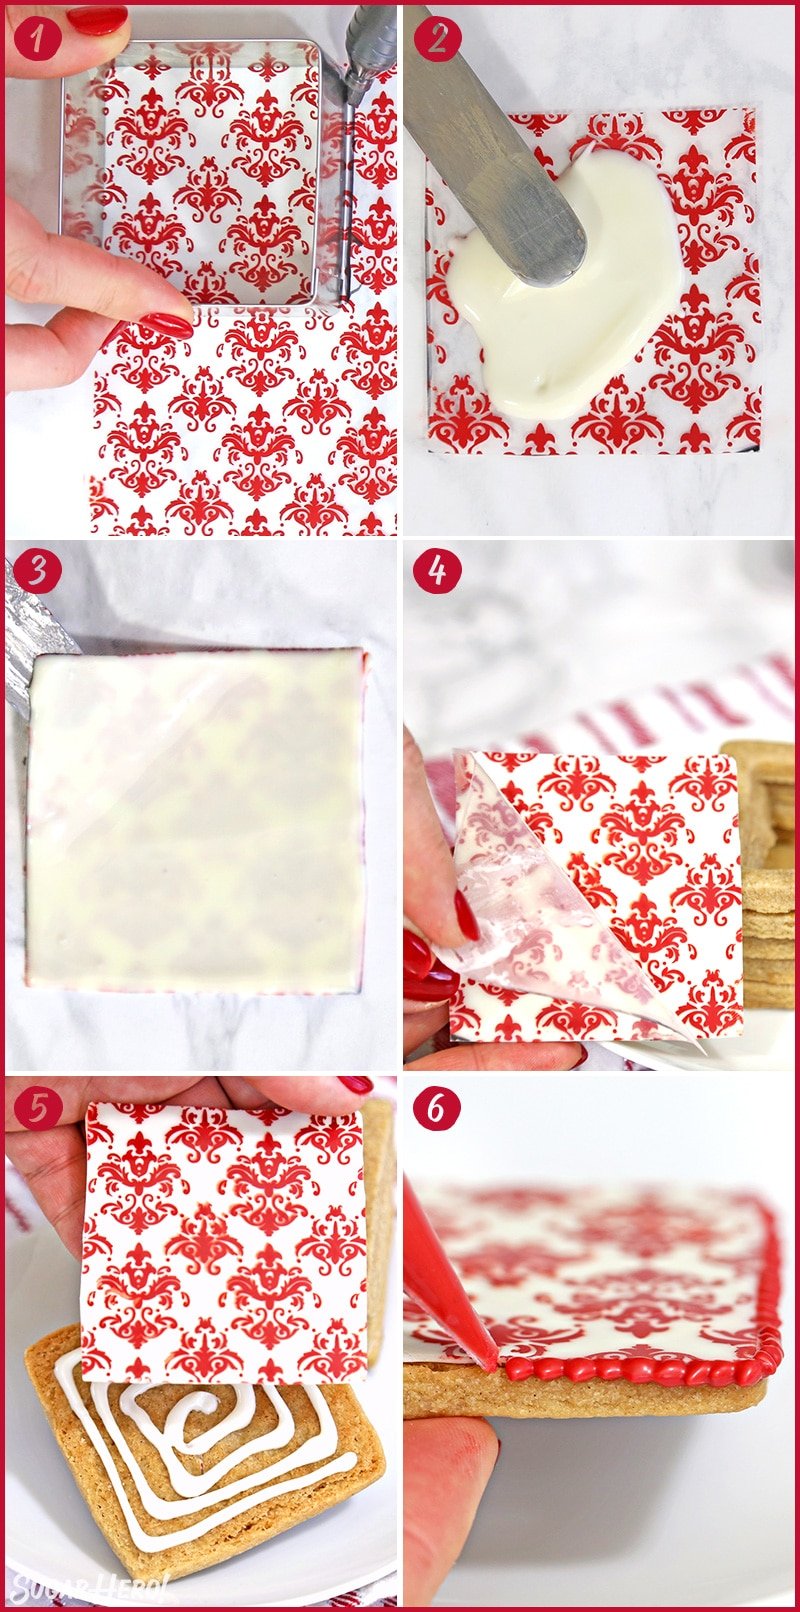
To Decorate the Cookie Boxes:
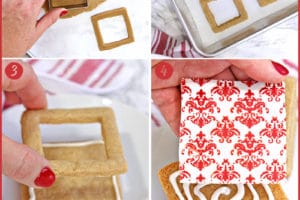
- Trace your large cookie cutter on the top (plastic-covered) side of the transfer sheets, then cut out the shapes. Try not to touch the back side too much, or you might smear the design.
- Place the transfer sheets on your work surface with the plastic side down and cocoa butter side up, and spread a thin layer of warm melted candy coating onto the top all the way out to the edge and a bit beyond.
- When the sheet is completely covered, work a spatula under the sheet and transfer it to a different area of parchment so the edges are clean. Repeat with the remaining sheets, and let dry completely.
- Carefully peel back the plastic from the tops of the sheets
- Spread some melted coating on the bottom (flat side) of one of the top cookies, and gently press the chocolate on top.
- Pipe a line of dots around the edge to finish the look of the cookies.
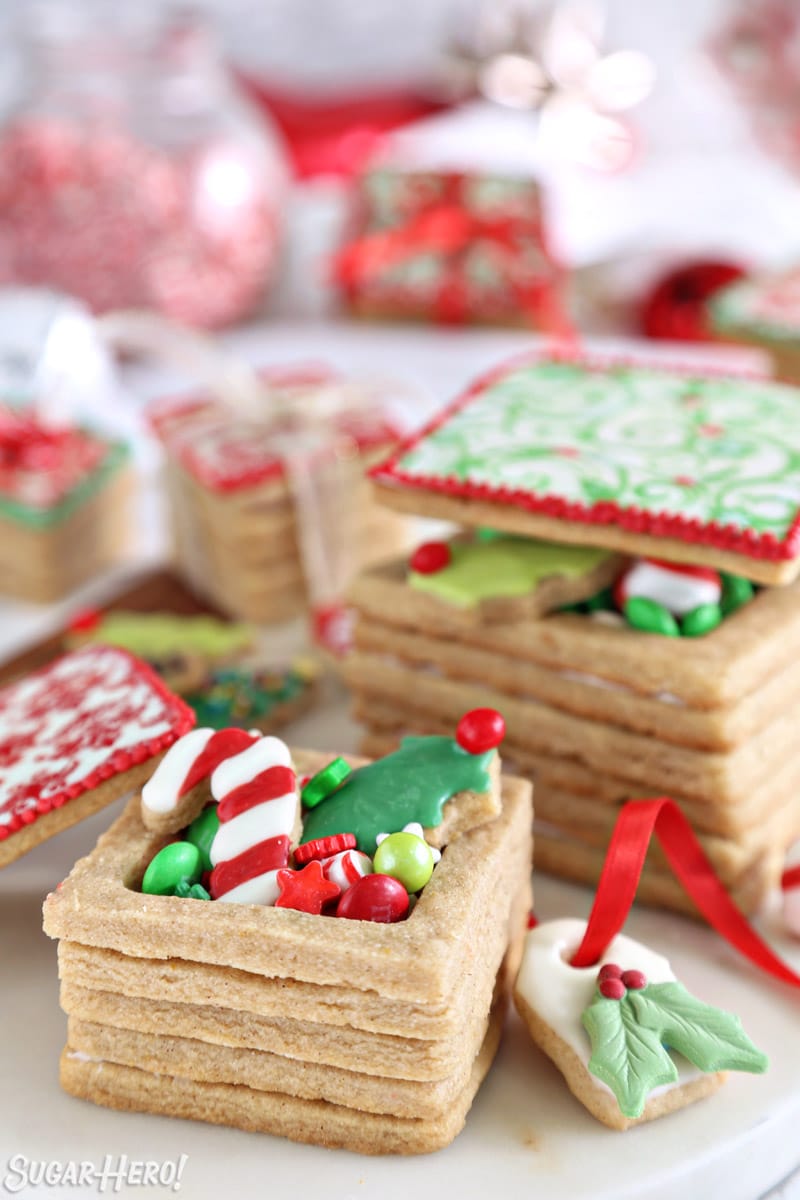
🍬 Filling The Edible Cookie Boxes
And now for the most important question: what to put in the cookie boxes??
I couldn’t resist making tiny cookies for my gifts—gingerbread men, holly leaves, stars, and Christmas trees, all decorated with melted candy coating. Since I was already rolling and cutting dough for the boxes, why not have a little fun with it?
I also added some holiday candies, like peppermints and cinnamon imperials. I think mini cupcakes would also be adorable in here! Just make sure you’ve sized your boxes to accommodate whatever treat will be going inside.
💡 Tips and FAQs
Chocolate transfer sheets are clear plastic sheets with cocoa butter designs stamped onto one side of them. When you put melted chocolate or candy coating onto the sheets, the cocoa butter transfers onto the chocolate, and once it’s hardened, you peel off the plastic and have very fancy chocolate! They are an easy way to make your desserts look super fun with minimal effort.
Transfer sheets can be found at cake supply stores, or purchased online, and typically cost $3-6/sheet. (Here are a few examples of Christmas transfer sheets: one, two, three, four.)
You absolutely do not need to use transfer sheets–they’re just a fun decorating option. You can decorate the boxes with candy coating, sprinkles, candies, or anything else you’d like!
Yes, definitely! I like the taste and texture of candy coating a little better, so I used it for this recipe, but royal icing will produce the same results and can be used to assemble and decorate the boxes. If you want to use royal icing, check out these Gingerbread Cookie Mug Toppers for an easy royal icing recipe!
Note that you can’t use transfer sheets with royal icing–they are designed to be used with melted chocolate.
To gift these, I recommend leaving the top unattached, and securing it with a ribbon around the box. It’s cute and festive, and also makes it easy for people to open the box and get to the goodies inside! But if you’ll be mailing them or are otherwise worried about stability, you can always attach the tops with a bit of melted chocolate.
The dough can be made in advance, formed into discs, and wrapped tightly in plastic wrap. Store it for up to a week in the refrigerator, or up to three months in the freezer.
To use the dough later, let it defrost in the refrigerator overnight, then let it sit on the counter for 20-30 minutes before rolling it out so it is more workable.
Baked cookies can be frozen in freezer-safe bags on a flat surface for up to a month. For optimal results, I don’t recommend freezing the assembled boxes or making them more than a week in advance.
❤️ More Christmas Desserts You’ll Love
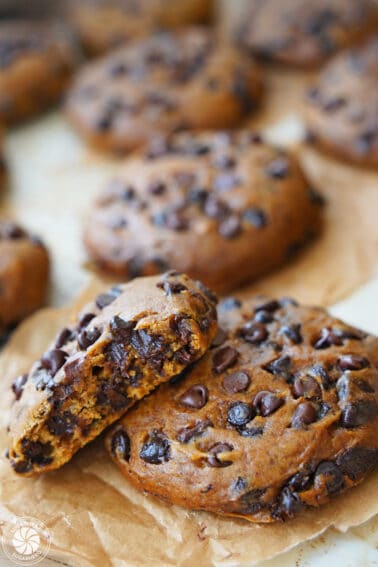
- Gingerbread Chocolate Chip Cookies
- Peppermint Affogato
- Oreo Cookie Christmas Ornaments
- Christmas Pinwheel Cookies
- Pull-Apart Cupcake Wreath
- Red Velvet Trifle
- Gingerbread Cookie Mug Toppers
- Grinch Cake
- Snow Globe Cupcakes

Candy Cane Cookies

Chocolate Peppermint Kiss Cookies
Leave a Review!
If you make this recipe, let us know! Leave a ⭐️⭐️⭐️⭐️⭐️ rating on the recipe below, and leave a comment, take a photo and tag me on Instagram @elabau, or use #sugarhero on IG!
Edible Christmas Cookie Boxes Recipe
Ingredients
For the Brown Sugar Cookie Dough:
- 8 oz unsalted butter, at room temperature
- 11.25 oz brown sugar, (1 ½ cups), packed
- 1 TBSP orange zest, (from 1 large orange)
- 1 tsp vanilla extract
- 1 TBSP heavy cream, or milk
- 1 large egg, at room temperature
- 16 oz all-purpose flour, (3 ¾ cups)
- ½ tsp salt
- 2 tsp ground cinnamon
To Assemble:
- 8 oz white candy coating melts
- Chocolate transfer sheets, optional
- Candies and ribbon, to fill and decorate
Instructions
To Make the Brown Sugar Cookies:
- Combine the butter and brown sugar in the bowl of a large stand mixer fitted with a paddle attachment. Cream them together for about 30-60 seconds, until well-mixed. Do not overbeat until light in color, or you’ll incorporate too much air and the cookies will spread.
- Add the orange zest, vanilla extract, cream, and egg, and mix them in on low speed until well-incorporated. Finally, add the flour, salt, and cinnamon. Mix on low speed until everything is combined and no dry patches remain. Finish stirring by hand, scraping down the bottom and sides with a rubber spatula to make sure the dough is well-mixed.
- Roll out the dough between two sheets of waxed paper until it is ¼-inch thick. Refrigerate for at least an hour, until firm. If you’re making this several days in advance, don’t roll out the dough—instead, form it into a disc and wrap it in plastic wrap, then roll it out when you’re ready to bake.
- Preheat the oven to 350 F, and line cookie sheets with parchment paper. Cut out the tops and bases of the cookies first with a 3-inch square cutter —you’ll need 2 per cookie box, so 6 total. Place all the solid squares on one cookie sheet together, and bake at 350 F for 10-12 minutes. The cookies won’t take on much color on top, but you’ll start to see them color around the edges, and they will look dry and slightly puffed in the center. Cool completely.
- To make the frames, use the same 3-inch square cutter, but this time, use a second, smaller square cutter to cut out the inside of the cookies. Aim for a margin about 1/3-1/2” around the cookie. Too thin and they might break, too thick and you’ll have no room for goodies inside the boxes! You’ll need to re-roll the dough several times during this process, and if you find it gets too soft, refrigerate it briefly until you can work with it again. Try to avoid adding flour while rolling and instead roll between waxed paper—too much flour will make the cookies tough.
- You’ll want 4-5 frames per cookie, so 12-15 frames total. Bake them at 350 F for 8-10 minutes, then cool.
To Assemble the Cookie Boxes:
- Melt the white candy coating, and place it in a piping bag with a small round tip. Pipe a thin line of coating around the border of one of the base cookies, and gently press a frame cookie on top. Repeat until you’ve added 4 frames to the base. Fill the boxes with whatever goodies you’d like!
- To decorate the tops, trace the cookie cutter shape onto the plastic side of your transfer sheet, and cut out the transfer sheet squares.
- Re-warm the candy coating, if necessary. Place the transfer sheet squares cocoa butter side up on a piece of parchment or waxed paper. (The cocoa butter side will feel slightly rough to the touch, not smooth. Try not to touch it too much so you don’t smear the pattern.) Spread a thin layer of melted coating on top of one of the transfer sheets. Spread it out to the edges and a bit beyond. When the sheet is completely covered, work a spatula under the sheet and transfer it to a different area of parchment so the edges are clean. Repeat with the remaining sheets, and let dry completely.
- Once dry, carefully peel back the plastic from the tops of the sheets. Spread some melted coating on bottom (flat side) of one of the top cookies, and gently press the chocolate on top. Repeat until all of the top cookies are decorated. If you’d like, you can pipe a line of dots around the edge to finish the look of the cookies.
- Put the tops on the cookie boxes, tie a ribbon around the box to secure, and they’re ready to go!
Recipe Notes
Measuring Tips
Our recipes are developed using weight measurements, and we highly recommend using a kitchen scale for baking whenever possible. However, if you prefer to use cups, volume measurements are provided as well. PLEASE NOTE: the adage “8 oz = 1 cup” is NOT true when speaking about weight, so don’t be concerned if the measurements don’t fit this formula.
Want to learn more about baking measurements and conversion?
Nutrition


Wow this sounds so amazing .. i never thought that we could make a cookie box
This is a perfect gift to to give to our loved ones for Christmas.
Thanks for such a lovely innovative idea
Thank you so much, I’m so happy you like them! Merry Christmas!
These are so cute!! Perfect to bring to a holiday party… And I love the idea of mini cookie inception 🙂
Thank you SO much and I’m so glad you like them!
Oh how cute!! I love how you decorated the lids with the chocolate transfer sheets. Such a beautiful touch. My kids would love assembling these.
So glad you like it! It’s always fun to include your kids in the kitchen!
Love this idea! Can’t wait to try making them 🙂
Thank you!
These are so cute! What a fun treat to make for the holidays.
Thank you so much I’m glad you like them!
Such a creative idea!! I am totally I live with this cookie ..can’t wait to
try it with my boys,❤️
Thank you so much, I’m so glad you like it!
Good recipe, just to the point, happy holidays!
Thanks so much, Jane!
I love this cookie box I’m going to try it… love all your recipes.. I miss this video on facebook …
Hey Irma, Thank you so much! I appreciate that, if you try them let me know how it goes!
Thanks, a lot for the great recipe. We loved it!
Hi Lily! So glad to hear that you enjoyed the recipe!
Thanks for the great idea about cookie packaging boxes.
My pleasure, Lily! Glad it was helpful.