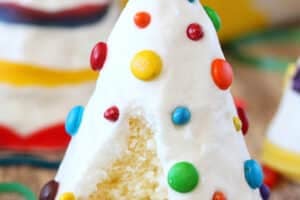
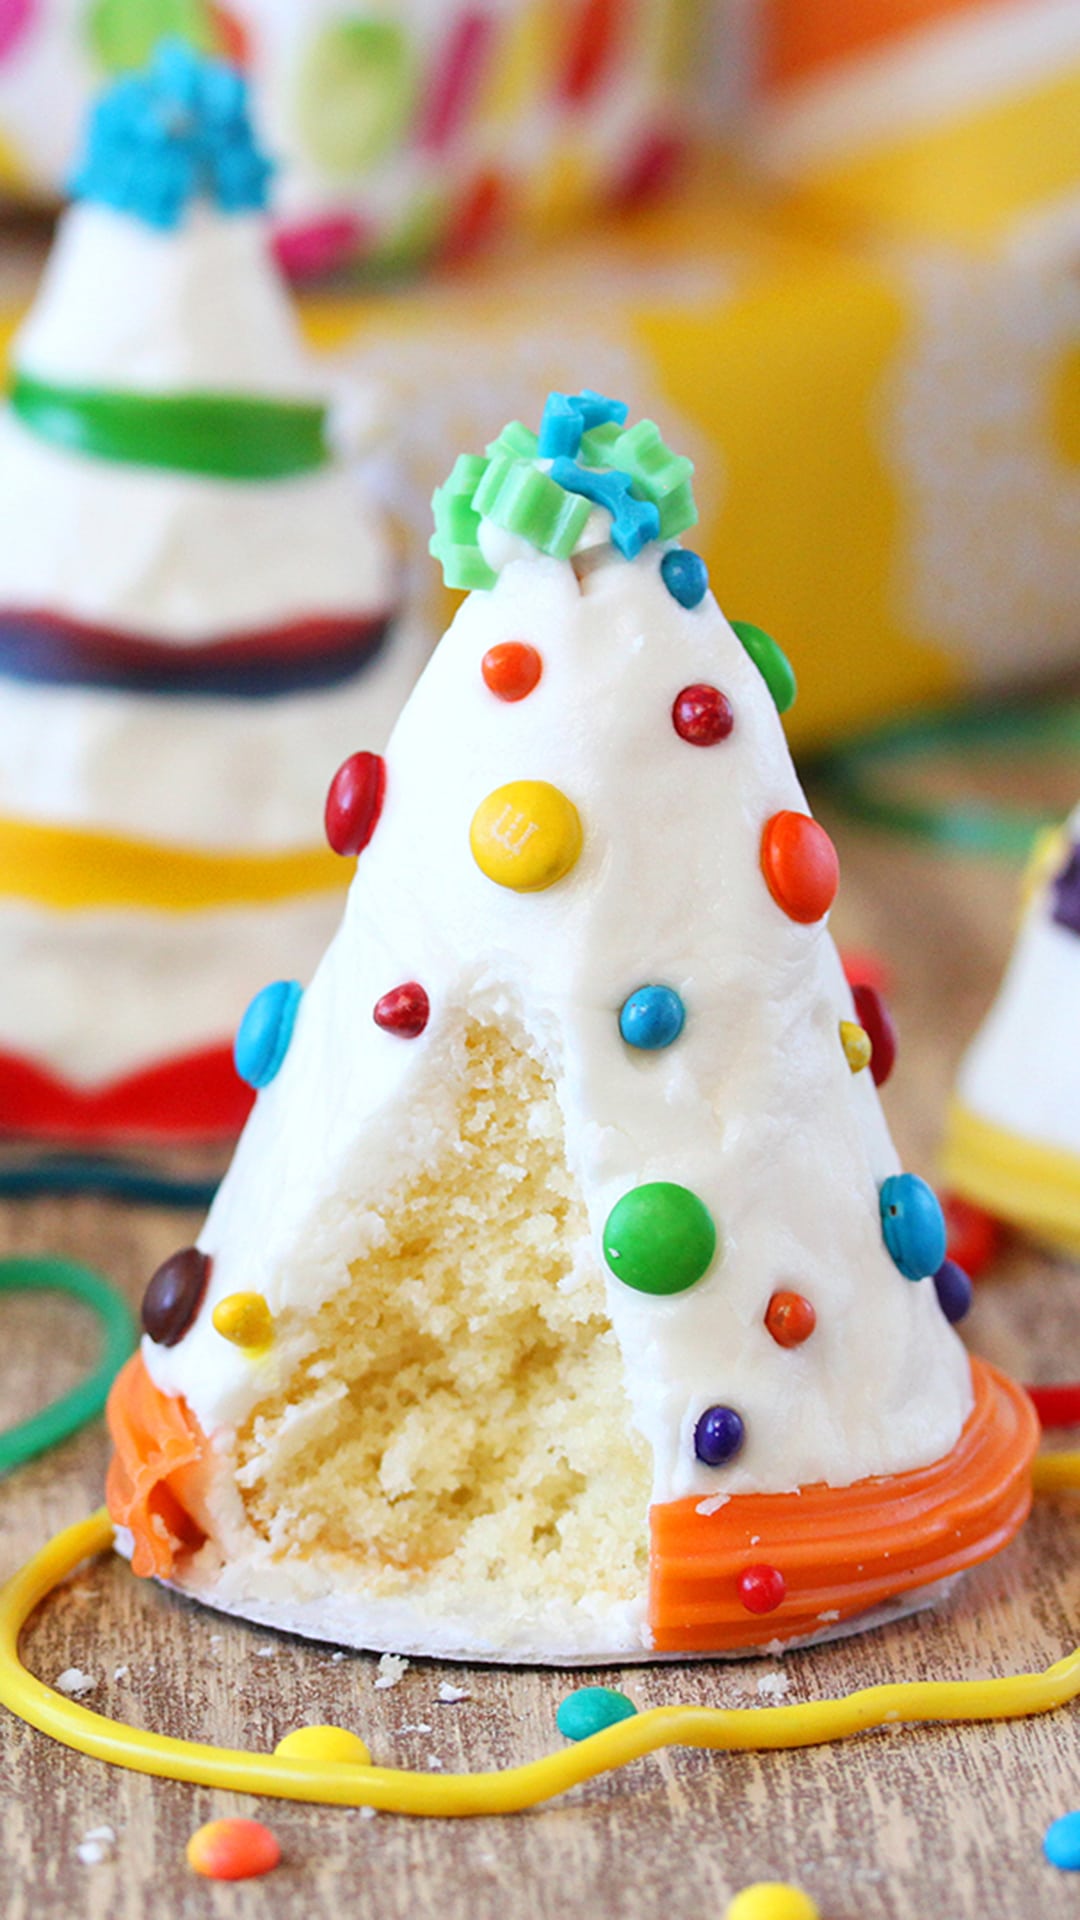
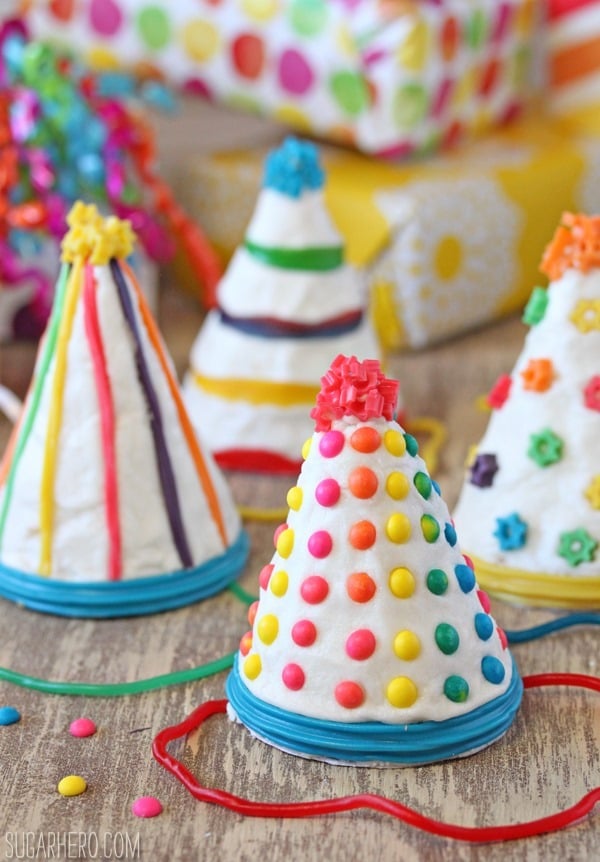
These colorful cone-shaped Birthday Party Cake Hats are perfect for celebrating any birthday or special occasion. Decorate them with your favorite candies, and don’t forget to add a licorice string as a finishing touch!
🎉Mini Birthday Cakes
I’ve had the idea for these colorful hat-shaped cakes bouncing around my head for months! I knew I wanted something bright and colorful that would put a little wow-factor into birthday festivities!
These cakes can be made from a boxed mix (any flavor you like!) and good ole American buttercream. You do need to use a buttercream that crusts in order to get the best results, but aside from that little constraint, you can make these with whatever flavors of cake or frosting you’d like!
The secret to getting the cone-shaped cake is to bake the cakes in…cones. Revolutionary, I know. Seriously, it’s just that simple! I bought a large box of snow cone cups, thinking that it might take days of experimenting before I was finally able to bake successful cone cakes, and it pretty much worked out on the first try. There is a little trick to getting the cones to stand up straight, but it’s all explained in the recipe. Otherwise, it’s just like baking cupcakes in paper cupcake liners—just scoop and bake!
The most fun part of the project was definitely decorating the cones with the colorful candies. Picture me skipping down the candy aisle, tossing rainbow candies in my cart willy-nilly! Idealic, I know! Check the ingredients below for some tips on my favorite candies to use.
So are you ready to make amazing Birthday Hat Cakes of your own? Let’s get started!

Table of Contents
🧾 What You’ll Need
Ingredients
Before heading to the store, check out these ingredient tips so that you can make the BEST Party Hat Cakes. Full ingredient amounts can be found in the recipe card below. (Links are affiliate links and I earn a small commission from qualifying purchases.)
For the Cake
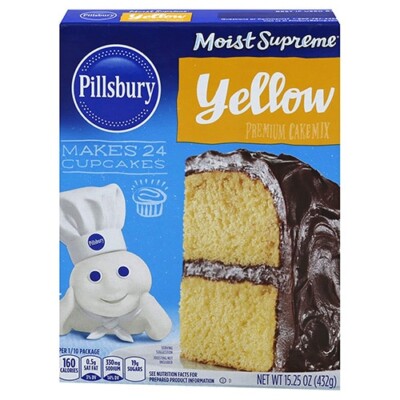
- Box cake mix: I used a yellow cake mix for my party hats, but you can you any cake flavor you’d like. Make sure to check the back of the box for any ingredients you’ll need to mix up the batter.
For the Butter Frosting and Decorations
- Butter: You can use salted or unsalted butter for this recipe.
- Powdered sugar: The cornstarch in the powdered sugar will help to thicken the frosting so that it holds up well on the outside of the party hats. It will actually form a little crust. Don’t skimp on the powdered sugar or your decorations might slide right off.
- Milk: You can use any percentage of milk you have on hand. I’d recommend using a higher percentage for the best flavor.
- Vanilla extract: I kept the flavor of my frosting simple and used a clear vanilla extract. However, you can use any flavoring you’d like to pair with the cake flavor you choose. If you change the flavoring, start with a half teaspoon and check the flavor. Add more as needed until you reach the desired amount.
- Gel food coloring: If you plan to color your frosting, I recommend using Americolor brand gel food coloring. It’s highly concentrated, so you’ll only need to use a little to get vibrant shades.
- Candy decorations: Choose your favorite candies to make fun designs, a ‘pom pom’ and even a chin strap at the bottom of the cake. If you’d like to decorate like I did, here are my top candy recommendations. First of all, I used Rainbow Twizzlers to create the colored bands around the bottom of the cones and also the pom-poms on top (just snip them with kitchen shears and they have an adorable shape!). M&Ms, Skittles, and Fruit Roll-Ups also worked well, but my favorite addition would have to be Candy Buttons. They don’t taste like anything, other than pure sugar, but their petite size and ultra-bright colors really made these hats pop! The “strings” for the hats are made from Rainbow Licorice Laces or red shoestring licorice.

Equipment
These cute Birthday Party Hats are such a fun baking project! You’ll need a few specialty items to make them successfully, so check the list below to make sure you’re ready to get started. (Links are affiliate links and I earn a small commission from qualifying purchases.)
- Snow cone cups: You’ll need 28 heavy-duty 6-ounce snow cone cups to make 14 hat cakes. The snow cones will be doubled up during baking.
- Muffin pan: If possible, I recommend using two standard muffin/cupcake pans so that all 14 cones can be baked at the same time. If you only have one pan, take into account that you’ll need to bake the cones in two batches.
- Dried beans:The beans will be used to help support the cones during baking. If you don’t have beans you could also use uncooked rice. Or you can rip off sheets of foil, wind them into a coil and insert them into the muffin pan cups. See the step-by-step directions below.
- Heavy duty foil: You’ll need heavy duty foil for this project so that it’s stong enough to support the cones while baking. If you don’t have heavy duty foil, you could also use multiple layers of regular strength foil.
- Cake cardboard or mat board: Pro tip here! Trace the snow cone onto a cakeboard or mat board and then use it to cut out 14 mini cake boards. It will make it so much easier to move your cakes when it’s time to decorate!
- Piping bag and couplers: I like these disposable piping bags (I wash them and re-use them to reduce waste!), and don’t forget the couplers!
- Piping tip: To pipe the Butter Frosting, I used a medium round piping tip.
- Paper towels: The frosting will need to be smoothed out after it’s had a chance to firm up a little. I like to use plain paper towels to do the smoothing. Avoid paper towels with printed designs that might transfer to your frosting.

❤️ More Birthday Treats


Leave a Review!
If you make this recipe, let us know! Leave a ⭐️⭐️⭐️⭐️⭐️ rating on the recipe below, and leave a comment, take a photo and tag me on Instagram @elabau, or use #sugarhero on IG!

Birthday Party Cake Hats
Ingredients
- 1 box yellow cake mix, plus ingredients to prepare mix
- 1/3 cup butter, or margarine
- 4 1/2 cups powdered sugar
- 1/4 cup milk, plus additional milk to adjust consistency, if needed
- 1 1/2 tsp vanilla extract, or clear vanilla extract
- Assorted gel food coloring, optional
- Small candies
- Shoestring licorice
Instructions
Make and Bake the Cones
- Prepare your cake batter by following the directions on the back of the box.
- Preheat the oven to 350°F. While the oven heats, trace the top of a snow cone cup onto a cake cardboard or mat board. Use the tracing to cut out 14 small circles to go under each of the cakes. This will make decorating and transferring them much easier. Set the small circles to the side for later use.
- Stack snow cone cups to make 14 double-layer cups. Then fill fourteen 2-1/2-inch muffin cups with dried beans.
- Cover muffin pan(s) with heavy-duty foil. (You may need to bake half of the cakes at a time if you only have one muffin pan.) Press down the foil so you can see the impressions of the round muffin cups.
- Using the tip of a sharp knife, make a small slit in the foil over the center of each muffin cup. Place the double-layered snow cone cups, point sides down, in each of the slits. See Note for alternate foil method.
- Fill snow cone cups about half full with cake batter. Carefully transfer muffin pans to the oven. Bake cakes about 25 minutes or until the tops of the cakes are golden and a toothpick inserted into the centers comes out clean.
- Carefully remove muffin pans from the oven. Let the cakes stand for 10 minutes before transferring them to a wire rack to cool completely. The cones can be flipped over to their widest part while cooling on the rack.
- Once the cakes are completely cool, carefully cut or peel off the snow cone cups from the outsides of the cakes. Place each cake on a small cardboard round.
Make the Butter Frosting and Finish the Cakes
- In a mixing bowl beat the butter for the frosting until fluffy. Gradually add 2 cups of the powdered sugar, beating well. Slowly beat in the 1/4 cup milk and vanilla extract.
- Slowly beat in remaining powdered sugar. Beat in additional milk, if needed, to reach spreading consistency. If desired, tint with gel food coloring.
- Fit a decorating bag with a coupler and a medium round decorating tip, then fill the bag with frosting. Pipe frosting onto one of the cakes using an up-and-down motion (don't worry about covering every space). Use an offset spatula or a knife to spread the frosting all over the cake.
- Let the cake stand about 5 minutes or until the frosting starts to form a crust. Gently press a paper towel around the cake with your hands, rubbing it up and down and smoothing out the frosting. If the frosting sticks to the paper towel, wait a few more minutes until the frosting has a firmer crust.
- Press assorted small candies and licorice strings into the frosting to decorate the party hat. Attach licorice strings to the bottom of the cake to represent the elastic strap. Repeat with the remaining cakes, frosting, candies, and licorice.
Recipe Notes
Measuring Tips
Our recipes are developed using weight measurements, and we highly recommend using a kitchen scale for baking whenever possible. However, if you prefer to use cups, volume measurements are provided as well. PLEASE NOTE: the adage “8 oz = 1 cup” is NOT true when speaking about weight, so don’t be concerned if the measurements don’t fit this formula.
Want to learn more about baking measurements and conversion?
Nutrition
📸 Photo Tutorial: How to Make Birthday Party Hat Cakes
Check out these step-by-step photos to guide you through the process of making Party Hat Cakes! Full instructions are included in the recipe card down above.
Prepare the Pans and Cones
- Make the cake batter. Prepare your cake batter by following the directions on the back of the box.
- Prepare to bake. Preheat the oven to 350°F. While the oven heats, trace the top of a snow cone cup onto a cake cardboard or mat board. Use the tracing to cut out 14 small circles to go under each of the cakes. This will make decorating and transferring them much easier. Set the small circles to the side for later use.
- Prep the cones. Stack snow cone cups to make 14 double-layer cups. Then fill fourteen 2-1/2-inch muffin cups with dried beans.
- Prep the pans. In order to successfully bake the cones, they need to be supported in the pan in one of two ways.
- Use foil coil method. Use strips of heavy duty foil and wind them into a coil. Then place them in the muffin pan cups so that they will fit snuggly around the base of the cones.
- Or use beans and foil method. Alternately, you can cover muffin the pan(s) with heavy-duty foil. (You may need to bake half of the cakes at a time if you only have one muffin pan.) Press down the foil so you can see the impressions of the round muffin cups. Using the tip of a sharp knife, make a small slit in the foil over the center of each muffin cup. Place the double-layered snow cone cups, point sides down, in each of the slits.
- Fill cones and bake. Fill snow cone cups about half full with cake batter. Carefully transfer muffin pans to the oven. Bake cakes about 25 minutes or until the tops of the cakes are golden and a toothpick inserted into the centers comes out clean.


Cool, Frost and Decorate
- Cool. Carefully remove muffin pans from the oven. Let the cakes stand for 10 minutes before transferring them to a wire rack to cool completely. The cones can be flipped over to their widest part while cooling on the rack.
- Remove cone. Once the cakes are completely cool, carefully cut or peel off the snow cone cups from the outsides of the cakes. Place each cake on a small cardboard round.
- Start the frosting. In a mixing bowl beat 1/3 cup butter for the frosting until fluffy. Gradually add 2 cups of the powdered sugar, beating well. Slowly beat in the 1/4 cup milk and 1 1/2 teaspoon vanilla extract.
- Finish the frosting. Slowly beat in remaining 2 1/2 cups powdered sugar. Beat in additional milk, if needed, to reach spreading consistency. If desired, tint with gel food coloring.
- Pipe frosting on cones. Fit a decorating bag with a coupler and a medium round decorating tip, then fill the bag with frosting. Pipe frosting onto one of the cakes using an up-and-down motion (don’t worry about covering every space).


- Spread frosting. Use an offset spatula or a knife to spread the frosting all over the cake. Let the cake stand about 5 minutes or until the frosting starts to form a crust.
- Smooth frosting with paper towel. Gently press a paper towel around the cake with your hands, rubbing it up and down and smoothing out the frosting. If the frosting sticks to the paper towel, wait a few more minutes until the frosting has a firmer crust.


- Press assorted small candies and licorice strings into the frosting to decorate the party hat. Attach licorice strings to the bottom of the cake to represent the elastic strap. Repeat with the remaining cakes, frosting, candies, and licorice.

Browse More:


Oh my gosh these are SO cute! I made a version of these for my 5-year-old’s rainbow unicorn party last month and they were the star of the dessert table. Used the snow cone cups just like you said — worked on the first try which honestly shocked me. The candy buttons were genius, they stuck to the buttercream perfectly. One thing I did differently — I put actual little party hats on top of each cake hat (like hat-ception lol). Got a pack of mini cone hats from GINYOU on Amazon and they were the perfect size to sit on top. The kids went NUTS. Only complaint is I definitely should have made more… 14 was not enough for 22 kids plus all the adults who wanted one. Making a double batch next time for sure.
So glad the recipe worked so well for you!