


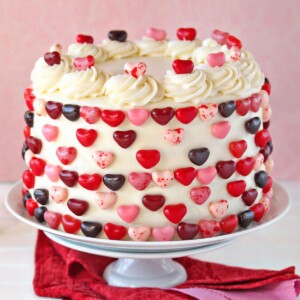
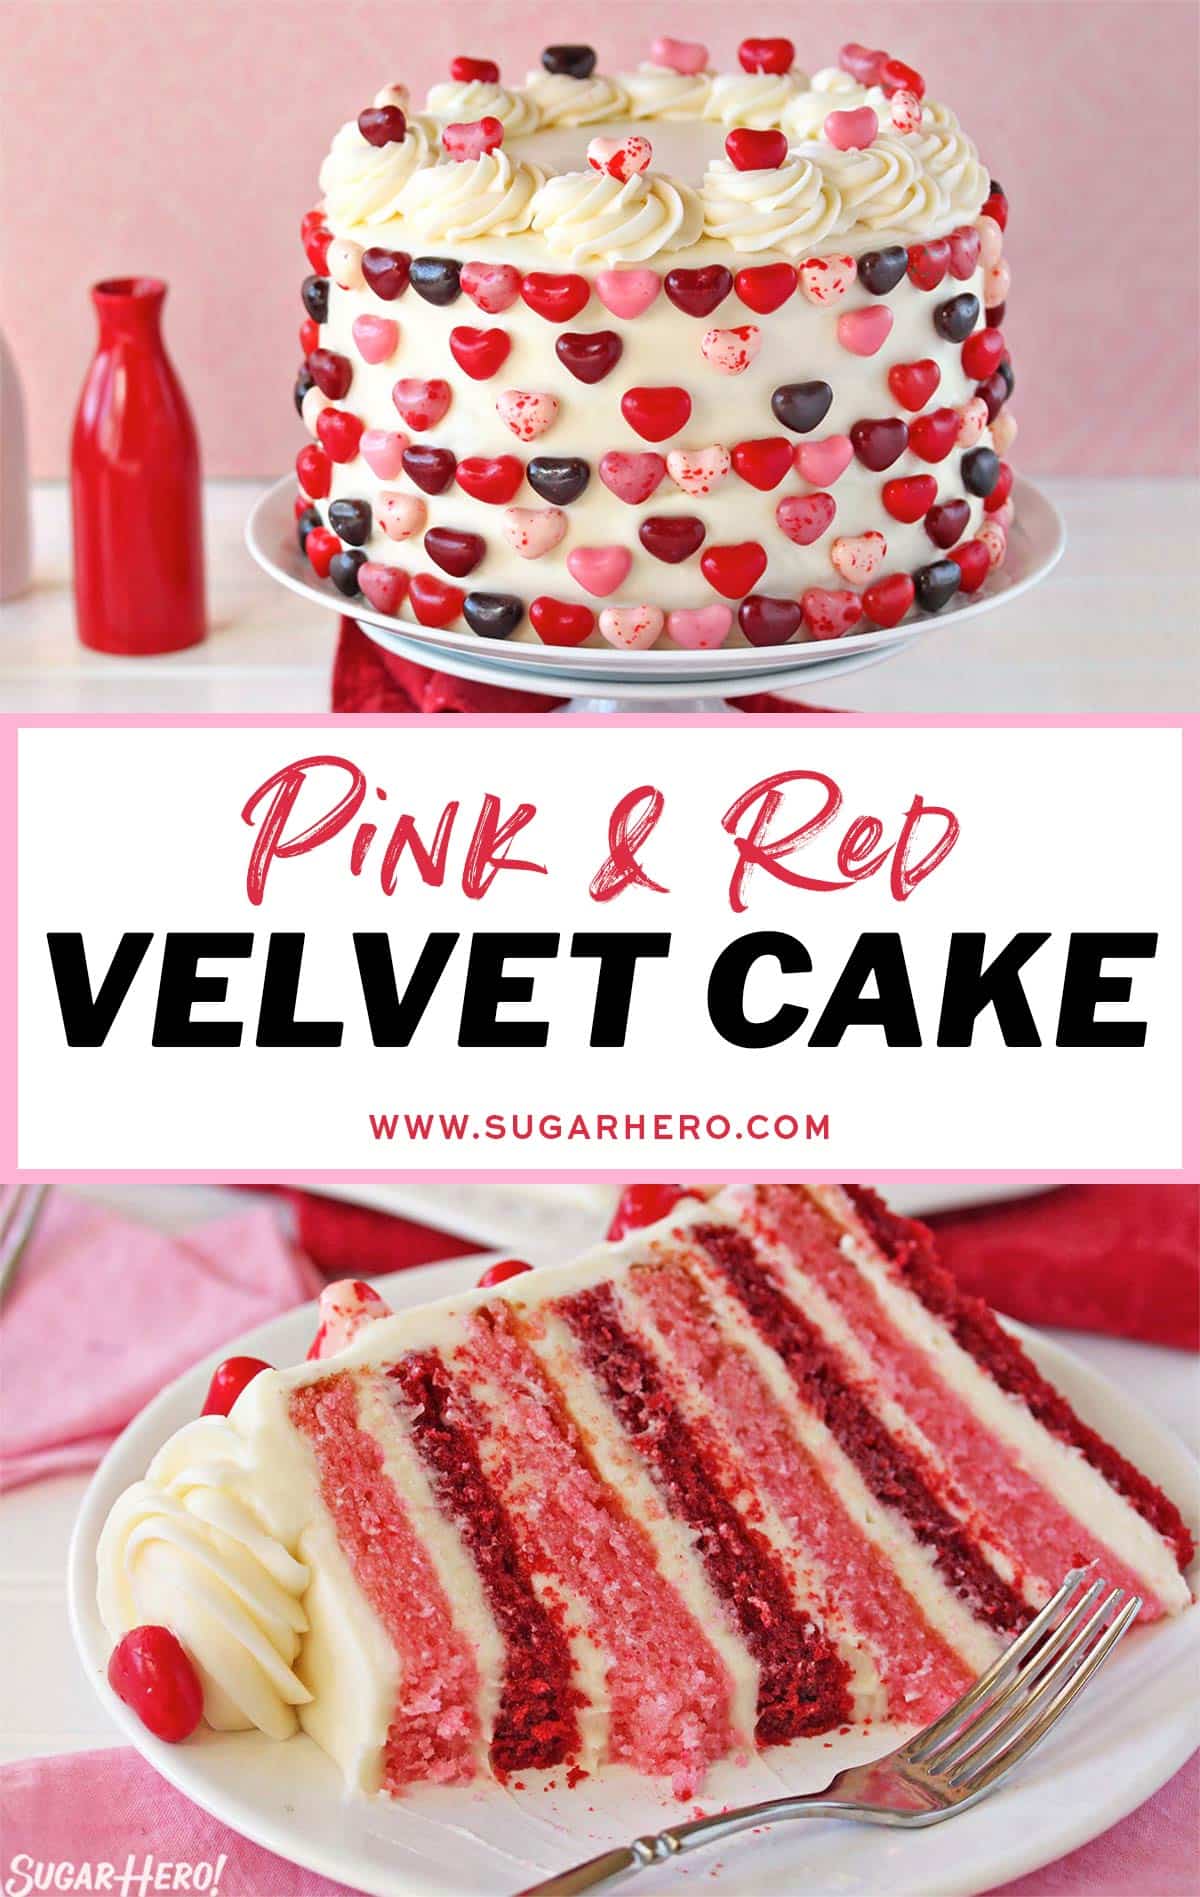
Looking for the perfect Valentine’s Day dessert? This Pink and Red Velvet Cake has it all – 8 beautiful cake layers, a delicious cream cheese frosting, and a super easy decoration anyone can do!
💗Pink velvet cake for Valentine’s Day
Flowers and chocolates are all well and good, but if you really want to win someone’s heart this Valentine’s Day, you’ve gotta up your game. Might I suggest making them a big ole layer cake as a token of affection?
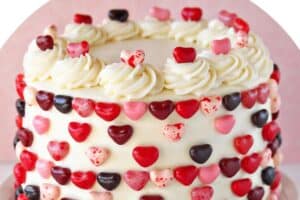
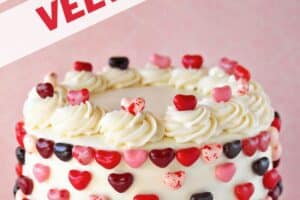
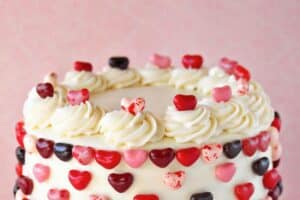
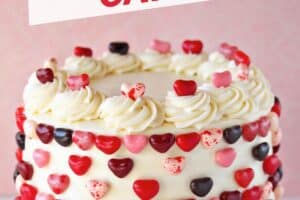
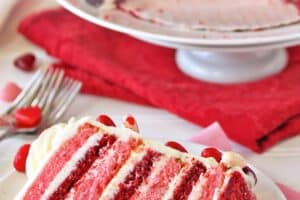
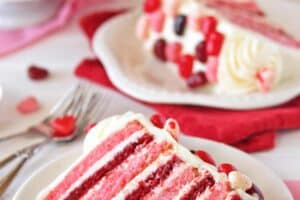
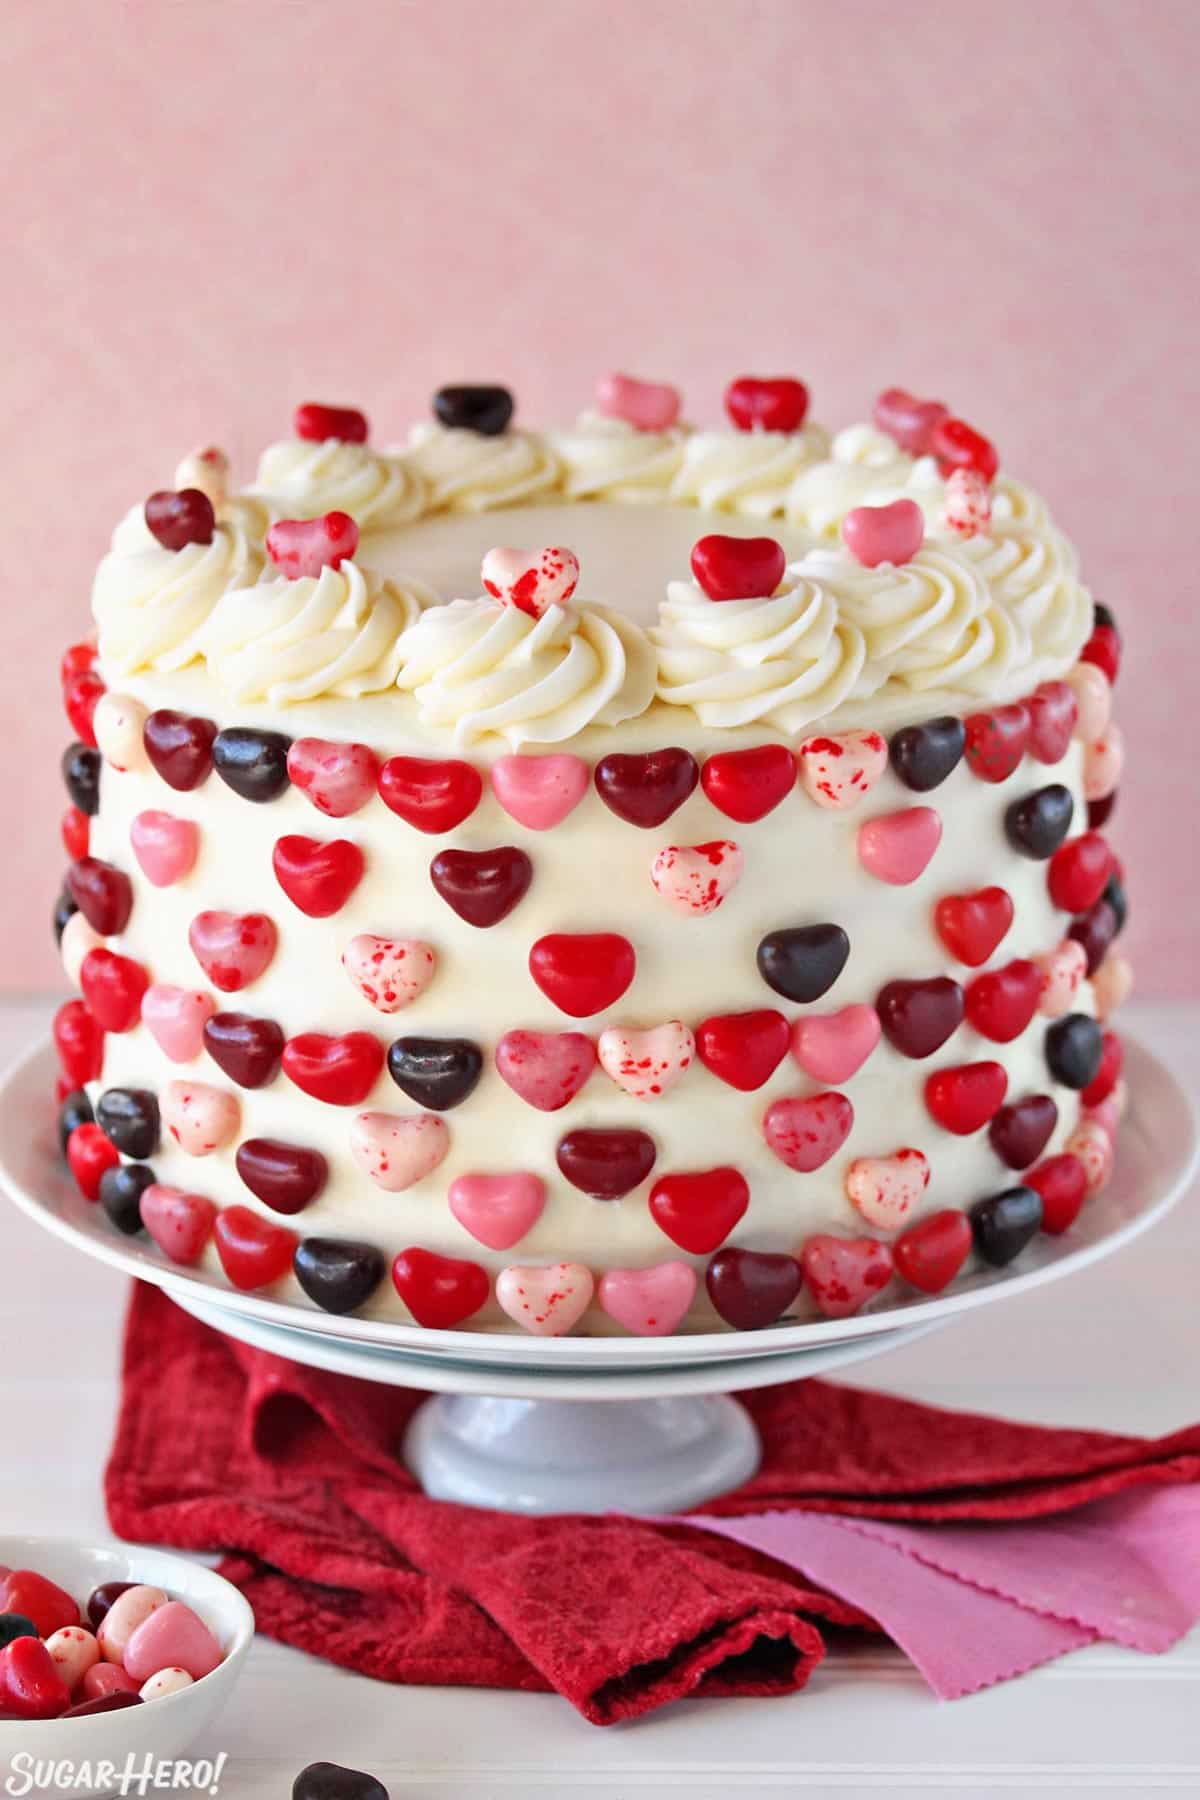
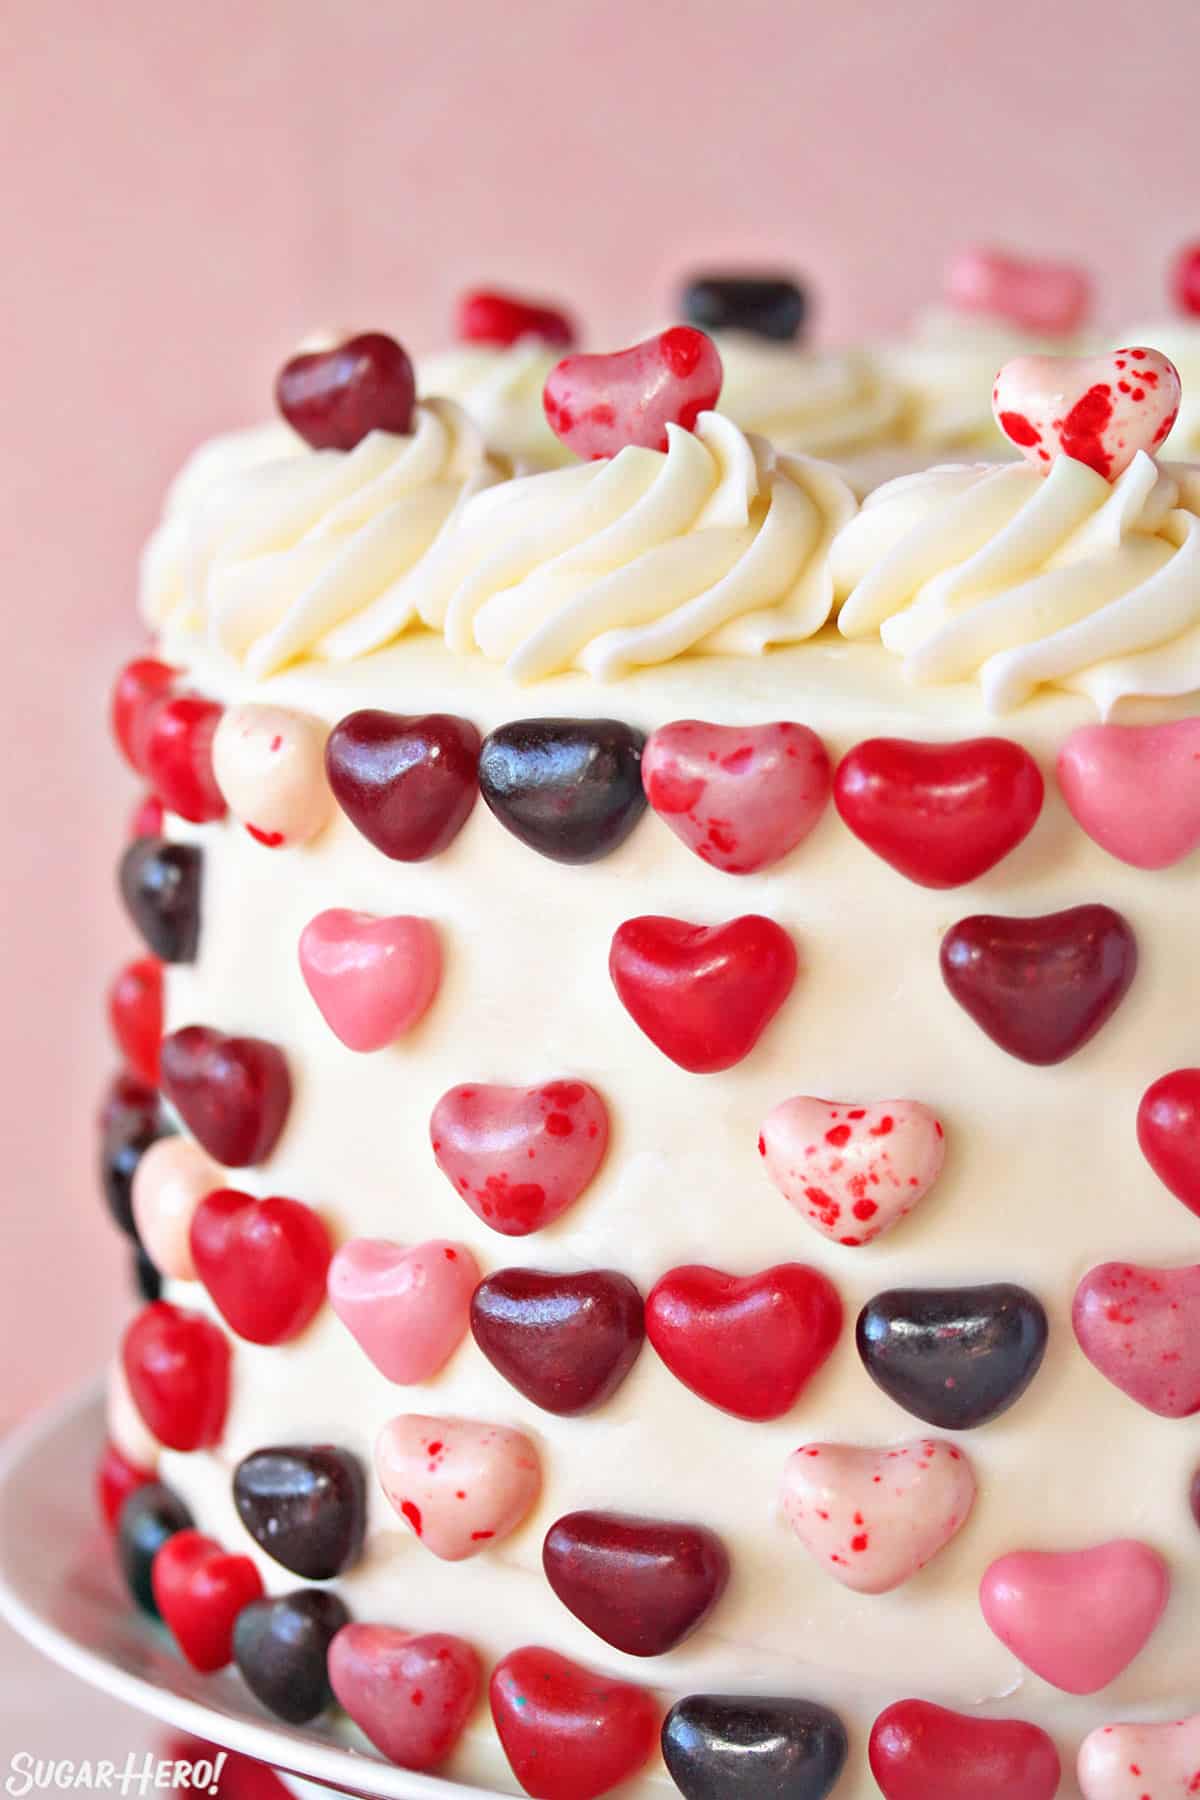
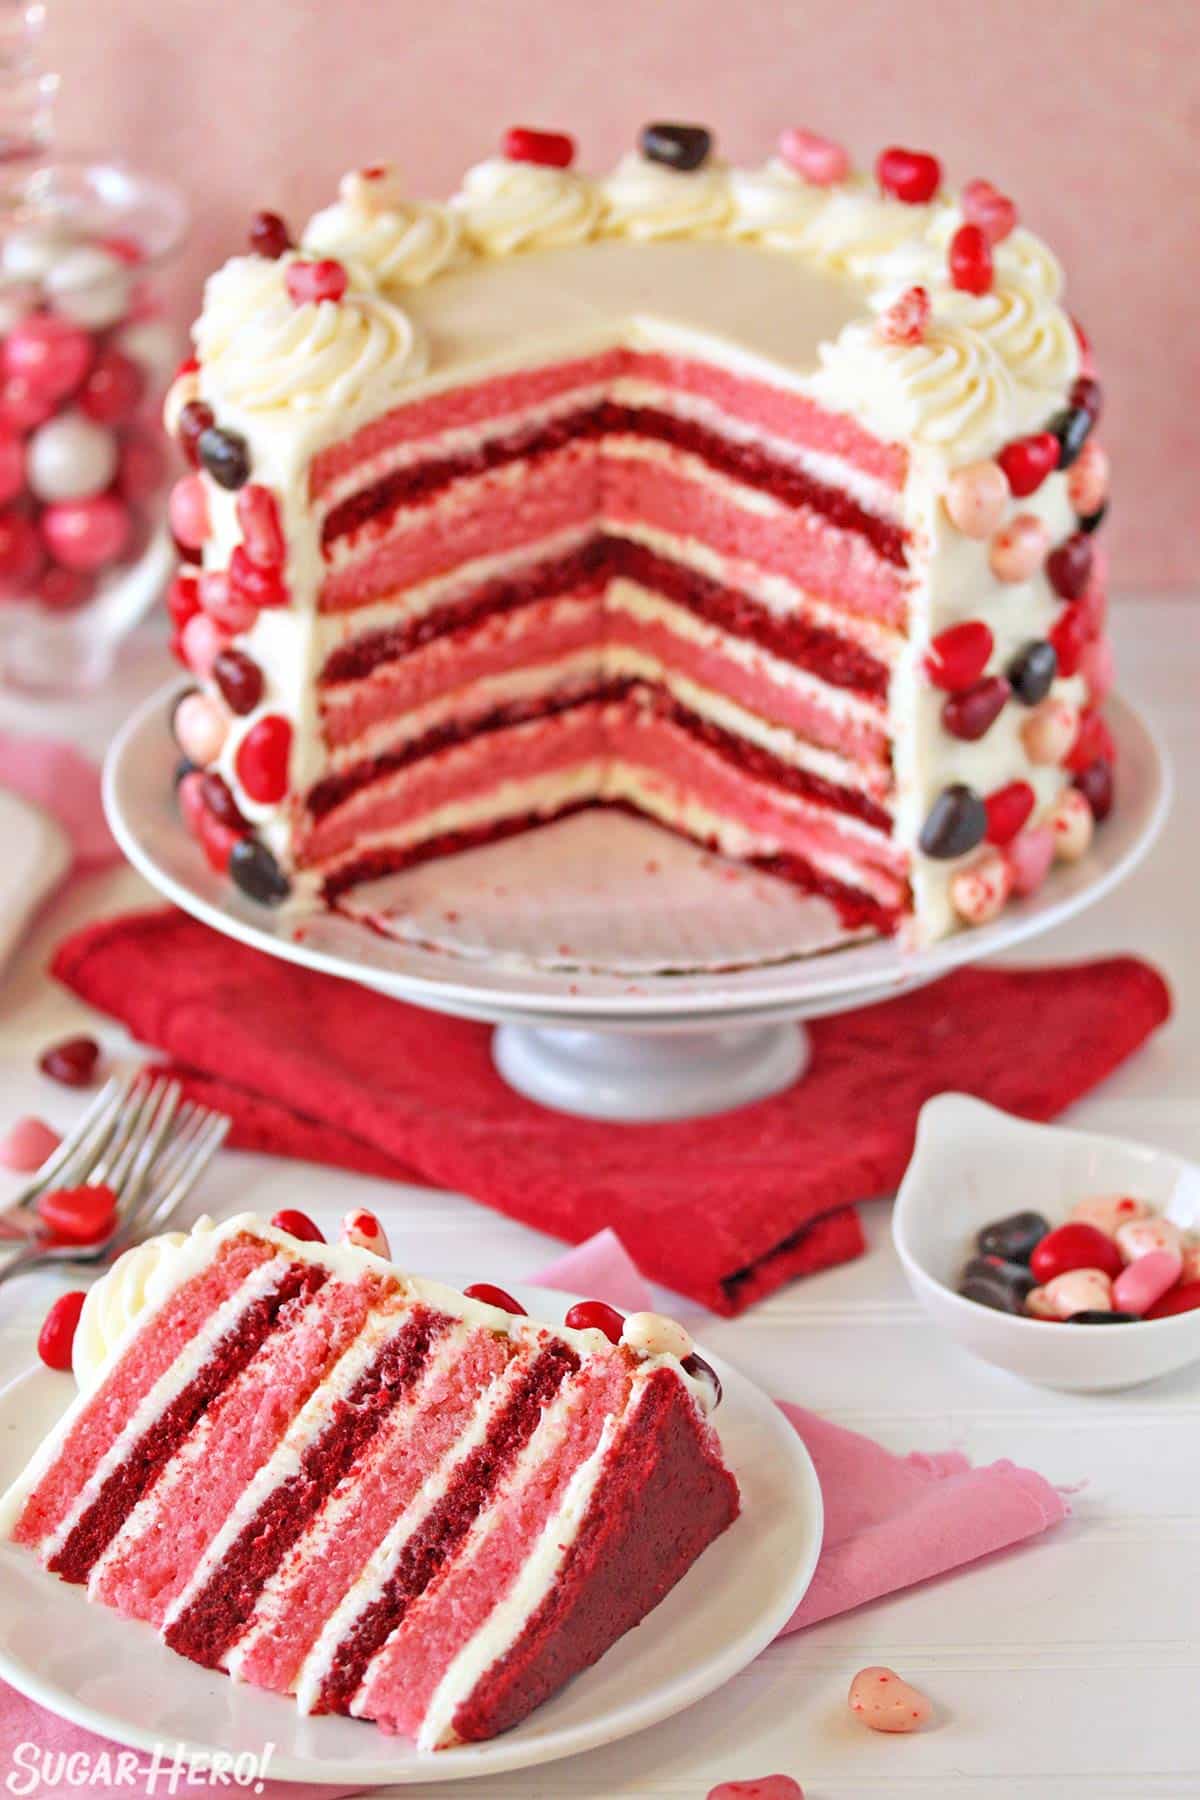
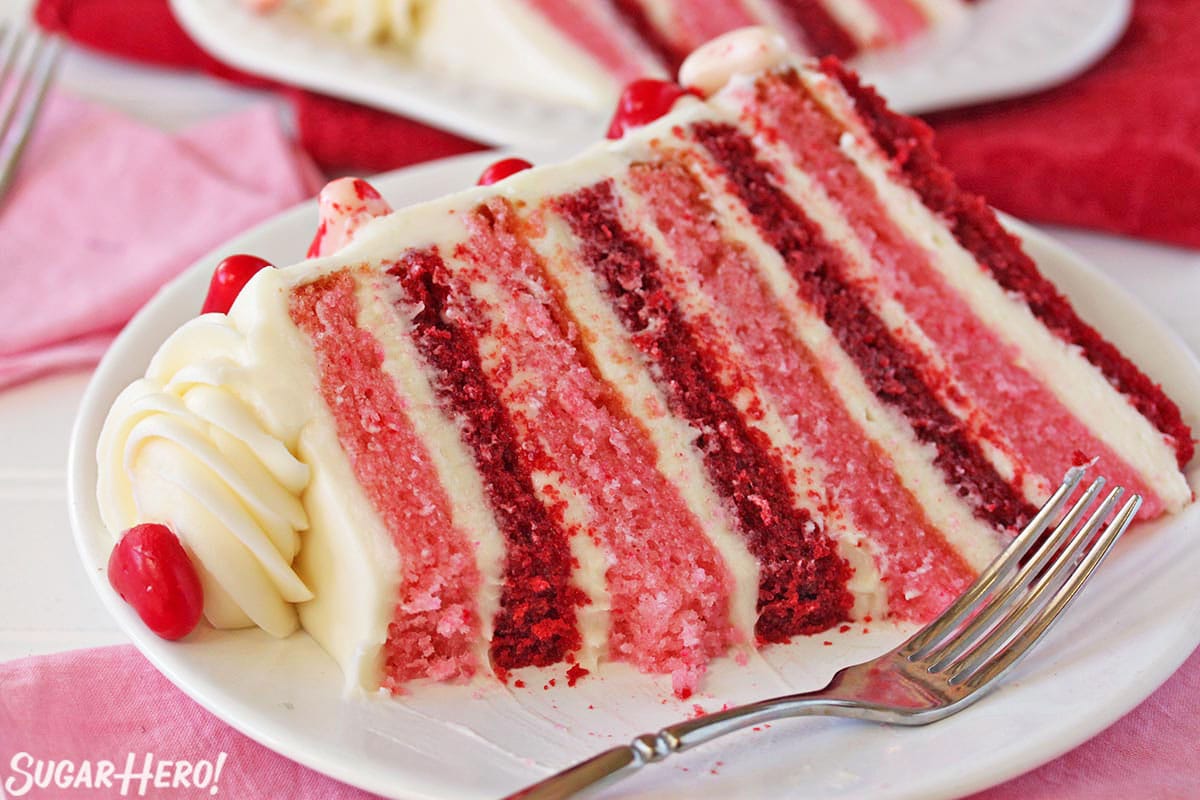
Everything about this Sky-High Pink & Red Velvet Cake is swoon-worthy: the eight (!!!) layers of super-moist pink and red velvet cake, the smooth and tangy cream cheese frosting, and the easy but eye-catching candy decorations ringing the sides and top.
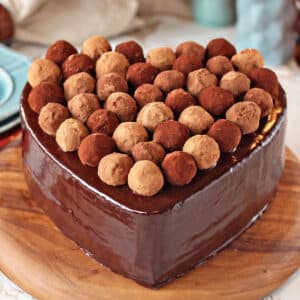
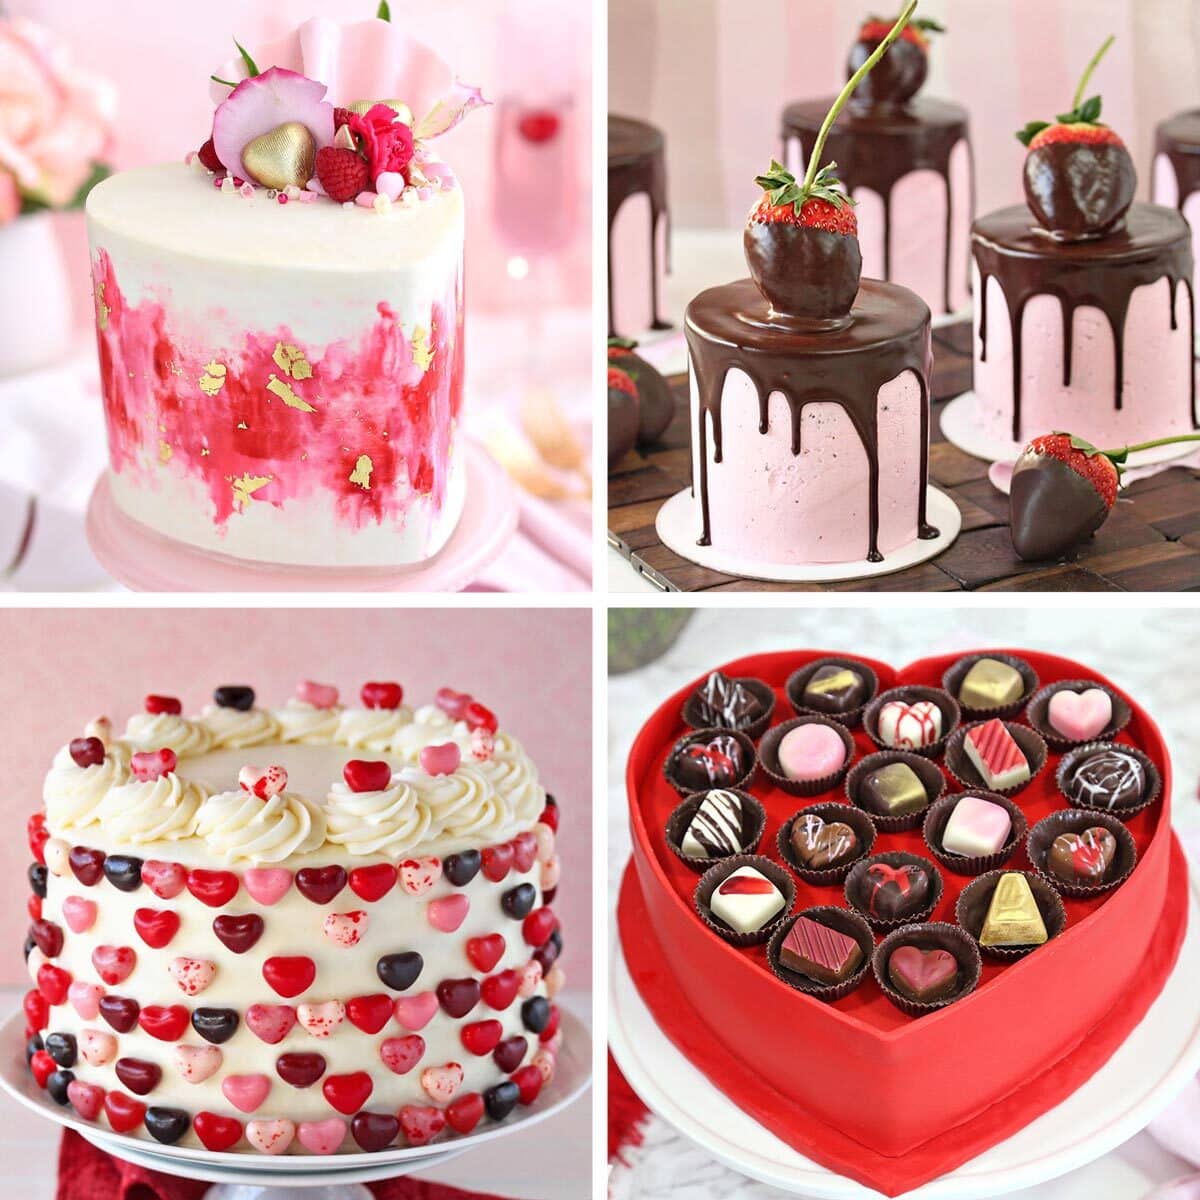
If you love the sound of this cake, you won’t want to miss some of our most-beloved Valentine’s Day dessert recipes, including Valentine’s Day Sugar Cookies, Trendy Cream Tarts, Chocolate-Covered Strawberry Cakes, and another romantic red velvet cake, our Heart-Topped Valentine’s Day Cake.
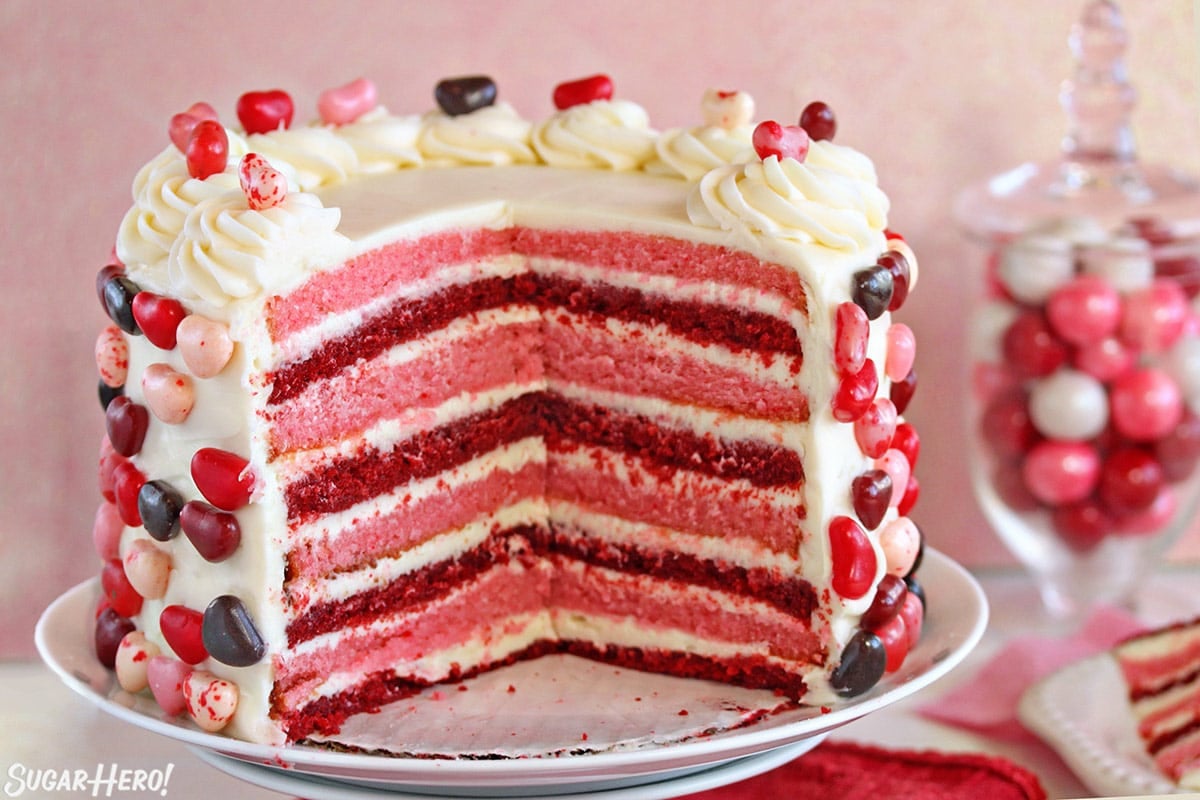
Table of Contents
🧾 What You’ll Need
Ingredients & Substitutions
You probably have most of what you need to make this cake already, but here are a few things to keep in mind as you gather ingredients. (Links are affiliate links and I earn a small commission from qualifying purchases.)
- Oil: This cake uses vegetable oil instead of butter, so it stays moist for days. You can swap in another neutral oil, like canola oil, if you’d like.
- Buttermilk: Buttermilk adds moisture and flavor, and is a signature part of red velvet cake. If you don’t have any, you can whisk together equal amounts of sour cream and milk, or Greek yogurt and milk, or check out the FAQ below for instructions on making your own.
- Eggs: Use large eggs, and for the best results, have them at room temperature before beginning. Either let them sit out for 20-30 minutes, or submerge them in a bowl of warm water for a few minutes to warm them up quickly.
- Vinegar: The cake recipe uses a little white vinegar to help react with the baking soda, which gives the cake a lot of lift and a super-soft texture. Don’t worry, you can’t taste it in the final product!
- Cocoa powder: Cocoa powder is a traditional part of red velvet cakes. This isn’t a chocolate cake, however — it has just a hint of light cocoa flavor.
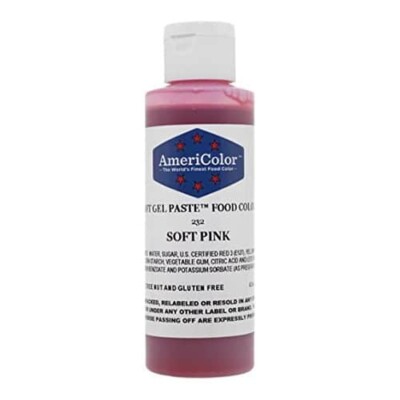
- Gel food coloring: For this cake, I used Americolor gel coloring in Super Red and Soft Pink. Gel color is preferred to liquid color because it’s much more potent, so you can get brighter colors with less coloring.
- Butter: Make sure the butter is at room temperature when making the frosting. This means it’s pliable but cool–you don’t want it to be greasy and melty.
- Cream cheese: Be sure to use full fat blocks of cream cheese for the best results. Avoid “light” and “whipped” cream cheese, and any cream cheese sold in a tub. I recommend using Philadelphia brand cream cheese when possible–I have had mixed experiences with store brands. Also, make sure your cream cheese is at room temperature before you begin.
- Marshmallow cream: I like to add a bit of marshmallow cream to this cream cheese frosting — it helps with stability and texture. But you can omit it if you’d like.
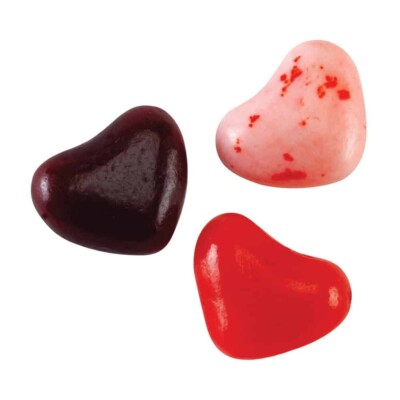
- Heart-shaped jelly beans: This cake is decorated with these sweet “cherry lovers” heart-shaped jelly beans. If you can’t find them, you can recreate the look with basically any heart-shaped candy. I think conversation hearts would be a fun variation on this idea!
Equipment
- 8-inch cake pans: My absolute favorite cake pans are 3-inch tall pans with removable bottoms, like these 8-inch cake pans. They’re super versatile, can handle extra-high cakes and cheesecakes, and make removing even the stickiest cake a cinch.
- Mixer: You’ll need some kind of mixer to properly beat the cake batter and frosting. Either a stand mixer or hand mixer will work fine.
- Cake turntable:You can certainly make this cake without a cake turntable, but it’s much easier to layer and decorate cakes when you use one. If you think you will be making cakes regularly, it’s worth it to pick one up — my favorite is this Ateco revolving cake stand.
- Offset spatula: A medium offset spatula is perfect for smoothing frosting on the sides and top of the cake.
- Piping bag and tip: I like these piping bags (I wash them and re-use them to reduce waste!) and used a large closed star piping tip to pipe the rosettes on top.
💭 Variations
There are lots of different ways to play around with this recipe! Try one of these fun variations:
- Turn it into cupcakes: this recipe can easily be converted into Red Velvet Cupcakes. A single batch of the red velvet cake batter makes about 24 cupcakes, and you can bake them at 350 F for about 20-23 minutes.
- Put it in a jar: use this Red Velvet Cake in a Jar recipe to assemble this cake in adorable, single-serving jars. Perfect for parties and celebrations!
- Add additional flavors: because red velvet and cream cheese frosting are both fairly neutral flavors, you can get creative and add extra flavoring extracts to the cake batter or frosting. One of my favorites is adding a bit of mint, like in this wintery Red Velvet Trifle.
- Change the color scheme: maybe it’s not Valentine’s Day, or maybe you hate pink and red. No worries! Most colors will work with this cake batter. But because there is a bit of cocoa in it, it’s not a great choice for lighter colors like yellow.
- Decorate differently: you can use other candies for decoration, or go in a whole different direction entirely! Try rolling the sides in sprinkles, or get creative by topping it with a heart like this Valentine’s Day cake.
- Try other frostings: Swiss meringue, easy Swiss meringue, or even stabilized whipped cream would be great with this tender cake.
💡 Tips and FAQs
Homemade Buttermilk replacement
If you don’t have buttermilk on hand, you can easily make your own. Combine 3 TBSP of fresh lemon juice or white vinegar with 3 cups of 2% or whole milk. Stir well, and let the milk sit for 10 minutes, until it’s thickened slightly, then you can use it!
Yes! Line cupcake pans with 24 paper wrappers. Scoop batter into pans and bake at 350 F for 20-22 minutes, until the tops spring back when lightly pressed. Cool completely before decorating.
Traditional red velvet cake has a few signature components: buttermilk, a bit of cocoa powder, and white vinegar, which reacts with the acidity of the buttermilk, cocoa and baking soda to give the cake its traditional velvety texture. And of course, these days it’s customary to add lots of red food coloring as well, but that’s entirely optional.
Both components of this cake can be made ahead of time. The frosting can be made and stored in an airtight container in the refrigerator for up to a week. To use it, let it sit at room temperature until cool but not cold, then mix it briefly to give it a smooth, creamy consistency again.
The cake layers can be baked, then wrapped well in plastic wrap when still slightly warm. Freeze them for up to 6 months. Let them defrost in the refrigerator or at room temperature. They don’t have to defrost all the way — I actually like working with slightly frozen layers when assembling tall layer cakes, because it adds additional stability.

💖 More Layer Cakes You’ll Love
Pink and Red Velvet Valentine’s Day Cake
Truffle-Topped Heart Cake
Sky-High Pink and Red Velvet Cake
Ingredients
For the Red Velvet Cake:
- 10.5 oz all-purpose flour, 2 1/2 cups
- 10.5 oz granulated sugar, 1 1/2 cups
- 1 tsp baking soda
- 1 tsp salt
- 1 TBSP unsweetened cocoa powder
- 1 cup vegetable oil
- 1.5 cups buttermilk, at room temperature
- 2 large eggs, at room temperature
- 1 TBSP red gel food coloring, or 2 TBSP red liquid food coloring
- 1 tsp white vinegar
- 1 tsp vanilla extract
For the Pink Velvet Cake:
- 10.5 oz all-purpose flour, 2 1/2 cups
- 10.5 oz granulated sugar, 1 1/2 cups
- 1 tsp baking soda
- 1 tsp salt
- 1 cup vegetable oil
- 1 ½ cups buttermilk, at room temperature
- 2 large eggs, at room temperature
- 1 tsp pink gel food coloring, or 2 tsp pink liquid food coloring
- 1 tsp white vinegar
- 1 tsp vanilla extract
For the Cream Cheese Frosting:
- 1 lb unsalted butter, at room temperature
- 2 lbs full-fat cream cheese, at room temperature
- 3.5 oz marshmallow cream or fluff, 1/2 cup
- 2 TBSP vanilla extract
- 3 lbs powdered sugar
- 1/4 cup heavy cream, or milk
- 1/4 tsp salt
To Decorate:
- 2 cups heart-shaped jelly beans
Instructions
To Make the Cakes:
- Preheat oven to 350 F. Line four 8-inch cake pans with parchment rounds, and spray the pans with nonstick cooking spray.
- Begin by making the red velvet cake: in a medium bowl, sift together the flour, sugar, baking soda, cocoa, and salt. In a separate mixing bowl, combine the oil, buttermilk, eggs, food coloring, vinegar, and vanilla, and mix on medium speed with a paddle attachment until everything is smooth.
- Stop the mixer, add the dry ingredients, and mix on low until the flour streaks disappear. Turn the speed to medium and continue to mix until any lumps are gone and the batter is smooth. Divide the batter between two cake pans.
- Wash your bowl and paddle, and repeat the process to make the pink velvet layer cakes. They will be made in exactly the same way, except the pink velvet doesn’t contain any cocoa powder, and the amount of food coloring used is less. Bake the pink and red velvet cakes for 30 minutes, until the tops spring back when touched lightly and a toothpick inserted into the center comes out clean.
- Cool the cakes completely on a wire rack, then turn them out of the pans and wrap them well in plastic wrap. Place the cakes in the freezer to chill for at least 1 hour before assembling the cake. They don’t need to be frozen solid, but it will be much easier to assemble if they are partially frozen and firm. If you do want to make them in advance and freeze them for several days or several weeks, that’s fine—they will keep well. Just let them sit at room temperature for 10-15 minutes before trying to slice them so they’re easier to cut.
To Make the Frosting:
- Combine the butter, cream cheese, and marshmallow cream in the bowl of a large stand mixer fitted with a paddle attachment. Cream them together until they’re light and fluffy, without any chunks of butter or cream cheese. Add the vanilla and salt, and mix it in.
- Add the powdered sugar and cream, and mix on low speed until the sugar is moistened. Turn the speed to medium-high and whip until the frosting is fluffy and light. Add more cream or sugar as desired, to get your optimal texture. Use immediately, or store in the refrigerator until ready to use. If it’s too cold straight from the fridge, beat it briefly until it’s a workable texture.
To Assemble:
- Working with partially frozen cakes, cut each one in half so you have 4 red velvet rounds and 4 pink velvet rounds. Place a red velvet round on a cardboard cake circle, and top it with about 1/2 – 2/3 cup of frosting. Use an offset spatula to spread the frosting to the edge of the cake. Place a pink velvet round on top, and top it with more cream cheese.
- Continue to layer the cakes and frosting until you have stacked all 8 cake layers. Spread a very thin layer of frosting on the top and sides of the cake. It will look rough and imperfect, and that’s okay – this is the “crumb coat” and it is used to lock in any stray crumbs.
- Refrigerate the cake for at least an hour, until the frosting on the outside is cold and firm. Add a thicker layer of frosting to the top and sides of each cake, covering the crumb coat, making sure the frosting is as smooth as possible. To get the sides extra-smooth, run a metal offset spatula under very hot water, then wipe it dry and run it along the sides of the cake—the heat from the spatula helps smooth out the frosting.
- Transfer some remaining frosting to a piping bag fitted with a large star tip, and pipe a ring of rosettes around the outer edge of the cake.
- Press heart-shaped jelly beans into the side of the cake in the pattern of your choice, and add a heart on top of each rosette.
- Keep the cake refrigerated until shortly before you're ready to serve it. This cake keeps well, and should stay moist for 4-5 days in the refrigerator.
Recipe Notes
Measuring Tips
Our recipes are developed using weight measurements, and we highly recommend using a kitchen scale for baking whenever possible. However, if you prefer to use cups, volume measurements are provided as well. PLEASE NOTE: the adage “8 oz = 1 cup” is NOT true when speaking about weight, so don’t be concerned if the measurements don’t fit this formula.
Want to learn more about baking measurements and conversion?
Nutrition
THE BEST VALENTINE’S DAY CAKES
Check out our collection of the 27 best Valentine’s Day cake ideas — click here to get all the recipes!


This looks so perfect and amazing! Seriously, how did you make this so perfectly? You seriously rock! Thanks for sharing with us!
Thanks so much, Danielle! I wouldn’t say it’s perfect, but a decade of practice has made cake assembly a little easier. 🙂 I appreciate the kind words!
Gorgeous cake. I’ve only made a few cakes over the years (cheesecakes, crepes and cream puffs are more my thing) but I could never hope to make anything like this in my wildest dreams. I’d love to have a slice though. 🙂
Thank you! I have to disagree, though–if you can make crepes, cream puffs, etc, you can definitely make this cake! The candy does the hard work of making it look complicated. 🙂 Thanks for stopping by!
This cake is gorgeous. I just sent my roommate the link and told her I found my next birthday cake. Too bad that’s 8 months away! This looks so good.
Thanks so much, Stephanie! Maybe you should celebrate your half-birthday in 2 months! 🙂
Pinned this a year ago, bought the Gimbal’s and FINALLY BAKED THE LAYERS YESTERDAY. Waiting for the butter/cream cheese to soften and I’ll finally get it put together. Hope mine looks as good as yours! I have been eating the jelly bean hearts, so I hope I still have enough to decorate!
Oh yay! Let me know how the cake turns out! Aren’t the Gimbal’s just the prettiest??
I really love the cake idea but which frosting should i use instead of cream cheese for someone who doesnt take cheese
Any buttercream will work! My most popular frosting is this Easy Swiss Meringue that people LOVE. It’s light and fluffy and not crazy-sweet:
https://www.sugarhero.com/the-easiest-swiss-meringue-buttercream/
Hi what size cake tins do you use please?
Drooling over this cake. Looks so perfect.
Hi Marie, thank you so much! I really appreciate that!!
Loving all your recipes i’ve tried. Simply amazing
Hi Marie, that makes me so happy! Thank you so much for your response!
What can be used as a substitute if you can’t get buttermilk
Hi Madiha! If you have sour cream, you can use half sour cream and half milk and whisk them together before adding to the cake batter. Or you can make sour milk yourself: add 4 tsp white vinegar or fresh lemon juice to a measuring cup, then fill it up to 1.5 cups with milk. Let it sit for 5-7 minutes, then gently stir. The acid will curdle the milk a bit and it will act like buttermilk in the recipe. Hope this helps!
The 1X recipe for your pink & red velvet cake states it will make “20” — if that’s 20 cupcakes, how large of a layer cake will it make?
Hi! The yield of “20” means 20 servings/slices of cake. The cake is made from 4 8-inch cake rounds (cut in half to make 8 layers) and the frosting between the layers and outside. Depending on how thick your layers are the cake turns out to be about 7-8″ high and about 8″ wide. I hope that helps. All the best.