

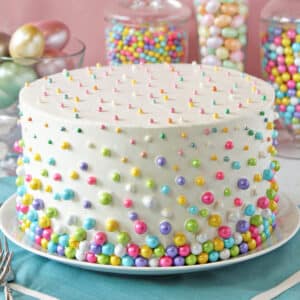
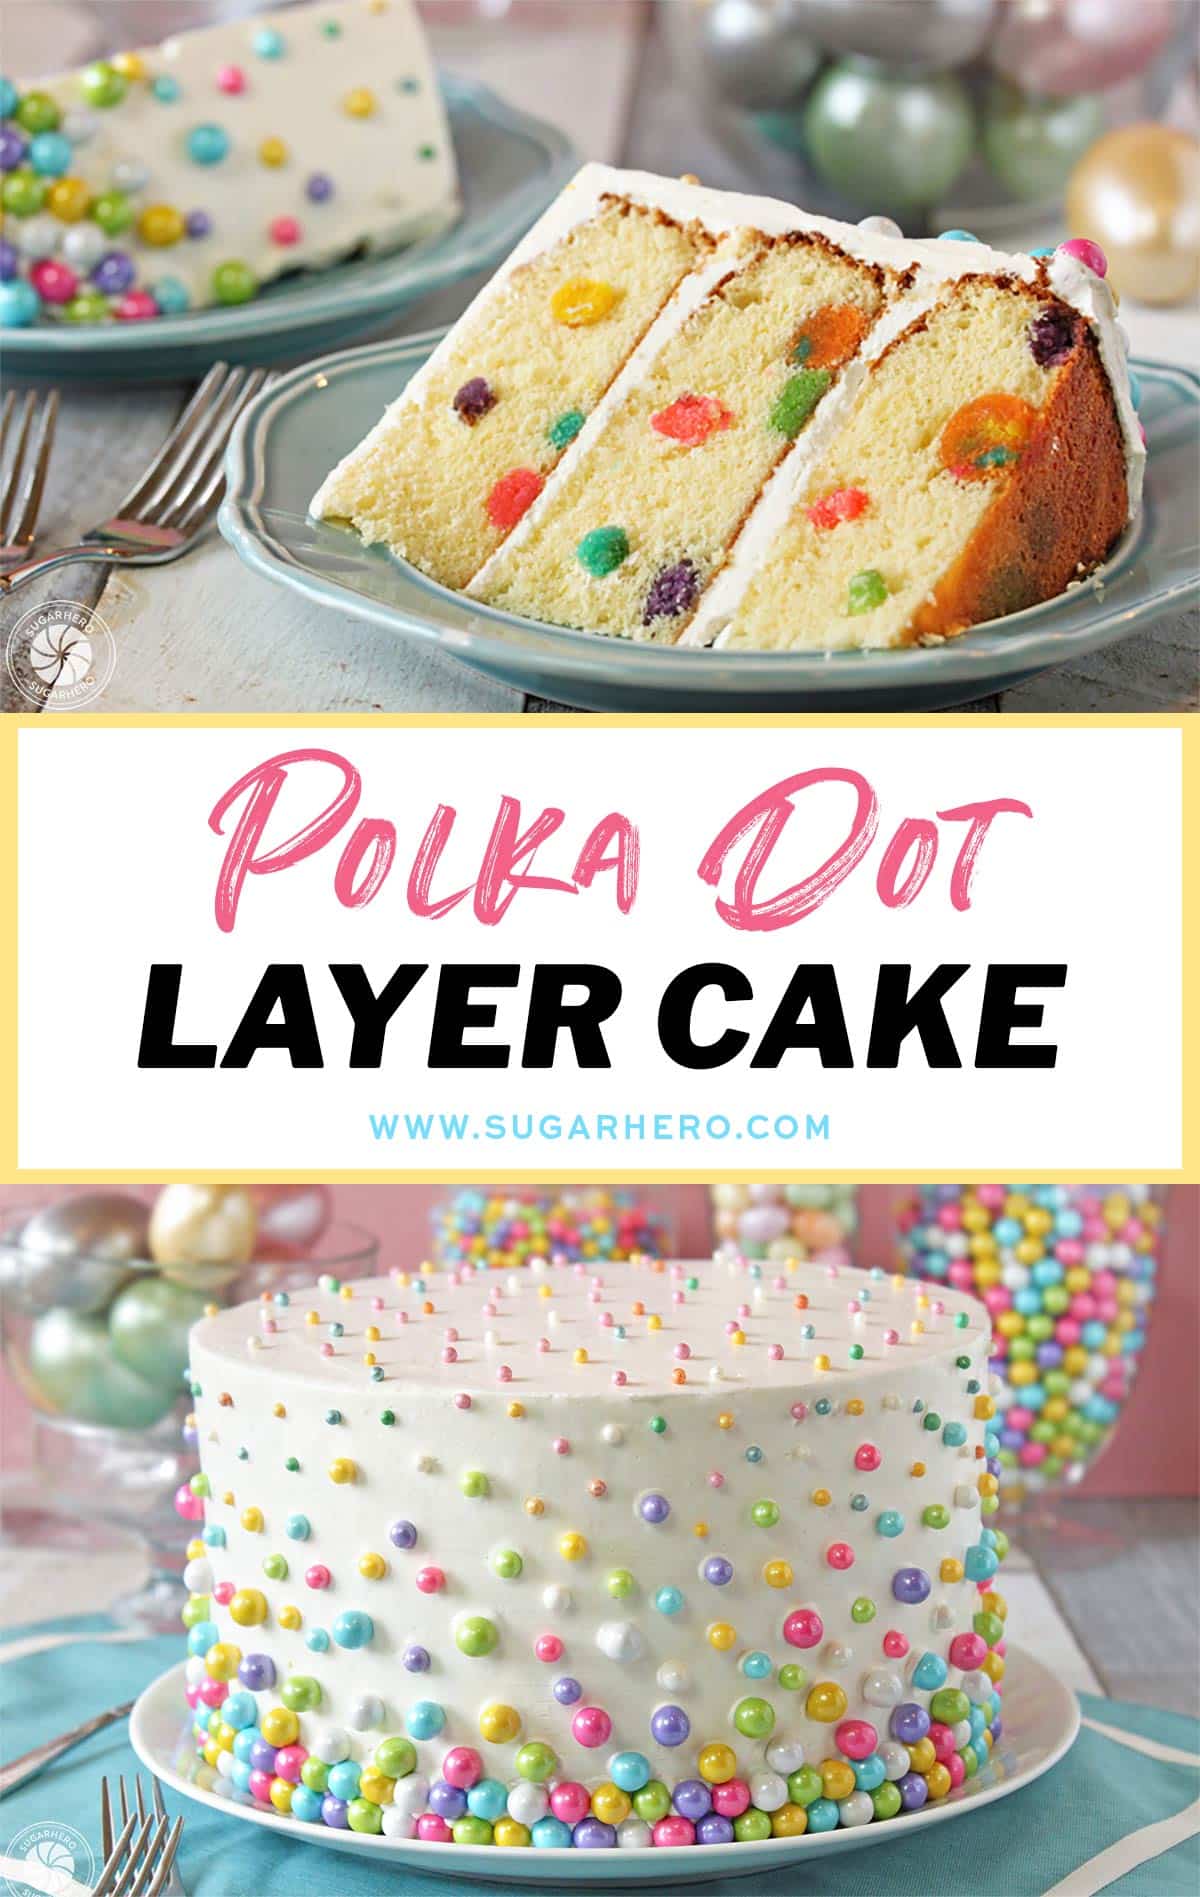
This Easter Polka Dot Cake is a gorgeous spring cake with polka dots on both the outside AND inside of the cake! Learn how to create this cute, easy cake with surprise polka dots inside.

The Cutest Polka Dot Cake for Easter
When it’s time to celebrate any big holiday, I gravitate toward big, flashy desserts that taste amazing and bring the bling. Over-the-top desserts are my specialty, and I love blogging about desserts that are exciting! What excites me most are semi-ridiculous things like sky-high mousse desserts, homemade stuffed doughnuts, eight layer cakes, and swirled tarts topped with whipped cream, chocolate curls and homemade truffles! In my world, more is more, and I own that.
So without further adieu, let me introduce you to my newest fancy cake — The Easter Polka Dot Cake.
Table of Contents
- The Cutest Polka Dot Cake for Easter
- More Easter Desserts
- How to Decorate the Outside of a Polka Dot Cake
- Variety is the Spice of Life
- Easy Colorful Cake Balls
- Equipment You’ll Need to Make a Springy Lemon Coconut Layer Cake
- 💗More Spring Layer Cakes You’ll Love
- Easter Polka Dot Cake Recipe
- EASTER CAKE RECIPES 🐇

More Easter Desserts
Looking for more Easter dessert inspiration? Try these…
- Cupcakes: Easter Basket Cupcakes, Spring Chick Cupcakes and Easter Baby Chick Cupcakes.
- Candy: Marbled Easter Egg Truffles and Peanut Butter Easter Eggs.
- Unique Treats: Easter Push-Up Pops and Chocolate Easter Nests (Birds Nest Cookies)
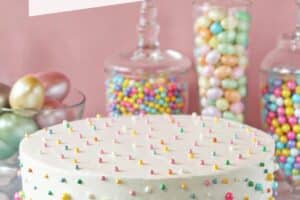
How to Decorate the Outside of a Polka Dot Cake
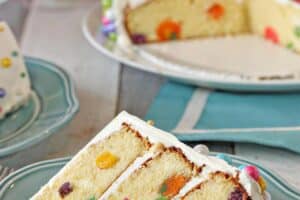
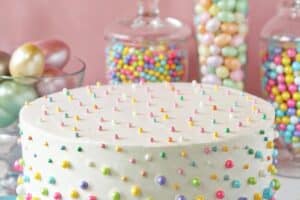
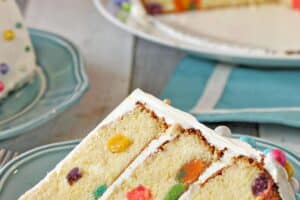
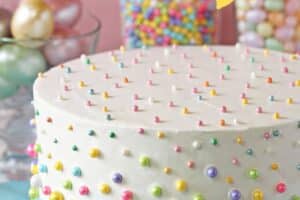
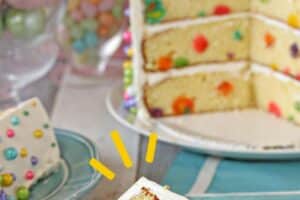
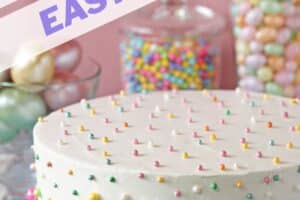
The outside is relatively easy to put together compared to some of my other creations; it’s got shiny Pastel Sixlets, pastel sugar pearls and mini pastel sugar pearls (or round sprinkles) pressed into creamy coconut buttercream. You can make your outside decorations as simple or intricate as you want. It makes a sweet presentation, but the real magic happens when you cut into the cake. It’s filled with the cutest, colorful polka dots made from homemade cake balls!
Variety is the Spice of Life
Use different sizes of round candy to give the outside of the cake depth and visual interest. I used Sixlets and sugar pearls between 10mm and 2mm in diameter, but you can use any type of candy or sprinkle you like.

Easy Colorful Cake Balls
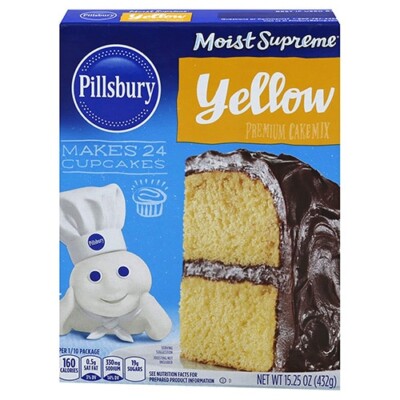
The mini cake balls are very easy to make (promise!). We’ll be using a yellow cake mix to color and bake several mini cakes. Depending on how many colors you choose to make, you could use small glass bowls, small round cake pans cake pans, pie tins, or even a cupcake pan to make the mini cakes. Just make sure the containers are oven-safe and watch them closely for doneness.
Once they are done baking and completely cooled, it’s time to start crumbling each of the mini cakes into crumbs, mix them with frosting, and roll them into colorful cake balls! You can make a variety of sizes of cake balls and experiment with combining colors to form cool patterns. Let your creativity go wild!
Place them on a parchment paper lined baking sheet, cover with cling wrap and keep them in the refrigerator until you’re ready to make your cake layers. (Make-ahead information: the polka dots can be made up to a week in advance, and kept in the refrigerator or freezer until ready to use!)
The pre-made cake balls will be suspended in the layers of homemade lemon cake batter. You’ll take the cake balls and press them into the batter, pressing some all the way to the bottom, some into the middle, and leaving some on top. You don’t have to use all of the cake balls, but do use a lot of them—it takes a surprising amount of polka dots to make the cake slices look well-dotted!
What You’ll Need to Make the Cake Balls
- Mini oven-safe baking containers
- Yellow cake mix
- Frosting (homemade or store-bought)
- Assorted gel food coloring
- Baking sheet
- Parchment paper
- Plastic wrap

Equipment You’ll Need to Make a Springy Lemon Coconut Layer Cake
The cake itself is a lemon cake with coconut buttercream, so it tastes light and springy. You’ll need a few important tools to make this cake. Make sure to have 9×2-inch cake pans (you’ll need three), parchment paper and a cardboard cake round. It’s also helpful to have a revolving cake stand and offset spatula to smooth the frosting and add the decorations.

Trust me when I say, this cheerful Polka Dot Cake is the perfect way to end a special Easter dinner, or any other special occasion. Birthdays, anniversaries, and major holidays all call for surprise polka dots, in my opinion.
Enjoy!
💗More Spring Layer Cakes You’ll Love
- Spring In Bloom Layer Cake
- Chocolate-Covered Strawberry Cakes
- Sugar Easter Egg Cake
- Blueberry Layer Cake
- Strawberries and Cream Layer Cake
- Hydrangea Cakes
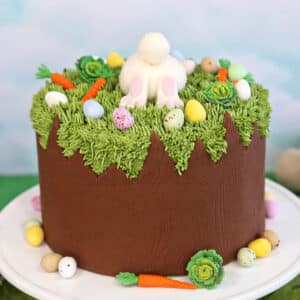
Chocolate Easter Bunny Cake
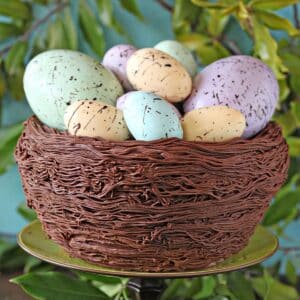
Easter Nest Cake
Easter Polka Dot Cake
Ingredients
For the polka dots:
- 1 yellow cake mix, or white cake mix, plus ingredients to prepare mix
- Assorted gel food coloring
- 2 cups prepared frosting, homemade or store-bought
For the lemon cake:
- 9 large egg yolks
- 1 1/2 cups milk
- 1 tbsp lemon extract
- Zest of 2 lemons
- 15.75 oz granulated sugar, (2 ¼ cups)
- 15.75 oz cake flour, (3 ⅔ cup)
- 2 tbsp baking powder
- 1 tsp salt
- 9 oz unsalted butter, at room temperature
For the coconut buttercream:
- 9 large egg whites, at room temperature
- 14 oz granulated sugar, (2 cups)
- 1 lb unsalted butter, softened but still quite cool
- 1/2 tsp salt
- 2-3 tsp coconut extract, to taste
To Assemble:
- Pastel sixlets, sugar pearls, or other sprinkles
Instructions
To Make the Polka Dots:
- Preheat the oven to 350 F. Prepare the box mix according to the package directions. Divide the batter between five or six oven-safe small bowls/pans. Add a small amount of food coloring to each bowl to make different pastel shades.
- Scrape the colored batter into the small oven-safe containers you've chose. Bake until a toothpick inserted into the center comes out clean and the top springs back when lightly pressed. The baking time will vary depending on how much batter you use and the size of the pan, so watch the cakes carefully and start checking for doneness after 10-15 minutes of baking.
- After the cakes are baked, let them cool completely. Crumble the cooled cakes into separate small bowls, then add a spoonful or two of frosting to each bowl.
- Work the frosting and cake together with your fingertips until the cake is moistened and holds its shape when rolled into a ball. (If you have ever made cake balls before, you are looking for the same texture as cake balls.) If necessary, add more frosting until you get a consistency that's easy to work with, but stop adding frosting before the cake gets greasy or gummy.
- Roll the cake into small balls of different sizes, and place them on a parchment paper lined baking sheet. Cover the sheet with cling wrap and keep it in the refrigerator until you're ready to make your cake layers. The polka dots can be made up to a week in advance, and kept in the refrigerator or freezer until ready to use.
To Make the Cakes:
- Preheat the oven to 350 F. Line three 9×2-inch cake pans with parchment paper, and spray them with nonstick cooking spray. Combine the yolks, 1/2 cup of milk, and lemon extract in a small bowl, and whisk gently to combine. Set aside for now.
- Combine the lemon zest and sugar in the bowl of a large stand mixer, and rub them together with your fingers until the sugar is moist and fragrant. Add the flour, baking powder, and salt, and mix together with a paddle attachment on low speed for 30 seconds.
- Add the room temperature butter and the remaining 1 cup of milk to the flour, and mix on low speed for 30 seconds, until the dry ingredients are moistened. Turn the speed up to medium and mix for 90 seconds. With the mixer running on medium-low, add the egg yolks in three batches, mixing for 30 seconds after each addition. At the end, stop the mixer and scrape down the bottom and sides with a spatula so that the batter is well-mixed.
- Divide the batter evenly between the three cake pans. Take the cake balls and press them into the batter, pressing some all the way to the bottom, some into the middle, and leaving some on top. You don’t have to use all of the cake balls, but do use a lot of them—it takes a surprising amount of polka dots to make the cake slices look well-dotted!
- Bake the cakes at 350 F for about 25 minutes, until they’re puffed and golden on top, and a toothpick inserted into the center comes out with just a few moist crumbs attached. Cool the cakes completely.
To Make the Coconut Buttercream:
- Combine the egg whites and the granulated sugar in the bowl of a large stand mixer, and whisk them together. Choose a small saucepan that lets you fit the base of the stand mixer snugly into the top of the saucepan—this is your makeshift hot water bath. (Alternately, you can use a different bowl or an actual bain marie and then transfer the mixture to a mixing bowl once it’s heated.) Add an inch of water to the bottom of the saucepan, and bring the water to a simmer.
- Place the mixing bowl on top of the saucepan, making sure that the bottom isn’t in contact with the water, and heat the egg white mixture. Whisk frequently so that the egg whites don’t cook. Continue to heat the whites until they are hot to the touch, and when you rub a bit between your fingers, you don’t feel any grittiness from the sugar. Once the whites are hot, transfer the mixing bowl to your mixer and fit it with a whisk attachment.
- Beat the whites on medium-high speed until they are no longer warm to the touch—feel the outside of the bowl, and make sure that it is around room temperature. Depending on your mixer and the temperature of your environment, this may take 15-20 minutes, or more. Reduce the speed to medium-low and add the softened but cool butter in small chunks, a tablespoon at a time, making sure to wait in between additions. It may separate or look a little gloopy at this point—fear not. Once all of the butter is added, increase the speed again and whip until it comes together and is light and fluffy. If, after 5 minutes, it hasn’t come together, refrigerate the mixing bowl for 5-7 minutes, to cool the mixture down, and whip it again.
- Add the salt and 2 tsp coconut extract, and mix until well-blended. Taste the frosting and add more coconut flavoring if desired. The buttercream can be made in advance and kept at room temperature if you’re going to use it the same day, or refrigerated. If it’s been chilled, let it sit at room temperature until it softens, then re-whip it to get the fluffy texture back before you use it.
To Assemble:
- Trim the tops of the cakes so that they are level. Place one cake layer on a cake cardboard (ideally) or a plate. Spread a generous cup of frosting on top of the cake, extending out to the sides. Place a second cake layer on top of the first, and top that one with frosting as well. Finish with the third cake layer, then cover the sides and top of the cake with a thin layer of frosting, then refrigerate until firm.
- Once firm, spread the top and sides with the remaining frosting. To get a very smooth finish, I like to run very hot water over an offset metal spatula, wipe it dry, then slowly run it over the sides and top, rinsing frequently. The heat of the metal helps to smooth out the frosting. Finish the cake by pressing Sixlets, sugar pearls, or other sprinkles into the tops and sides of the cake. For the best taste and texture, serve this cake at room temperature.
Measuring Tips
Our recipes are developed using weight measurements, and we highly recommend using a kitchen scale for baking whenever possible. However, if you prefer to use cups, volume measurements are provided as well. PLEASE NOTE: the adage “8 oz = 1 cup” is NOT true when speaking about weight, so don’t be concerned if the measurements don’t fit this formula.
Want to learn more about baking measurements and conversion?
Nutrition
EASTER CAKE RECIPES 🐇
We’ve rounded up 35 adorable Easter cake recipes that will make your holiday extra-special — click here to get all the recipes!


You totally ripped this off from my mother. Please remove from your site immediately or give her the credit she deserves. She came up with this 4 years before you did. http://once-upon-a-pedestal.blogspot.com/2012/05/polka-dot-cake-from-bake-pop-pan.html
Hi Sarah,
I have no memory of seeing that blog post you linked before. I do know that there are many variations of polka dot cakes out there, and mine is certainly not the first. I never claimed to invent the idea. When I am inspired by a specific source I always try to link to that source, but sometimes it’s a case of being inspired by a trend on Pinterest recreated by many other people and blogs. It’s possible that your mom was the first to make a polka dot cake, but that is a long way from saying I “totally ripped off” her blog post when there are dozens–if not hundreds–of polka dot cakes out there, all of which seemed to work their way into the blogosphere in the last few years. I understand that you’re upset–I’ve had my own desserts recreated without credit before and I know how frustrating it is–but what you’re alleging is just not the case. If you’d like to discuss this further I invite you to send me an email.
Ok I’m totally inspired! We’re having a “dalmatian” party for my son’s first birthday in a few weeks and I think I’m going to give this a go, in black and white of course.
I’m having visions of all of my cake balls ending up on the bottom of the cake though…how do they stay suspended?! Is this cake mixture on the thicker side? Or is there some other kind of magic at work here?!
By far the best polka dot cake I’ve seen in all of my searching!!!
Hi Annalisa, Apologies for the very late reply! The homemade cake batter is definitely on the thicker side (not thin and pourable like a cake mix) so there’s no trouble having the cake balls suspended in the batter. Hope the cake and party turn out wonderfully well!
Hi Elizabeth. Thank you for sharing. I am in the midst of getting my ingredients out to make this lovely looking cake and fell upon some left over fondant. What do you think of the idea of molding this into balls instead of you polka dot recipe?
did you have any problems with sticking the beads on to the cake?
Hi Becky, the buttercream doesn’t crust, so it’s easy to press decorations (like the beads) into the BC and have it stick. So no, it wasn’t a problem. 🙂
I absolutely LOVE this cake but I’m a little surprised at something. I would have thought FOR SURE the frosting in the cake balls (essentially cake pops) would have melted in the oven during their rebaking. You know, 10 years ago if someone would have asked me if cake could be baked, then placed inside of another cake to create a design I would have told them ABSOLUTELY NOT. I originally thought the second cake would have become dry, tough, something nasty so when the cakes first began to appear online in blogs and I finally learned the secret I was FLABBERGASTED to say the least. I finally found and bought one of the pans that makes the cake balls so I thought that’s what you did here until I read the instructions in detail. I’m still wondering why the frosting doesn’t melt. If you think about it scientifically it should by all accounts but I guess the cake batter protects it and the inside of the cake doesn’t get hot enough. Even though I’ve been baking from very little for 50+ years cake bakers still astound me every week. I tell people that from the time I began decorating cakes in the early 2000s until now the advancement in tools, “toys” as I call many of them, molds, stencils, edible glitters, gems, pearls, lace, and any other decoration you can imagine and ALL sorts of gizmos that make cake decorating a thousand times easier than it was when I was little and very young is overwhelming. I truthfully can’t keep up with it all. The “trends” in cake decorating are changing as fast as fashion trends do anymore and in fact, I believe fashion is having a huge impact on cake designs as well. One of my favorite cakes done by professionals are ones where the cake design is based on a runway style gown design. It’s amazing the interpretation that occurs. Keep up the good work on your cakes. I’m SO glad people like you are willing to spend the time creating items like this and sharing it with people like me who don’t have the artistic ability to think of these things. I’m a good baker, in fact I would go so far as to say most people who know me would say I’m a really GREAT baker of cakes, but my strength lies in baking the actual cake and the frosting and the fillings and putting it all together. I’m a detail person and that’s what a good baker needs to be. However, my brother got all the artistic talent in the family so I’m far better at copying ideas than creating them. If the world sat around waiting for me to come up with such lovely and adorable ideas as this cake, which if the colors are changed would be great at all sorts of functions, they would be waiting until the end of time most likely. That’s my favorite cake design, one that can be used for multiple events. Sometimes just the way they are and sometimes with just changing colors or other details. Thanks for all of your good work.
This recipe looks amazing, making it for my sons 6th birthday this weekend. What are you thoughts on using whipped cream over the buttercream? i purchased 1/4 dot sprinkles to decorate the cake along with the pearls. thought i’d use the pears on the top of the cake and the dot sprinkles along the sides. Do you think whipped cream with hold them in place?
Hello,
I’m planning to make this cake for my sons 6th birthday this weekend. He prefers whipped cream over buttercream. I purchased 1/4 dot sprinkles for the sides of the cake and pearls for the top. Do you this whipped cream can hold the dots if I put a stabilizer in the cream?
Hello,
I’m planning to make this cake for my sons 6th birthday this weekend. What are you thought about using whipped cream over butter cream? I bought 1/4 dot sprinkles for the sides, do you think whipped cream can hold them?
Beautiful cake! is it possible to make the cake ahead of time and then ice it the day of the birthday? If yes, should it be frozen and then iced? Thanks
Thank you! Yes, it definitely can be made ahead of time. I like to assembly my cakes when they are semi-frozen so that they are sturdy but have time to defrost before serving, because it is best at room temperature. Hope it goes well!
Hello can you give me some help I made one of you cakes today The strawberry rhubarb shortcake and yes it was a challenge.
With in an hour of finishing it the layers split and the cake collapsed.
It was Like a mud slide OMG ……lucky it was a test cake for my mums 80th birthday party.
What Happened.?
How can I keep the layers of this cake breaking in the middle.? Please help…..